Last fall, my friend Jeremy and I were killing time at Best Buy when we ran across this blue gel keyboard wrist rest. He was looking for a wrist rest anyway; and since we’re obsessed with blue LEDs, I offered that I could rig it up to glow. He loved the idea, and his wrist rest has been sitting at my house begging for attention ever since.
I’ve been tinkering around with ideas for a month or two, but finally yesterday I cleared some space on my workbench and got at it. There were four main components to the project:
- The translucent blue wrist rest, which I hoped would have enough internal reflection to glow nicely
- Blue LEDs, which I harvested from a string of Phillips Christmas lights
- A USB cable, to supply power to the LEDs (Jeremy preferred USB so the lights would power on and off with the computer)
- Some means of holding the LEDs in place
Glow Test
I’d been thinking I’d drill some holes into the wrist rest to embed the LEDs, but I wasn’t sure quite what the effect would be. I started testing by putting a couple of LEDs in my LED tester and shining them into the gel pad from different locations and angles, with disappointing results–they didn’t make any part of the pad glow like the edges of plexiglas (high internal reflections from the parallel surfaces) or milky plastic (high diffusion of the light beam).
So they kinda shine through instead of making the whole thing glow, and I just have to deal with that. On the other hand, that meant I didn’t need to bother drilling holes into the gel–I could butt the LEDs up against it and they’d work just as well. So I started thinking about etching a long, skinny circuit board to go across the back . . .
USB Cable
And meanwhile, tried to figure out where to get a USB cable to sacrifice. USB cables cost more than it seems like they ought to, so I was asking around for a dead USB mouse that I could salvage. I really wanted a black cable, to disappear on a dark desktop; and I really wanted a skinny and supple cable, to route well.
Then a couple of guys at work gave me a USB hot plate, I kid you not. It was from a trade show and was supposed to keep a coffee mug warm–which, no surprise, didn’t work out so well, given the limited current USB can supply. It had a skinny cable with silver foil inside–not black, but it still sorta fit with the theme. Perfect. Well, good enough.
Light Bar
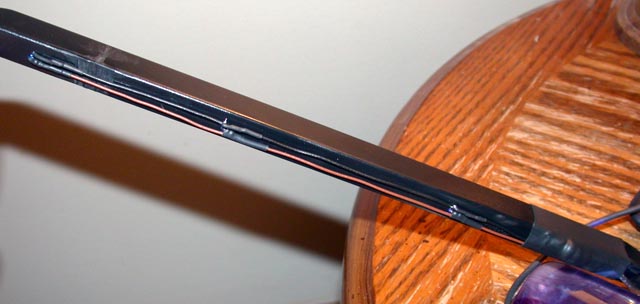
Since it would have taken me a while to rig up a PC board for the LEDs, I was thinking about other ways to hold them in place and wire them together. I have some black plastic U-channel pieces about a foot long, which were supposed to be magazine or books supports for some wire cube shelves I bought, but which I’ve never used. Yesterday I cut the brackets off one, drilled holes in the back to poke leads through, and stuck four LEDs into it.
Several of the LEDs in the Christmas tree lights had 250Ω resistors already soldered to one leg, and that turned out to be a nice current-limiting value for a 5V supply, so I just left them in place. I daisy-chain soldered wires to the leads, connecting the LED/resistor assemblies in parallel, and attached the USB cable to one end. [Side note: In the USB cable, the black wire was positive and the white wire was ground. Good thing I checked first.]
Yup, I was soldering wires onto leads that were poking through (and touching) plastic. Surprisingly, I didn’t have much trouble with it–the wires were pretty clean, so they all soldered quickly, and apparently didn’t heat up much. I didn’t notice any melting plastic at all.
I used some big heatshrink to anchor the end of the USB cable in place and provide some strain relief (lower right end of the above pic), and the light bar was ready to go.
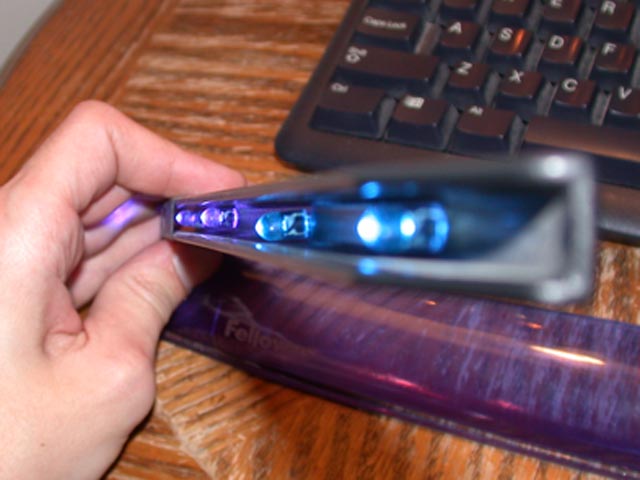
The LEDs are on the inside of the bar pointing out. That does a reasonable job of shielding the (annoyingly bright) light sources from direct line of sight, and plenty of light still makes it into the gel pad when the light bar is placed up against it.
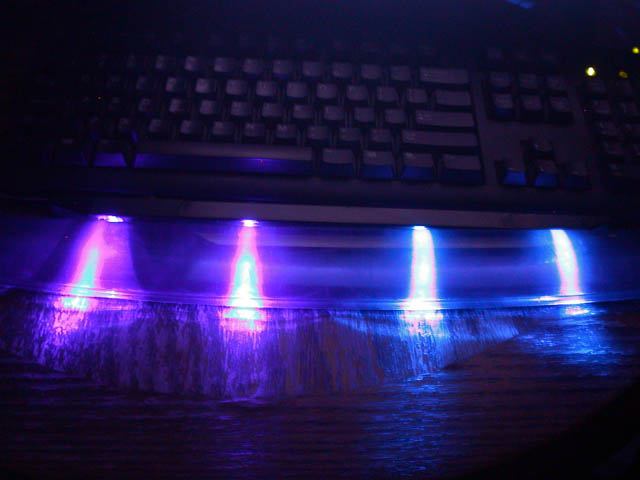
This isn’t just a trick of the camera–it really does look like four beams of light aimed through the wrist rest. It’s not quite what I was aiming for, but isn’t a bad effect in itself.
The digital pic exaggerates the effect, but the four LEDs really are two different colors–two slightly more aqua, two slightly more violet. They’re all from the same string of LEDs, and I’d never noticed the effect before–I assume they’re from different manufacturing batches, with not particularly high quality control.
Credits
It wasn’t much of a project, but (1) it provided motivation to get some things cleaned off of my workbench; (2) it was itself part of the clutter on my workbench; and (3) it helped build momentum to get me back into tinkering. I’ve already started on my next project, which should appear here in a few more days.
Thanks to Jeremy Burkey for the photos. I forgot to take pics as I was working on it; and his camera did a much better job with the dark shot than mine would have anyway.
I have a black keyboard and I’ve long thought about using some LEDs to illuminate the keys. I think this is a great start for something like this. Instead of aiming the LEDs _away_ from the keybd, I’d try aiming them _at_ the keybd, and see if they made enough light to see the keys. Thanks for the great idea.