A while back I bought a batch of ATtiny25 microcontrollers and today I finally put one to use and got it programmed. MIT’s High-Low Tech group has put together a really nice package for programming ATtiny45s and ATtiny85s from the Arduino IDE, but it doesn’t support ATtiny25s, presumably because the limited memory doesn’t leave enough space after the bootloader is installed. I had a dickens of a time trying to find instructions to walk through programming an ATtiny25, much less on OS X; but it turned out to be pretty easy after pulling together a few separate resources. Here’s the path to blinkemness.

Install CrossPack Development Environment
First, install CrossPack, which provides “the GNU compiler suite, a C library for the AVR, the AVRDUDE uploader and several other useful tools.” Make sure you completely close your Terminal program (if you had it running) and restart it after the installation, to pick up the location it adds to your command search path.
Test the Programmer and Connectivity
Once installed, connect your programmer (I have a couple of USBtinyISPs, so that’s what I used) to your computer and target board and test that the programmer is working and sees your ATtiny:
$ avrdude -c usbtiny -p attiny25

avrdude: AVR device initialized and ready to accept instructions
Reading | ################################################## | 100% 0.01s
avrdude: Device signature = 0x1e9108
avrdude: safemode: Fuses OK
avrdude done. Thank you.
If you get any other response, check the troubleshooting notes at the bottom of Jeff Keyzer’s AVR toolchain installation page.
Create Blink Code
The CrossPack web page includes a blinky demo project, but it’s written for a different microcontroller and requires minor adaptation to work on the ATtiny25. Follow along both here and there for greatest insight.
In your Terminal window,
$ avr-project blink

Using template: /usr/local/CrossPack-AVR-20120217/etc/templates/TemplateProject

$ cd blink/firmware

$ ls

Makefile	main.c
The Crosspack example is written for an ATmega8, which has more I/O ports than the ATtiny. The ATtiny has a single I/O port, and it’s port B (mystery of the universe why not A). So adapting the example code, use your favorite text editor to insert into main.c to create the following (picking whichever pin you’d like to use for your LED):
#include <avr/io.h>
#include <util/delay.h>

#define LEDPIN (3)

int main(void) {
    DDRB = 1 << LEDPIN;  //  make only the LED pin an output
    while (1) {
        char i;
        for (i = 0; i < 10; ++i) {
            _delay_ms(50);
        }
        PORTB ^= 1 << LEDPIN;
    }
    return 0;   /* never reached */
}
Calculate Fuse Values and Edit the Makefile
Use the Engbedded AVR fuse calculator to calculate the command-line values to set all the ATtiny behavior flags. Use AVR part name: ATtiny25, uncheck (for this example) Divide clock by 8 internally, and scroll down to Current settings. You should see something like
-U lfuse:w:0xe2:m -U hfuse:w:0xdf:m

-U efuse:w:0xff:m
Back in Terminal, edit Makefile . Update the following lines:
DEVICE     = attiny25

PROGRAMMER = -c usbtiny

FUSES      = -U lfuse:w:0xe2:m -U hfuse:w:0xdf:m -U efuse:w:0xff:m
(using whatever programmer you have and any additional flags it needs) and save and exit the Makefile .
Compile and Load the Program
Run
$ make

avr-gcc -Wall -Os -DF_CPU=8000000 -mmcu=attiny25 -c main.c -o main.o

avr-gcc -Wall -Os -DF_CPU=8000000 -mmcu=attiny25 -o main.elf main.o

rm -f main.hex

avr-objcopy -j .text -j .data -O ihex main.elf main.hex

avr-size --format=avr --mcu=attiny25 main.elf

AVR Memory Usage

----------------

Device: attiny25
Program: 92 bytes (4.5% Full)
(.text + .data + .bootloader)
Data: 0 bytes (0.0% Full)
(.data + .bss + .noinit)
to build the program. If you get errors instead, double-check main.c around the line the compiler indicates.
Run
$ make flash

avrdude -c usbtiny -p attiny25 -U flash:w:main.hex:i
avrdude: AVR device initialized and ready to accept instructions
Reading | ################################################## | 100% 0.01s
avrdude: Device signature = 0x1e9108
avrdude: NOTE: FLASH memory has been specified, an erase cycle will be performed
To disable this feature, specify the -D option.
avrdude: erasing chip
avrdude: reading input file "main.hex"
avrdude: writing flash (92 bytes):
Writing | ################################################## | 100% 0.08s
avrdude: 92 bytes of flash written
avrdude: verifying flash memory against main.hex:
avrdude: load data flash data from input file main.hex:
avrdude: input file main.hex contains 92 bytes
avrdude: reading on-chip flash data:
Reading | ################################################## | 100% 0.05s
avrdude: verifying ...
avrdude: 92 bytes of flash verified
avrdude: safemode: Fuses OK
avrdude done. Thank you.
to program the IC. Run
$ make fuse

avrdude -c usbtiny -p attiny25 -U lfuse:w:0xe2:m -U hfuse:w:0xdf:m -U efuse:w:0xff:m
avrdude: AVR device initialized and ready to accept instructions
Reading | ################################################## | 100% 0.01s
avrdude: Device signature = 0x1e9108
avrdude: reading input file "0xe2"
avrdude: writing lfuse (1 bytes):
Writing | ################################################## | 100% 0.00s
avrdude: 1 bytes of lfuse written
avrdude: verifying lfuse memory against 0xe2:
avrdude: load data lfuse data from input file 0xe2:
avrdude: input file 0xe2 contains 1 bytes
avrdude: reading on-chip lfuse data:
Reading | ################################################## | 100% 0.00s
avrdude: verifying ...
avrdude: 1 bytes of lfuse verified
avrdude: reading input file "0xdf"
avrdude: writing hfuse (1 bytes):
Writing | ################################################## | 100% 0.00s
avrdude: 1 bytes of hfuse written
avrdude: verifying hfuse memory against 0xdf:
avrdude: load data hfuse data from input file 0xdf:
avrdude: input file 0xdf contains 1 bytes
avrdude: reading on-chip hfuse data:
Reading | ################################################## | 100% 0.00s
avrdude: verifying ...
avrdude: 1 bytes of hfuse verified
avrdude: reading input file "0xff"
avrdude: writing efuse (1 bytes):
Writing | ################################################## | 100% 0.00s
avrdude: 1 bytes of efuse written
avrdude: verifying efuse memory against 0xff:
avrdude: load data efuse data from input file 0xff:
avrdude: input file 0xff contains 1 bytes
avrdude: reading on-chip efuse data:
Reading | ################################################## | 100% 0.00s
avrdude: verifying ...
avrdude: 1 bytes of efuse verified
avrdude: safemode: Fuses OK
avrdude done. Thank you.
to burn the fuse bits.
Behold Blinky Goodness
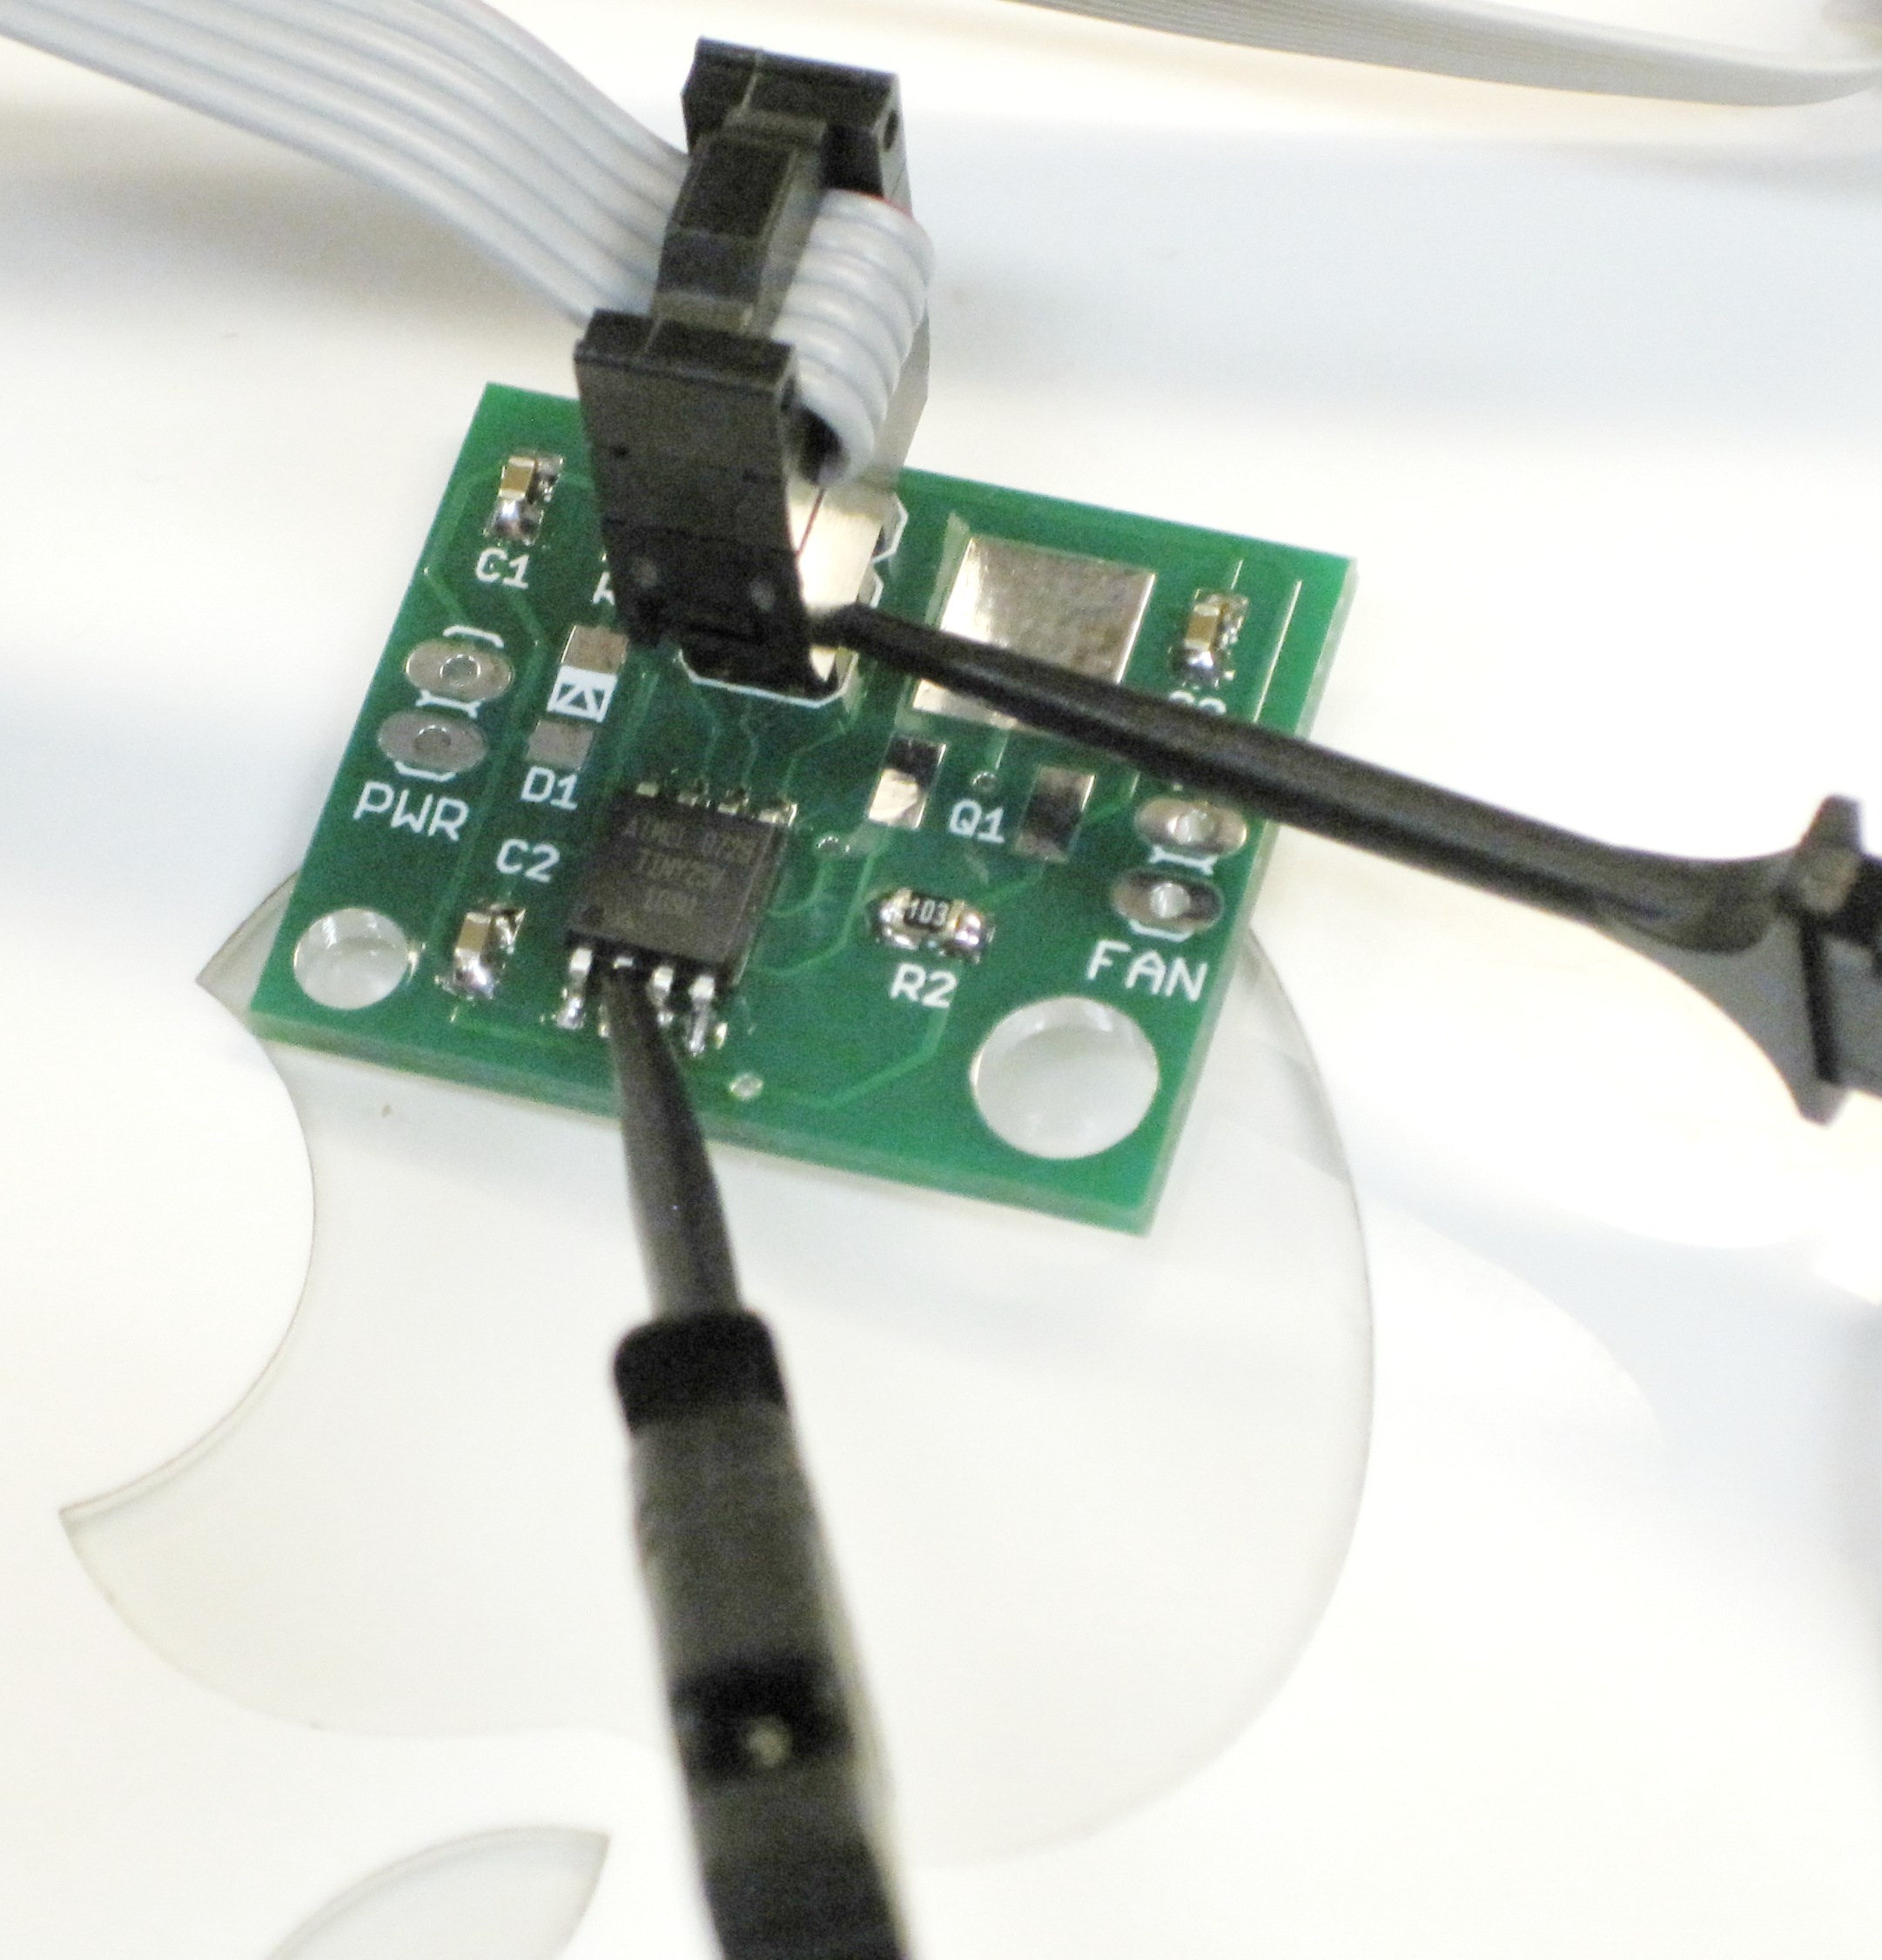
The board I’m developing doesn’t have an LED on it, so I clipped my logic analyzer to ground and I/O pin B3 (IC pin 2) to test for blinking.
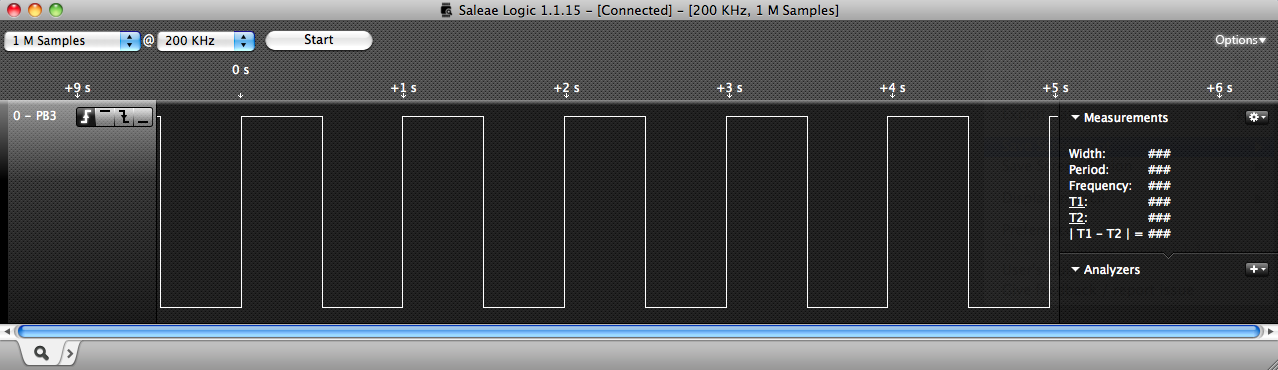
1 Hz blinking on my I/O pin. Fundamental programming accomplished.