After knowing that the Voron 2.4′s Z limit switch and Z probe produce repeatable results, we’re almost ready to begin calibrating the heated build platform for optimal first layers. But since the goal is to achieve the right temperature for different filaments (at the very least, radically different temperature for ABS vs PLA, and quite likely somewhat different from brand to brand and even color to color), I’d like to know that the printer is setting the surface of the build platform to the temperature I’ve asked it to.
One could — and I will — empirically test the best temperature setting for different filaments. But done without knowing how accurately the printer is achieving the temperature that has been set, the results will be unique to that printer. I’d like to tune my filament temperature settings to work reliably across all my printers (for a given build surface).

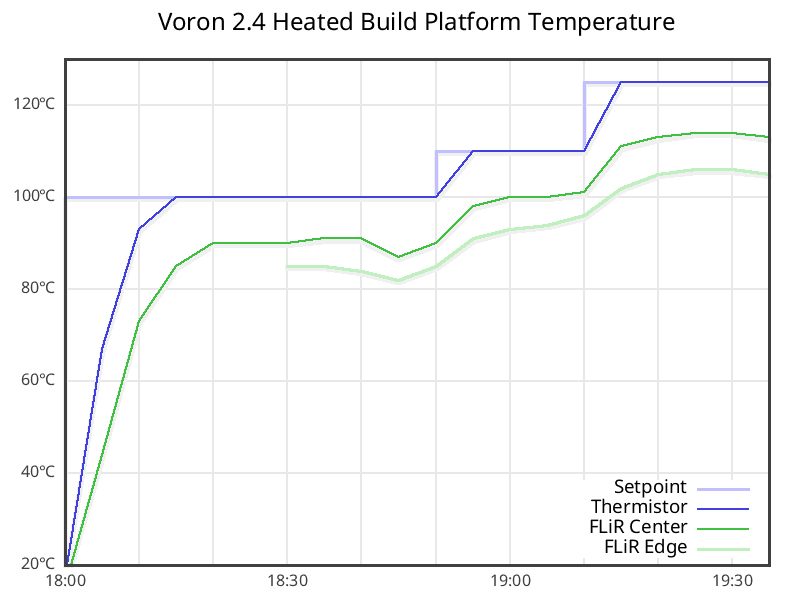
Apparently this will require some compromise, as the steady-state temperature between the center and edge of the build platform varied by 6°C when the setpoint was 100°C, a considerable amount given that first layers are often printed with the platform 10°C hotter than remaining layers and this 10°C is believed to make a difference.
Let’s see how the platform temperature behaves with a Fysetc kit in factory configuration.
Important factors:
- My printer uses the Fysetc kit’s 350-mm-square x 8-mm-thick rolled aluminum heat spreader.
- The heat spreader has a 300-mm-square AC-powered silicone heating pad adhered to the bottom with the thermistor factory-adhered to the underside of the silicone heater where it will always get heated faster than the aluminum plate.
- The heater heats the bottom of the aluminum plate and the top is open to the air in the build chamber, so one should expect the print surface at the top to be cooler than the bottom that’s in contact with the heater.
- I trust the accuracy of my FLIR camera.
My method is this:
- Start with the platform at room temperature.
- Set it for 100°C nominal ABS printing temperature.
- Every five minutes, record the temperature reported by the printer’s thermistor attached to the heater, the temperature reported by my FLIR camera of the center of the build surface on the upper face of the aluminum plate, and (once I thought of it) the temperature my FLIR sees toward the edge of the build surface.
- Wait until the platform temperature reaches a steady state.
- If needed (and I already know it will be), raise the setpoint enough for the actual platform temperature to reach 100°C and wait for steady state.
- Raise the setpoint again to 125°C (empirically best on this printer for grey eSUN ABS+, something I’ve been using recently) and again wait for the actual platform temperature to reach a steady state.
And here’s what that looks like, after logging data into Google Sheets for convenience and then passing it through gnuplot:
Here are some important takeaways:
- The factory thermistor thinks the platform has reached steady-state temperature after 15 minutes but it takes another 5 for the center of the print surface to reach steady-state temperature. This lag needs to be accounted for in preheating procedure; but (at this stage) it looks like we can preheat this Voron’s platform in 20 minutes, not an hour as sometimes suggested.
- Once in the general range of ABS printing temperature, small adjustments take only 5 minutes to make at the factory thermistor and 10 minutes at the actual build surface.
- The center of the build surface is about 10°C cooler than the factory thermistor at a target temperature of 100-110°C and 11-12°C cooler at an actual surface temperature around 110°C.
- The edge of this print surface runs about 5°C cooler than the center — 15°C cooler than the factory thermistor — at a target temperature of 100-110°C and about 8°C cooler than the center when the center is at 110°C. If you’re dialing in platform temperature for best adhesion by printing small test parts at the center and then change to printing something large, the periphery is not at your target temperature. Worse, if you’re printing a plate of parts, the ones further from the center may lack the target temperature on their entire first layer.
What to do about this?
- Adjust slicer filament settings until the filament works, and keep a custom filament profile for the Voron vs the Prusa, like I have been. I don’t like lying to my slicer about what’s really happening and I don’t like customizing filament for each different printer. (It’s bad enough having to tune it for different build surfaces.)
- Adjust Klipper’s thermistor settings to compensate for the difference between the thermistor attached to the heating pad and the temperature of the build surface, like others have done. I don’t like lying to my firmware about what’s really happening and the NTC thermistor response curve means that tuning it for ABS temperatures means it’ll still be off at PLA temperatures, and vice-versa.
- Find a way for the printer to measure the actual temperature of the build surface. This would be great but complicated; any contact sensor would be in the way of the print and the print would be in the way of any non-contact sensor.
- Consider and test alternate thermistor placement.
And regardless of the path chosen:
- Continue paying heed to the steady-state temperature difference between the center and edge of the build surface, and expect to compromise by choosing the perimeter temperature and letting the center be hotter.