With the Spider mainboard online and talking to OctoPrint, a cabling issue corrected, and a pinning issue I-thought-dealt-with-but-actually-no, documenting-soon, it was time to work through Voron’s initial startup checks to verify all pinning and basic functionality. The document’s order of operations is fantastic; but too often it says what to do and doesn’t say how to do it. Let’s fill in some gaps.
Verify Thermistors and Heaters
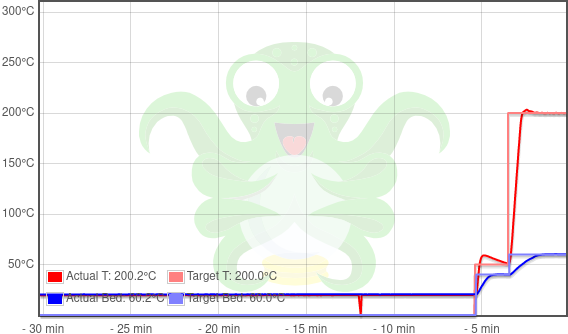
Thermistors are working; they show room temperature. Heaters are working; they heat their respective components and the thermistors read the temperature accordingly. Also this hotend is pretty snappy about getting up to printing temperature even without a silicone sock, and I’m not sure why it’s faster than (for example) my Enders, which also use 24V. Possibly a higher-current/power heating cartridge, haven’t checked.
Verify Stepper Motors
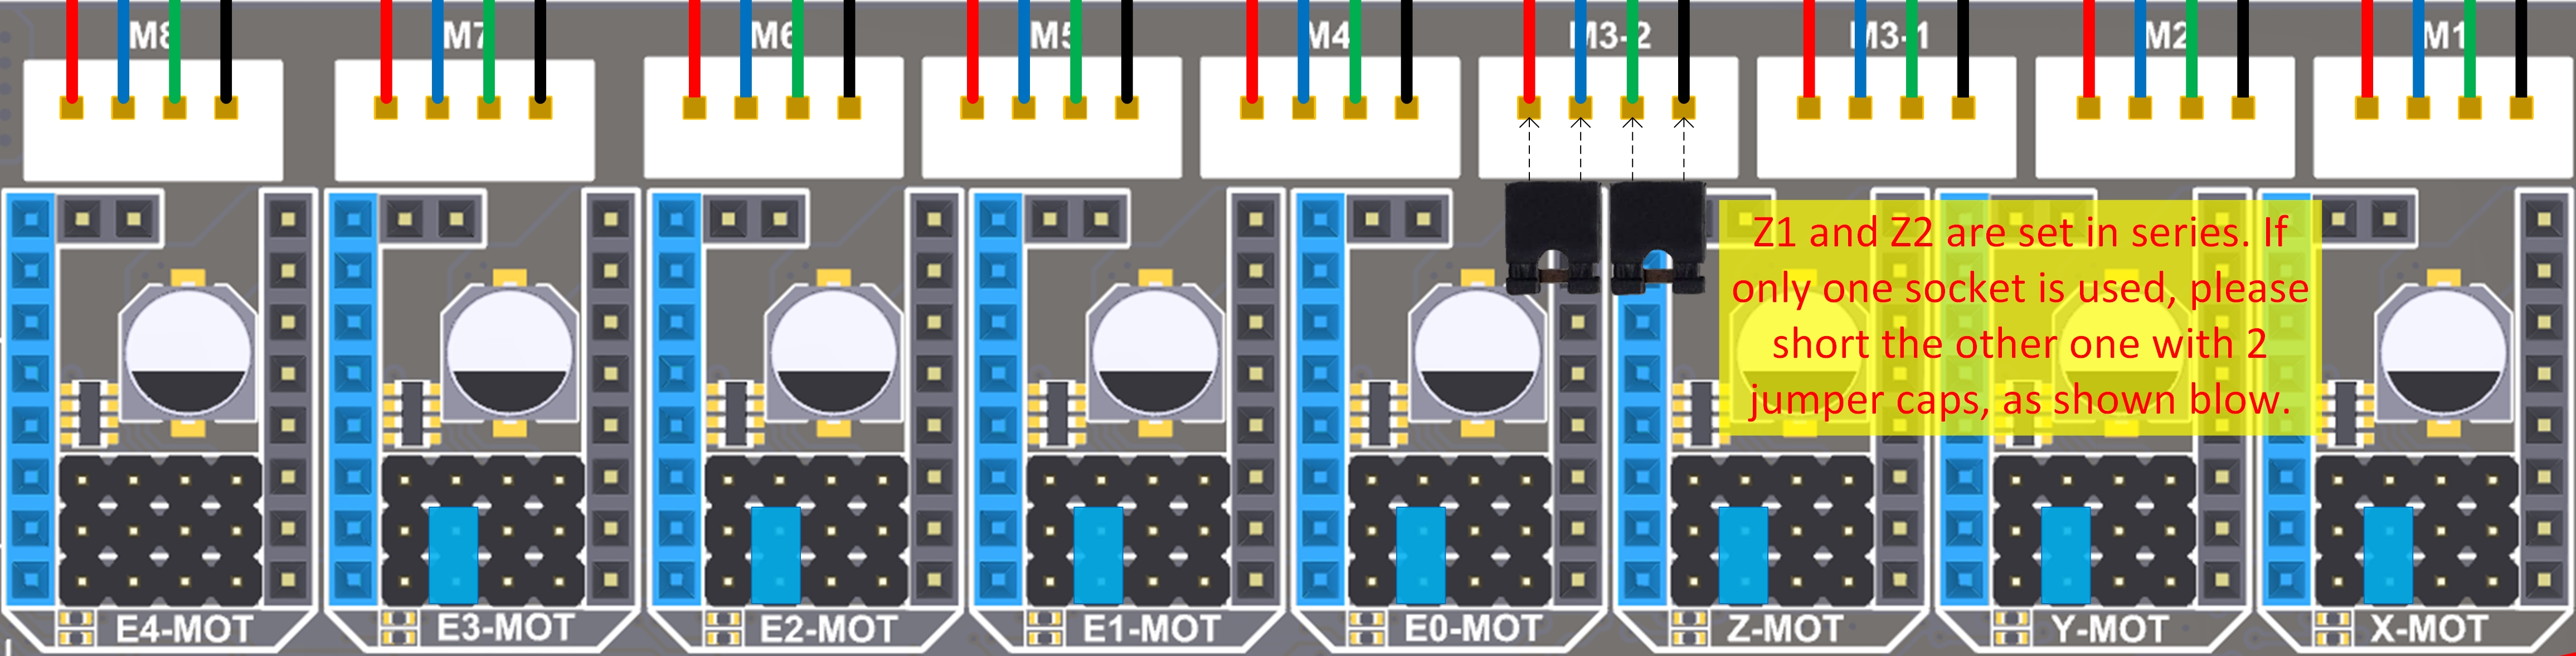
Test operation and confirm that each axis is configured where it’s actually cabled, check. Except that initially, any attempt to move my B motor (identified in printer.cfg as stepper_x and I assume that’s because it’s labeled that way on the PCB silkscreen but I don’t know yet how the Klipper firmware knows that “X” means “B”) caused the Klipper firmware to lock up. I successfully moved the driver, cable, and configuration of the B motor from the X socket to the E4 socket and had it running fine there; then when I moved it back to X to troubleshoot the issue, it just worked. Okay, I’ll just … leave it there??
Verify Endstops AKA Limit Switches
This is my separate issue, now dealt with, soon-to-be-documented.
Verify Homing X and Y
Check. For those of you like me who haven’t memorized all the gcodes, note from the Voron instructions that you can send g28 x and g28 y to test homing individually, with one hand on the E-stop button, before using OctoPrint’s control panel button to home both.
Configure and Test Z Limit Switch
The Voron instructions are missing critical steps that the firmware requires you to do before executing the listed steps. Here’s a path I found that worked; there may be others.

- Home the X and Y axes.
- We need the nozzle to be pretty low over the Z limit switch pin, but the printer won’t let us move the Z axis until we’ve homed Z, but the printer won’t let us home Z until we’ve defined the X-Y coordinates for the Z limit switch pin, but we can’t find the coordinates of the Z limit switch pin until we lower the nozzle.
- Disable the stepper motors. I used the OctoPrint control panel’s
Motors offbutton. - Manually and gently push the gantry down pretty far until the nozzle isn’t much higher than the build platform (and consequently the Z pin).
- Disable the stepper motors. I used the OctoPrint control panel’s
- Under software control, move the nozzle until it’s directly over the Z pin. I used the OctoPrint control panel again. Note that the Z pin should be directly left of the nozzle after Y homing — that is, the Z limit switch pin should be at Ymax. If it’s not, then the Z pin and possibly build plate should be moved accordingly.
- Query the printer for its current position. I used the OctoPrint terminal to send
M114; mine returnedX:260.000 Y:350.000 Z:10.000 E:0.000. - Enter these X and Y coordinates into
printer.cfg— likehome_xy_position:260,350— and restart the Klippy host software. - Home X and Y (I used OctoPrint’s X-Y home button) and then Z while ready to hit E-stop. My homing works.
Locate Origin and Configure
The Voron 2.4′s X limit switch is on the right and the Y limit switch actuates on the back; so the Voron homes to the back right and Klipper sets the current X and Y coordinates to the respective position_endstop values when homing. These values are predefined to 350 mm for my printer and need to be adjusted to be the actual distance from the origin in the front left to the home position in the back right.
Because we’ve set the Z limit switch X,Y coordinates based on the X,Y endstops being at (350,350), the Z limit switch X,Y coordinates also need to be translated by the same vector as the home position.
I found the Voron instructions to be algorithmically correct but, on the first pass, not clear what was being accomplished and how. Here’s my version:

- Home the X-Y axes.
- Under software control, jog the toolhead as far to the front left as possible without (A) physically ramming the side or front of the gantry and (B) exiting the firmware’s current idea of the coordinate space (which it won’t let you do). Query the current position with
M114.
My toolhead is as close as I care to get it to the left edge at X = 2 mm and hadn’t reached the front of the build platform at Y = 0 mm. - In the
[stepper_x]and[stepper_y]sections ofprinter.cfg:- Adjust
position_endstopaccordingly. - Adjust
position_maxto the newposition_endstopvalue, because the Voron 2.4′s limit switches are at max X and Y travel. - I set my X
position_endstopandposition_maxto 348 to reflect that my X has 2 mm less travel than the nominal 350 mm. - I set my Y
position_endstopandposition_maxto 360 to reflect that my Y endstop is off the back end of my build platform and I need it to allow me to move it further to find out where the front is.
- Adjust
Then I restarted Klippy and again jogged the toolhead toward the front left corner. It now knew not to travel further left than where I had stopped it before; and I could now move it far enough forward to get the gantry almost to the frame at what M114 revealed was Y = 4 mm; so I updated the Y position_endstop and position_max to 356.
Finally, I had reconfigured the coordinates of the home position by (-2,+6) so I needed to make the same change to the coordinates of the Z limit switch. In the [safe_z_home] section, I adjusted home_xy_position from 260,350 to 258,356.
One more restart and I can now home X-Y, home Z, and issue g0 x0 y0 to move the toolhead as far to the front left as I care for it to go.
Verify Inductive Probe Operation
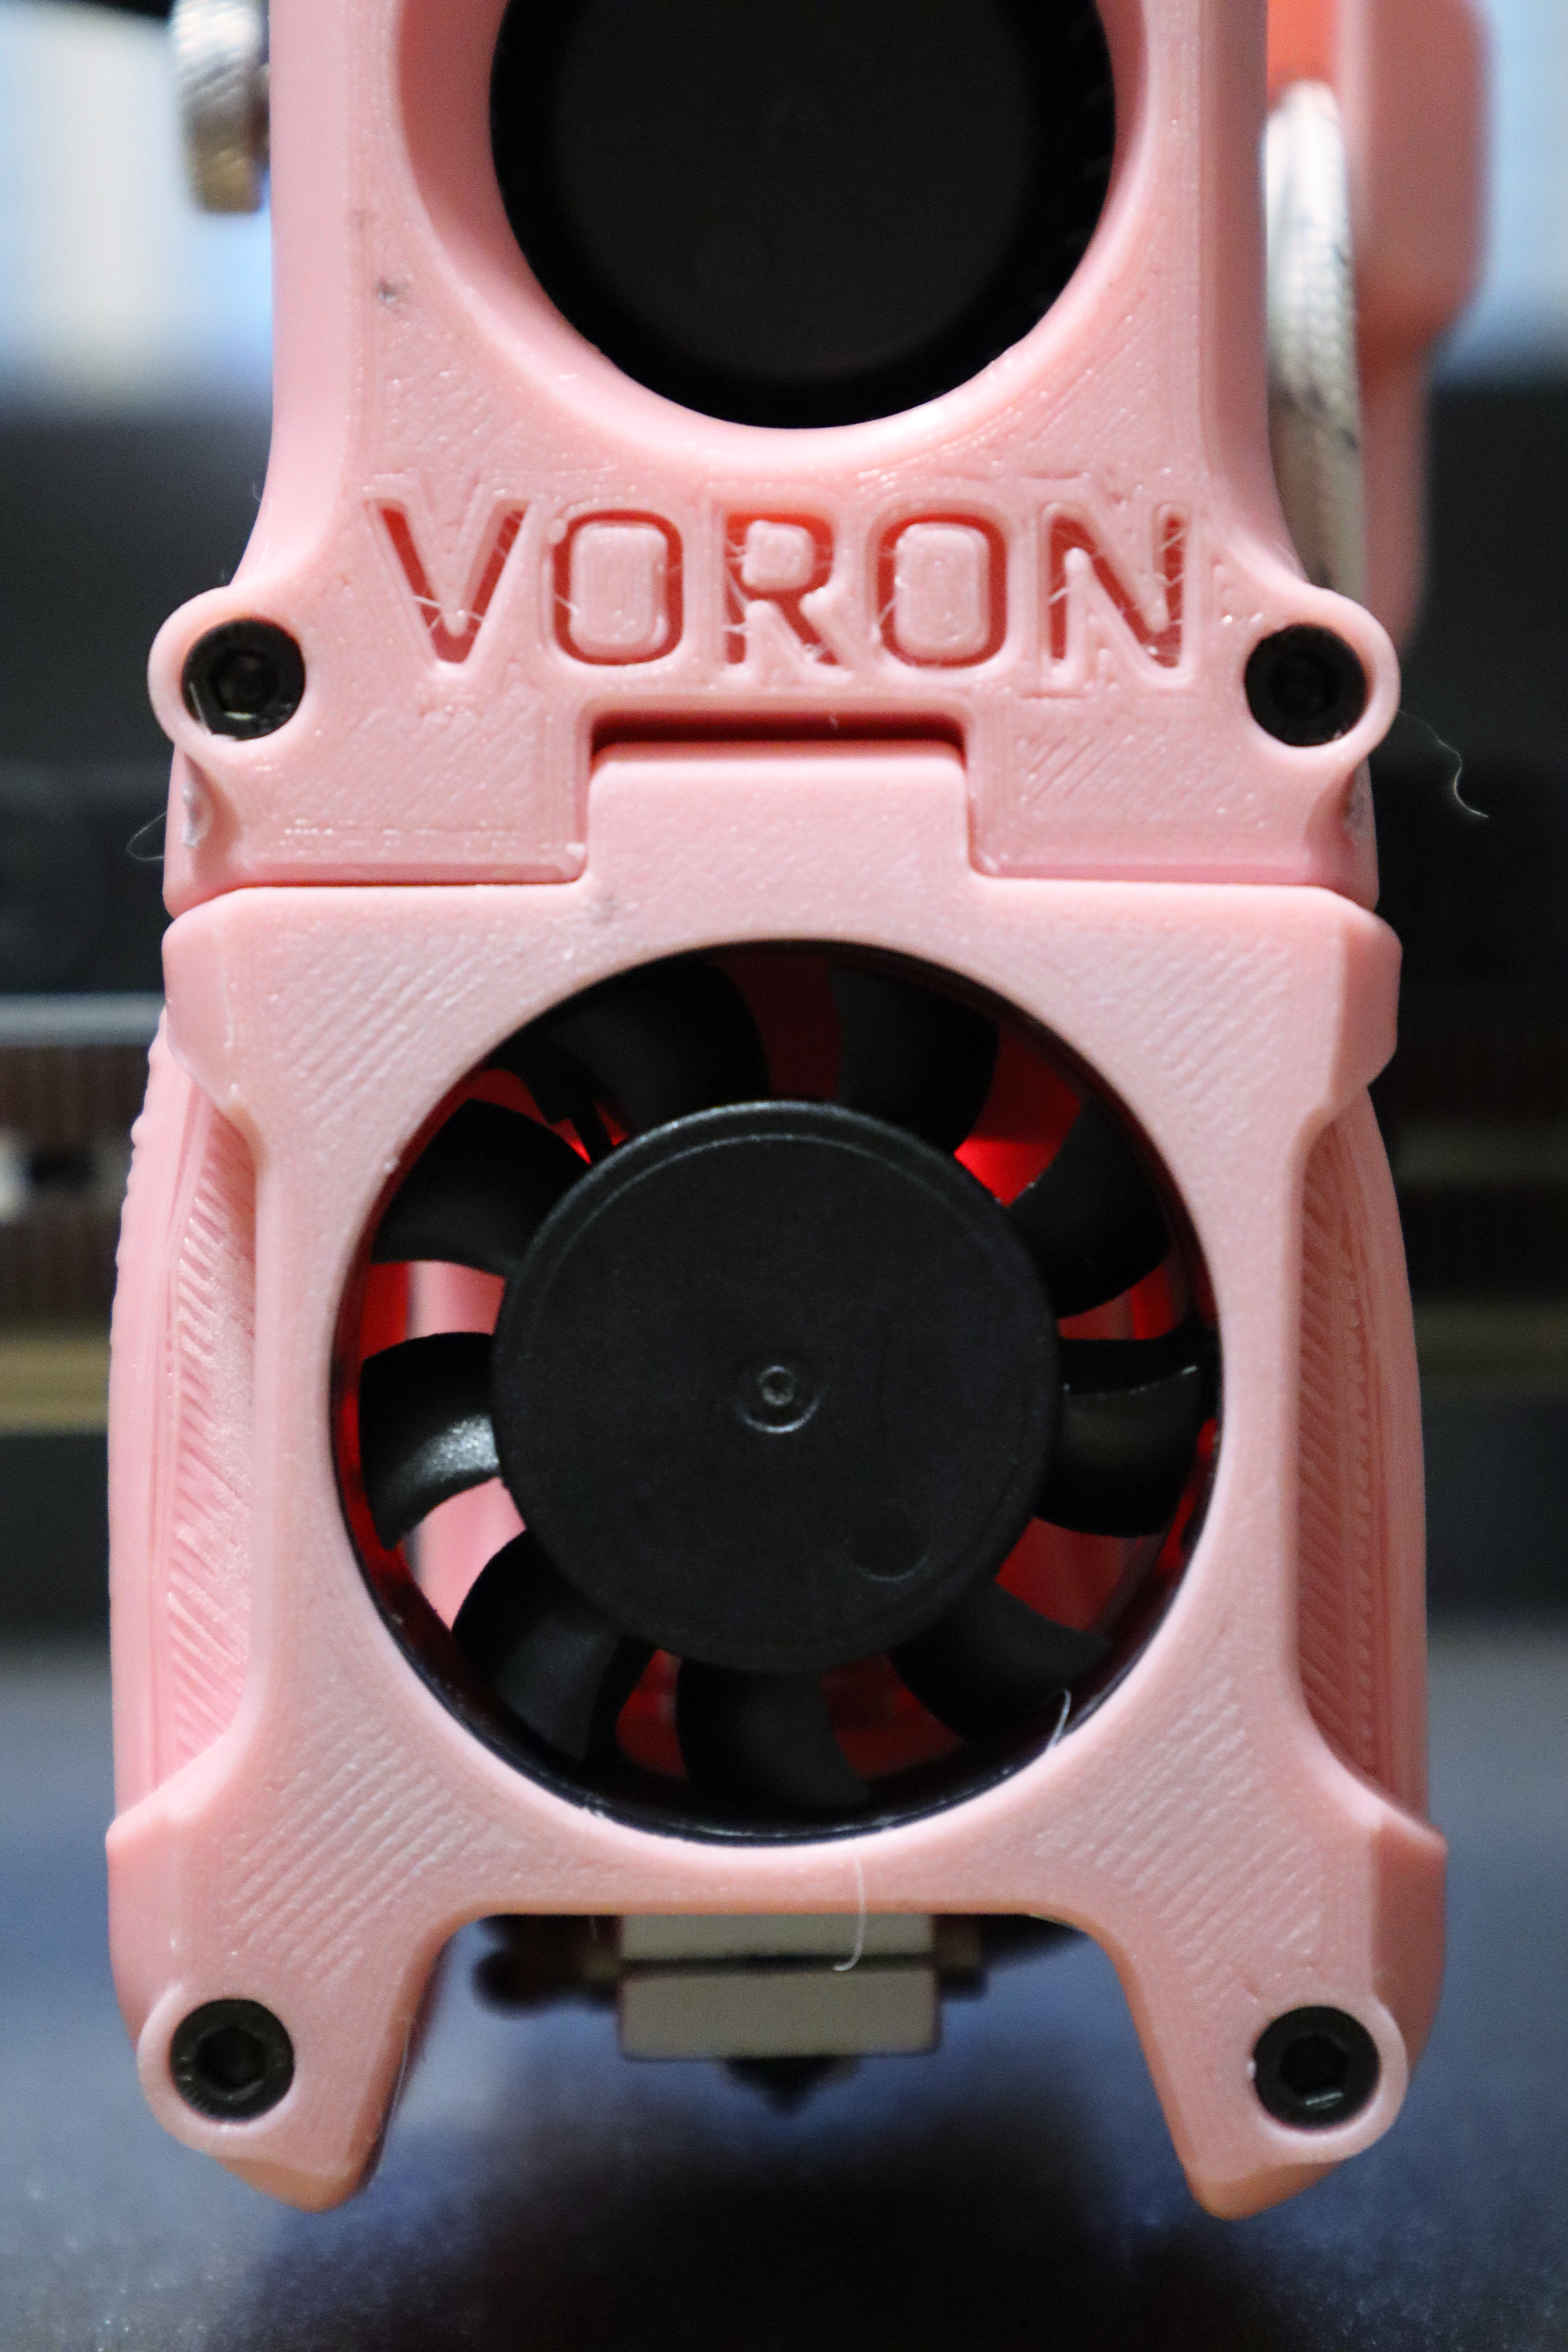
My probe triggers when getting close to the build surface and passes the repeatability check with a standard deviation of just over 0.002 mm, within spec. You can even see the warm lava glow of the probe’s LED oozing around the cold end and out the cooling fan.
I note that without my spring steel sheet build surface, my probe doesn’t trigger at all on the exposed fridge magnet. Let’s remember never to probe with a hot nozzle and missing steel sheet.
PID Tuning
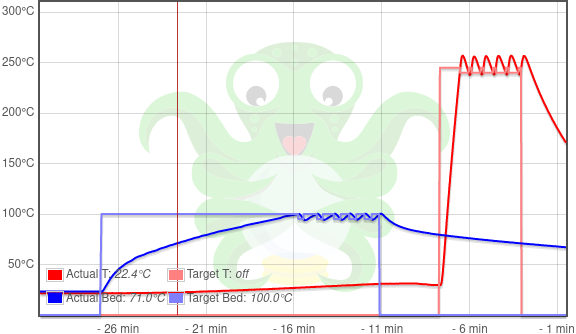
The PID tuning worked fine, although … you gonna leave that much overshoot on the nozzle temperature?
I’ll need to remember to retune the bed when I have the build chamber enclosed. I did have the silicone sock installed on the heat block, so the nozzle tuning should be pretty realistic.


The tuning gave me these results and offered to write them to printer.cfg for me; but I’ve been allergic to mixing hand-editing and automated writes of configuration files since testing webmin in the late 90s and watching it delete valid DHCP and DNS configurations that it hadn’t learned to parse yet; so I entered these values into printer.cfg by hand.
Run Quad Gantry Leveling
Done; works. Also it’s really neat.
Measure and Set Z Limit Switch Offset

Klipper has a nice procedure that walks through bringing the nozzle down to the build surface, then reporting the value to which to set the Z limit switch offset. I used a 0.1-mm feeler gauge and plan to go back and test further with a 0.01-mm feeler gauge, as that level of precision really does make a difference in first-layer performance.
As with other measurements, I copied this into printer.cfg myself rather than have Klippy save it for me.
Calibrate Extruder Steps
This is the last step of the initial startup instructions … and I need to defer it to a separate post. Right now my extruder motor is having trouble feeding filament and is skipping steps, so I have more work to do before calibration.