I do all of my mobile computing — and my blogging slouched on the couch in my family room — using a hand-me-down 500MHz PowerBook G4. It was given to me used, battered, and obsolete two and half years ago, and after upgrading the RAM to 1G, installing OS X Tiger from a family license, and installing an AirPort card, it has served me well.
It’s starting to feel a little slow when loading bloated web pages, but my main complaint at this point is its battery life. I was given two batteries with it, one of which never held a charge at all. The second battery’s usable lifespan has slowly decreased from about three hours to around one, even when I turn off power to the AirPort card.
Worse, the battery meter still shows upwards of 60% charge remaining when it suddenly powers off with no warning. I’ve run Apple’s battery recalibration procedure several times, but it doesn’t make any difference.
Replacement batteries seem to run upwards of $80, and it’s impossible to tell from the online sales pages whether they’re original stock every bit as old as my own failing battery. I’m not afraid to dig into things and I’ve rebuilt my original Roomba’s battery before, so I decided to tackle this one myself. And since I had a spare battery that was already worthless, I could rebuild the spare without risking damage to my main battery that still mostly worked.
But it turned out I couldn’t find replacement cells at my usual surplus sites — they’re a little larger than AA, which was all I could find. eBay to the rescue. One of my favorite sellers is a surplus recycling center in Topeka. I get up to Lawrence enough that I buy a trickle of stuff from them, then pick it up when I’m in the neighborhood anyway, and save a bunch of money not having to have things shipped.
I started watching their auctions for notebook batteries. Not PowerBook batteries — but other batteries at low enough prices that I could cannibalize them for cells. Within a matter of days, I had purchased a Compaq and a Dell battery for $5 each. I’m well aware that they’re not likely to be brand new, but for only $5, it’s still worth trying them for a rebuild.
Today I got around to doing it.
Inside the Batteries
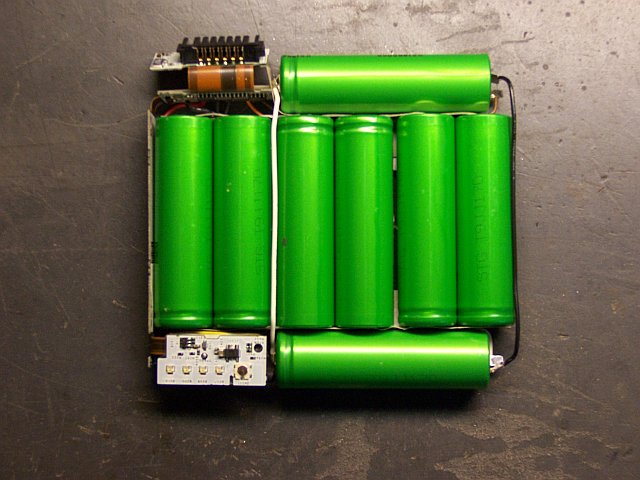
Here’s my original battery with the two donors:
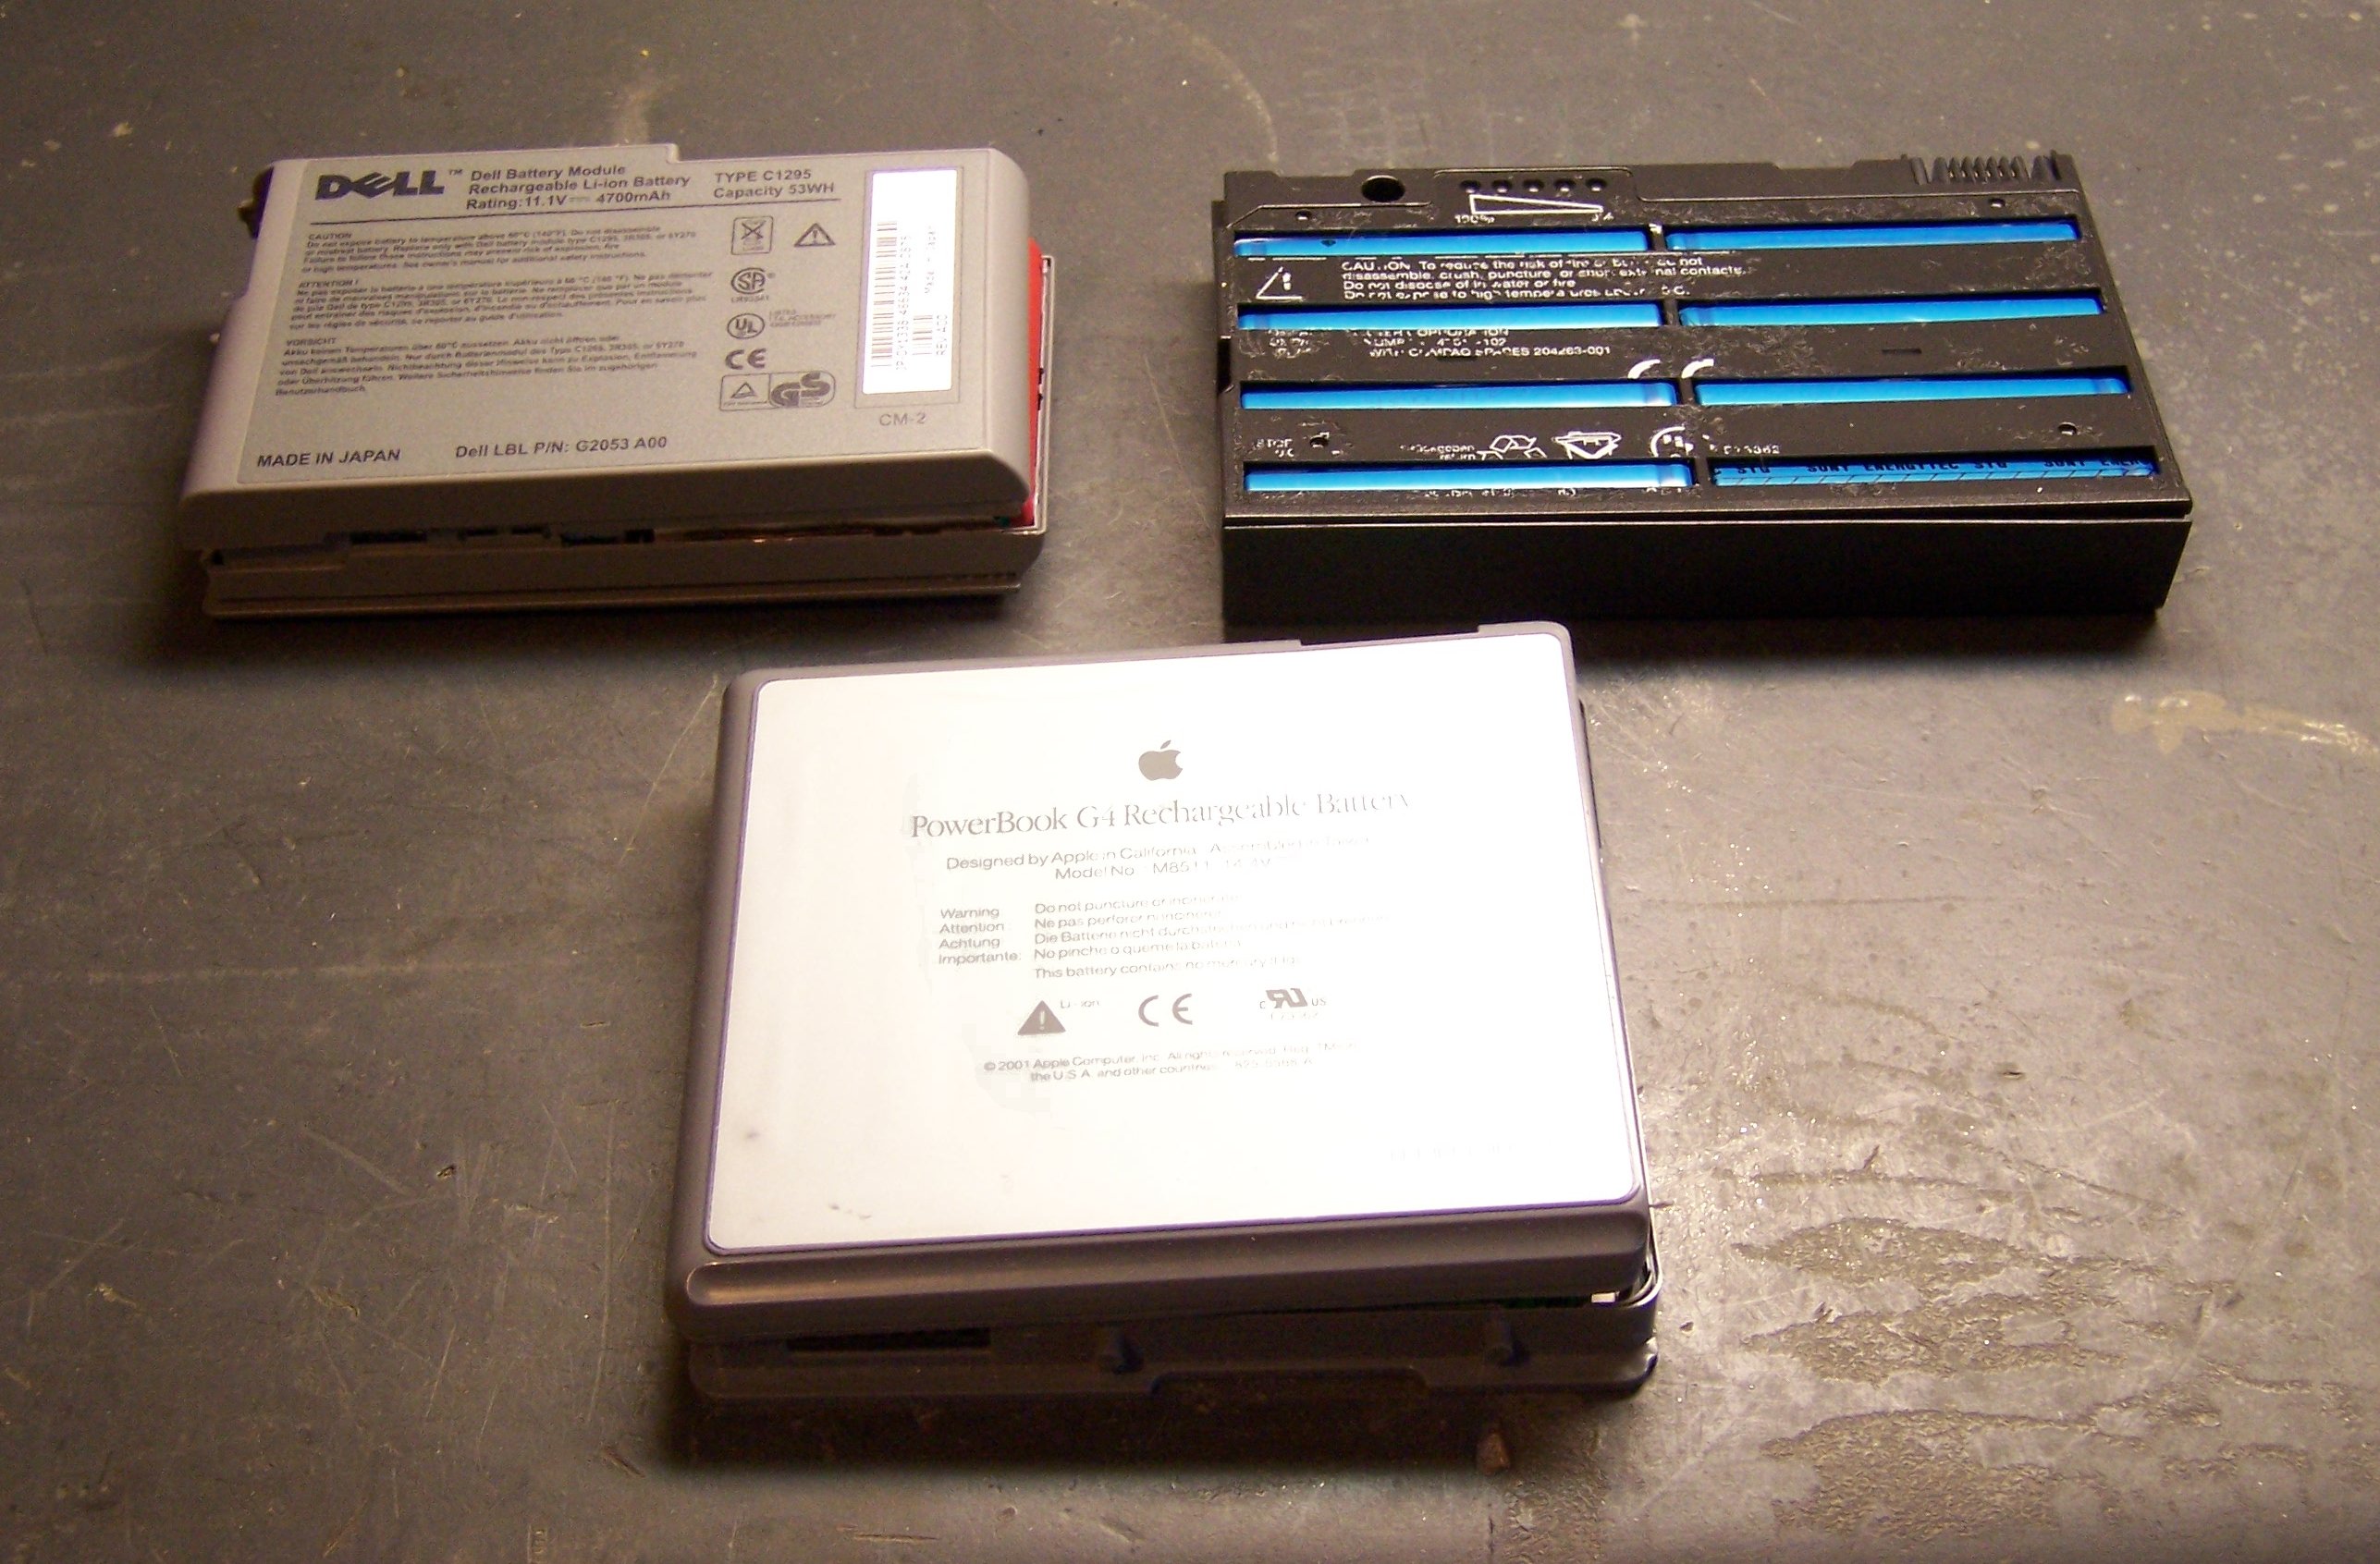
And the same batteries with the cases removed:
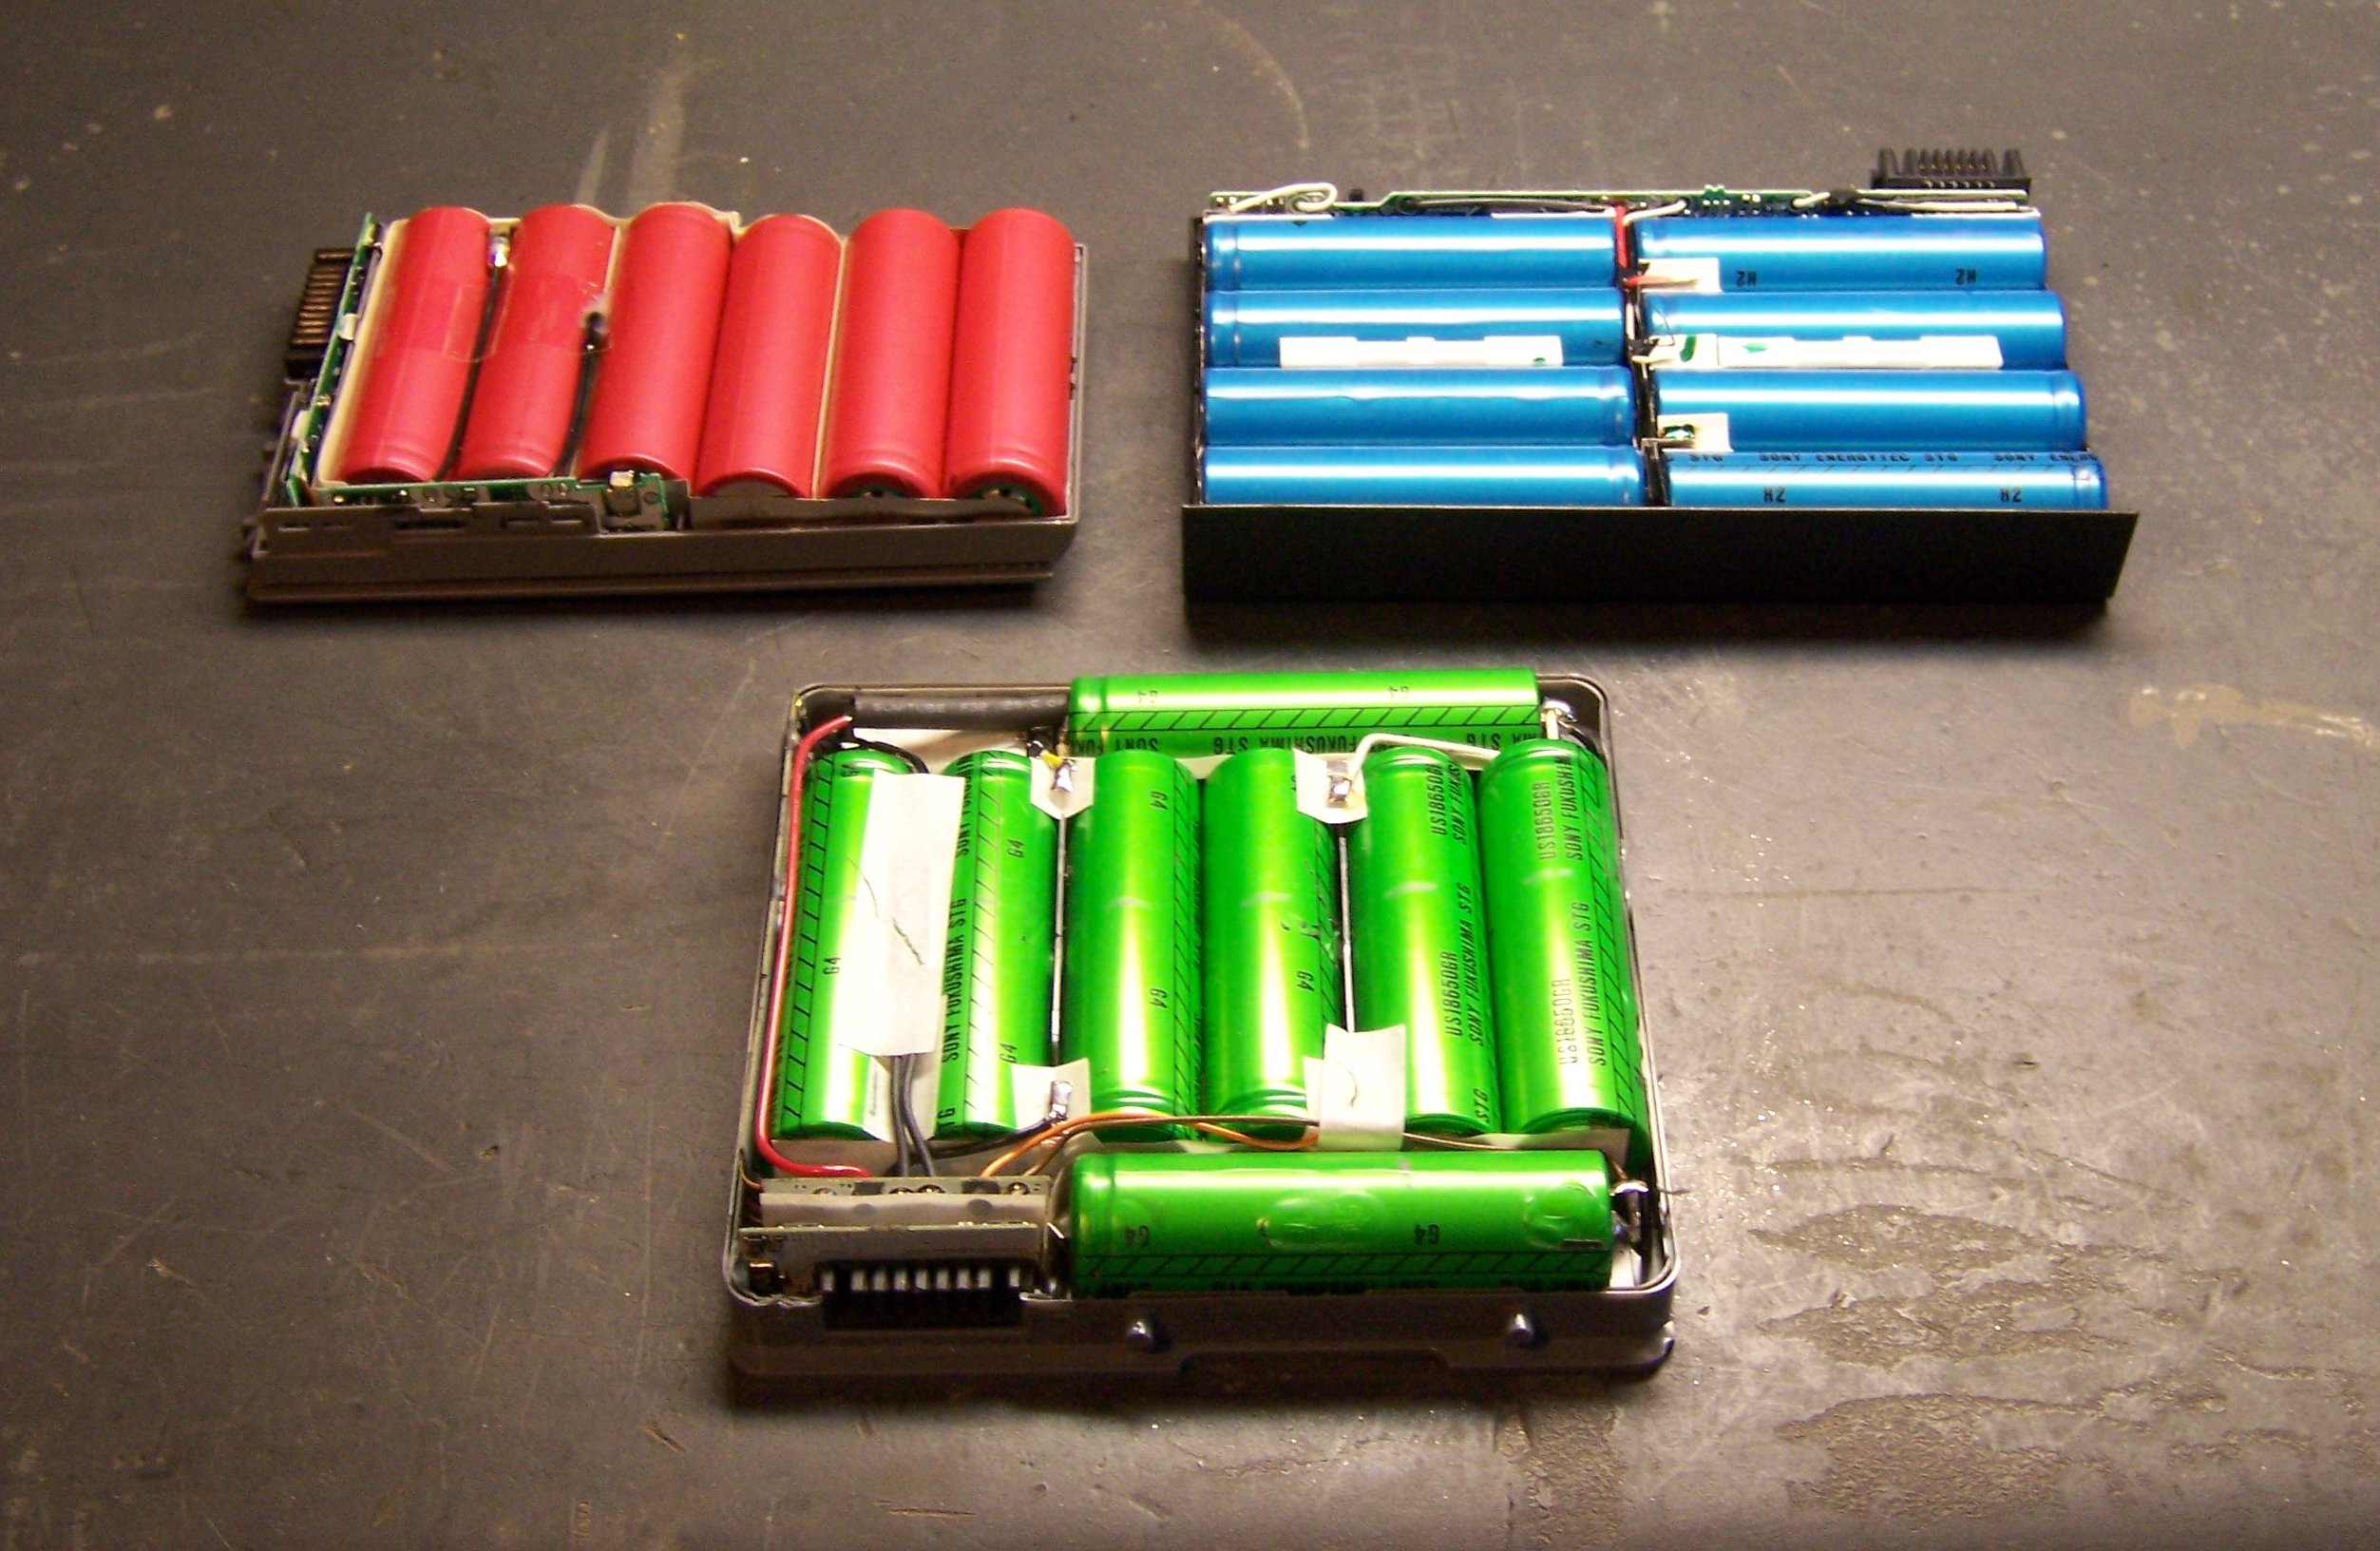
You can see that the Dell battery has only six cells, which aren’t enough to rebuild the PowerBook. They’re still available as donors; but as the Compaq has eight cells, the Dell’s won’t be needed.
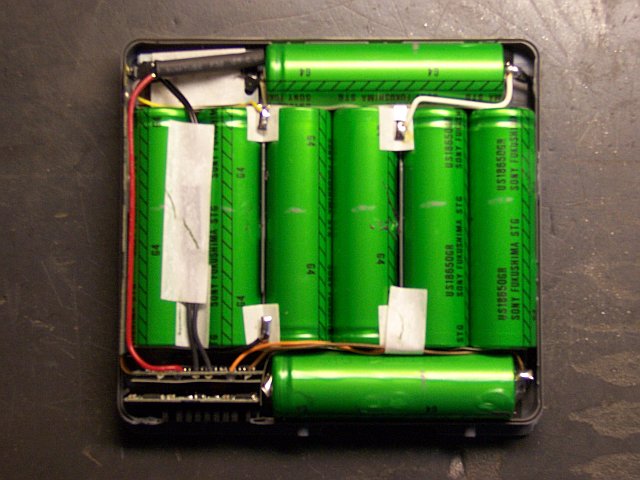
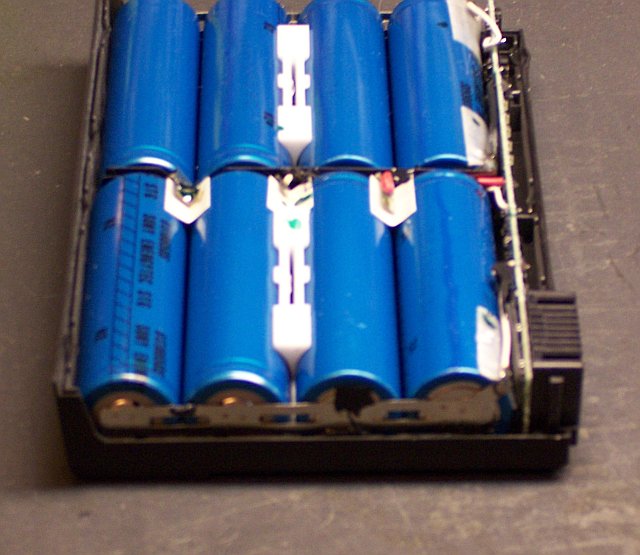
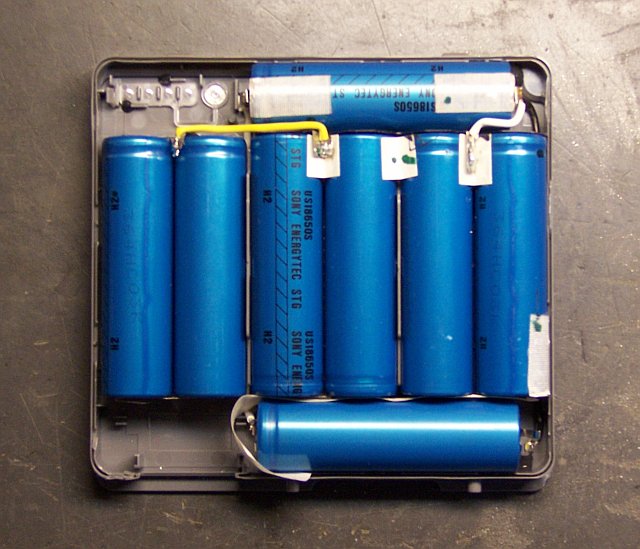
The first step was making a careful diagram of the inside of the original battery, noting cell polarity and wiring connections. Here’s the top view:
And the resulting diagram:
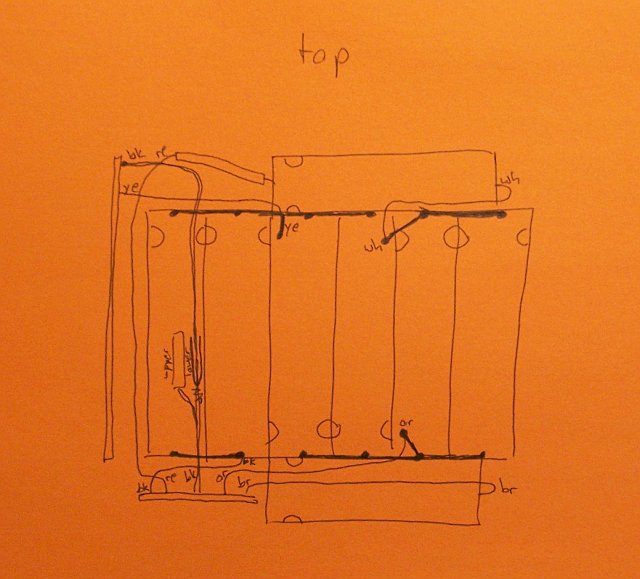
The heavy black lines along the tops and bottoms of the cells are foil strips spot-welded to the cells, joining them together two-by-two in parallel, and the pairs into a series string. When I took apart the donor batteries, I looked for sets of cells welded together the same way, to minimize unnecessary soldering during reassembly.
The bottom side had only two wires:
So its diagram was trivial:

Happily, the cells in the Compaq donor were spot-welded together in parallel pairs like the PowerBook cells, making reuse easy.
This set of four can replace either the left and middle or middle and right cells.
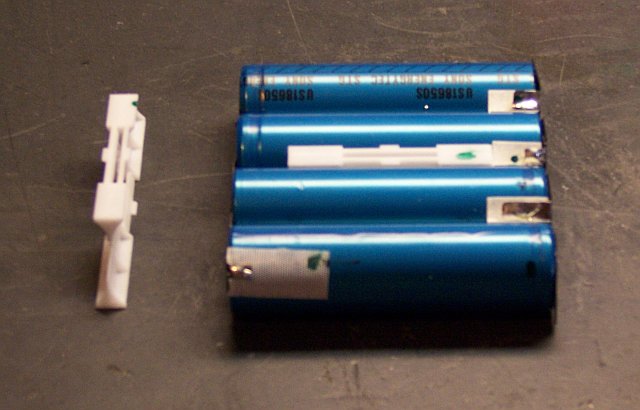
Where a pair of batteries was spot-welded in parallel, both ends were connected rigidly and the two cells formed a solid assembly. But where only one end was connected in series to the next pair, the strip at that end acted as a hinge and the two pairs tended to flop out of alignment. The Compaq battery had clever clips sandwiched between parallel pairs to maintain alignment. At first I thought I’d be able to reuse the clips, but my PowerBook battery case had ridges sticking up between pairs, so I had to remove the clips.
Reassembly
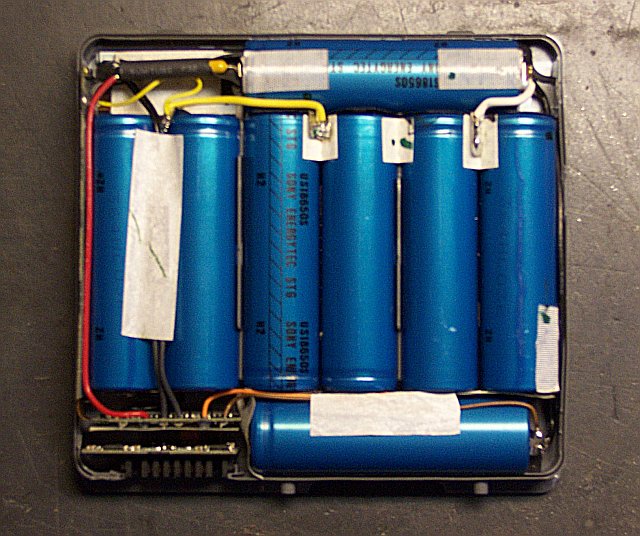
After comparing the various spot-welded tabs on the new cells to those on the old, I decided which cells to put where and test-fitted everything into the case.
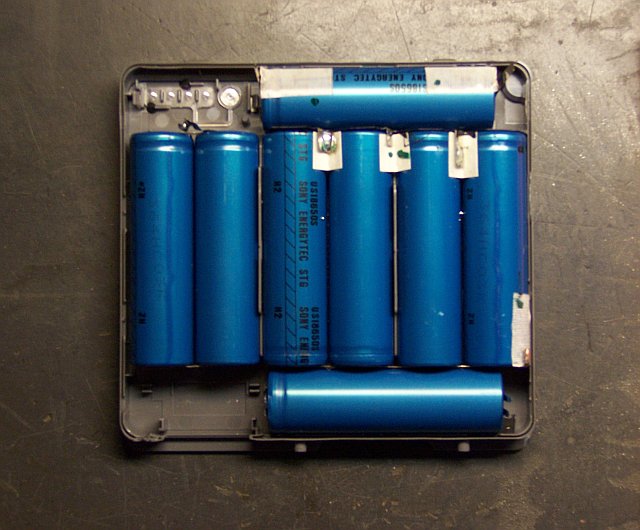
Looks good! Now I needed to rewire.
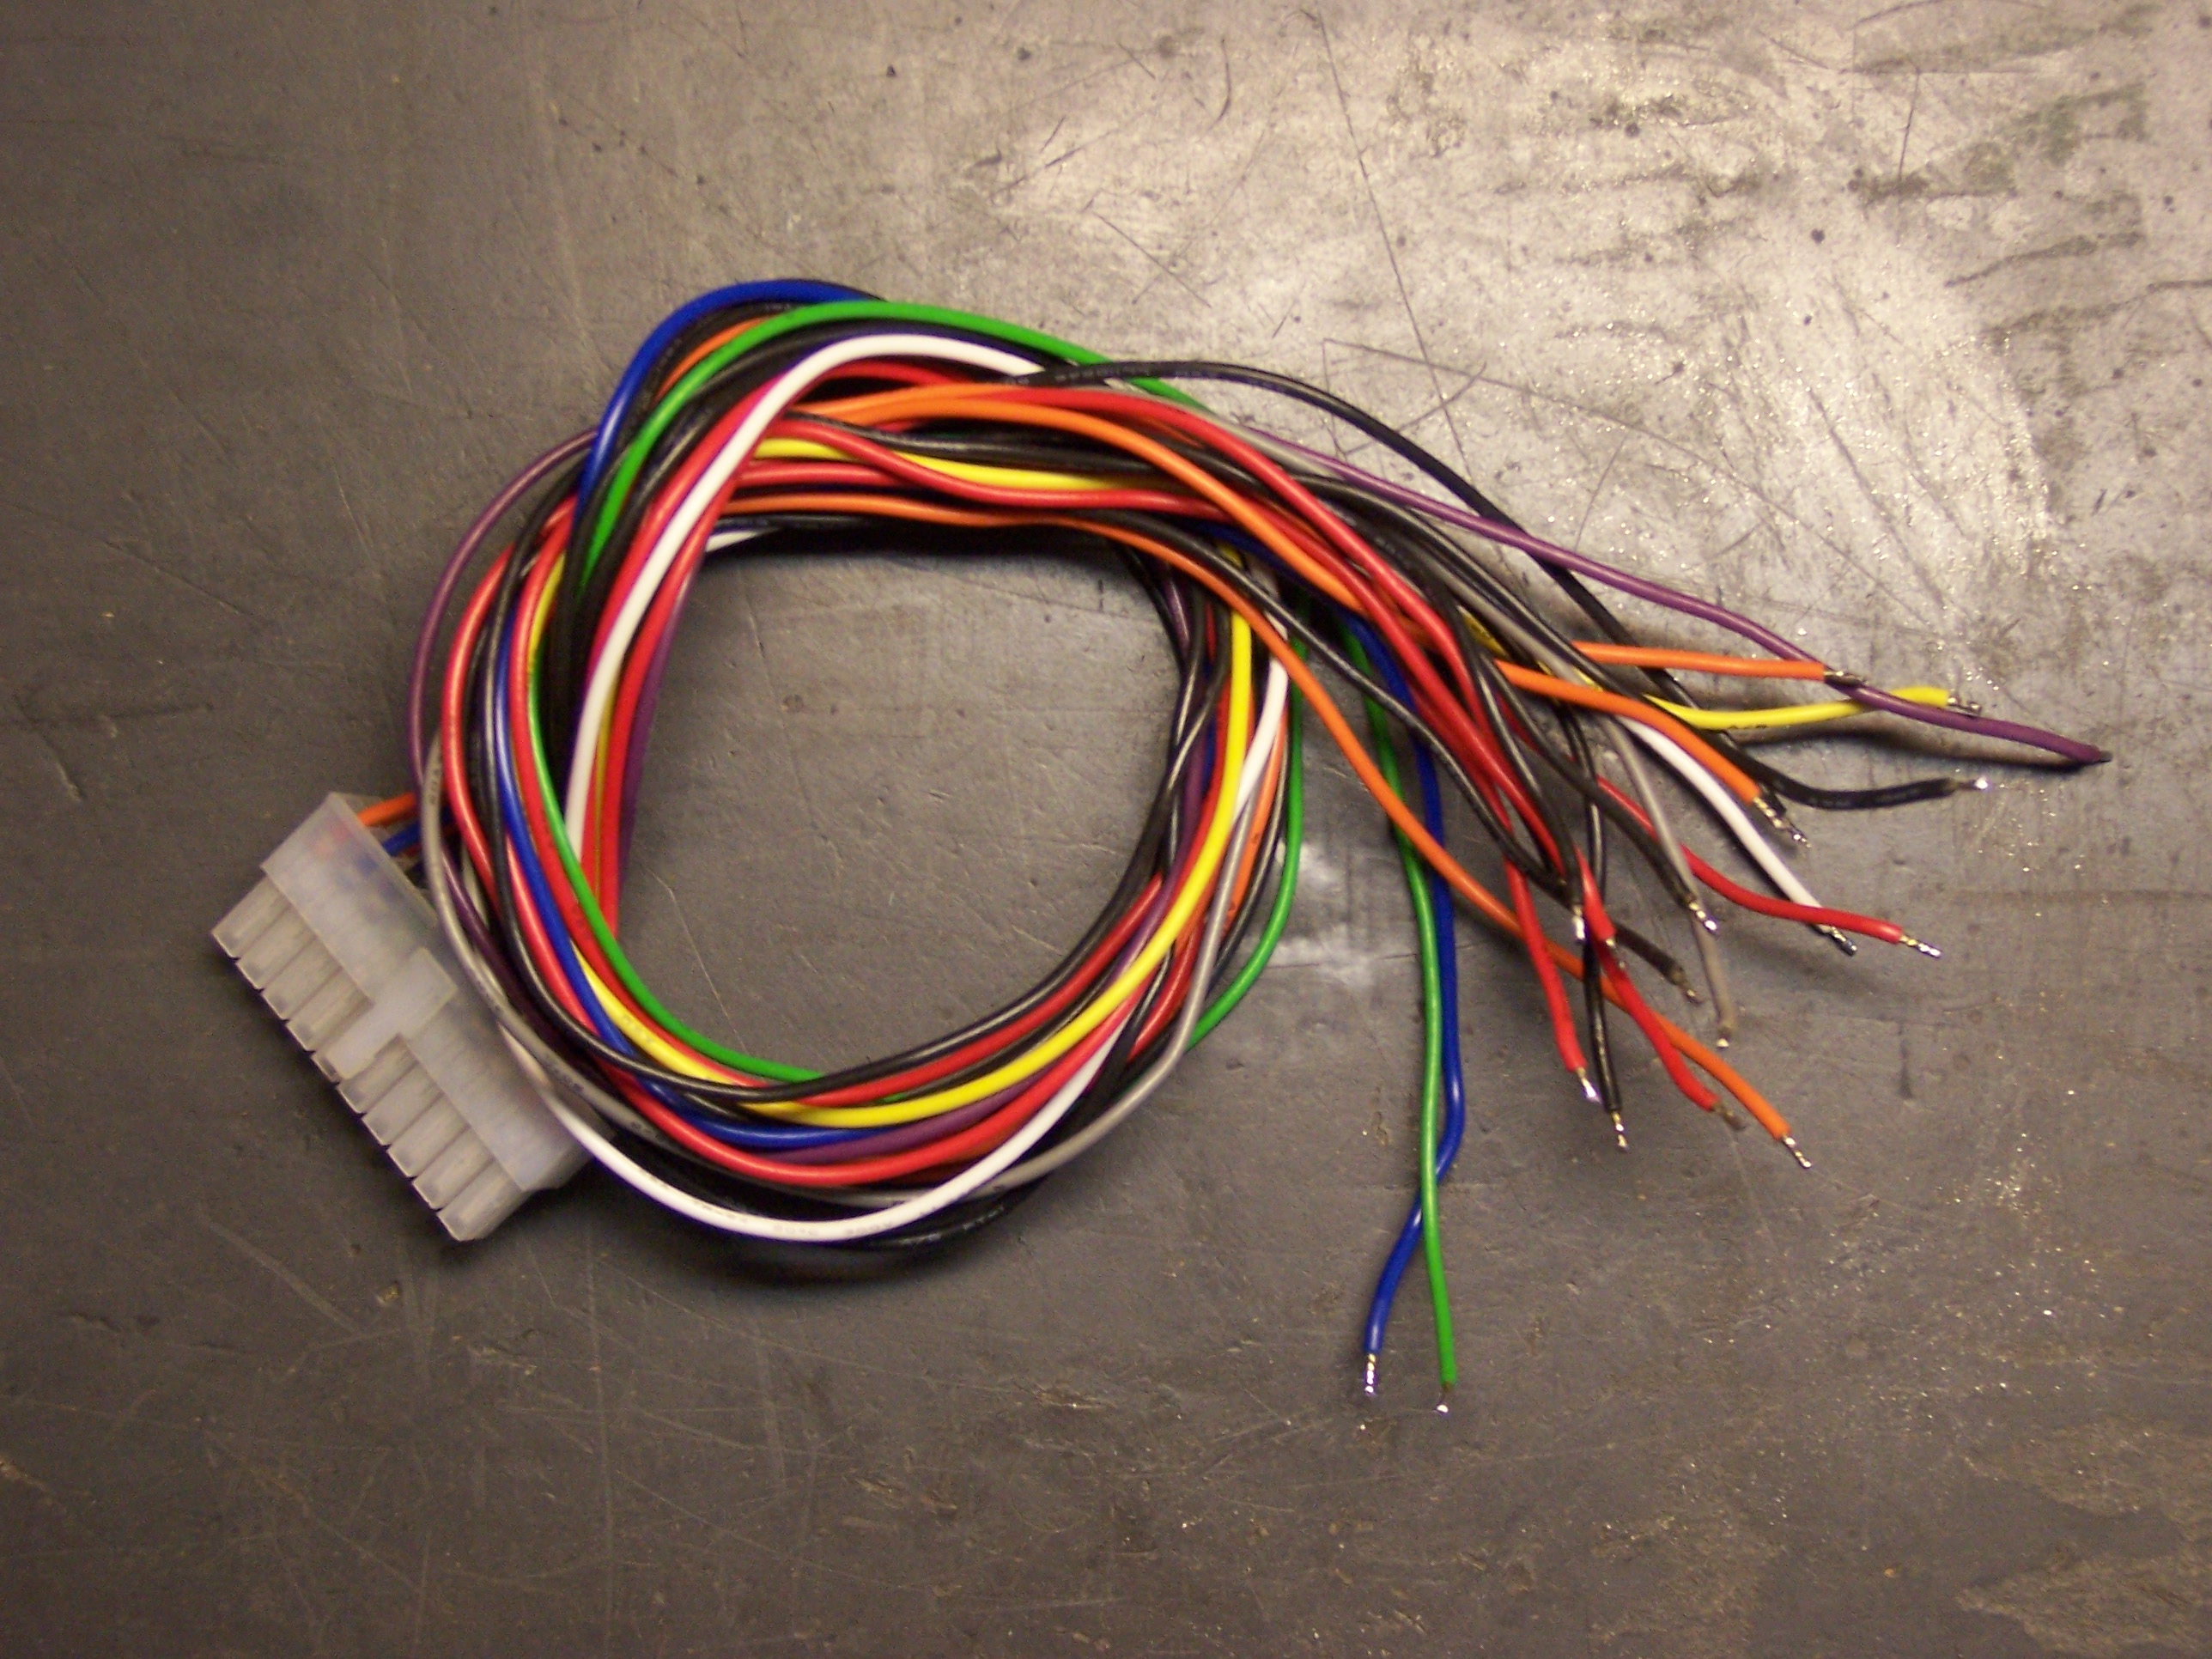
The original battery had fine wires from the battery-control PC boards to the different cells, but also a few heavier-gauge wires directly from cell to cell. Rather than desolder those wires from the original and move them to the new battery, I looked around for similar-gauge wire. The motherboard wiring harness from a dead PC power supply looked perfect — and it’s even a little heavier gauge (20 instead of 22).
First I fitted and soldered the black and white wires on the underside that connect the upper and lower single cells into a parallel pair. I also made the series connection from their right terminal to the upper terminal of the right pair.
Next, I needed to connect the left pair in series with the center pair. The original battery had their upper terminals all spot-welded to the same strip, but the donor battery had a different cell configuration, so I needed to make that connection with wire. I chose yellow to match the yellow PCB fly wire that connects to the same junction. Now the inter-cell wiring was complete.
Reconnecting the PCBs
I pushed the PC boards approximately back into place and started reconnecting their wires. Leaving for last the upper left connection with heatshrink covering some inline mystery component, I started on the bottom set of wires. I hooked up the small black wire from the lower left PCB to the lower left battery terminal, then the orange wire to the center of the lower side of the center cells.
As I soldered the brown wire to the right end of the lower cells, I smelled something funny — and it didn’t smell just like melted insulation. I quickly desoldered it and sniffed around. Convincing myself that it was just the insulation, I resoldered it.

Then I noticed that the right two cells in the main row were warm — quite warm — and it had been a long time since I had soldered them. I desoldered every connection as fast as I could and sat back to think about what was happening. At that point, my infrared thermometer said that the rightmost cell was 100°F.
Connection Sequence Matters
There were only two good explanations: Either I had made an error in my rewiring, or it mattered in what order the cells were reconnected. After re-rechecking my connections, I redrew my diagram of the original battery to consider exactly how the cells were wired.
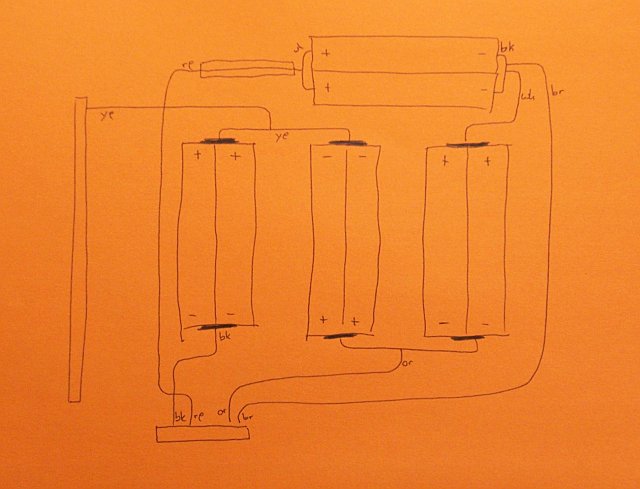
After seeing the diagram drawn out like this, it made sense to think that the order of attaching connections could matter. The black wire hidden in the lower left is the ground, and the red wire going to the connection I’d been saving for last is the positive output. The orange, brown, and yellow wires tap into the series chain between cell pairs, presumably to measure the health of each pair.
So . . . maybe the monitoring circuit didn’t like having the lower cells reconnected without the main V+ connected yet. By then, all the cells were back down to room temperature, and I cautiously reassembled them in the case. This time I made the red connection first, then the black, completing the overall circuit.
I checked the temperature of the cells again and it didn’t seem to be rising, so I reconnected the orange, brown, and yellow wires. After waiting a few minutes and checking the temperature yet again, I put insulating tape back over several of the connections and called it good.
Testing and Results
The battery case press-fits together well enough that it doesn’t need much help to stay closed, but I put a couple of pieces of clear tape on opposite sides to keep it from surprising me. If the rebuilt battery works well and seems worth using, I’ll probably replace them with thin, metallic foil tape.
I shut down my PowerBook and took it to the kitchen sink, where a hypothetical fire would be the easiest to contain with the least damage to the house. I cautiously put the rebuilt battery into the computer, and nothing blew up or got warm. I connected the power cable and its LEDs went orange, indicating that it was charging the battery. The battery’s lowest light flickered, also indicating a charge. So far, so good.
I booted OS X and watched the battery monitor on the menu bar. By the time the computer was up, the indicator showed 6% charge, climbing very quickly to 8% as I watched. Switching to time-remaining mode indicated 0:18 to a full charge. Hm, that doesn’t seem nearly long enough.
Well, after a few weeks of disuse, NiMH batteries often need several charge cycles before regaining their full capacity; maybe Li-Ion batteries are similar. I’ll run a few charge cycles and see.
The Trouble with the Old Battery
Out of curiosity, I put the meter across each cell pair in the old battery and measured the voltage.
| Cell Pair> | Voltage |
|---|---|
| left | 2.09V |
| center | 3.17V |
| right | 3.20V |
| upper/lower | 3.10V |
It looks like just one cell pair — or maybe just one cell within that pair — was bad. Maybe the rest of the battery could reasonably have been salvaged — maybe I should still go back and replace just those two cells. If they were NiCd, I’d consider zapping them to burn out the fuzz crystals on the electrodes, but I don’t know enough about Li-Ion to know whether that’s safe (or useful) to do.
I’ll see how the rebuilt battery works before thinking too hard about this. Even if the cells I just installed aren’t the best, I’m guessing I could look around and get newer cells that’d be fresher and hold more of a charge than the better of the original cells, so it’s probably not worth trying to salvage the rest of the original battery.
How’s it working?
After cycling the battery charge a few times, I was able to get a typical runtime of about 90 minutes — not as good as when the battery was new, but far better than it had been. Additionally, it has a smooth and accurate remaining-time meter — none of this surprise-shutting-off-at-60% business.
The sad thing is that shortly after that repair, one of my cats pushed the PowerBook off a counter, and hitting the floor sheared off one of the screen hinges and associated wires. I don’t have another donor to transplant the screen again, so I haven’t decided what to do with it yet. I’ve been using an iBook that I got from a friend instead, which is a little faster but the screen’s not as nice.
what is the volt of the rebuilt battery
Erez, I haven’t measured it when fully charged, but it should be 4 * ~3.7V ≅ 14.8V, same as the original.
thanks for the replay
i have apowerbook g4 12 inch, i want to replace the battery.
i want to ask you if i need to put exactly the same type of battery (in my case panasonic cgr 18650) or i can put another model?
of course the volt is 3.9 and the size need to be the same and i-on battery
thanks
Erez, I wouldn’t nitpick terminology, except the difference is critical here: A battery is made up of one or more cells, so the entire enclosed object that I was rebuilding is a battery, and I rebuilt it by replacing cells.
If your question is, do you need to replace the cells with the exact same manufacturer and part number, the answer is no. For the best rebuild, they should be replaced with the same size and type, but they could come from a different manufacturer.
They absolutely must be the same chemistry, i.e. lithium ion. There are slightly different “flavors” of lithium ion that differ by .1V, and I don’t know how critical it is to get the same flavor. I assume it’s okay to have slightly more or less mAh capacity, because I know replacement batteries (the entire pack) are often advertised as having more capacity than the original.
What it comes down to is that there’s the potential for damaging your laptop or even starting a fire, and if you’re not confident enough about what you’re doing then it might be better not to do it. I don’t specifically want to be discouraging, but I’m not an expert at this, just a guy who’s not afraid to tinker, and I can’t be responsible for what happens under circumstances I don’t control.
i have the confident to do it,but i dont want to spent mony on nothing.
some guy want to sale me ibook g3 12 inch battery
i want to buy his battery (20$) and put the call in my battery
i think his battery is fit to my powerbook 12 inch but i afraid to do it because the serial num is diffrent
thenk you for everithing
i do it, im sorry thet i dont have apic
i buy ibook g3 battery and put it on apowerbook g4 12 inch
i open the ibook battery ,take the call with the pcb
and put it in the powerbook batery(only the plastic of cours)
thenks
6 hours )
)
Just stopping by from some Googling. So you’re aware, and so that others are as well, lithium-ion cells burn at temperatures up to 2000 degrees, and WATER DOES NOT PUT OUT LITHIUM FIRES. WATER AGGRAVATES LITHIUM FIRES.
Congratulations on the mod well done. Just next time, stay away from the kitchen sink. ;]
Aaronbeekay –
The kitchen sink (porcelain, in my case) was for containment, not water.
But you make a very good point to warn unfamiliar readers of the dangers of lithium fires. From my reading, only a class D fire extinguisher containing powdered copper will reliably put out a lithium fire, and I don’t think you can buy those at Wal-Mart. Other types of extinguishers will only spread or worsen a lithium fire, as you note.
If I read Erez’s last message (6/6/08) correctly, he took the insides (cells, pcb, etc.) from a iBook G3 battery and put them in the plastic case of a PowerBook G4 battery. So that would mean the only difference between a PBG4 battery and the iBook G3 battery is the plastic case. but what does the 6 hours mean? Did it take that long to make the switch or is that how long the battery lasts?
Erez, are you there??
Thanks,
Jerry
Jerry, I have Erez’s email address. If you don’t hear back in a few days via the comments, post me a reminder and I’ll send an email asking your questions.
hii im hare, sorry thet i did not replay quick
about the 6 hours, the battery was new from box
i do what i do with the battry. i charge it about 4 hours and then i unplug the ac and work with the computer about 5-6 hours
Thanks for the info. 5-6 hours is longer than I got when my PB was new!
I have a slightly-used iBook G3 battery, now I need to troll eBay for a cheap used PB battery!
Thanks!!
i buy my battery for 50 $ and it was new )
)
i hope you get one, you have pb or ibook?
if you have pb and ibook battery you can do what i did, but if you find acheap battery from ebay,just buy
good luck
I have a PowerBook and the battery is, so far, fine, but I’d like to make a spare if I can do it cheaply. I already have a G3 iBook battery from a dead iBook (the battery is fine) so I figured if you could take the insides from the iBook battery and put it in a dead PB battery case, I could too, if I can get a cheap used PB battery, that is.
Or I could hang on the the iBook battery and wait for my PB battery to die, then do the exchange.
i think you can get aded pb battery for free !! because the battery not working, nobody need to know what you do with the battery good idae
Hi to everyone
I have similar problem. I replaced PB G4 15″ battery cells. And the problem is that the battery capacity is the same as old one (446mAh instead 4400mAh). I try to reset PMU, reset-nvram in open firmware, try Leopard, Tiger. But problem is still there. I didn’t try reset-all in OF, I will try that later.
Is there any help for me or not?
Bule, you only have 446mAh, or your computer only displays 446mAh? If the latter, there are Apple articles about completely discharging and recharging (I don’t remember whether once or multiple times) the new battery to reset its internal capacity calculator. And it does need to completely discharge and recharge for this to work — find one of the articles for the details, and you may return to the performance you expect.
Well Keith my mac show only 446mAh. And battery last for only 20min. Just as old original. I try completely discharging and recharging couple times (10-15 times) and the problem is still same. What else should I do, except buying a new battery?
Could be problem in charger? Or is just a battery? I am new mac owner after many years using pc. And I realy like Mac. Is there anything I can do whit this battery?
Bule, I’m sorry, but you’ve encountered a situation that I haven’t and which is beyond my expertise.
I did read something recently about the charge controller in the battery detecting when lithium wires are forming inside the cells and permanently (?) disabling itself. You may want to look for information on doing an Open Firmware reset (three commands), but it sounds like you may already have done this.
I’m afraid I can’t help you any more than that.
Thank you very much Keith for all the trouble…
Can you just tell me witch 3 commands I should run in Open Firmware?
I run reset-all and reset-nvram. Is there something more?
Sorry on my bad English!!!
Bule, I don’t remember, but I bet if you Google for PowerBook lithium-ion Open Firmware reset-all reset-nvram, you’ll find something.
I accidentally shorted out the two outermost pins of my iBook G4′s battery. Now there is no voltage reading. The Mac will not charge it nor can it use its power. Can this be revived?
Gino, I don’t know whether it’s fixable. Since you were shorting across some of the cells, you’re probably lucky they didn’t ignite and explode. Since they’re lithium-ion, I doubt you simply drained the cells beyond recharging — I think they would have ignited before that happened.
So you probably broke part of the charging / charge-monitoring circuit, and I have no knowledge of fixing that.
Hi, Keith.
How did you open up the G4 battery to get at the cells? Do you have to saw along the seam, or is there a trick to just popping the case open?
I love your blog, by the way: you have hints on just about every project I’ve thought about undertaking, and a bunch I haven’t! Just for starters, I’ve decided that I can use this old TiBook G4 without repairing its hinges — not for the first project I had in mind, admittedly, but for a project I’m more likely to finish if I don’t have a 10-part hinge repair first.
Bob
Bob, good question! I don’t remember in detail, but I know I didn’t saw or chisel the seam. I think there were a few latching pieces and a little bit of glue and it mostly popped open with a little prying, not much abuse, and no significant amount of destroyed plastic.
And thanks for the kind words! I picked up a real “just try it” attitude from my parents; one of my dad’s classic expressions is “I figure I’m at least as smart as the guy who put this together.”
Google has done a great job at making it possible to find tips on doing all manner of things. Now it’s the responsibility of the rest of us to write up our experiences clearly and pass them on to the next person.
Good luck with the rebuild!
In the absence of high amp activity I figured the smart circuit just shut off power. So I decided to run down the battery so that the circuit will reset. With zero power, led off, I put back the battery and viola, the iBook began charging it. It also fixed the constant single led problem I had. For a while one led was constantly lit. Even with the battery removed it stayed lit. So that indicator was non-functional. Well, the reset fixed that too.
Nice screed, and well done. But it’s nuts to put all the effort into rebuilding a pack, and use used cells of unknown history.
There are a lot of oddball cell sizes used in industrial applications, which you rarely see, such as the A cells, which are a little bigger than the AAs, and come in various lengths like the 4/3A I use a lot. You can get these from inet battery vendors like batteryspace.com brand new, for reasonable prices, Be sure to have them weld on the solder tabs, it just costs a few cents more, since it is very difficult to do this yourself, and often ruins the cell.
Kyle, “nuts” is completely relative to one’s interests.
The batteries I salvaged were unused in original packaging but probably not brand new, which I realize I didn’t make completely clear in the original text. So I spent < $10, had an enjoyable and educational experience, and got dramatically improved battery life for an old computer. Wouldn’t work for everyone, but it was a pretty good win for me.
Great blog. A buddy of mine just recently shut down his battery company and gave me some of his batteries. I received one for a 15″ powerbook G4. Its a Li-Ion 10.8 volts. When I hit the battery indicator button on the battery, the leds do not light up. What terminals would I use to check the voltage of the battery to make sure this is good so I can put it up on craigslist.. Thanks
Brian, if the LEDs don’t light, the battery is either discharged or dead. Either way, you won’t know until you charge it and check the runtime; and I don’t know any way to do that without the computer it was meant to go in. Maybe you can ask around a few friends to see whether one can try charging it for you?
Li-ion batteries have a finite shelf life, no matter how much they get used – its not the mileage, its the years.
The battery cells in the Powerbook G4 pack are standard Li-ion 18650 cylindricals. You can get them new from places like batteryspace.com. Order them with tabs pre-soldered and avoid the potential fireworks. You will get like-new battery life for a total cost of around $66. That said, freshbattery.com sells a compatible battery pack for $90, so depending on how you value your labor …
Steve, as noted more than once above, I got 90-minute runtime for $5 plus a little fun with a soldering iron. For me, that was a way better deal than $66 or $90.
Of course I don’t claim that would be true for everyone; but all the other everyones already know how to find other sources for cells and batteries.
Hi,
Me again…
Long time no hear. But I am still here with the same problem. My Powerbook G4 is still reading 460mAh. I still didn’t make it to reset cycle timer of battery. Is this posible or there is no salvation for my money… What if I dry battery? Or … I don’t know what else to do.
I am sad…
Give it up. I just bought a cheap China made battery from Hong Kong off eBay. Just ask them to give you a fresh one. Tell them the previous one you bought went bad. My replacement battery is working well. Started with 4140mah. Down to 4131mah in 4 months. Not bad.
I had always wanted to crack open the battery of TI. After looking over this article I went and tackled it. First thing is that the A1012 model (for the 867/1G) DVI models is a bit more intense in getting open. Using some sharp model knives I managed to slit the outside rim. You can hear a nice masking tape like tear sound as you make you way around the outside of the case and break the glue.
I managed to pretty much destroy the plastic getting down deep enough to break all the glue. Also, there are little clips all around the battery to keep the case together, however those clips are actually inside another rim going around the battery. The clips are designed to close once and there doesn’t appear to ever be a way to put pressure on them to release them because in order to get to them you have to put pressure on the outside case to get to them. It is hard to explain without pictures.
Think of the batter as a shoe box. So, the take your batter out and flip it label side down so you see the LEDs. That is your lid and the other portion, the label side is the box bottom. Now, imagine that inside the lid there is another rim that runs around the entire lid, this sits on the inside of the box bottom and that has the latches. Think of the letter U and inserting an I into it.
I have two of these batteries to play with so I wasn’t so much concerned about destroying one to understand how it worked. My cells are a nice LG Chem peach. I wish there was a trick to opening this cleanly, but after breaking the glue joint you would need a way to grasp both ends and pull apart hard to release the tabs. I plan on cleaning this case up, sanding down all the plastic shards and then using a nice thin grey tape to seal it up. It would like just fine inside the TI as the bottom doesn’t have a mark on it.
I am curious of the cheap china ebay ones are easier to open or even if the earlier TI bats used a lot less glue.
Thank you for pointing out a working order to wire this thing back up. I had never read about order of the wires being important on any other thread.
oh, and this batter had the white spacers like the compaq battery does. They are long and white, same length as the cells themselves and are both sides. I think it even has a little latch to lock to posts in the LED side plastics.
Battery specs on the cells in the A1012:
http://www.monstercells.com/pdf/li-ion/2200-18650.pdf
http://www.lgchem.com/upload/chemProdFile/20061017/icr18650s2.pdf
Safety: http://www.hp.com/hpinfo/globalcitizenship/environment/pdf/msds_lg_liion.pdf
Nice page and article!
I just rebuilt a PowerBook G4 15″ 1.5Ghz battery, and it’s still not working for me, however I noticed something strange: one of the 3 cell pairs (top-left if you’re looking down at it and the connecting point is on the north side) has a REVERSED voltage (-2.5V). However the original cell pair in that location did not indicate a negative voltage I double checked my wiring, compared to photos of the cells that I had taken prior to desoldering, and I can’t figure it out!
Any hints anyone?
Dude, measure the voltage across individual cells and make sure they’re in the direction you expect. I’m quite certain that my battery was a series chain of four parallel pairs, and I assume yours should be too. I’ve heard of NiCd cells reversing the direction of their charge after being abused, but I don’t think Li-Ion cells can do that.
Also, don’t plug it into the charger yet if there’s any chance of it being miswired. Everything I’ve read gives me the impression it could explode pretty dramatically.
Thanks for the response Keith. You are correct, the cell pairs are in series. I guess the cell pair that had a negative charge was bad because I replaced it with another and it seemed to be fine. Now I even get the 1st blinking LED to work as it ought to, except my PB insists on not charging the battery and unfortunately no matter what I try I cannot figure out where the issue is. I’ve tried everything (and if I may say so myself, I’m an expert on most electronics things/Macs, etc.): reset-nvram business, PRAM 3x, PMU reset, checking the internal PRAM module for failure (it works fine, charges fine, keeps date fine, etc.).
The only thing I don’t know how to do is to test either the computer logic board if it’s got a problem with charging any batteries (I’m trying to find a 2nd battery to test with, but haven’t got one so far) or if the actual battery management board inside the battery has the issue with charging. Does anyone know how to reset the battery management board? I’ve been thinking to short some of the chips on there (while the cells are disconnected), but I don’t know which. There are a whole bunch of TPs (test points) but again no manual to know what they really do…
As for exploding and burning up, yeah, I’m pretty aware of the possibilities and I’ve seen the flaming videos and I try to be as careful as possible as should everyone messing with Lithium batteries. Always checking cell temperatures and keeping a wire cutter near by.
Hi there,
at first: thank you very much for this blog!!!
I hope we can figure out here some probs related to battery-cell-change…
I just change the cells of a battery from a PowerBook G4 12″ (1.5GHz).
It works so far: The new cells lasts approx. 2 hours.
But: coconutBattery said for the battery with the old cells:
- 135 Loadcycles,
- Curent Battery Capacity: 409 mAh (9%)
After replacement of the cells, coconutBattery says the same…
I detected on the controller-board inside the battery the load-controller. It is a PS401. It holds inside a EEPROM, what stores all the values: Count of the loadcycles, current capacity etc…
My idea was to reset this values.
I found via google some interesting hints to reset this variables with applications for windows.
The controller-chip (PS401) can be programmed via serial port over the leads of the battery-pack!
The protocols are standard for nearly all battery-packs with this controller.
Now: Does someone of you know the pin/lead-design of PowerBook-Batteries? There are 6 leads. The outer ones are the power-leads (11,04 V). 3 of the least 4 ones should be the serial connectors to the microcontroller…
Btw: I’ve tested to reset this microcontroller by resetting the NVRAM (also: “reset-all”-command in O-F), I resetted the PRAM etc.
The result is the same. coconutBattery reports even after 10 completed loadcycles (100% down to 0% and going to sleep) 9% Capacity and 409 mAh…
BUT NOW the big joke: While I wrote this a first time, the battery went to 0% and the PowerBook shut down completely…
After boot up and beginning to write this a second time, I open coconutBattery and? It shows at first time since changing the cells diffent values!!! Now it shows: 20% Capacity (921 mAh)…
I think perhaps a reset of the internal battery controller isn’t inevitably necessary. Perhaps the controller inside the battery is learning the new values?
Some more: Before and after the cell exchange I had (and have) a look to the charging-curve. The old cells were loading from 0% to 100%, then the controller went to “green” (full) state.
The new cells curve goes from 0% to 100% but the state changes to “green” just after a further half hour! Same behavior at discharging: From 100% to 0%, but in this state (0% for about 50 minutes!!!).
Now, after coconutBattery reports new values, I´m very curious, how the curves behave now…
@Dude:
Please DON’T short one of the circuits!!! Please read my text above!!!
If you shorten some of the circuits on the microcontroller-board you’ll destroy this chips in the best case! In the worst case you fire the complete cells and your house… Li-Ion-Cells are no toys.
But the more intelligent way could be to figure out the programming of the microcontroller-board inside the battery…
Please google with terms like “PS401″ “PowerTools” or “PS401″ “reset”…
The direct way to one of these configuration-/programming-tools you can find on the pages of the manufacturer of the chip:
http://www.microchip.com/wwwproducts/Devices.aspx?dDocName=en022398
Best Regards and good luck
Georg
Georg, after changing my battery cells, I went through several charge/discharge cycles before the rebuilt battery seemed to behave at full capacity; and then I fully charged it and ran a single deep discharge (booted in target mode so it couldn’t hibernate and let it run until it shut off) to retrain the battery charge-monitoring circuitry’s limit values. That seemed to work for me.
Dear Keith,
thank you for your quick answer.
Yes, I read about the “target-mode”-trick and it was one of the first I tried. But it changed nothing to the values…
Until today in the early morning (when I wrote my comments. Yes in deed, in Germany is it “early morning”, when you have 7:20 pm …
…
To that point all the values are stable from the old cells…
I’ll try the charge/recharge-cycle to see, if there will be a update of the EEPROM-records…
I’ll post my results…
Best Regards
Georg
Hi Keith,
A quick question – how does one open the battery case?
Peter
Peter, it’s been a while, but my recollection is that mine was very lightly glued together along the seam and I was able to pry it apart with very little marring and risk of chipping. I have no idea whether different vintages/batches of batteries would be equally easy to open, but it’s worth a shot.
Many thanks Keith – I’ll give it a shot with some prying tools.
Cheers from Tromsø,
Peter
Hey all, I have two, never used and in the box Lithium Ion Powerbook 3400 series batteries. Is it possible they are good to use after all these years? Should I attempt to sell them?