I do all of my mobile computing — and my blogging slouched on the couch in my family room — using a hand-me-down 500MHz PowerBook G4. It was given to me used, battered, and obsolete two and half years ago, and after upgrading the RAM to 1G, installing OS X Tiger from a family license, and installing an AirPort card, it has served me well.
It’s starting to feel a little slow when loading bloated web pages, but my main complaint at this point is its battery life. I was given two batteries with it, one of which never held a charge at all. The second battery’s usable lifespan has slowly decreased from about three hours to around one, even when I turn off power to the AirPort card.
Worse, the battery meter still shows upwards of 60% charge remaining when it suddenly powers off with no warning. I’ve run Apple’s battery recalibration procedure several times, but it doesn’t make any difference.
Replacement batteries seem to run upwards of $80, and it’s impossible to tell from the online sales pages whether they’re original stock every bit as old as my own failing battery. I’m not afraid to dig into things and I’ve rebuilt my original Roomba’s battery before, so I decided to tackle this one myself. And since I had a spare battery that was already worthless, I could rebuild the spare without risking damage to my main battery that still mostly worked.
But it turned out I couldn’t find replacement cells at my usual surplus sites — they’re a little larger than AA, which was all I could find. eBay to the rescue. One of my favorite sellers is a surplus recycling center in Topeka. I get up to Lawrence enough that I buy a trickle of stuff from them, then pick it up when I’m in the neighborhood anyway, and save a bunch of money not having to have things shipped.
I started watching their auctions for notebook batteries. Not PowerBook batteries — but other batteries at low enough prices that I could cannibalize them for cells. Within a matter of days, I had purchased a Compaq and a Dell battery for $5 each. I’m well aware that they’re not likely to be brand new, but for only $5, it’s still worth trying them for a rebuild.
Today I got around to doing it.
Inside the Batteries
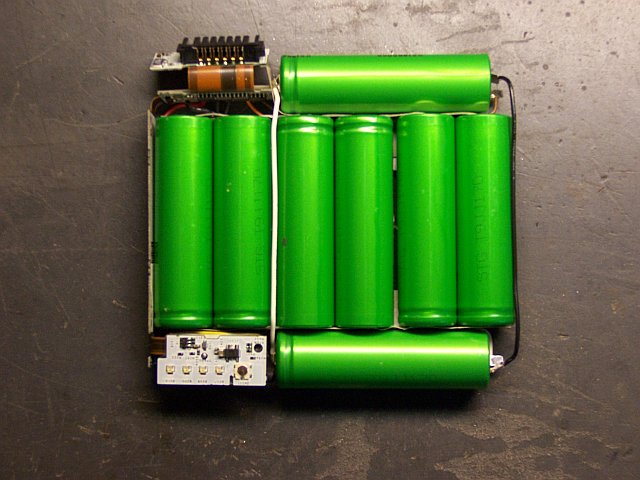
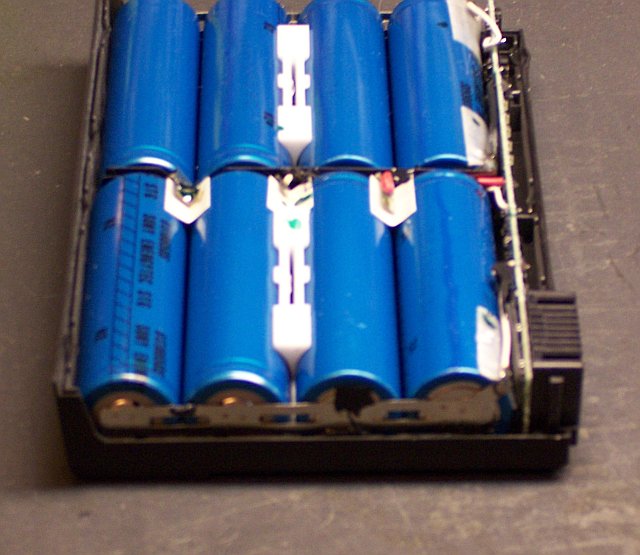
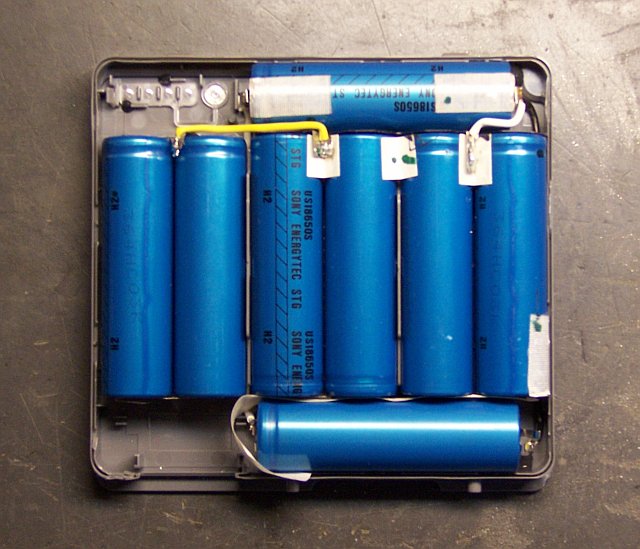
Here’s my original battery with the two donors:
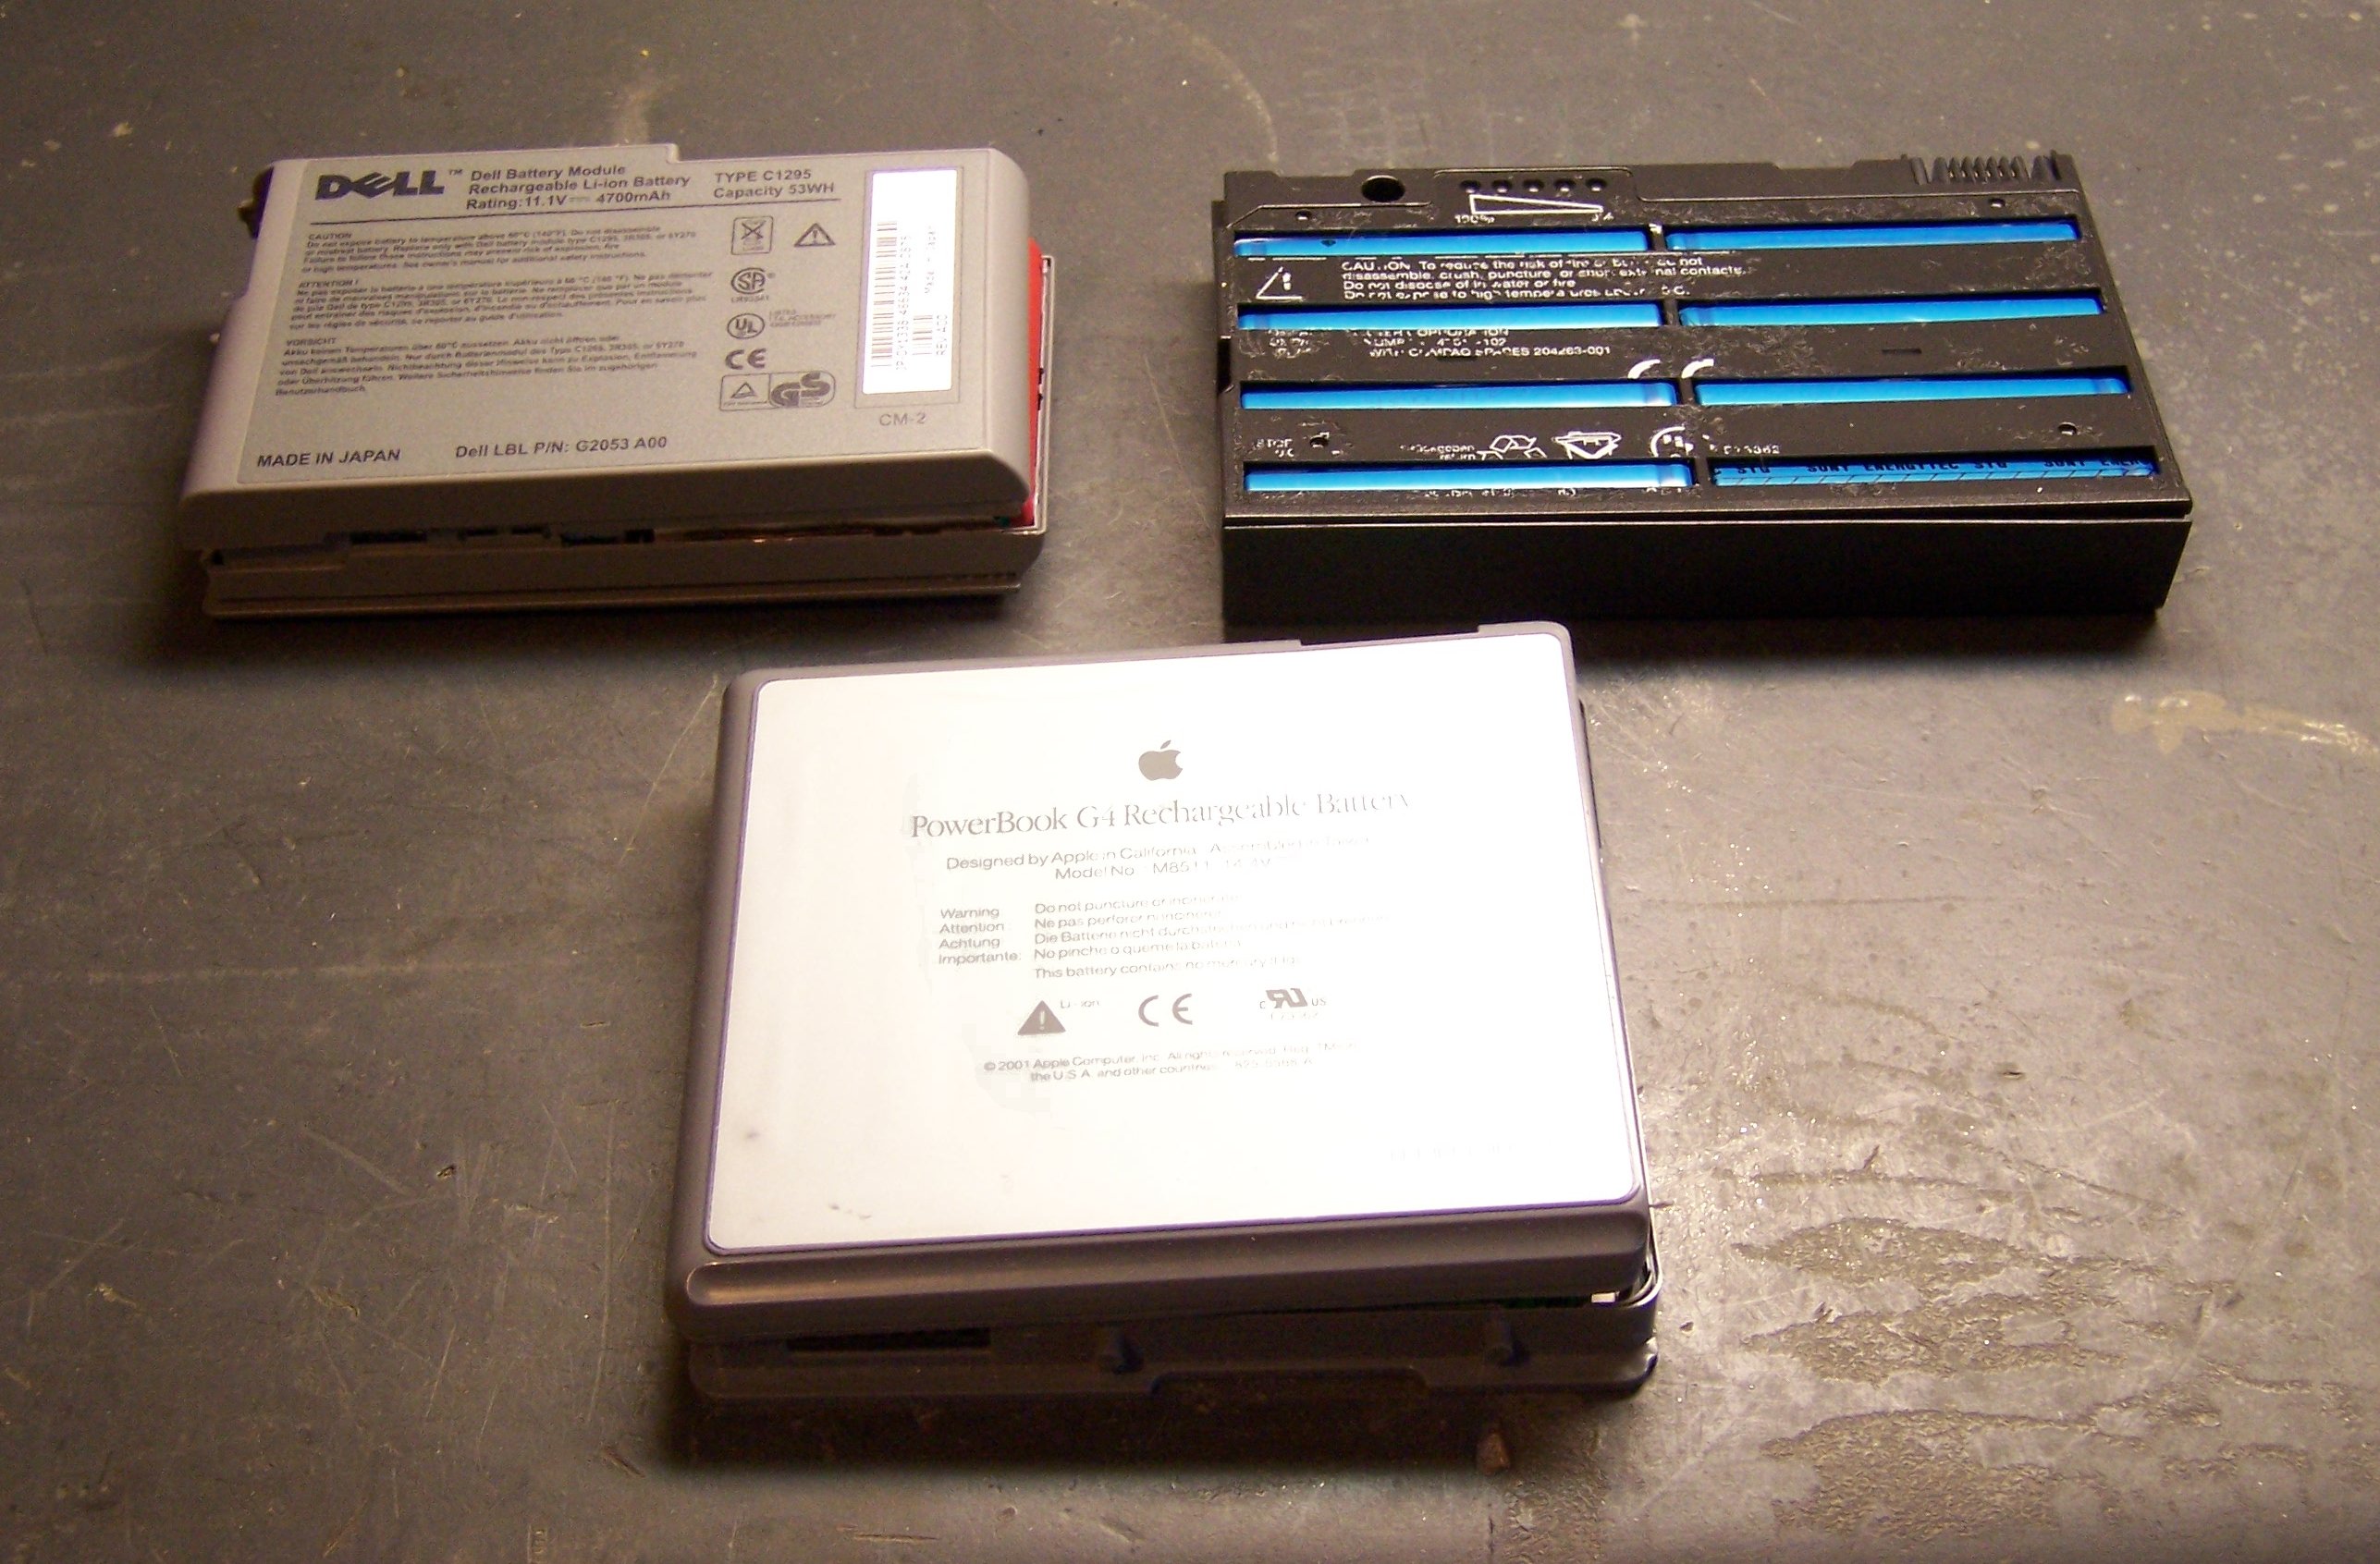
And the same batteries with the cases removed:
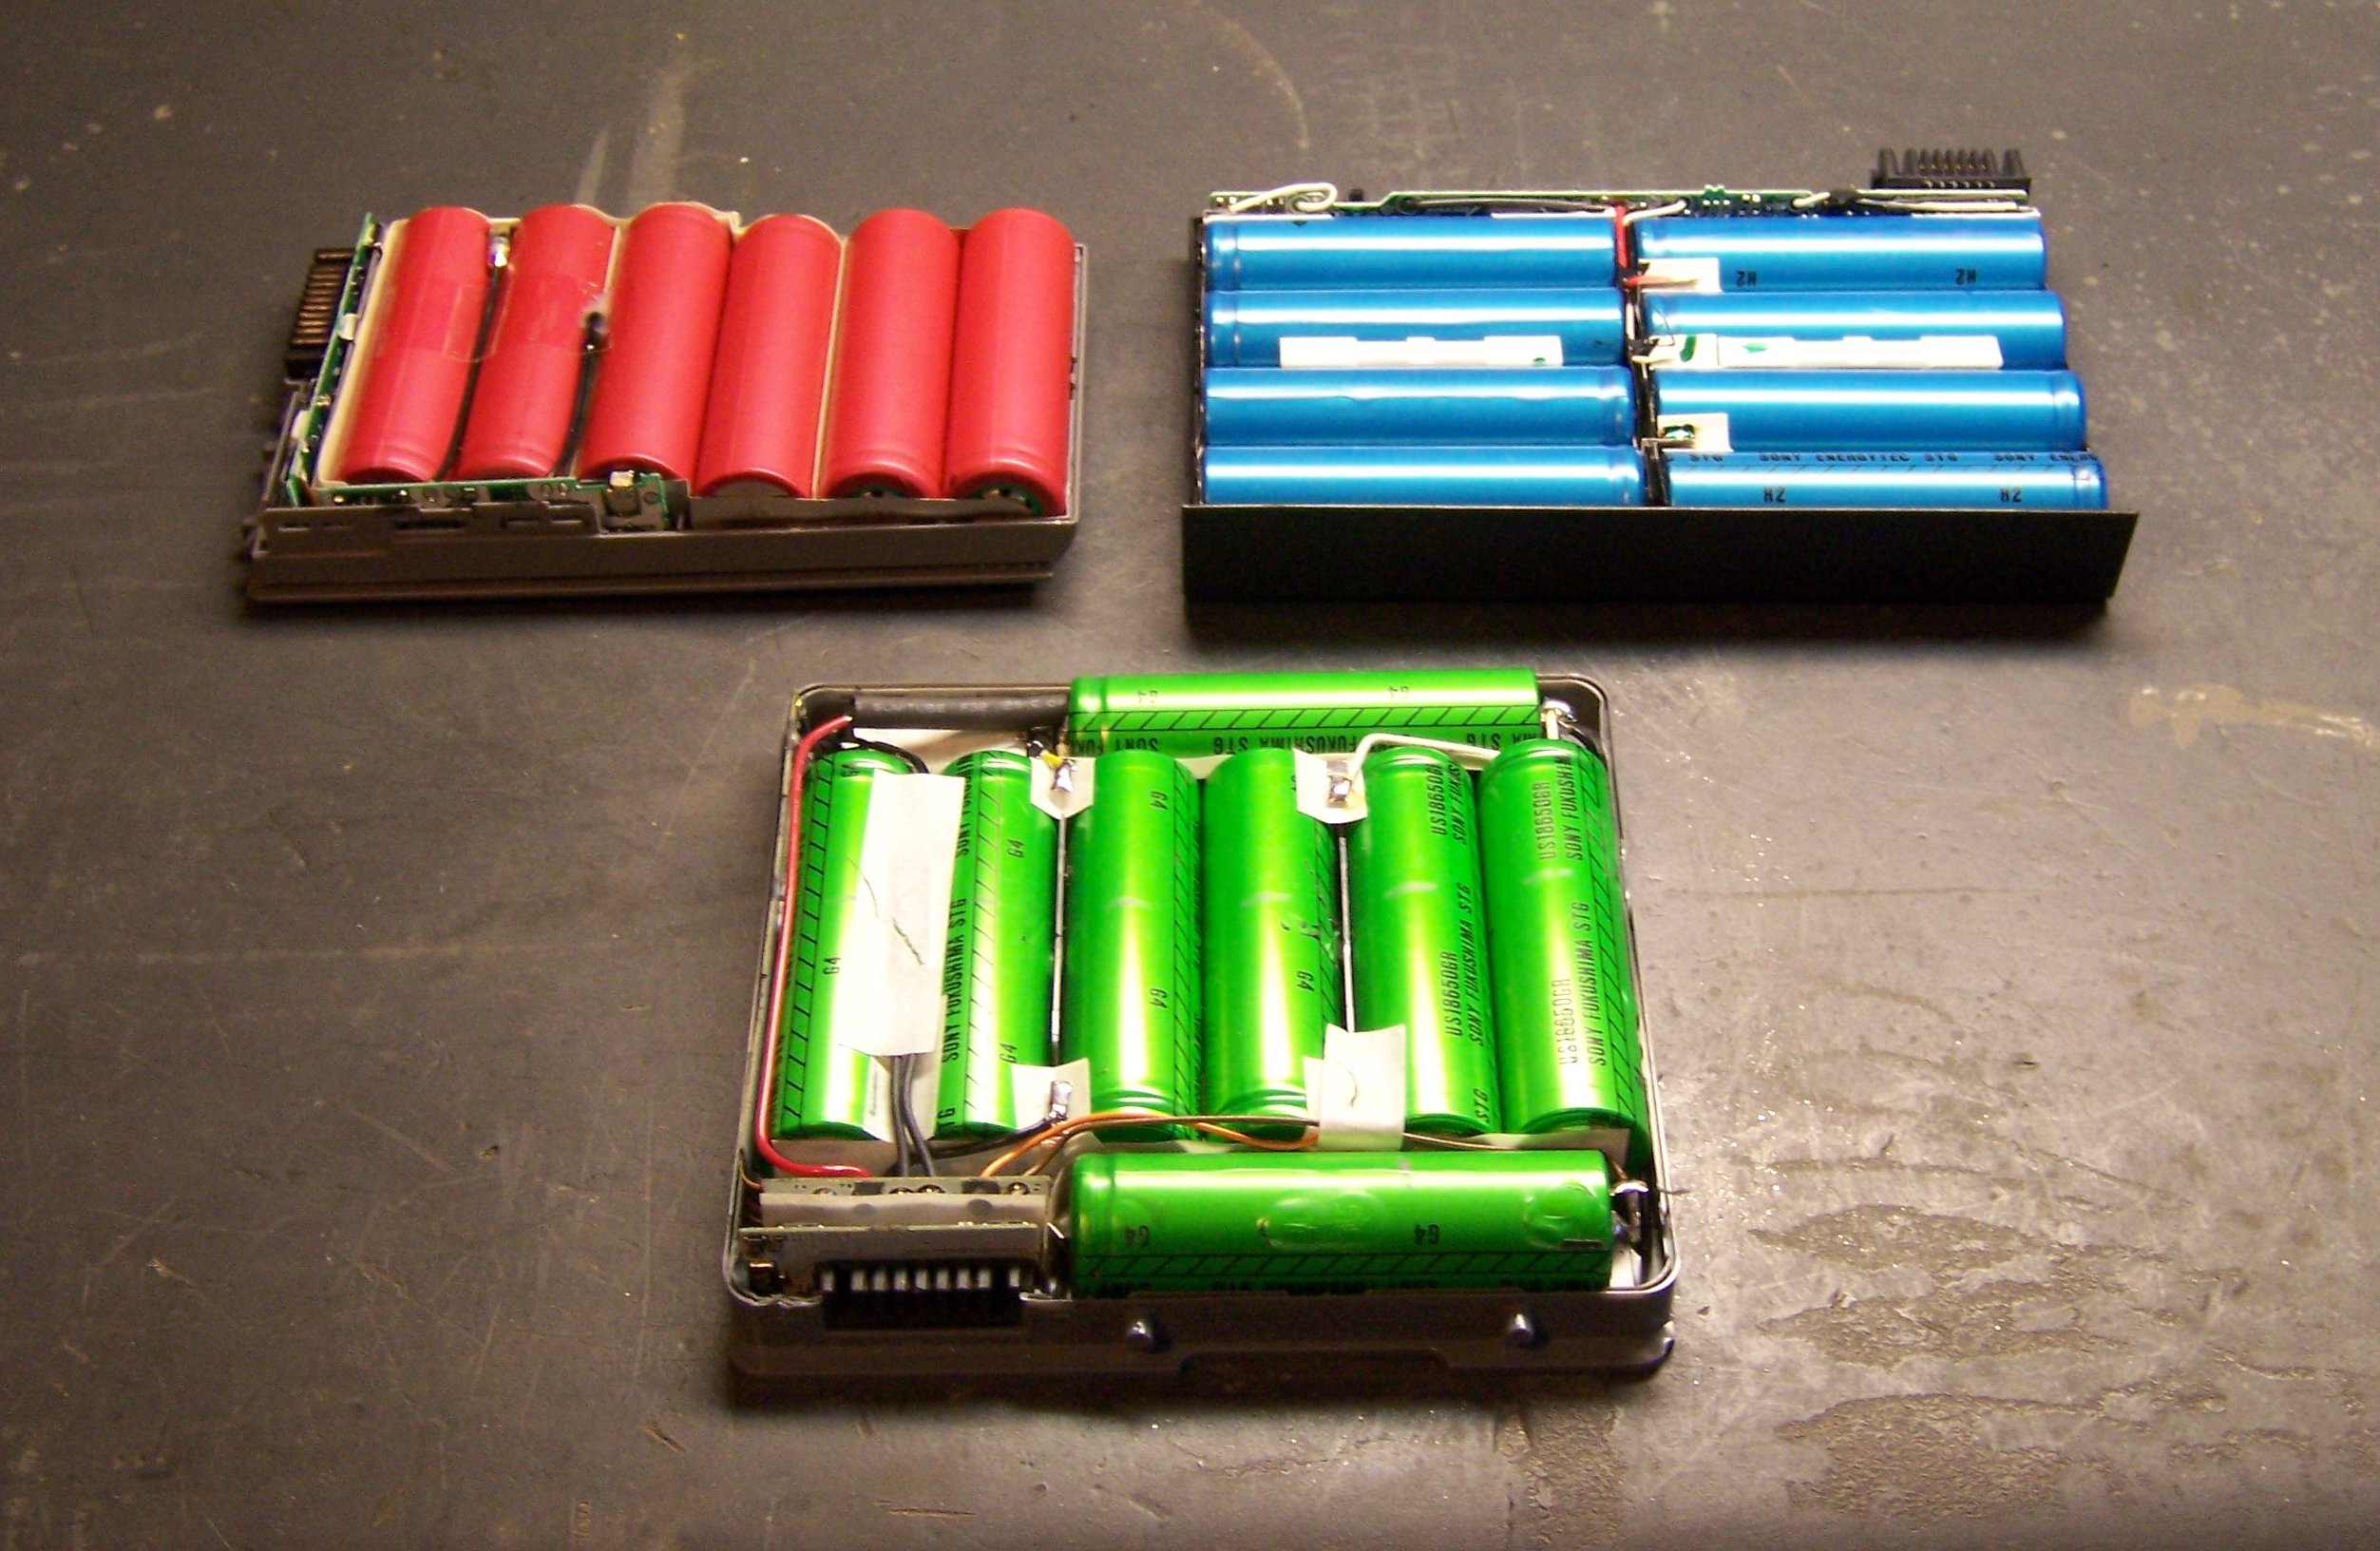
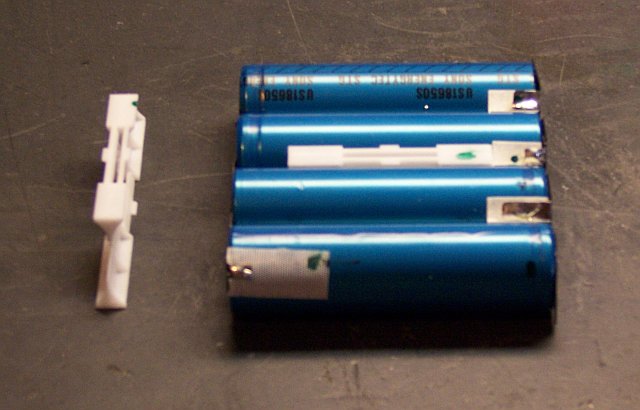
You can see that the Dell battery has only six cells, which aren’t enough to rebuild the PowerBook. They’re still available as donors; but as the Compaq has eight cells, the Dell’s won’t be needed.
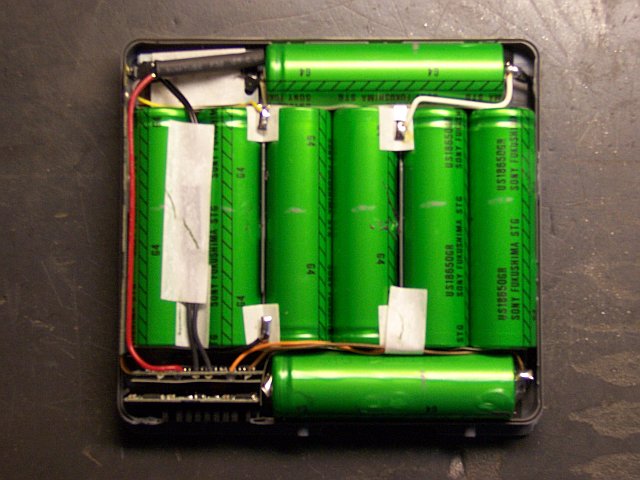
The first step was making a careful diagram of the inside of the original battery, noting cell polarity and wiring connections. Here’s the top view:
And the resulting diagram:
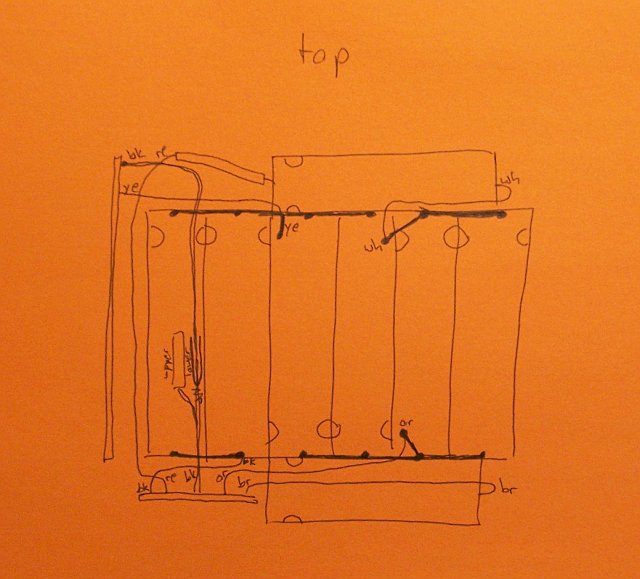
The heavy black lines along the tops and bottoms of the cells are foil strips spot-welded to the cells, joining them together two-by-two in parallel, and the pairs into a series string. When I took apart the donor batteries, I looked for sets of cells welded together the same way, to minimize unnecessary soldering during reassembly.
The bottom side had only two wires:
So its diagram was trivial:

Happily, the cells in the Compaq donor were spot-welded together in parallel pairs like the PowerBook cells, making reuse easy.
This set of four can replace either the left and middle or middle and right cells.
Where a pair of batteries was spot-welded in parallel, both ends were connected rigidly and the two cells formed a solid assembly. But where only one end was connected in series to the next pair, the strip at that end acted as a hinge and the two pairs tended to flop out of alignment. The Compaq battery had clever clips sandwiched between parallel pairs to maintain alignment. At first I thought I’d be able to reuse the clips, but my PowerBook battery case had ridges sticking up between pairs, so I had to remove the clips.
Reassembly
After comparing the various spot-welded tabs on the new cells to those on the old, I decided which cells to put where and test-fitted everything into the case.
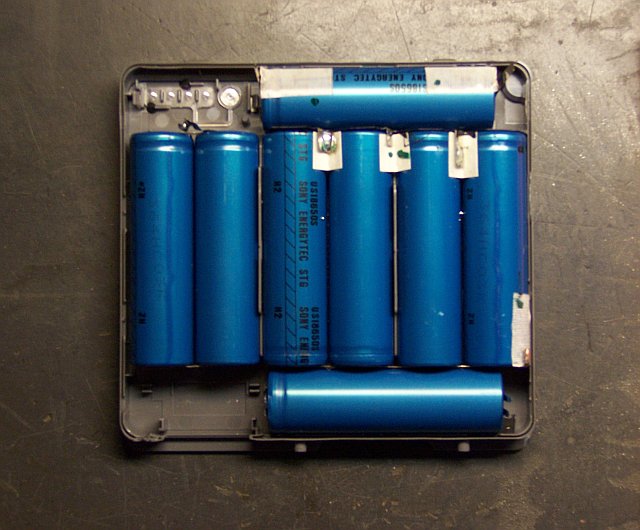
Looks good! Now I needed to rewire.
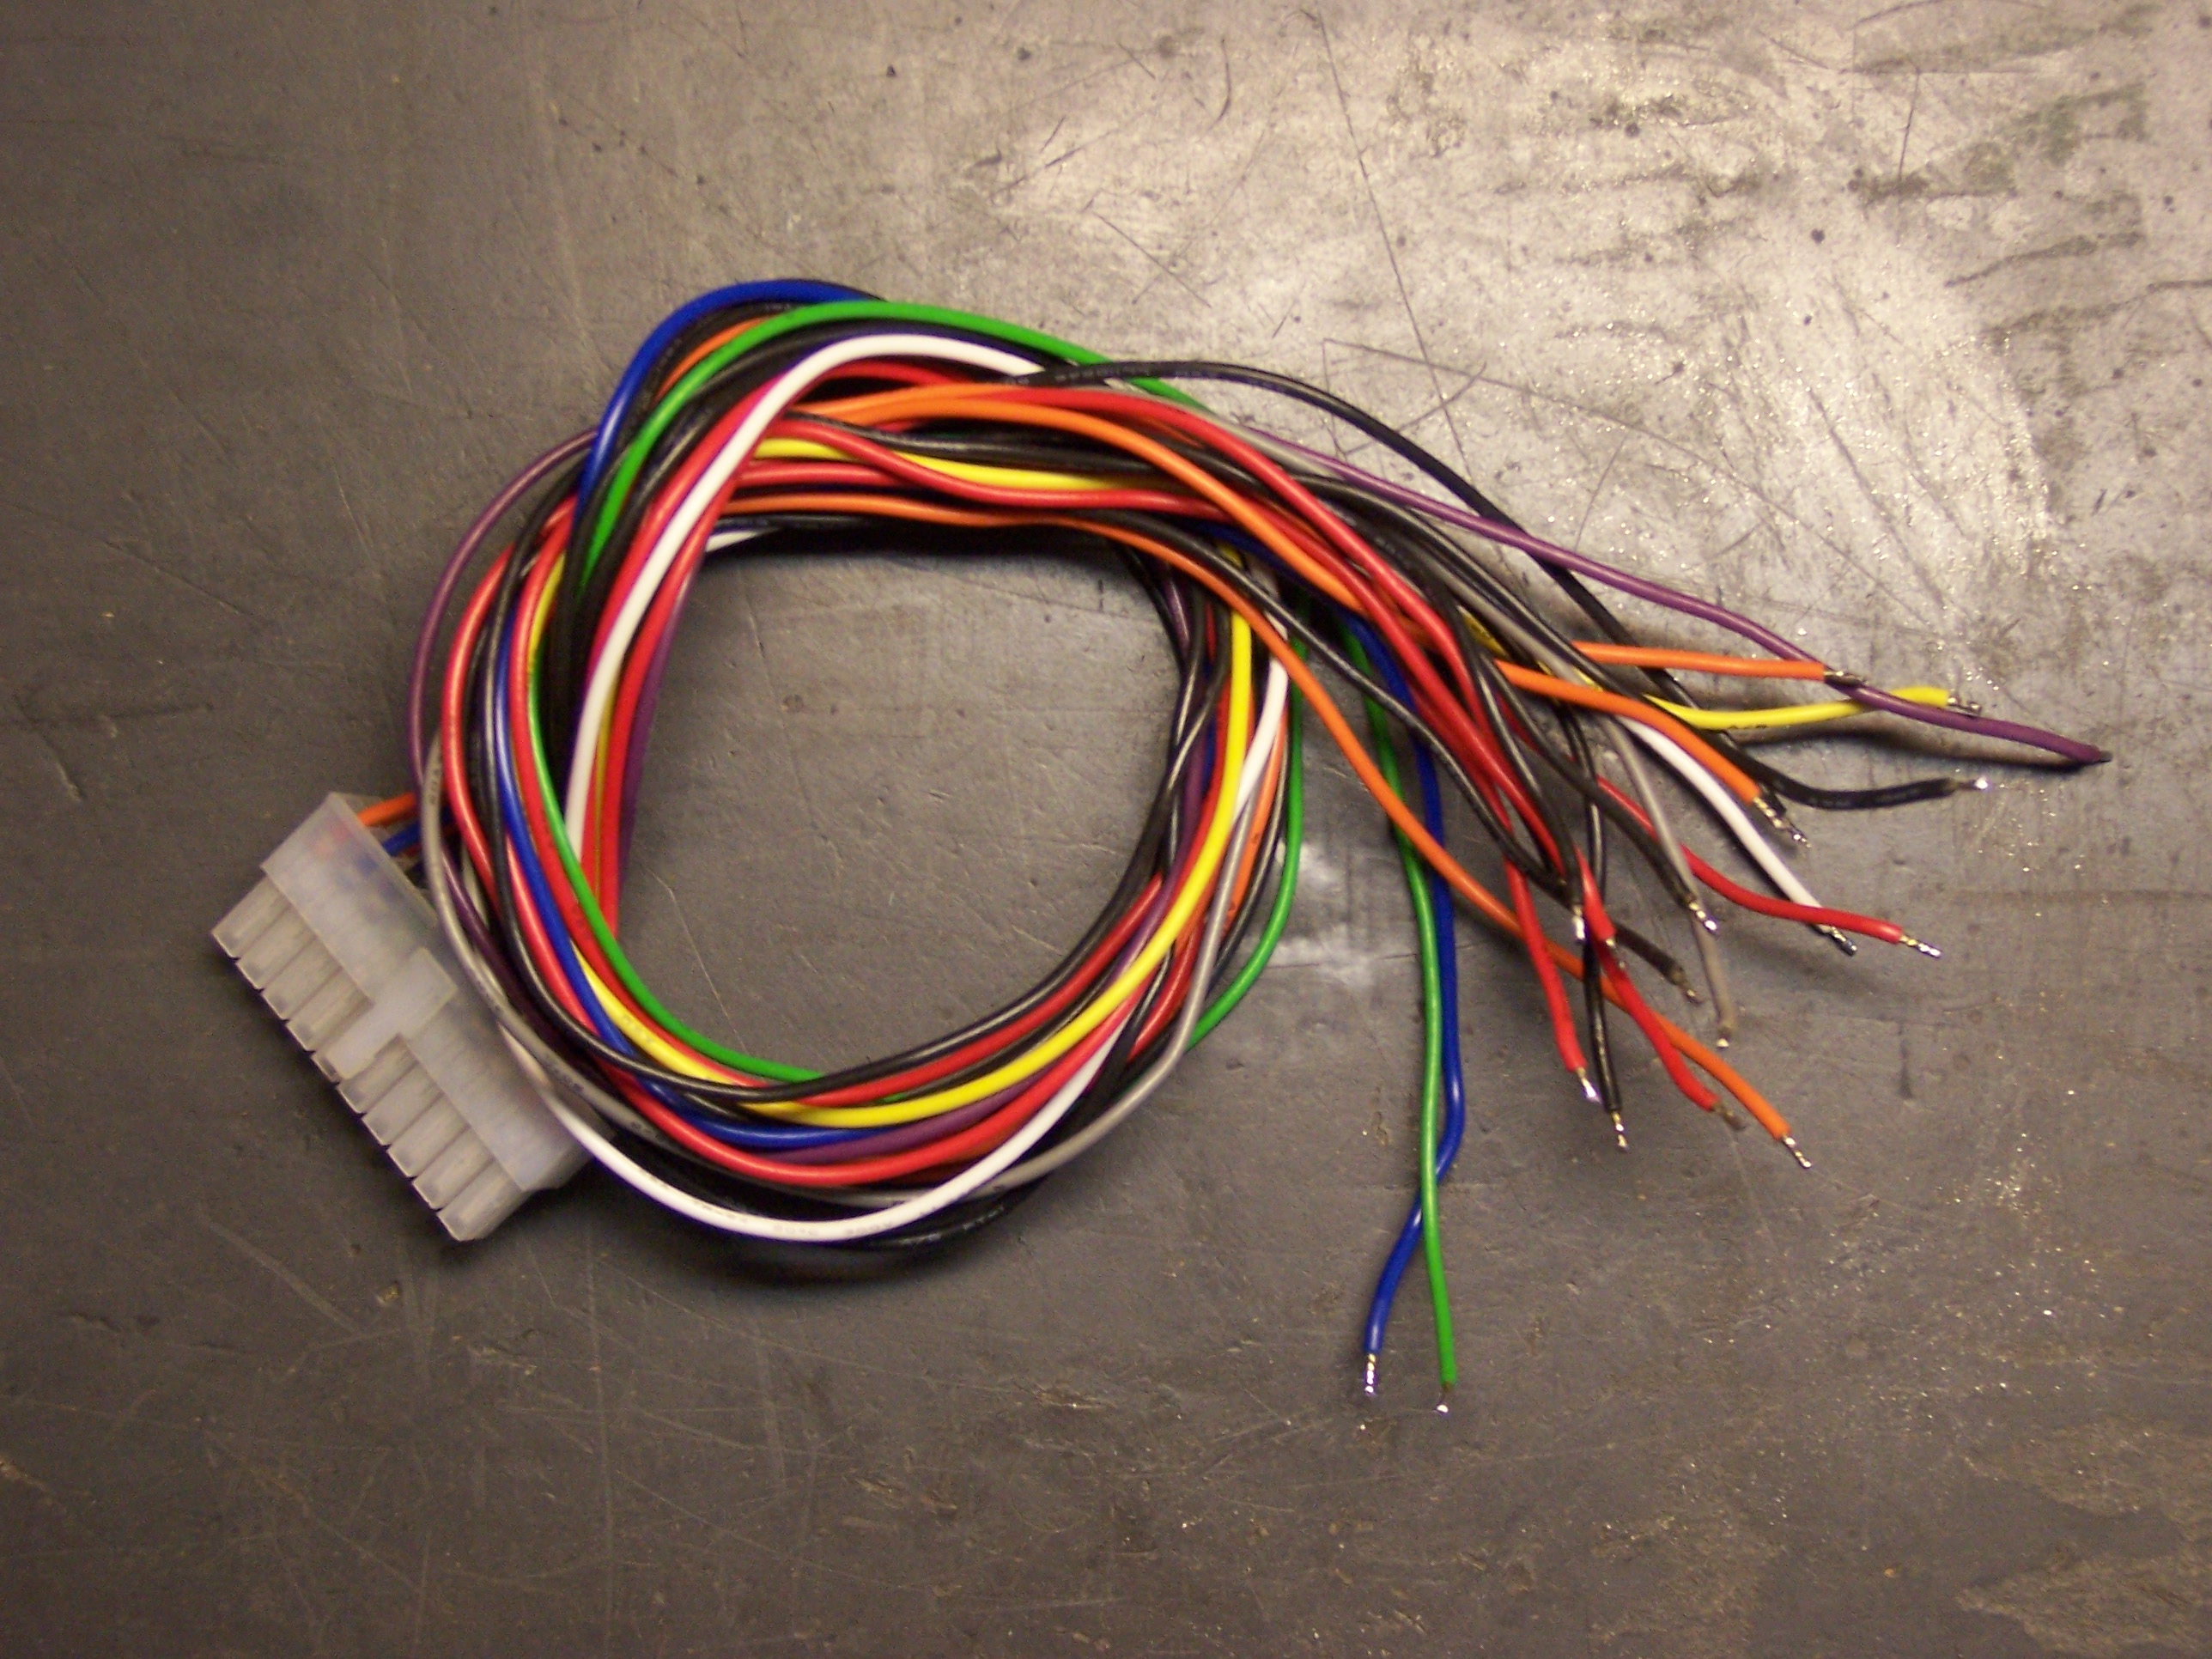
The original battery had fine wires from the battery-control PC boards to the different cells, but also a few heavier-gauge wires directly from cell to cell. Rather than desolder those wires from the original and move them to the new battery, I looked around for similar-gauge wire. The motherboard wiring harness from a dead PC power supply looked perfect — and it’s even a little heavier gauge (20 instead of 22).
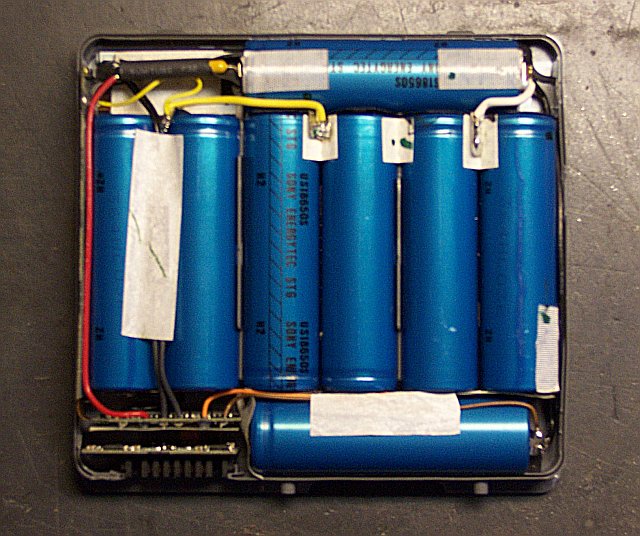
First I fitted and soldered the black and white wires on the underside that connect the upper and lower single cells into a parallel pair. I also made the series connection from their right terminal to the upper terminal of the right pair.
Next, I needed to connect the left pair in series with the center pair. The original battery had their upper terminals all spot-welded to the same strip, but the donor battery had a different cell configuration, so I needed to make that connection with wire. I chose yellow to match the yellow PCB fly wire that connects to the same junction. Now the inter-cell wiring was complete.
Reconnecting the PCBs
I pushed the PC boards approximately back into place and started reconnecting their wires. Leaving for last the upper left connection with heatshrink covering some inline mystery component, I started on the bottom set of wires. I hooked up the small black wire from the lower left PCB to the lower left battery terminal, then the orange wire to the center of the lower side of the center cells.
As I soldered the brown wire to the right end of the lower cells, I smelled something funny — and it didn’t smell just like melted insulation. I quickly desoldered it and sniffed around. Convincing myself that it was just the insulation, I resoldered it.

Then I noticed that the right two cells in the main row were warm — quite warm — and it had been a long time since I had soldered them. I desoldered every connection as fast as I could and sat back to think about what was happening. At that point, my infrared thermometer said that the rightmost cell was 100°F.
Connection Sequence Matters
There were only two good explanations: Either I had made an error in my rewiring, or it mattered in what order the cells were reconnected. After re-rechecking my connections, I redrew my diagram of the original battery to consider exactly how the cells were wired.
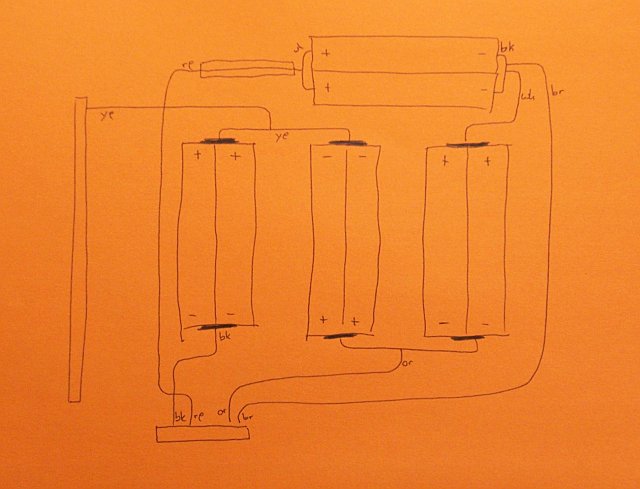
After seeing the diagram drawn out like this, it made sense to think that the order of attaching connections could matter. The black wire hidden in the lower left is the ground, and the red wire going to the connection I’d been saving for last is the positive output. The orange, brown, and yellow wires tap into the series chain between cell pairs, presumably to measure the health of each pair.
So . . . maybe the monitoring circuit didn’t like having the lower cells reconnected without the main V+ connected yet. By then, all the cells were back down to room temperature, and I cautiously reassembled them in the case. This time I made the red connection first, then the black, completing the overall circuit.
I checked the temperature of the cells again and it didn’t seem to be rising, so I reconnected the orange, brown, and yellow wires. After waiting a few minutes and checking the temperature yet again, I put insulating tape back over several of the connections and called it good.
Testing and Results
The battery case press-fits together well enough that it doesn’t need much help to stay closed, but I put a couple of pieces of clear tape on opposite sides to keep it from surprising me. If the rebuilt battery works well and seems worth using, I’ll probably replace them with thin, metallic foil tape.
I shut down my PowerBook and took it to the kitchen sink, where a hypothetical fire would be the easiest to contain with the least damage to the house. I cautiously put the rebuilt battery into the computer, and nothing blew up or got warm. I connected the power cable and its LEDs went orange, indicating that it was charging the battery. The battery’s lowest light flickered, also indicating a charge. So far, so good.
I booted OS X and watched the battery monitor on the menu bar. By the time the computer was up, the indicator showed 6% charge, climbing very quickly to 8% as I watched. Switching to time-remaining mode indicated 0:18 to a full charge. Hm, that doesn’t seem nearly long enough.
Well, after a few weeks of disuse, NiMH batteries often need several charge cycles before regaining their full capacity; maybe Li-Ion batteries are similar. I’ll run a few charge cycles and see.
The Trouble with the Old Battery
Out of curiosity, I put the meter across each cell pair in the old battery and measured the voltage.
| Cell Pair> | Voltage |
|---|---|
| left | 2.09V |
| center | 3.17V |
| right | 3.20V |
| upper/lower | 3.10V |
It looks like just one cell pair — or maybe just one cell within that pair — was bad. Maybe the rest of the battery could reasonably have been salvaged — maybe I should still go back and replace just those two cells. If they were NiCd, I’d consider zapping them to burn out the fuzz crystals on the electrodes, but I don’t know enough about Li-Ion to know whether that’s safe (or useful) to do.
I’ll see how the rebuilt battery works before thinking too hard about this. Even if the cells I just installed aren’t the best, I’m guessing I could look around and get newer cells that’d be fresher and hold more of a charge than the better of the original cells, so it’s probably not worth trying to salvage the rest of the original battery.
Kevin, I would expect the old batteries are not good — I don’t think Li-Ion has that great a shelf life. I take it you don’t have a PowerBook to try them in?
Keith, you are correct, I do not have a PowerBook to try the batteries in. Anyone else have any thoughts on whether or not two never used and in the box Lithium Ion Powerbook 3400 series batteries would be good enough to use after all these years?
A Google search finds this: Lithium-ion batteries age. They only last two to three years, even if they are sitting on a shelf unused. So do not “avoid using” the battery with the thought that the battery pack will last five years.
From the “How Stuff Works” website.
On the other hand, the battery in my Powerbook G4 are still going pretty strong. About 6 years now.
Another website does not speak well for their shelf life, either.
Recycle them, I say.
i did same thingh. replaced all 18650 cells(i book g4 14 inch). but the battery is not workin. the individual cells are showing charge in multimeter but is not giving any out put in multimeter. when i connect the adapter the adapter ligt changes from green to red
and on screen the battery icon show 0% and after some time the icon show a multiply sign on the battery icon. tell me why this thing
HELLO KEITH DO U HAVE A REPLY OF MY QUESTION. I DID THE SAME AS WRITTEN IN TUTORIALS. THE BATTERY IS NOT GIVING ANY OUTPUT. THOUGH THE INDIVIDUAL CELLS R CHARGED. I DID THE SAME THIN WITH THE OLD BATTERIES IN ORDER TO CONFIRM THE WIRE SETTINGS, THEY MIGHT HAVE BEEN SHOULDRED WRONG,BUT THE OLD BATTERIES ARE GIVING OUT PUT FOR FEW MINUTES. BUT THE IBOOK G4 14 INCH BATTERY WITH NEW CELLS IS NOT GIVIN OUT PUT. NEITHER THE LIGHTS ON THE BATTERY ARE WORKIN. WHEN I CONNECT THE CHARGER ,THE LIGHT ON CHARGER BECOMES ORANGE FROM GREEN BUT WITHIN 3 MINUTES IT BECOMES GREEN. MEANWHILE THE SCREEN SHOWS THE BATTERY INVALID. WHEN THE CHARGER LIGHT IS ORANGE 9charging mode 0 THE LIGHTS ON BATTERY DOES NOT BLINK. I THINK THE SUPPLY IS NOT COMIN OUT OF THE BATTERY IS THERE ANY DIODE OR RESSETTR IN THE BATTERY. REPLY ME.
Keith:
A couple comments on this procedure:
One, you really should use new cells, as Li-Ion cells die of old age fairly quickly, and also from being kept fully charged and not cycled. The internal resistance tends to climb due to deposition of something on the carbon electrode, and although deep cycling can help, it’s not fully reversable.
Two, you must make very sure that all solder connections are good. I use a very large iron my father bought in the 1940′s for this job. Great care must be taken to not fry the cells, but you need lots of heat and fresh flux to get that stainless steel to accept a decent solder connection.
Three: if you cannot find tabbed replacement cells, use 0.010″ thick brass shim stock cut into 1/8″ strips (wider is OK) to connect the cells. This won’t leave you will pacs that won’t fit into the case, as happened to me with some Lombard batteries when I first tried to rebuild batteries. You must then solder on some extra strips to connect the wires.
Four: It’s critical that the connections between the wires and battery are good — if not, the PCB won’t update the capacity and you will end up like I did with a battery that only “saw” 100 mAh capacity and kept switching off the computer on me. I found a cold solder joint on one connecting strip.
Five: Insulate the ends of the batteries. Use the old paper if you can, otherwise heavy tape. Shorts are a bad thing with li-ions.
Six: I have had trouble finding reasonable price cells lately. I spent $70 for a set of 8 18650 2600 mAh cells for my G4 Titanium, and that’s as much as a new battery. I will be attempting a re-cell with some Ultra-Fire cells (after taking off the protective circuit), we shall see how that goes. I’ve heard they are highly variable in quality. If you can’t find inexpensive cells, you aren’t gaining anything by rebuilding the battery!
Thanks for the guide, it was very helpful when I tackled this one!
Peter
Hi all, i rebuilt my powerbook battery with known good cells from a 12″ but…same poor results as original, its not the cells but the chipset in the connection block, tried all the known resets and wipes, any advice as to convincing the battery brain to accept the transplant? Please email me at kinematographer@gmail.com, as the ebay replacement went cold after 2 months!
I recently rescued a PowerBook G4 Ti from a recycle shop, fired up fine after installing a hard drive. The original battery was in it still and took a charge but only held it for ten minutes before shutting down, tried ‘reconditioning’ it but that did not work and replacements were out of my budget for a couple reasons. Began exploring the rebuild angle and had everything apart before realizing I had not marked my steps at all and happened upon your blog while looking for a schematic. One strap was tatered during the removal process so I had to make a jumper, plus the white wire that runs underneath fell off and got shortened so it needed replacing as well.
I went the route of new replacements over scavenging used, followed your original drawing and I have to say I am very happy with the results, I have over three hours of usage at this point. I have no idea how the original batteries performed but what I have now is significantly better than ten minutes. Odec makes a 3000miah lithium ion battery that comes in packs of four with flat tops; a little emery cloth helps them accept a bead of solder prior to assembly. Thanks for your help with the information in your blog!
Just to make sure we’re on the same page, these are 18650 cells right?
@Austin Farley
yes, 18650