Early last week, I was working on expanding my PWM motor speed control to be able to reverse directions. I had the PWM output from my LogoChip’s PWM subsystem, and I wanted to add another line to indicate whether to spin the motor forward or backward.
Because I’m using the 754410 motor driver chip, I need to apply the PWM signal to the pin corresponding to the direction I want the motor to turn, and keep the other 754410 input pin grounded. That means I needed to translate from (speed, direction) to (move forward, move backward). I have lots of digital logic chips lying around, so I knew I could put something together.
Ideal Schematic
Ideally, if I had all the gates I wanted on a single chip, it’s this simple:

(Pardon the truncated labels on the right side–EAGLE did that for me in the PNG export.)
I’m using a direction of 1 to mean forward and 0 reverse. So here’s what the schematic means:
- If the PWM speed signal is on and Direction is 1 (forward), activate the Forward output.
- If the PWM speed signal is on and Direction is 0 (reverse), activate the Reverse output.
I could have done this with a 74*08 quad AND gate and a 74*04 hex inverter, but that’s two chips. It offends my sensibilities to use two chips when one would suffice, plus I don’t have a lot of room to spare on my LogoChip breadboard. So I looked for something better.
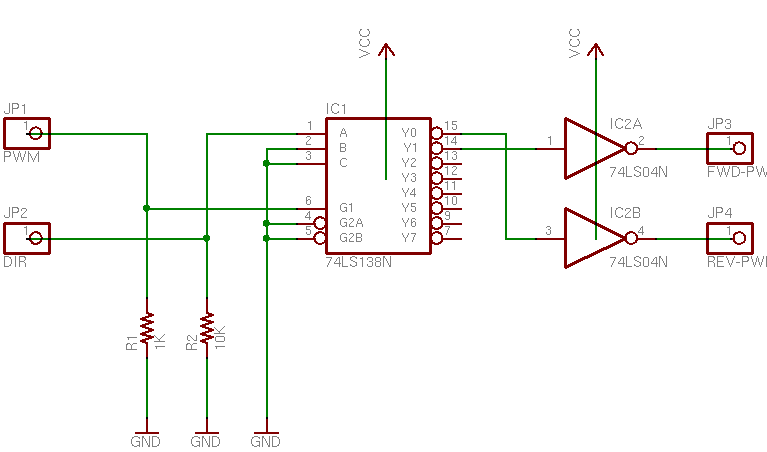
74LS138
I was looking for a chip with a data input and address input(s) to select which output line the data was routed to, and the closest I could find was the 74*138. The ’138 is 3-to-8 decoder/demultiplexer, meant to decode three lines of an address bus into eight enable inputs for memory or other chips: You supply a three-bit address to its inputs, and it activates the corresponding one of its eight outputs.
This wasn’t exactly what I needed, but there’s a trick I figured I could use. I applied the Direction signal to an address input, to select which output would receive the PWM signal; then I applied the PWM signal to one of the enable inputs. In theory, that means that both outputs would be inactive any time the PWM speed signal was off, and the appropriate output would be active when the PWM speed signal was on.

Unfortunately, EAGLE’s circuit symbol for the ’138 is a block diagram that doesn’t illustrate the internal logic, but here’s what’s going on. Direction is applied to address line A, which will select output Y1 (Forward) when Direction is 1 (forward) and output Y0 (Reverse) when direction is 0 (reverse). And the PWM speed signal is applied to active-high enable line G0, to activate the appropriate output whenever it’s high. The other enable lines are active-low, so they’re tied to ground to be active all the time.
But you’ve probably noticed that it’s still a two-chip design–there are two inverters off to the right. Unfortunately for this project, the ’138′s outputs are active-low. Most memory chips have active-low enable inputs (it makes it easier to gang together open-collector selection circuitry), so naturally the ’138 provides an active-low output. In order to get the active-high signals that I wanted to feed into the 754410 motor driver chip, I had to invert the ’138′s outputs, and that meant adding another chip. I did build and test this circuit as a proof of concept, but I still wasn’t satisfied, and kept looking.
As a bit of an aside–I could have used active-low signalling to drive the 754410. It’s an H-bridge driver chip, so it powers the motor whenever it has different inputs. When the inputs are the same–low or high–the motor doesn’t run. However, I’m guessing there’s slightly more power consumption when both inputs/outputs are high, and I wanted it to draw as little power as possible in the quiescent state, so I was determined to come up with a circuit that would provide active-high signalling.
One other note–I tied both inputs to ground with pull-down resistors. As long as the LogoChip is providing outputs, these are irrelevant–but when the LogoChip first powers up, its ports are configured as inputs and don’t provide a valid TTL signal to the ’138. The motor was freaking out (that’s the technical term) when I’d reset the LogoChip, so I added the pull-downs for power-up sanity.
74LS153
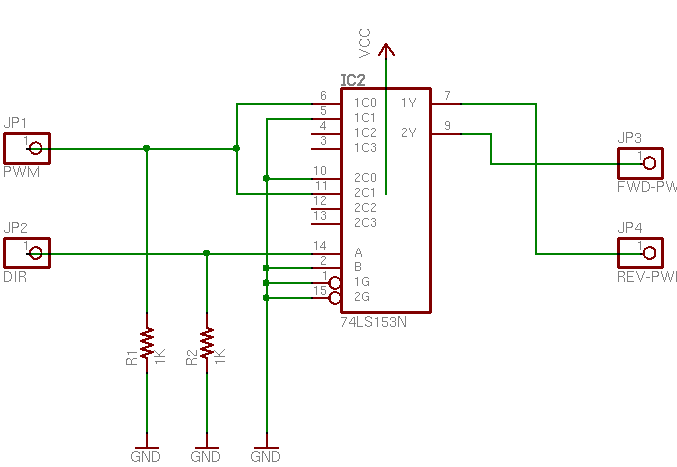
The 74LS153 is my final, one-chip solution. It’s a dual 4-line to 1-line data selector/multiplexer, meant to do exactly, uh, the opposite of what I need: It picks which of four inputs to send to the output. But that’s okay–there are two selector/multiplexers in one package. That means I can use one multiplexer to select whether the PWM or nothing goes to the Forward output, and the other to select whether nothing or the PWM goes to the Reverse output. Looks a little somethin’ like this:

Again, EAGLE renders the ’153 as a block without exposing its inner workings, so explanation is in order. Inputs A and B are the address lines (think A0 and A1) to select which data input will be delivered to the output. Note that A and B select for both multiplexers at the same time, so I don’t have to wire to separate address lines for the two multiplexers. Input B (address line 1) is tied to ground because I always want it 0–I’m only working with the first two possible inputs. And the active-low enable inputs are tied to ground, because I always want the chip enabled.
The first selector has the PWM signal at its 0 input (1C0), ground at its 1 input (1C1), and its output (1Y) feeding the Reverse driver. So when Direction is 0 (reverse), the first selector will pick input 0 (PWM) and feed it to the Reverse input of the motor driver. When Direction is 1 (forward), the first selector will pick input 1 (ground, or nothing) and feed it to the Reverse input of the motor driver.
Likewise, the second selector has ground at its 0 input (2C0), the PWM speed signal at its 1 input (2C1), and its output (2Y) feeding the Forward driver. When Direction is 1 (forward), the second selector routes input 1 (PWM) to the Forward motor drive pin. When Direction is 0 (reverse), the second selector routes input 0 (ground) to the Forward motor drive pin.
Because human minds are forward-centric (there’s a very interesting section of linguistics that studies which word out of pairs of opposites has connotations of dominance: forward/reverse, up/down, hot/cold, etc.), it would seem to make more sense to use the first selector for the forward drive and the second selector for reverse. But I wanted Direction == 0 to activate the first selector and Direction == 1 to activate the second, and because I made Direction == 1 for forward, it worked out like this.
I added pull-down resistors again–different values this time, based on the datasheet and application notes. And the circuit works, in a single chip! Yeah, the ’153 is overkill for this application–but I can’t find a simpler single chip that’ll do the job. I could do it with a PAL and have room left over for other tasks; but in the absence of a need for other logic in this project, that’s even more overkill.
Finis.
Hi Keith,
First of all, keep up the good work, your blog is full of great projects and ideas.
I encountered exactly the same problem while preparing my bachelor thesis (I am building a mobile robot). I am using MPC17531 for motor control because my main power supply is 3.3V. If I were using L293D I could have attached PWM to EN input but this was not the case, so I needed the same circuit you described.
Turns out you can do it with a quad NOR gate. If you want to check it out (maybe you’ll need this again) I have uploaded part of my not yet finished BT here: http://files-upload.com/files/459083/main.pdf (sorry for using upload service)
Regards,
Mike
Thanx for this circuit!!!! Did you ever saw the file Mike posted? I can’t access it now.
Thank you
Ernesto
Ernesto, I do remember having looked at Mike’s file, although it was over a year ago and I don’t remember much detail. But it’s easy to recreate.
Look at my drawing with one inverter and two AND gates. Then remember that a NOR with one active input and one input tied to ground acts as an inverter, and apply De Morgan to replace the AND gates with NOR gates and redraw the rest of the circuit.
Ernesto responded:
I’ve tryied to reproduce the AND with NOR GATES but now I’m not very good at
De Morgan Laws. The final circuit would be using only a quad NOR gate to
control de PWM into the HBridge?
Ernesto, an AND is equivalent to a NOR with both of its inputs inverted.
Redraw the diagram, replacing the AND with a NOR. Then on each input, use a NOR gate with one input tied to ground as an inverter, and start tracing logic signals through it, and I believe you’ll be able to figure it out quite quickly.
Thanks Keith… I now reproduced the circuit using 4 NORs.
Ernesto, excellent work!