A year or two ago, I bought a couple of cheap cordless drills at Harbor Freight with thoughts of tearing them down to use the motors for MOSFET-controlled robot drive systems. Yesterday in lab, several guys were talking about how to control DC motor speed for their final project. Serendipity kicked me in the butt and got me prototyping.
The Circuit
The obvious approaches to varying DC motor speed are varying the supply voltage and varying a resistor in series with the motor (which amounts to the same thing). The problem is, DC motors don’t run well on a low supply voltage, and the response is very non-linear.
The usual solution is to use pulse-width modulation (PWM): turn full power to the motor on and off rapidly, increasing (modulating) how long the power is on (pulse width) to increase the motor speed, and decreasing the pulse width to decrease the motor speed. And the PIC (the underlying hardware of the LogoChip) has built-in PWM control, because it’s designed to be used for a wide variety of applications just such as this.
The LogoChip/PIC can’t supply enough power to drive a large motor, so the total control circuit involves a LogoChip, a MOSFET power transistor, and some “glue” circuitry to interface the two together.
If I’d been building the circuit on a breadboard, I’d probably have started by plugging in components and wiring them up, because mistakes are easy to correct by unplugging and replugging. But since I was using larger components that I was going to need to solder, I didn’t want to have to change too many connections; so I started by drawing the schematic I intended to build.
(First I reread my May 2006 post about driving stepper motors with MOSFETs. They don’t use the same circuit, but I had taken the time to review my textbook and figure out how to treat MOSFETs right; and my blog isn’t just for y’all–it’s secondary storage for my own memory.)
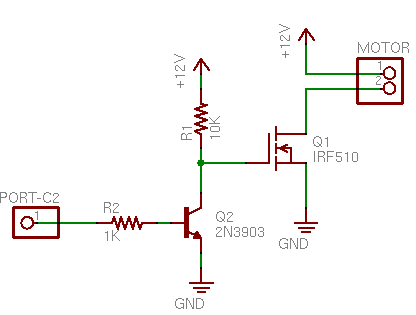
The PIC’s PWM output is on port C2. The MOSFET’s gate needs at least 7V to saturate (turn all the way on), so port C2 controls the base of an NPN transistor (any common NPN will do; I happened to have a 3903) that switches the MOSFET gate between 12V and ground. The N-channel MOSFET in turn provides a ground path to turn on the motor when the MOSFET’s gate voltage is high.
The only snag is that the bipolar transistor inverts the control logic; so when C2 is high, the motor is off; and when C2 is low, the motor is on. Oh well. We’ll compensate in software.
Wiring it Up
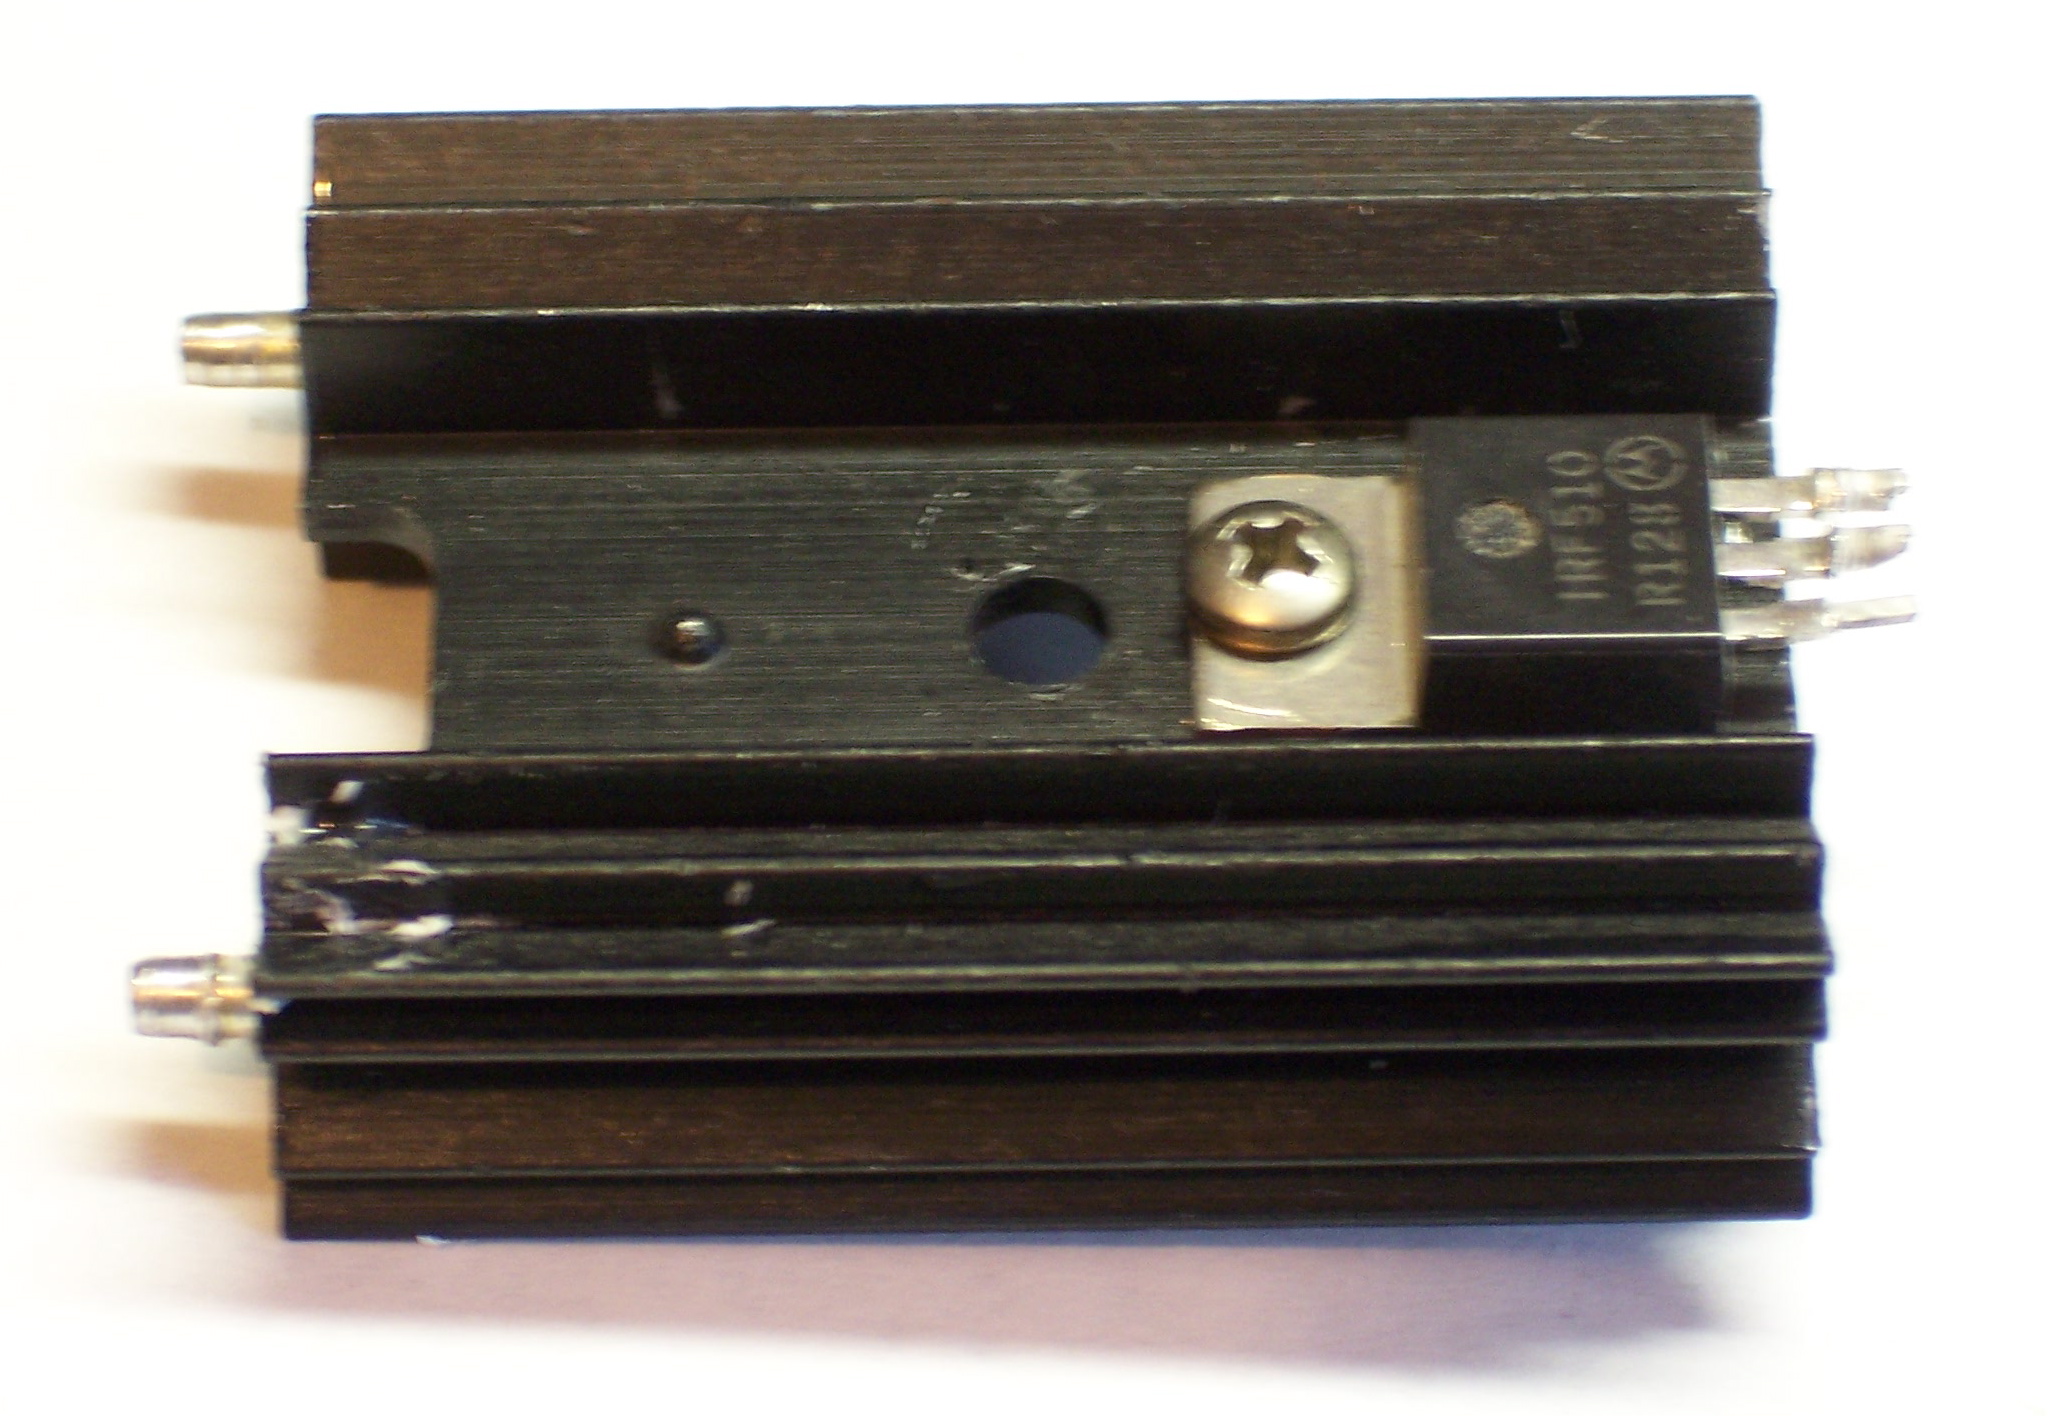
I started by bolting one of my IRF510 MOSFETs to a heatsink. I should have used thermal grease, but I didn’t have any handy and I’m doing a quick test. And I should have used an insulator (since the FET’s tab is wired to drain, and that’s not going to be ground, and the heatsink might bump into something that’s grounded), but the heatsink seems to be anodized and sorta insulated already and I’m just doing a quick test.
I could have used the cordless drill’s battery to power the motor, but I didn’t feel like rewiring that much of the drill right now. So I settled on using my trusty old PC power supply–and I desoldered a connector from a dead CD-ROM drive to mate with the power supply. (Bench vise, heat gun, and pliers.)

I wired the MOSFET to the power connector and left fly wires to go to the motor and the LogoChip. As always, I put heat-shrink tubing on each solder joint to be safe. The 10K pull-up resistor at the end of the blue wire, hidden behind the yellow wire next to the power connector.
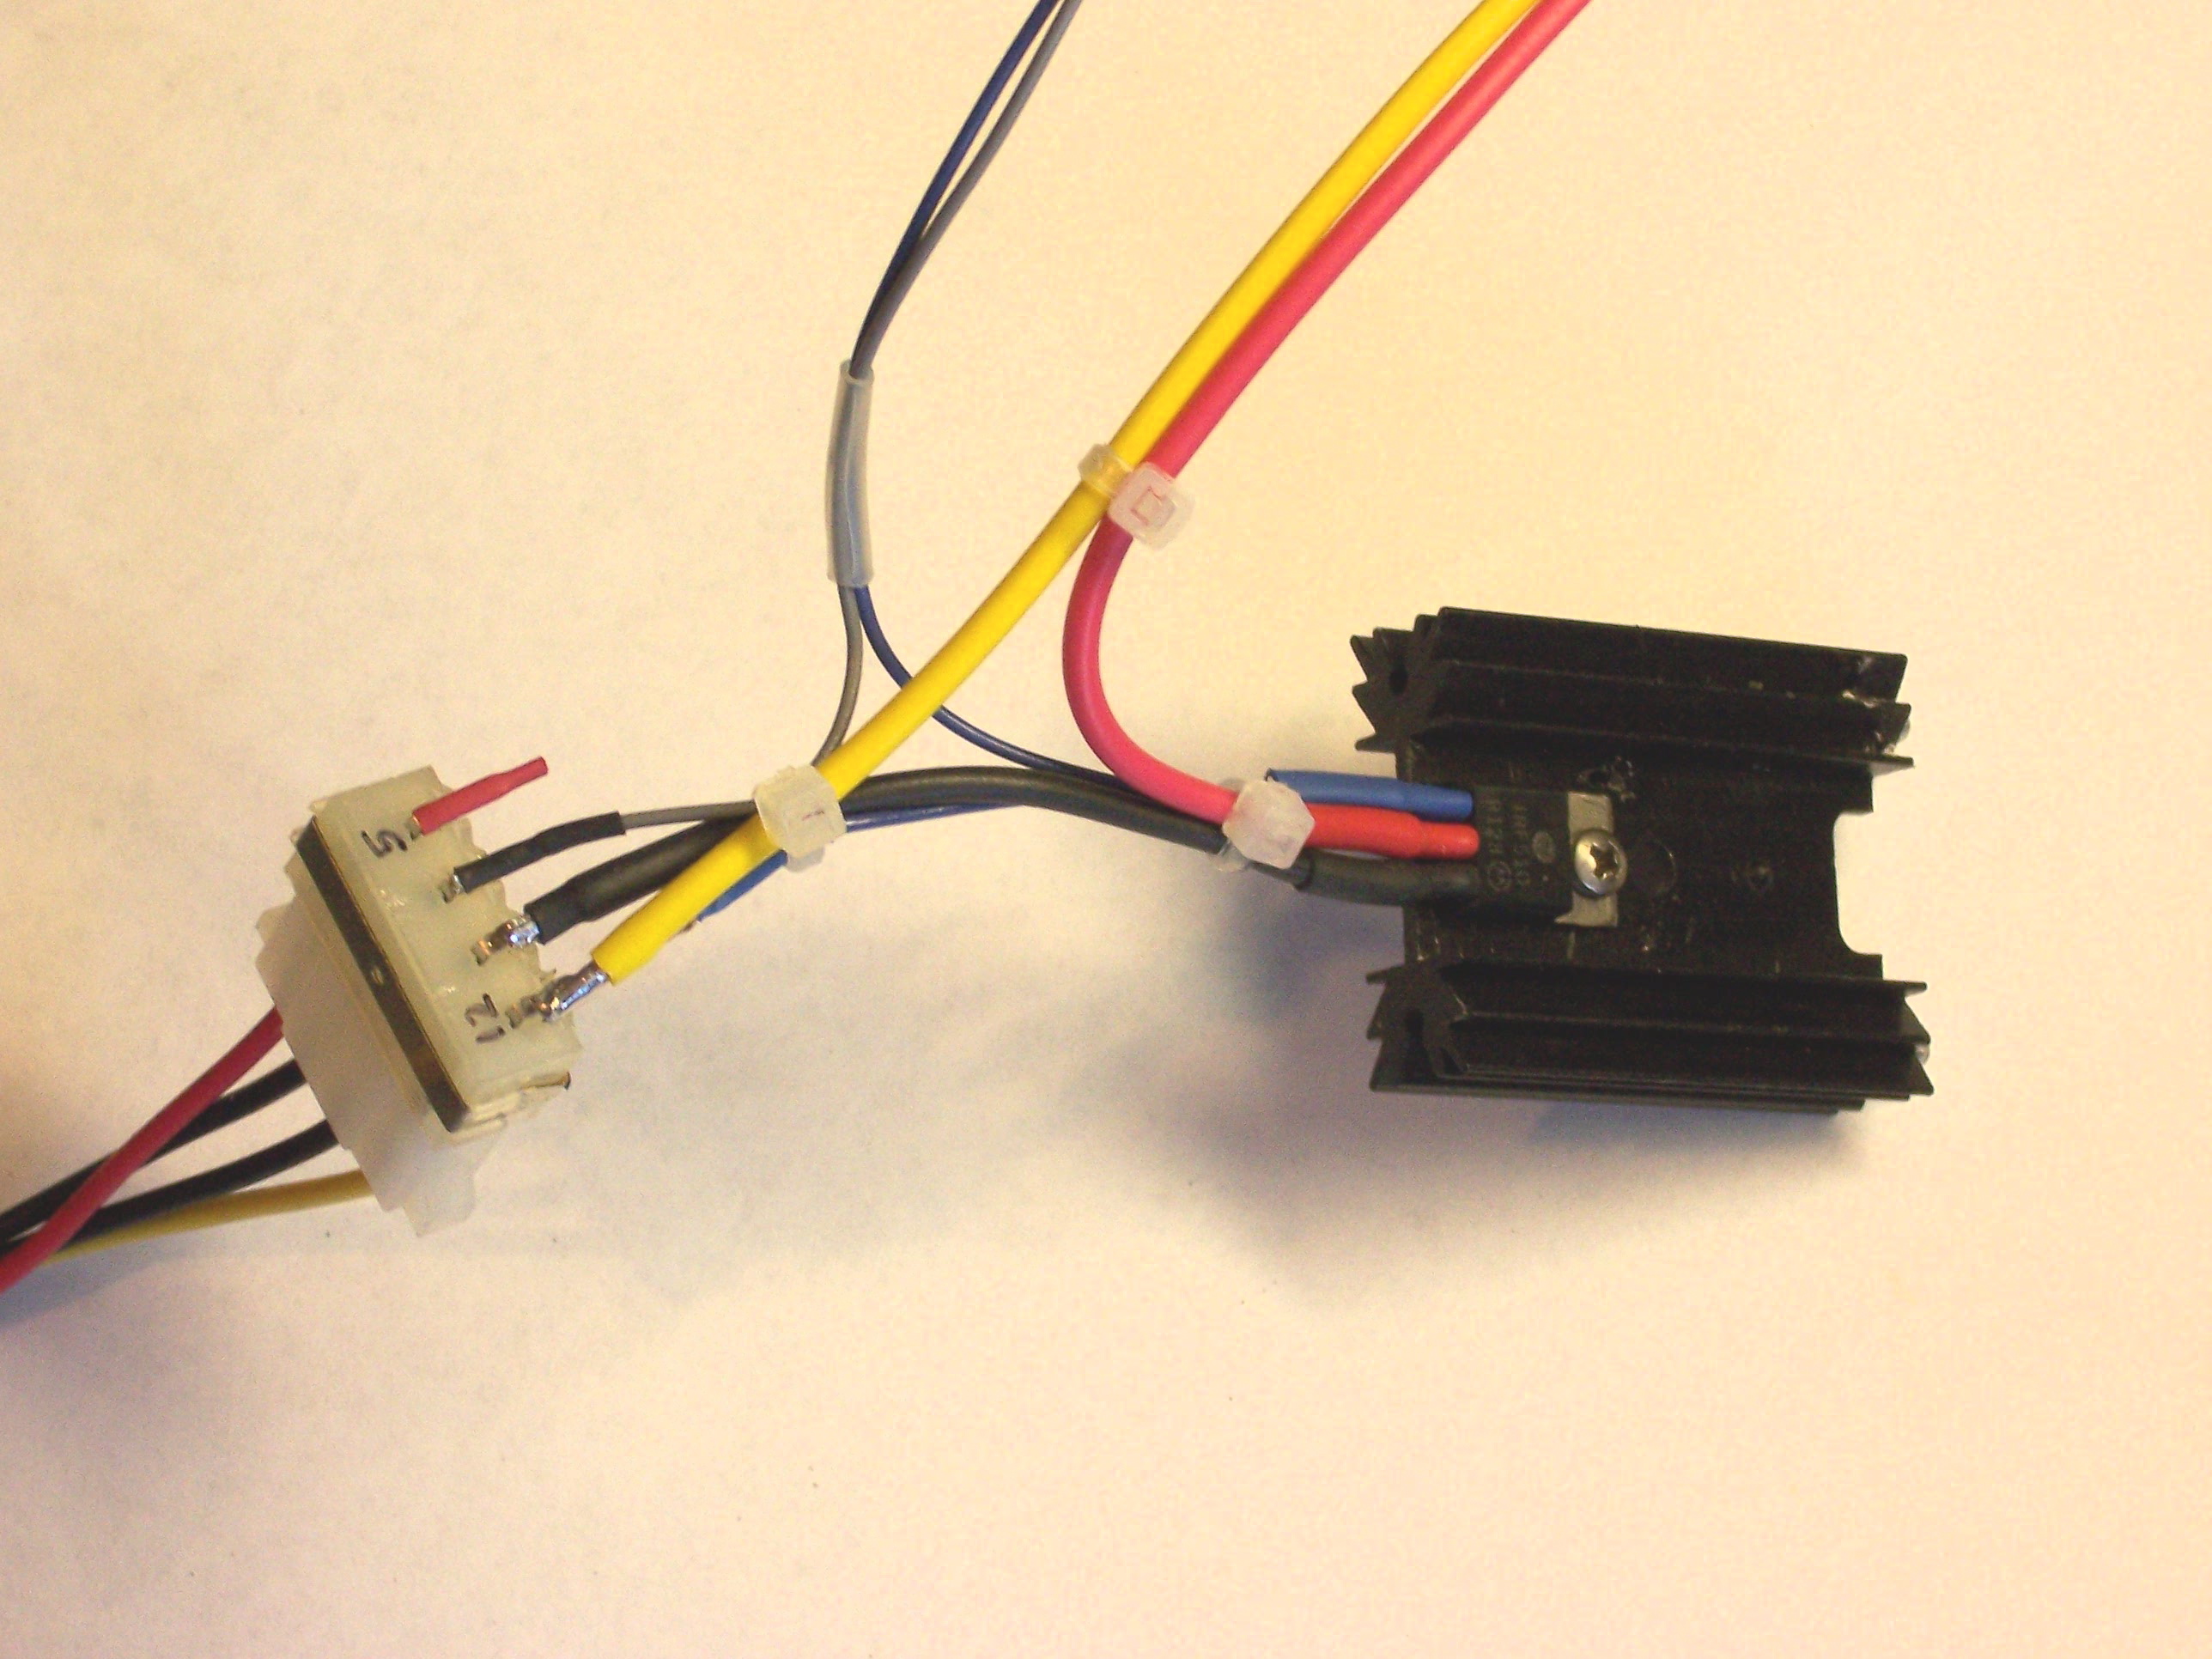
The 5V supply on the power plug isn’t needed, so I insulated it as well.
Connecting the Drill
The largest DC motor that I could think of having at home was the cordless drill. It’s not as big as the windshield wiper motor that Team Doccia might be using, but it’s the best I could do. Here’s the victim with its the case removed:
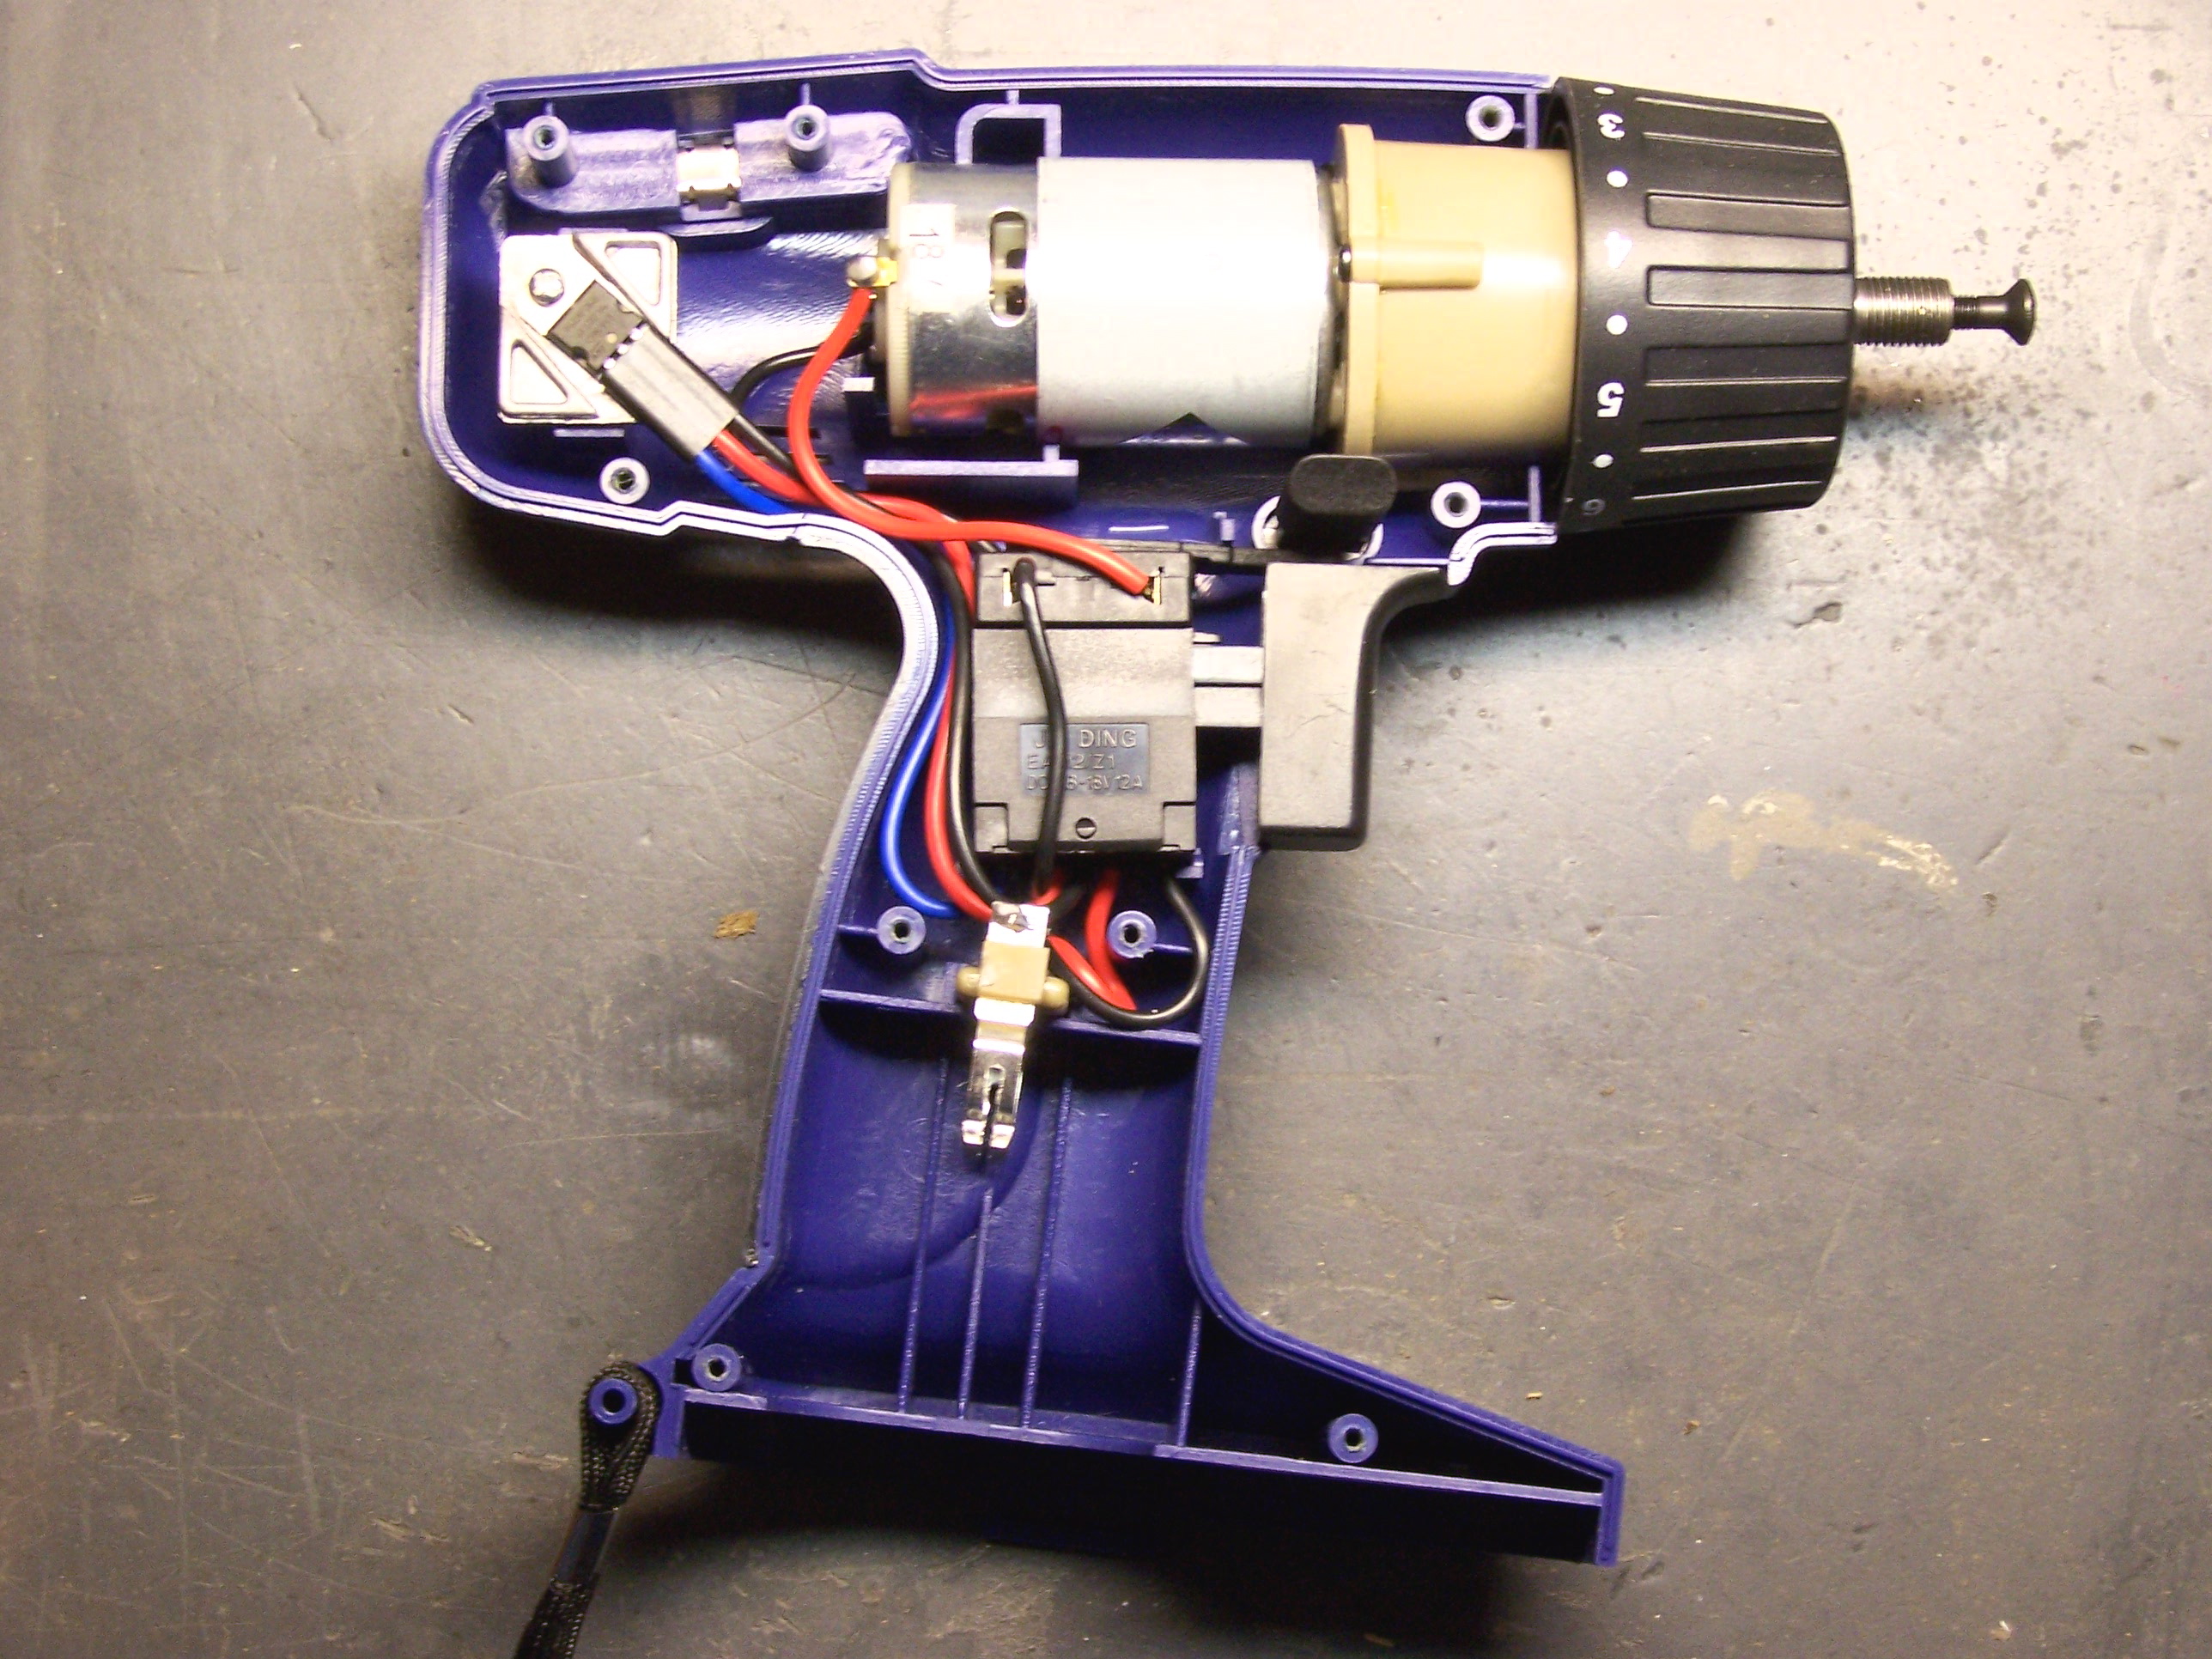
The motor is the silver and white cylinder in the center of the top of the picture. The tan cylinder to its right is the planetary gear system that reduces speed and increases torque.
To the left of the motor, you can see the MTP15N06V MOSFET that normally runs the drill. I could have reused it, but (1) then I’d have been done before I even started; and (2) I wanted to test with a FET that I had lots of, so someone else could use exactly the same circuit. Both the drill’s MTP15N06V and my IRF510 have a built-in reverse-biased diode to shunt the back-EMF spike that occurs when the supply voltage is removed from an inductive load (like a motor).

I pulled the the motor out of the drill casing, soldered on the leads from the FET wiring harness, and jammed it back in. I could have laid in on my bench for testing, but I was afraid the counter-torque when the motor started up at high speed might roll it right off the edge. The gearbox has a tab on the bottom that mates with the case and keeps it from twisting.
LogoChip Wiring
Tom left a nice prototyping area on the LogoBoard when he designed it, so I built the rest of the circuit there. I soldered a header socket into the connector for pin C2, plugged the NPN transistor into the breadboard section, and plugged in the base resistor and the gate and ground leads from the FET assembly.
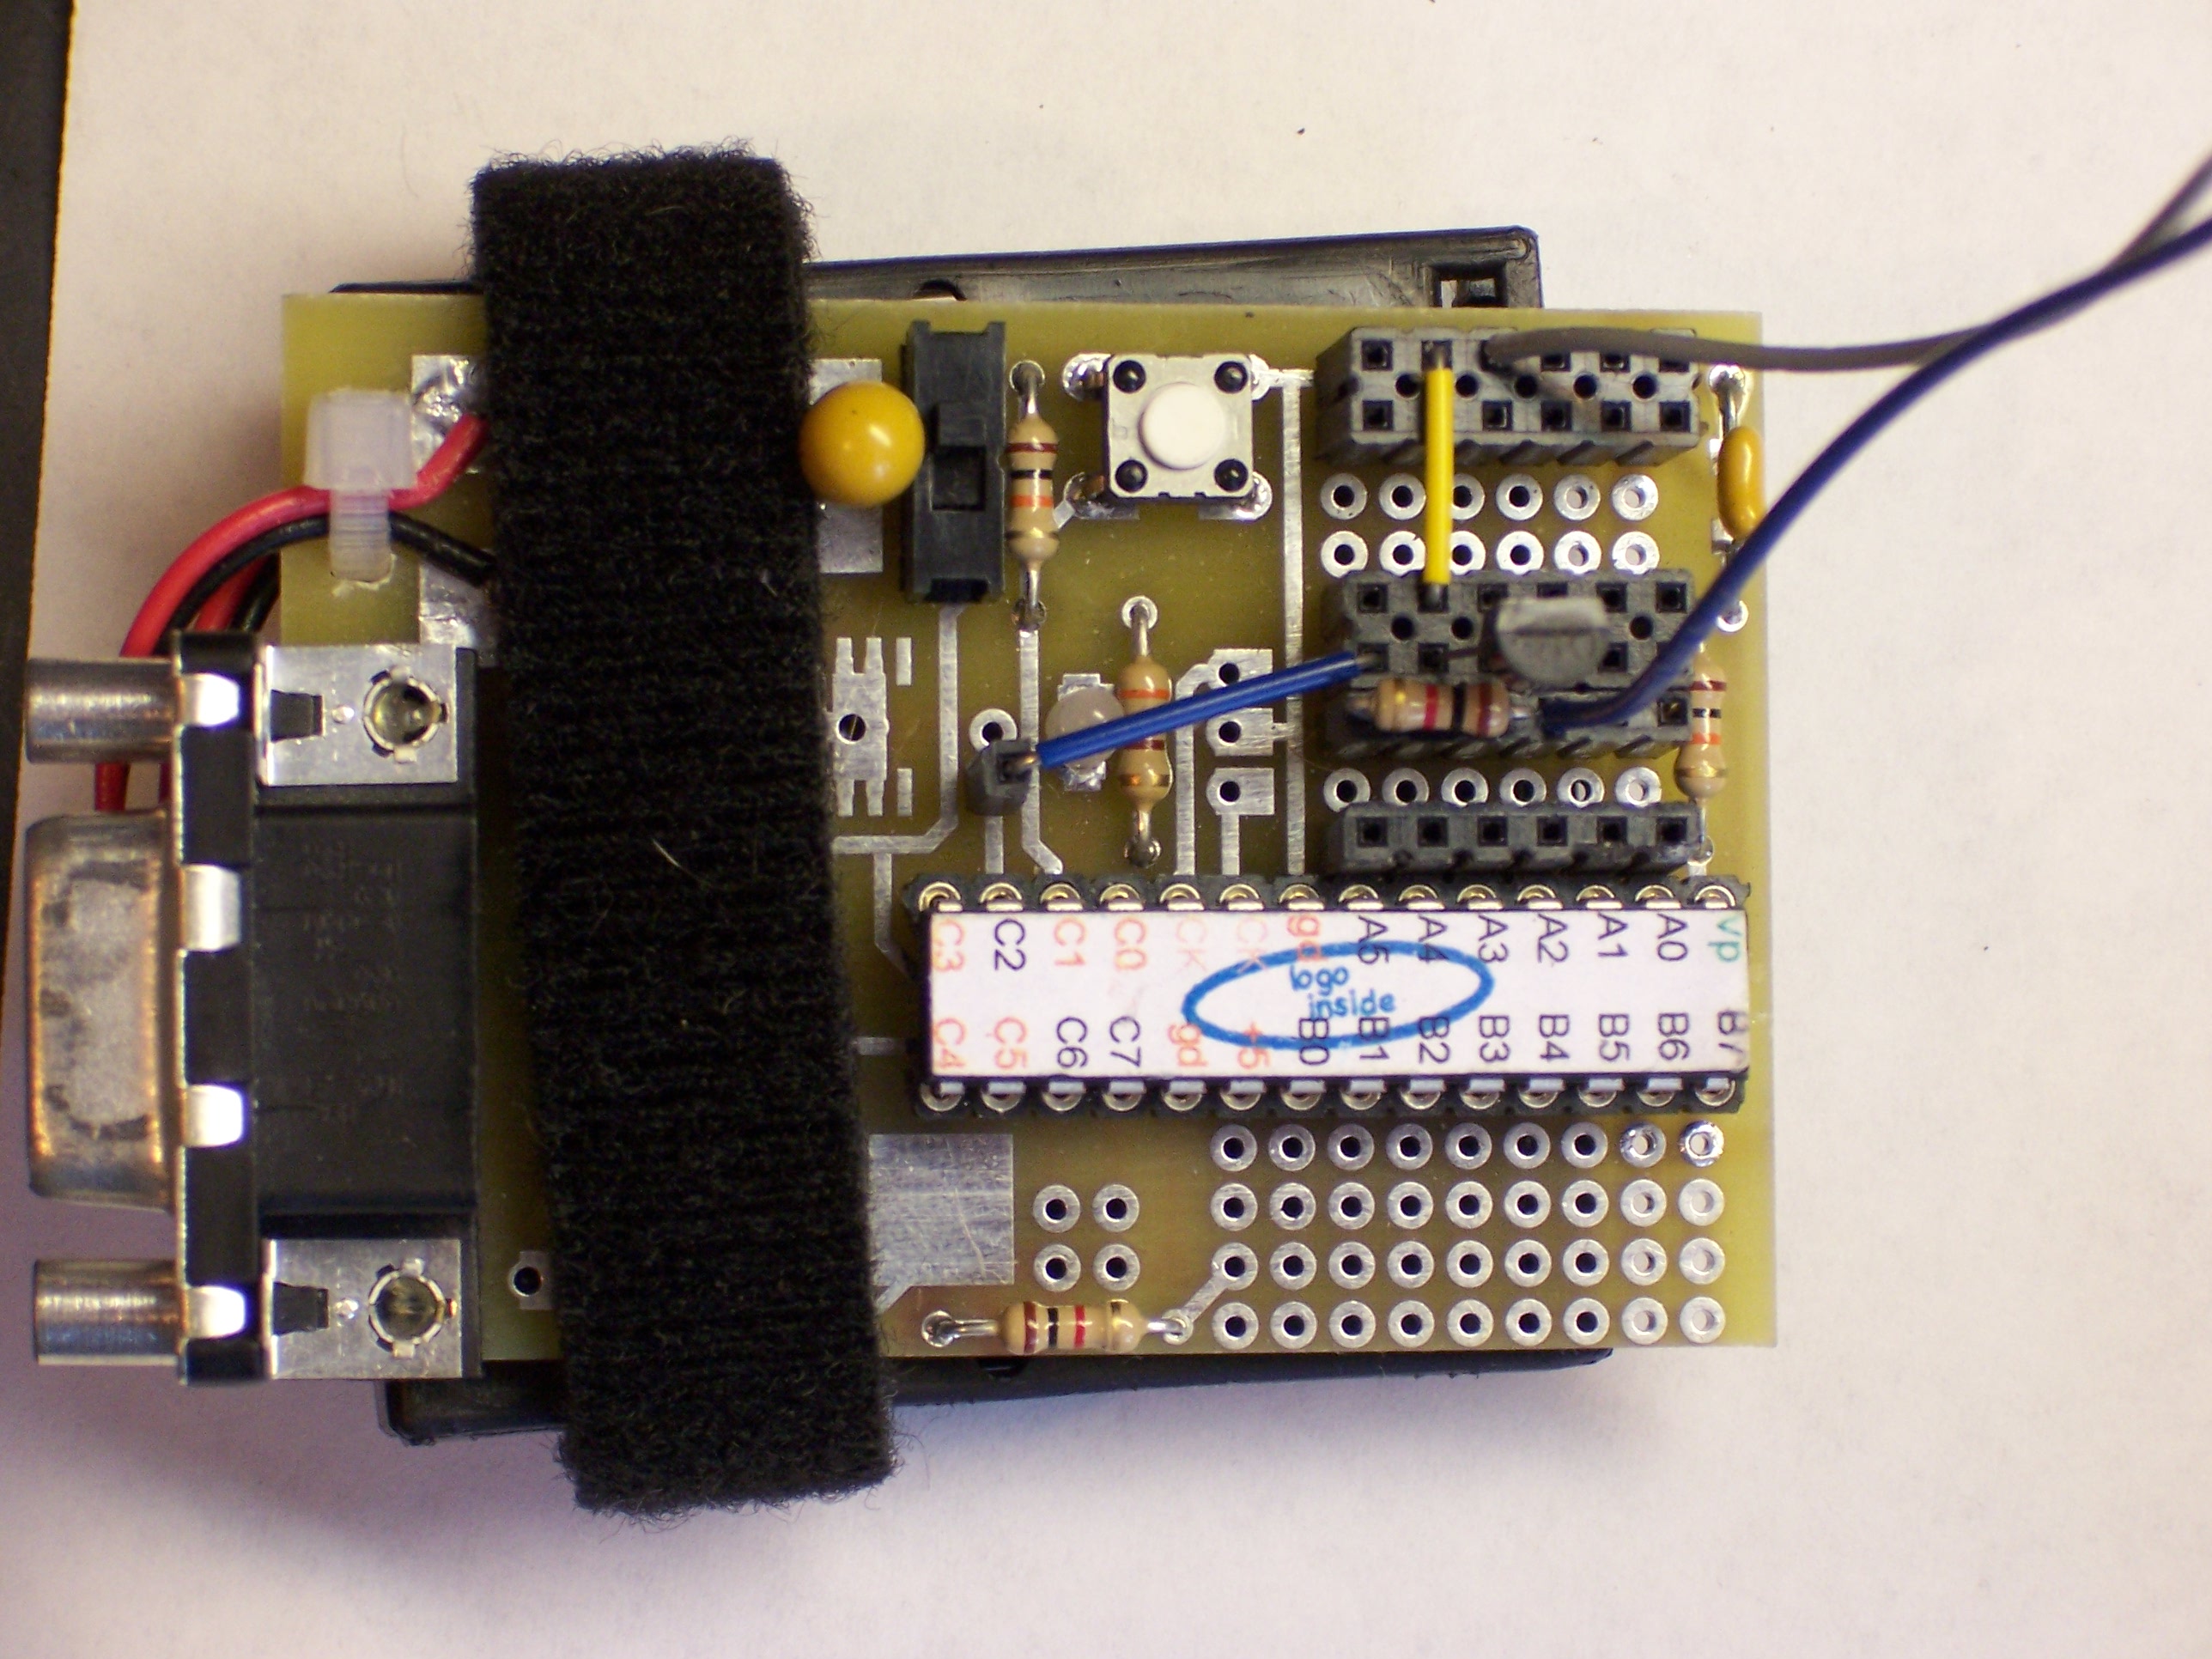
Here’s what the whole works looks like when it’s all hooked up:

Control Software
For prototyping, I reused my old motor-pwm-demo.txt program, even though it has some extra stuff that’s not needed here. I called pwm-init and then pwm-set 255 255 to shut the motor off. (Remember, it’s backwards logic because of the inverting effect of the NPN switching transistor.) pwm-set 255 0 turned the motor on at full speed, and pwm-set 255 128 selected a medium speed. pwm-set 255 196 was about as slow as it could reliably go.
To explain the code, the first parameter (the one that I’m always calling with 255) is the period of the control pulse–the higher the number, the longer between consecutive pulses (i.e. the slower the pulse train). The second parameter is the pulse width–how long each pulse output should be on. So pwm-set 128 64 should have about the same effect as pwm-set 255 128, only twice as fast (half as long).
Unfortunately, that ain’t quite so. Due to the inductive effects of the motor coils, some frequencies of PWM control work better (more efficiently) than others. In this case, the lower control frequency is more efficient–the motor runs a little faster at 255/128 (longer pulse = lower speed) than at 128/64 (shorter pulse = higher speed).
Worse, the motor would probably like it even better if the control frequency were even lower. But I can’t do that–I’m already running the PWM clock at its lowest speed and dividing that speed as far down as it goes. This is as good as it gets.
Final Thoughts
Motor On at Powerup
When the circuit powers on, port C2 is set as an input, so the MOSFET’s pull-up resistor pulls the line high and the motor turns on at full speed. That’s bad; you never want mechanical systems initiating motion before the control systems come online.
The circuit should really be redesigned to use non-inverting buffers to get around this problem. But for now, at a minimum, the motor should be turned off in the LogoChip’s powerup routine:
to powerup

    pwm-init

    pwm-set 255 255

end
Operating Temperature
With an ambient temperature of 72°F, the FET got up to about 96°F after running for a few minutes. The FET is rated for 250°C and its rated capacity only drops from 5.6A at 25°C to 4A at 100°C, so it’s well within safe operating conditions. If a larger load were required, I might look at using more FETs in parallel. (I don’t even remember whether you can do that, so I’d start with the Malvino textbook and review whether parallel FETs are subject to thermal runaway.)
Low Torque
The drill really doesn’t have much torque using this driver at low speeds. Granted, the drill is rated for 18V and I was running it 12V. But I was hoping to get away with using open-loop control for robotics, and it looks like I’ll probably have to put optical encoders on the wheels to make sure they’re really turning as fast as I told them to.
I’m still optimistic that a windshield wiper motor is geared down enough, and natively runs at a low enough speed, that this control method will be adequate for Team Doccia’s breathing mechanism.
[...] For variable speed I have a Pulse Width Modulation circuit in line with the motor’s power circuit. Currently I have built my PWM module exactly like Keith’s example expect with a 2n2222 transistor and a IRFZ44n Power MOSFETs. I am considering trying a totem pole driver. That is where I basically replace the 10K resistor in Keith’s example and use a properly current limited PNP transistor instead. This should give me a better response curve on the MOSFET as it build’s it’s channel possibly giving me better thermal stability. But as is, everything is work out as it should. [...]
can u tell me how to control dc fan motor using above circut???
Gouthami, you can use the circuit exactly as it is to control a DC fan motor.
I have a brand new Dewalt DCD710 cordless drill/driver. 12volt.
I am making a specialty tool in which I remove all mechanical components including the motor,gearbox, clutch and chuck. None of the electrics have changed. Now the two wires that went to the motor hang loose. I need to connect a resistive load to the wires that went to the motor but there is too much current. What would be the best thing to add to limit the current?
By the way, the control is presumably PWM.
Todd, I’d need to know more about the nature of the resistive load to be able to make a suggestion.
I am using a .75mm diameter, 60mm long piece of nickel titanium wire as the resistive load. This material is commonly known as shape memory alloy. (The wire ruturns to a programmed shape when heated)
I am using current in the wire to create the heat required to make the shape change. If the temperature in the wire gets too high, it will lose the ability to return to the original shape, therefore, I need to limit the current.
Todd, if you add series resistance to the load, the added resistor will get hot too. I think the original PWM variable-speed control is really what you want to use here — what you’re doing, although with heat rather than with motion, places much the same constraints on the current-control system that the original motor did.
One thing you may want to do is limit the range of the PWM so it can’t go far enough to overheat. I would pull the trigger until the shape memory wire was as hot as I ever wanted it to get, then mark that trigger position and power down and take things apart. Get the trigger back to that position and measure where it is on the potentiometer, then connect a series resistor at the “top” of the potentiometer to change the voltage divider so that the full range of the pot : the pot plus resistor :: the usable range of the pot : the whole pot.
If this makes sense, I think you’re good to go. If I’m diving too far into terminology, I can give you more detail about the process.
Hi Keith
If the FET was replaced with an IRF510L, could it be driven directly from the IC output and the transistor omitted? I understand the ‘L’ means the FET will fully switch on with 5V at the gate. Thanks!
I’m using this idea in a project of mine.My main aim is to control the DC motor speed using a 555 timer circuit which generates a square wave.Any idea how i can implement that?
Hi Keith, saw this write-up and thought I’d ask a question. I’m looking for an all in one ready to go (maybe solid state) small device that will turn a 1.5-3v motor on and off every 2-3 seconds (doesn’t need to be exact). I’ve had my techie buddies say get a 555 timer, a microcontroller, anything that would handle the 2 second on / 2 second off cycle and something else. I’m not technical that way. I have a 300rpm motor that’s connected to either 3xAAA batteries or 2xC batteries. I’d like to put this on/of switch in between so the motor goes on/off automatically. If I can put it in a box with an on/off button on the outside, bonus. Know anyone in the US I could outsource this to? Or find that damn timer thing?
Keith – I enjoyed your research, nice work. I’m preparing to build a similar motor drive system for use with a DeWalt 18-V drill motor and am wondering if the .54 Ohms of “On” resistance of the FET significantly reduced the power delivered to the motor. Did you notice any difference between the max speed/torque using the original factory circuitry and the max speed/torque using your assembled drive? Obviously, I’m trying to squeeze all available power from the battery. Thanks,
JL