In the last couple of months, I’ve worked through and fixed several major problems with my CupCake hardware and Skeinforge slicer settings that were preventing me from printing any useful models: warped build bed, infill density, printing stalls causing blobs, XY slowdown on curves causing blobs, and bizarrely bad printing.
Making a Less Warpable Build Bed
I switched a while back from the included foamcore build surfaces to a scrap of plexiglas, to which the extruded ABS sticks more securely and from which it releases after the build without damage. Initially I taped the plexi to the build platform at the corners; but as the the model being printed cooled and began to shrink, the plexi warped upward with it and the tape was insufficient to keep the plexi (and model) flat. The warped upper surface of the build then snagged the nozzle, the steppers lost steps, the next layer(s) got out of alignment, and builds were ruined.
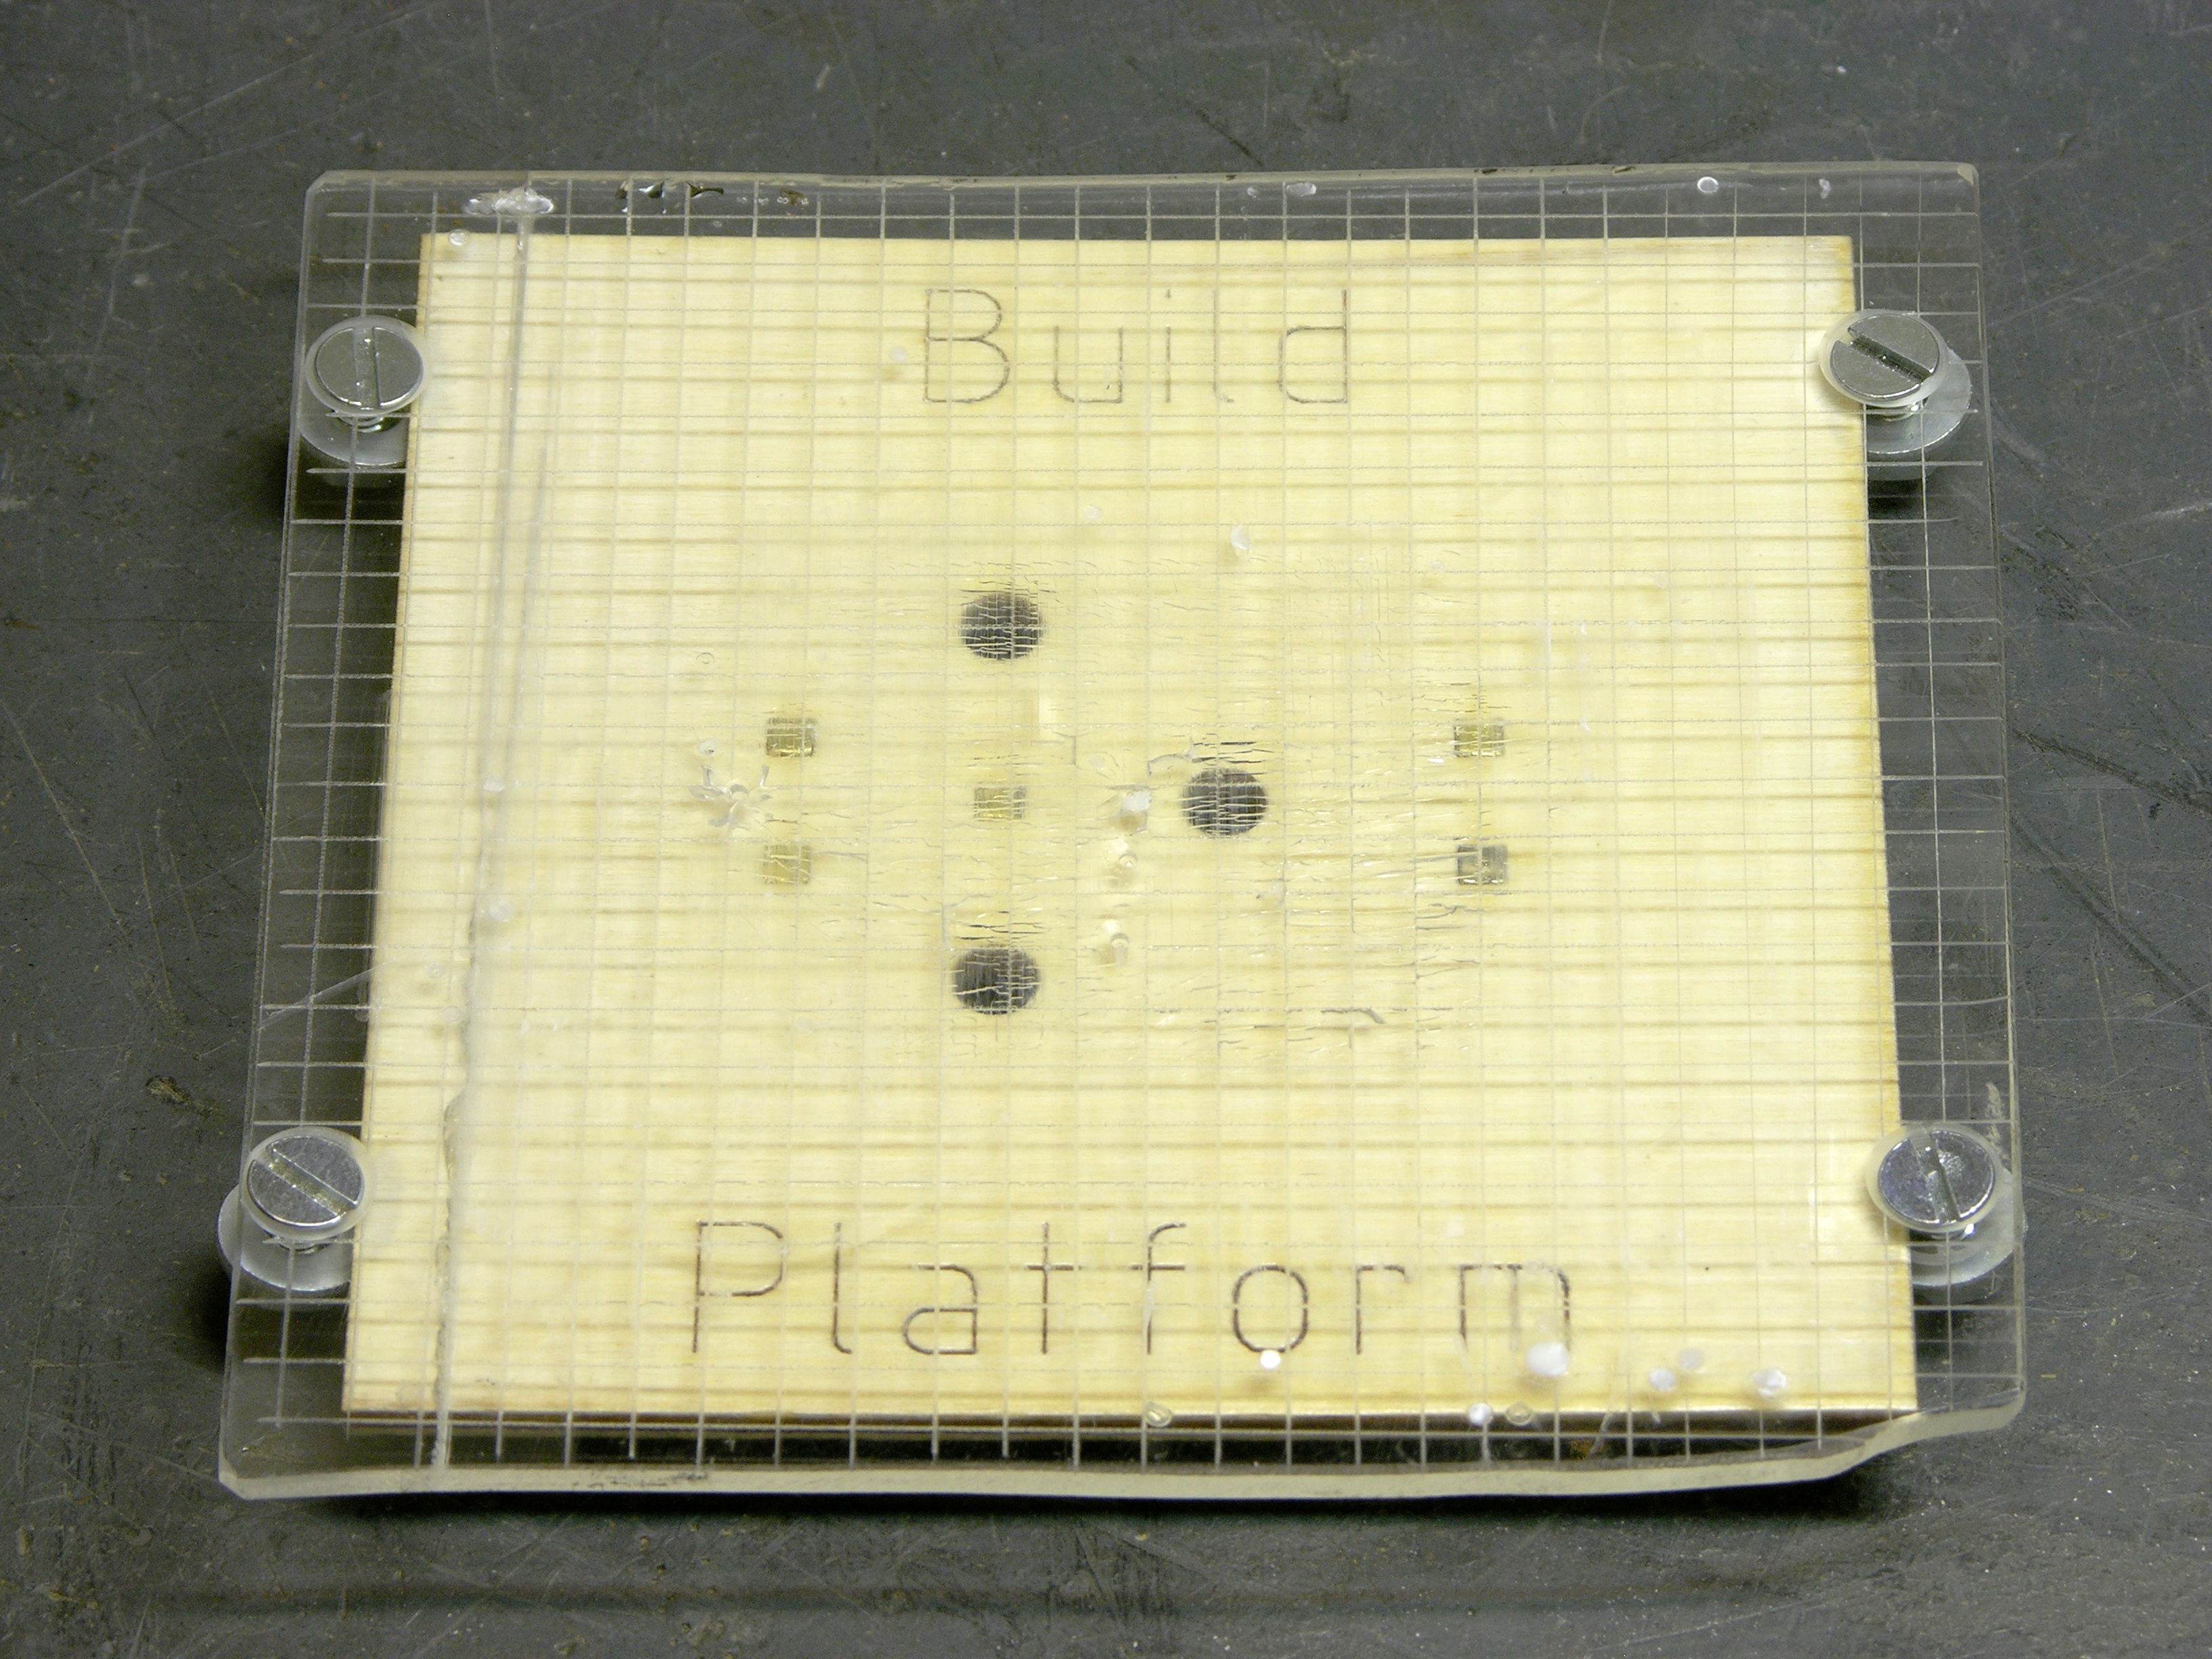
This was an easy enough fix — I bolted the build surface to the build platform, with the machine screws countersunk so they can’t snag the nozzle even if the bed moves to that far an extreme.
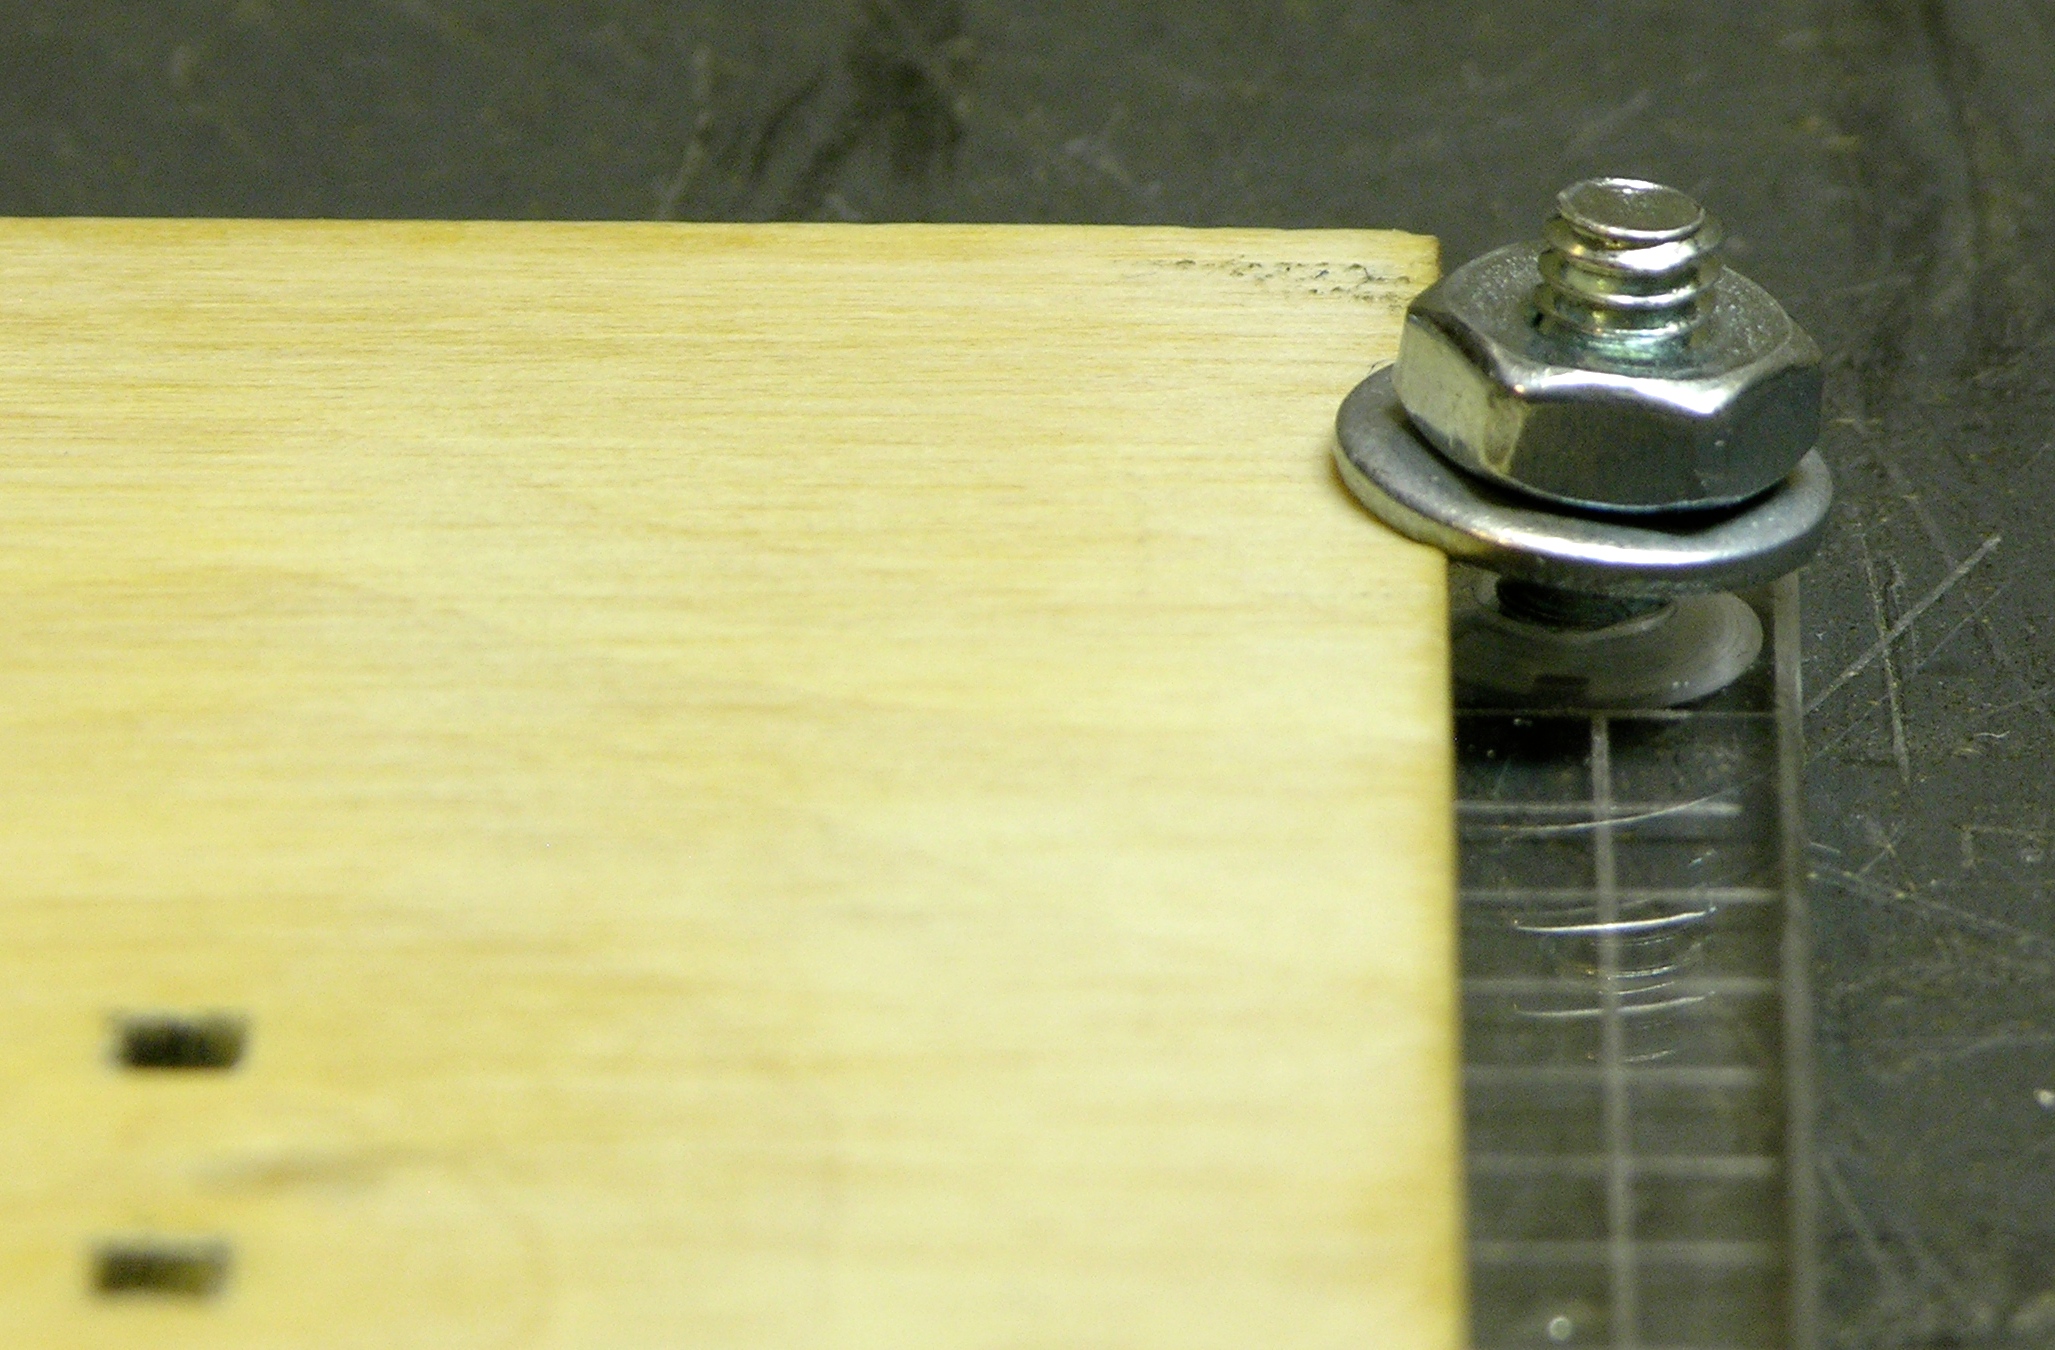
Rather than drill into the build platform, I used oversized washers to grip its edge. This arrangement allows me to tighten the nuts, then flex the “sandwich” until the top of the plexi registers as flat as possible against a straightedge. Once set, it seems to hold its position well. Of course the same could be done with oversized holes drilled in the build platform.
Fixing Infill Density
Skeinforge is the software that takes an STL model, slices it into layers for the CupCake or RepRap to print, and generates the G-code for the extruder toolpath. It has two settings that pertain to how densely the adjacent extrusions should be packed:
Carve / Extrusion Width over Thickness (ratio) [1.9]
Fill / Interior Infill Density over Exterior Density [0.9]
The extrusion width over thickness sets the aspect ratio of the ellipsoidal extrusion — in this case, 1.9 times wider than it is tall. This means that the vertical resolution is more finely-grained than the horizontal, but in exchange the extrusion gets smooshed pretty firmly down onto the previous layer for a good bond.
Interior infill density over exterior density allows you to specify that solid areas of infill should be less (or more) dense than the solid section around the perimeter. This can be used to make sure that the exterior lines are packed tightly together for good adhesion — maybe by packing two or three lines closer together than they really quite fit — and the interior can be packed at a closer approximation of the actual size of the extrusion. (This setting is for a solid infill, commonly used on top and bottom layers, and is independent of the sparse lattice commonly used to fill the interior of the volume.)

Unfortunately, early on I had problems with infill density, started tweaking the extrusion width over thickness parameter, and misunderstood its derivation so was changing it in the wrong direction. Here you can see that I had taken it from its CupCake default of 1.9 all the way down to 0.8 and beyond, causing the infill to be so overpacked that it was oozing up beyond the plane of extrusion. Not only does this cause a rough finished surface, but in extreme cases it snags the nozzle and causes the steppers to miss steps and the table to get out of alignment.

Once I realized what I was doing wrong, it was an easy matter to adjust the extrusion width over thickness in the proper direction. Here you can see too sparse a (puportedly) solid infill, with lower layers showing through.
The build on the left was aborted immediately after the steppers lost their place due to snagging the nozzle on blobs caused by stalls — you can see the beginning of an exterior wall being printed in the interior. Which brings me to my next point:
Fixing Stalls and Blobs
Several CupCake owners have reported problems with stalls and blobs, and mine seems to have been worse than most. While building, the XY table would randomly stop moving for between one and several seconds while the extruder kept extruding, causing a blob of plastic to be deposited. Depending on the preexisting density of the area getting blobbed, that could cause no problem at all (into a sparse interior lattice), a cosmetic disappointment (blobbing down the outside), or (much more often) a ruined model (building up and snagging the nozzle on the next pass).
The CupCake knew something was going on, too — it reported a communications error every time the table stalled:
Running GCode...

Running warmup commands.

Running build.

Error: payload not big enough.

Error: payload not big enough.

Error: payload not big enough.

Error: payload not big enough.
Looking at the source code and discussing the issue a little with Zack and Adam, it appeared that the problem was with the RS-485 communication between the motherboard and the extruder controller. The schematics showed a 180Ω termination resistor at each end of the connection, the electronics kits didn’t come with those resistors, and the MakerBot crew said to omit them, so I hadn’t had them installed. I tried adding them and the problem got even worse — nine out of ten builds couldn’t even complete the “raft” that’s laid down first to improve adhesion to the build platform. I took them back out.
Zack and Adam also suggested a bad patch cord between the motherboard and extruder controller. I switched to different patch cords from their set and other patch cords that I supplied with no noticeable difference. I’d be surprised if a proper RS-485 connection were that sensitive to patch cords anyway.
When I assembled my electronics in May, I noticed that five 1.8KΩ resistors were missing and contacted MakerBot for replacements. I caught the guys right when they were leaving on a whirlwind promotional tour, and my request got lost. Since they were pull-ups for the SD card socket and the I2C bus, neither of which I was using, I didn’t worry too much about it.
In late September when I was trying to debug the blob problem, one suggestion that other users have had is to upload the g-code to the SD card and print from there. I reminded MakerBot about my missing resistors and they promptly sent me a set. I entertained the notion that the unrelated pull-ups could somehow be causing the communications errors, ridiculous though that suggestion may be.
Yup, that was it.

I installed the heretofore missing resistors — sadly, my hand-soldered SMT is not nearly as lovely as my hotplate-soldered SMT — and the comms errors went away. The only thing I can think of is that the motherboard’s control loop checks for activity on the I2C bus and/or the SD card and flapping logical levels were causing it a lot of extra work that made it lose timing on its communications.
Whatever the cause, the stalls and blobs disappeared immediately and (as far as I can tell) permanently. I haven’t seen a single one since.
Using “Unpause” to Fix Slowdowns on Curves
With the default Skeinforge settings, my CupCake was slowing down on curves — the tighter the curve, the slower it went, with no concomitant slowing of the extrusion rate. On some curves, the CupCake table was slowing down so much that the extruder was blobbing, with results that by now should be painfully familiar.
Although I have the impression that g-code may support curve operations, I can see that Skeinforge is approximating curves as a series of straight segments. Shane Hathaway’s Delay Compensation in the G-Code Firmware describes the diagnosis and solution: the motherboard’s Arduino is taking too long doing the floating-point path calculations for the short line segments on tight curves, so increase the path feed rate for those segments.
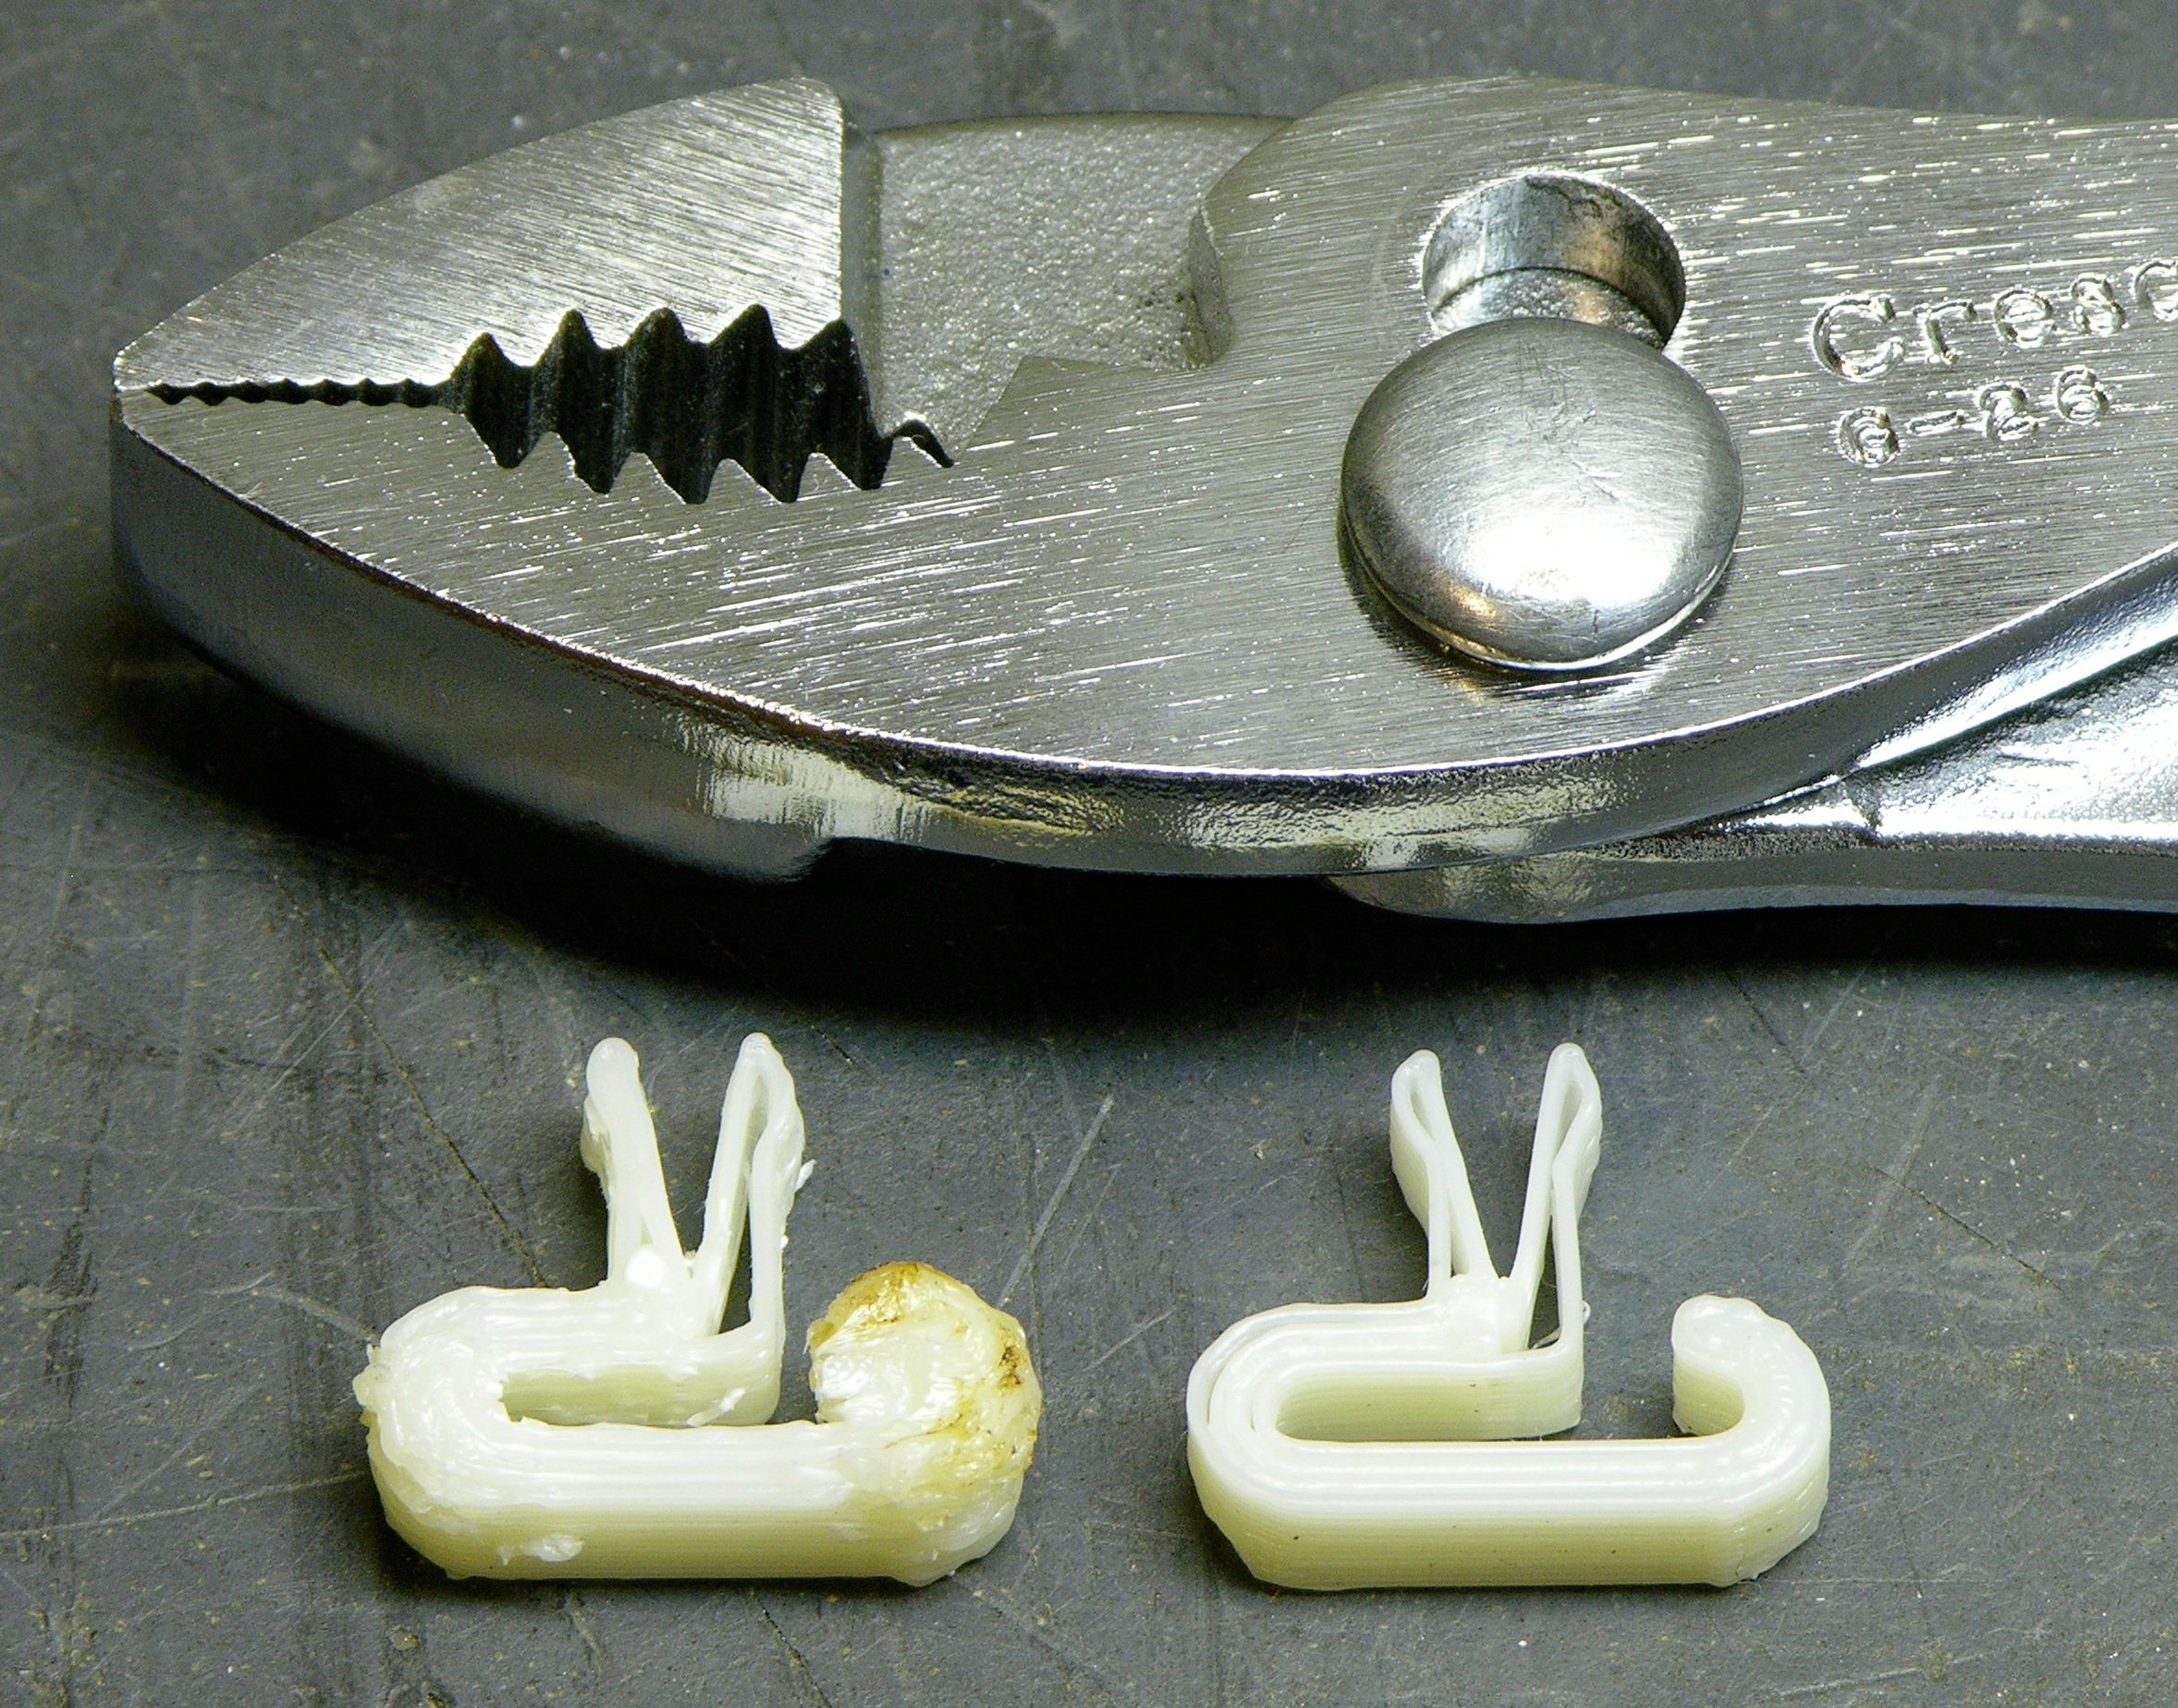
I don’t totally understand the interactions here, but the incorporation of Shane’s method in Skeinforge’s “Unpause” tool clearly works — the two cable clips above are exactly the same STL file and Skeinforge settings without and with Unpause activated (and with Comb active and inactive, but I promise that Unpause is the part that fixed this).
Turning off “Comb” to Eliminate “Hairs” and Bizarre Behavior
The “Comb” tool is supposed to alter the extruder path to reduce stray “hairs.” By way of example, instead of moving the extruder across an empty space and possibly leaving a thin filament on the exterior surface of the model, Comb will cause the extruder to take a longer path that keeps it within the interior of the build piece.
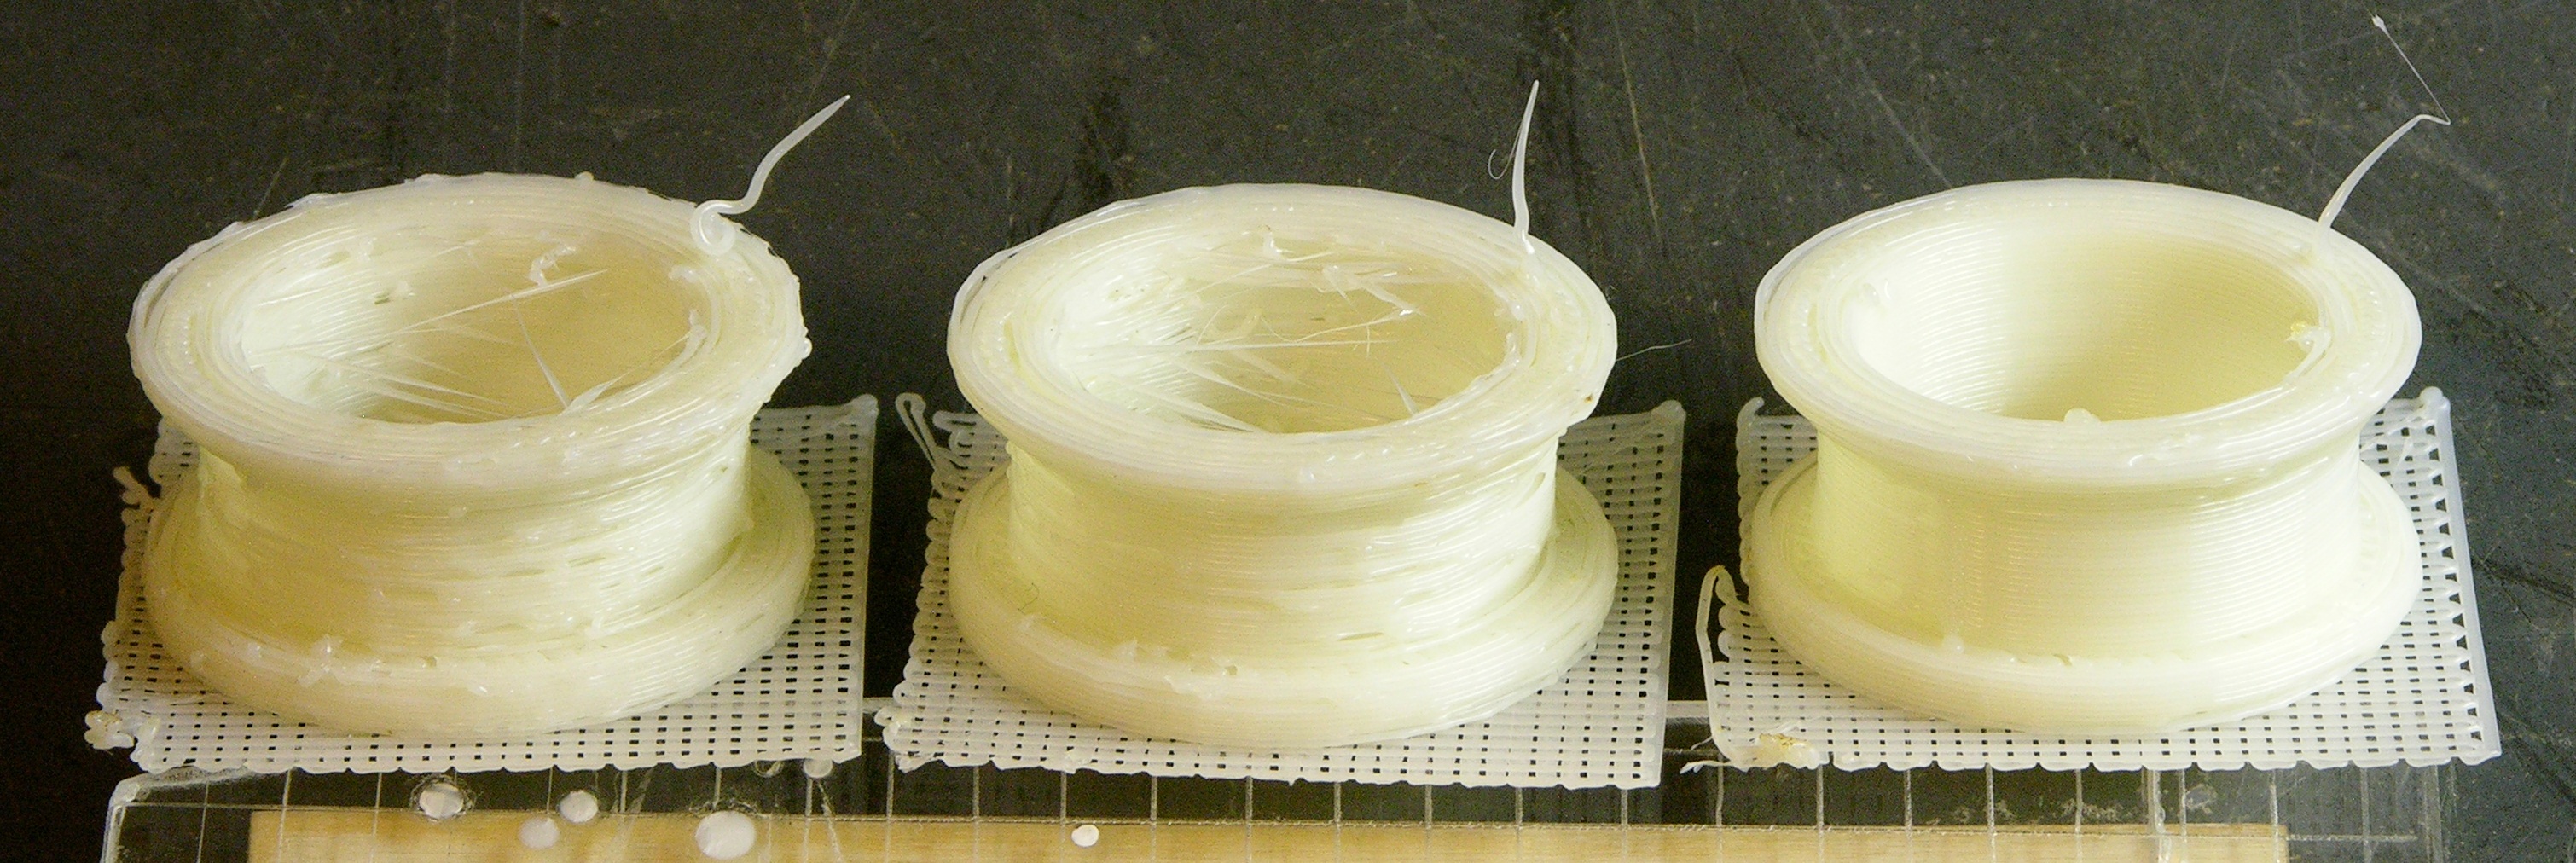
The problem is that Comb just isn’t working, at least with my Skeinforge (I believe 0006) and my CupCake. The left idler pulley above has Comb activated with default settings, the center has Comb activated with “Arrival Inset Follow Distance over Extrusion Width” and “Minimum Perimeter Departure Distance over Extrusion Width” set to 0 so they’d have no effect, and the right pulley is printed with Comb entirely disabled.
I don’t understand exactly what Comb is doing wrong, but during the print I can see the table making bizarre speed changes and doing things like circling the entire perimeter without printing, even though “Cool” isn’t active.
Looks like I won’t be using Comb.
And I’m now very pleased with my CupCake, and using it like crazy. More on that in the next few days.
I greatly appreciate your scientific approach to this — the before and after prints for Unpause were priceless. Gonna go play with Unpause now.
Great post! This should really help me clean up some of my prints. I have been somewhat plagued by blobbing, especially around small curved features.
I’ve wondered how you guys are printing “overhanging” features, like the top flange of your pulley. Is there a magic fillet radius value that works, depending upon the layer height?
Dave M, the generally accepted overhang value is 60°, meaning that you can print something with an overhang of 60° up from the horizontal plane (or 30° out from vertical). It’s a fairly shallow overhang because it means that no extrusion thread is unsupported underneath, as it would be with a 45° overhang or “less.”
(Personally, I think the overhang measurement is confusing — I think it would be more clear to measure the deviation from vertical than to measure the angle up from the horizontal plane. But as long as you keep it in mind, then whatever.)
So the top flange of the pulley is designed with a 30° supporting cone underneath. In the terminology used in CATIA, that’s a 30° chamfer — although Zach actually designed the pulley by drawing the radial cross-section and then spinning it around the axis. But you get the idea.
Thanks, Keith! 30 degrees from vertical makes a lot of sense.
Interesting. I turned off Comb yesterday, and my part ended up with hairs! With it on, I didn’t have any hairs. I’m also running 0006. I’m going to try Unpause next to see how that works for me.
Hi Keith,
What settings do you use for Unpause? Right now I’m using:
Delay (milliseconds): 28.0
Maximum speed (ratio): 1.5
Awesome info as always!
Jay, according to my notes, all I’ve done with Unpause is activate it — I haven’t tweaked the individual settings. My recollection is that simply enabling Unpause immediately made such a huge difference that any fine-tuning I might want to do is obscured by other Skeinforge tuning I need to do first.