The web is ablaze with projects for sous-vide (vacuum-sealed) and low-temperature / long-duration cooking. For those not familiar, the basic idea is that if a perfectly-cooked medium-rare steak is 120°F / 49°C in the center, by cooking traditionally on a grill, you overcook it everywhere but the center. Instead of cooking at a higher temperature and waiting exactly the right amount of time for the inside to warm up to the desired temperature, cook the entire piece in a water bath at the desired final temperature for a long time, then sear the outside to make it extra yummy.
My project this weekend, rolling around in my head for way too long and finally kicked into motion by EMSL’s omelette-in-the-shell post, is nothing new nor revolutionary; it’s merely mine. Like many others before me, I plugged a crockpot into a PID controller to turn the crockpot’s heating element on and off and maintain its temperature precisely over a long period of time.
PID Controller
Friday night I robbed the PID controller from my soldering hotplate, gathered the other pieces I was going to need, and prepared the back panel for my crockpot controller.
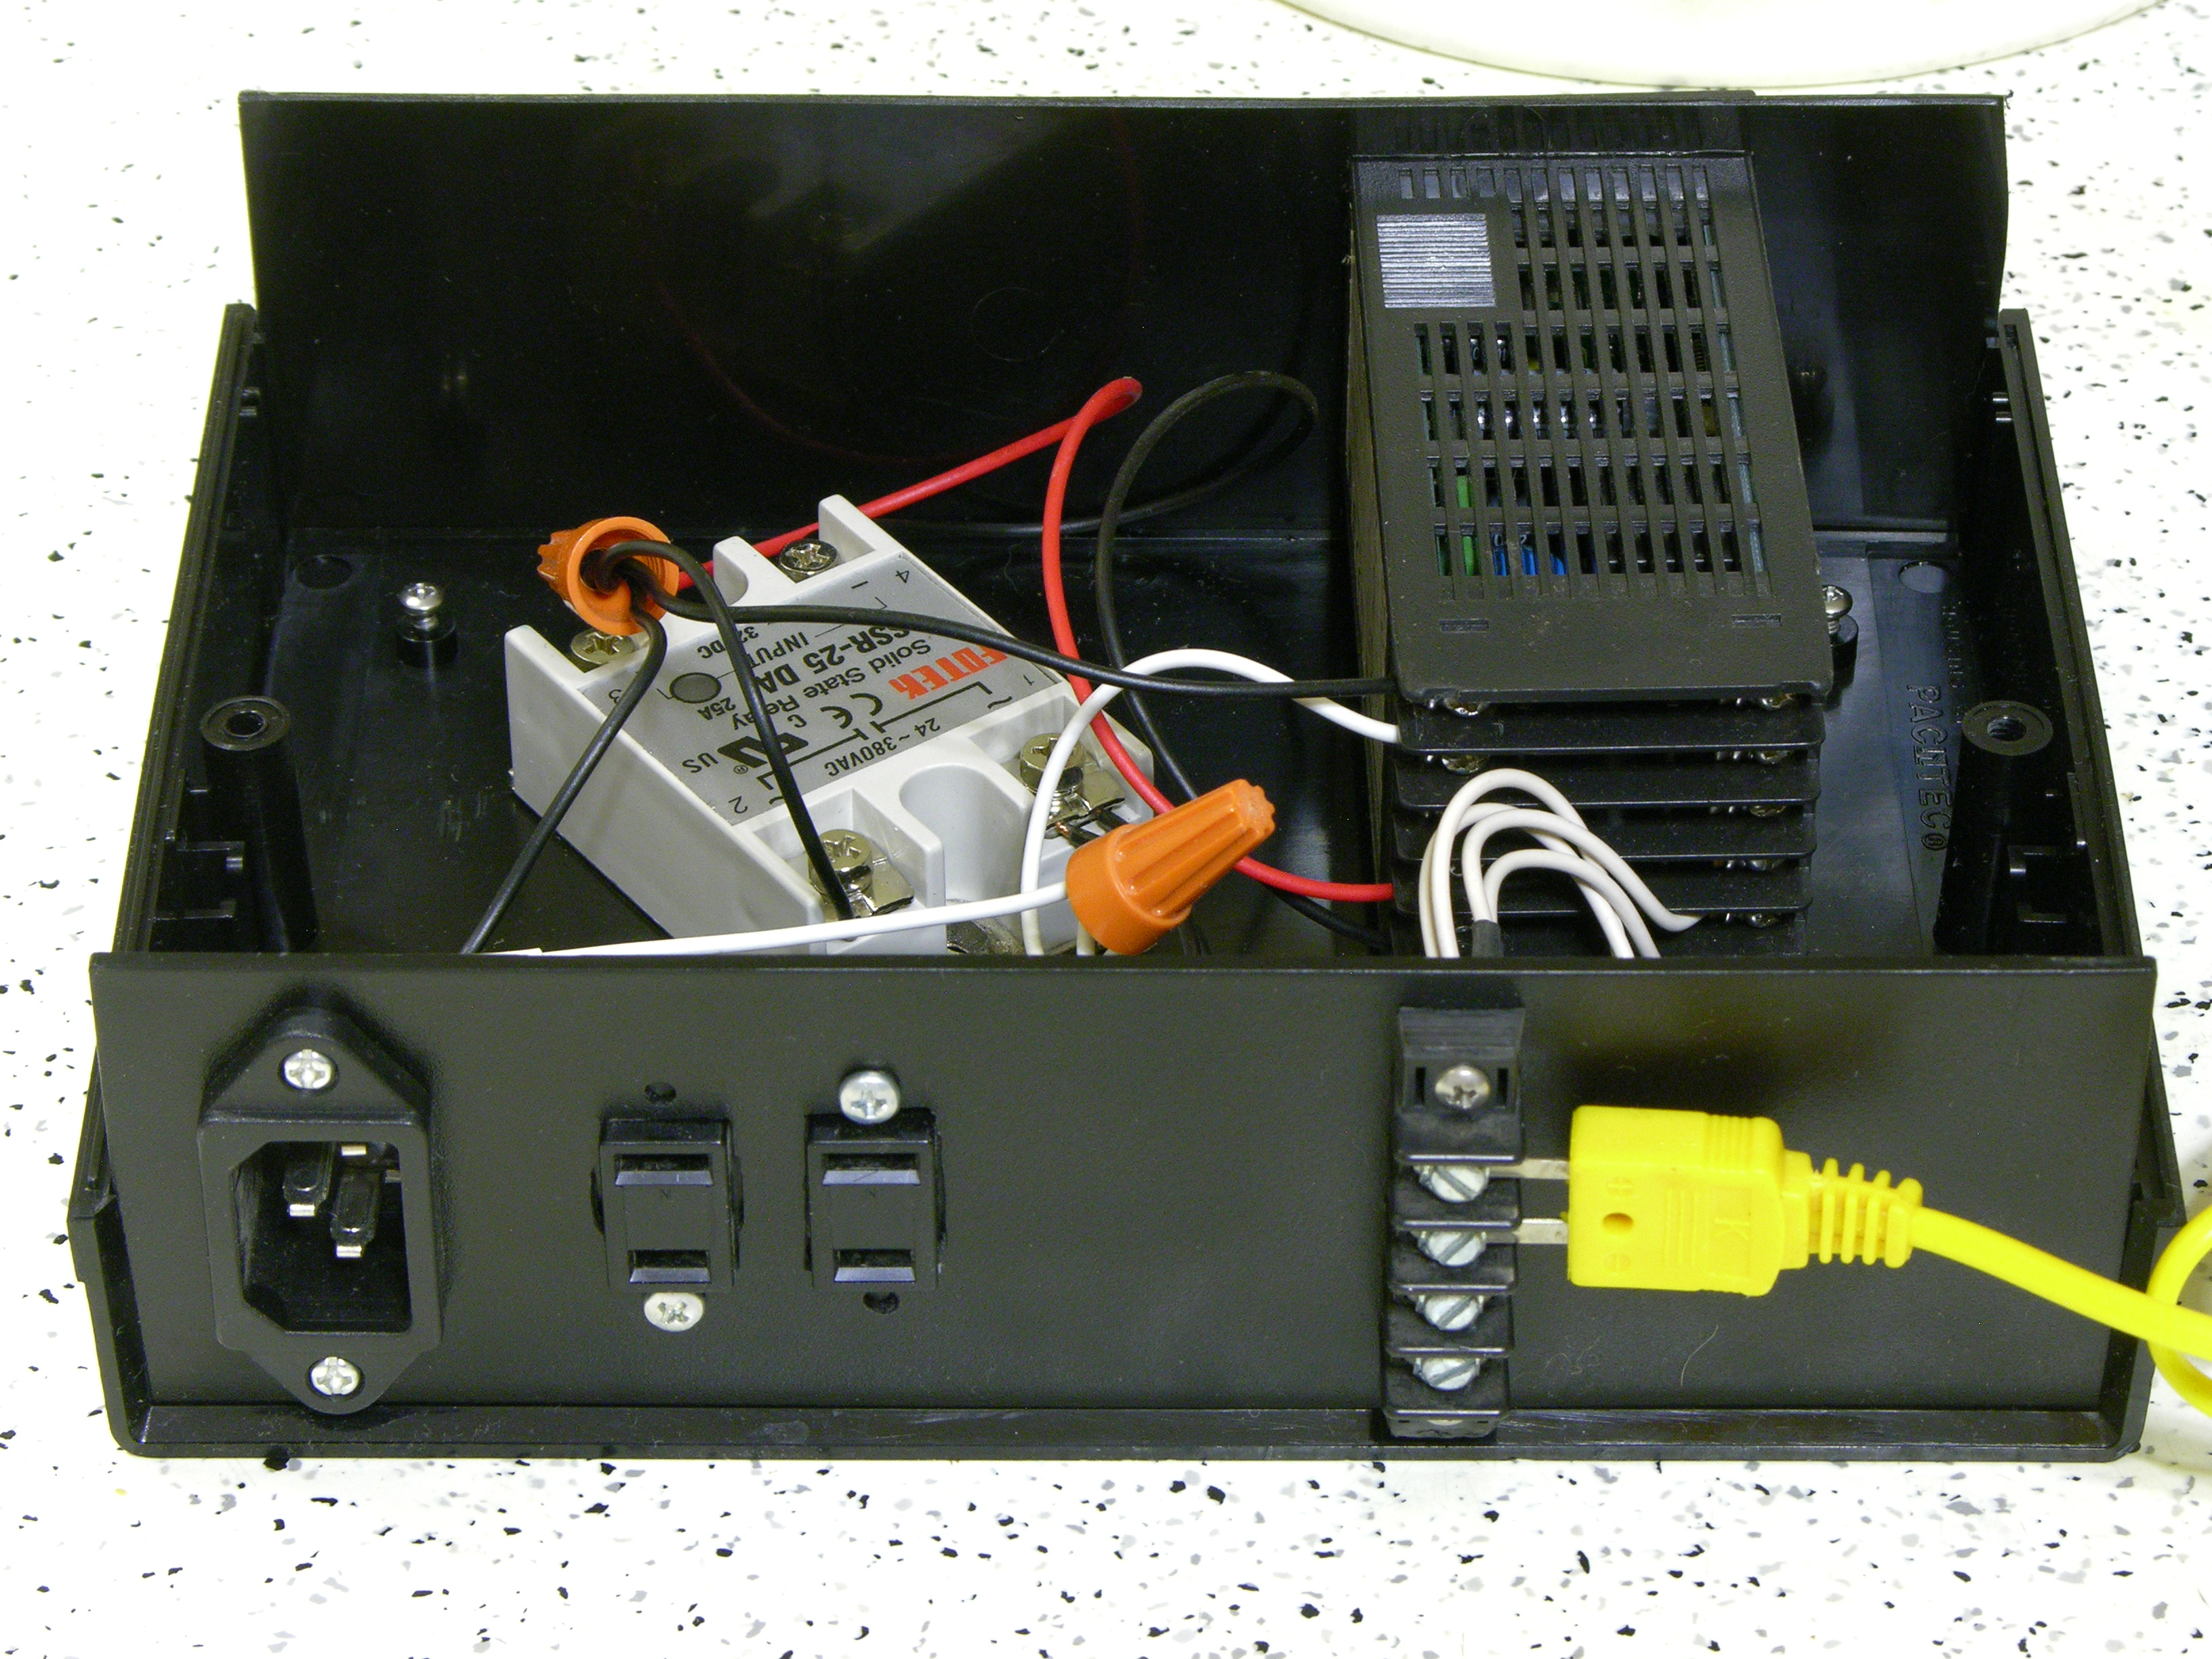
I used a C14 connector rather than a hard-wired power cord because I want this controller to be as modular as possible — easy to pack up and take to a friend’s house. Being able to disconnect the power cord made it feel a little easier to take apart and pack nicely. I put NEMA 1 receptacles on the back rather than cut open an extension cord or rewire a crockpot for the same reason. For now, I just trapped the thermocouple’s pins in the screw terminals that were already on the case.
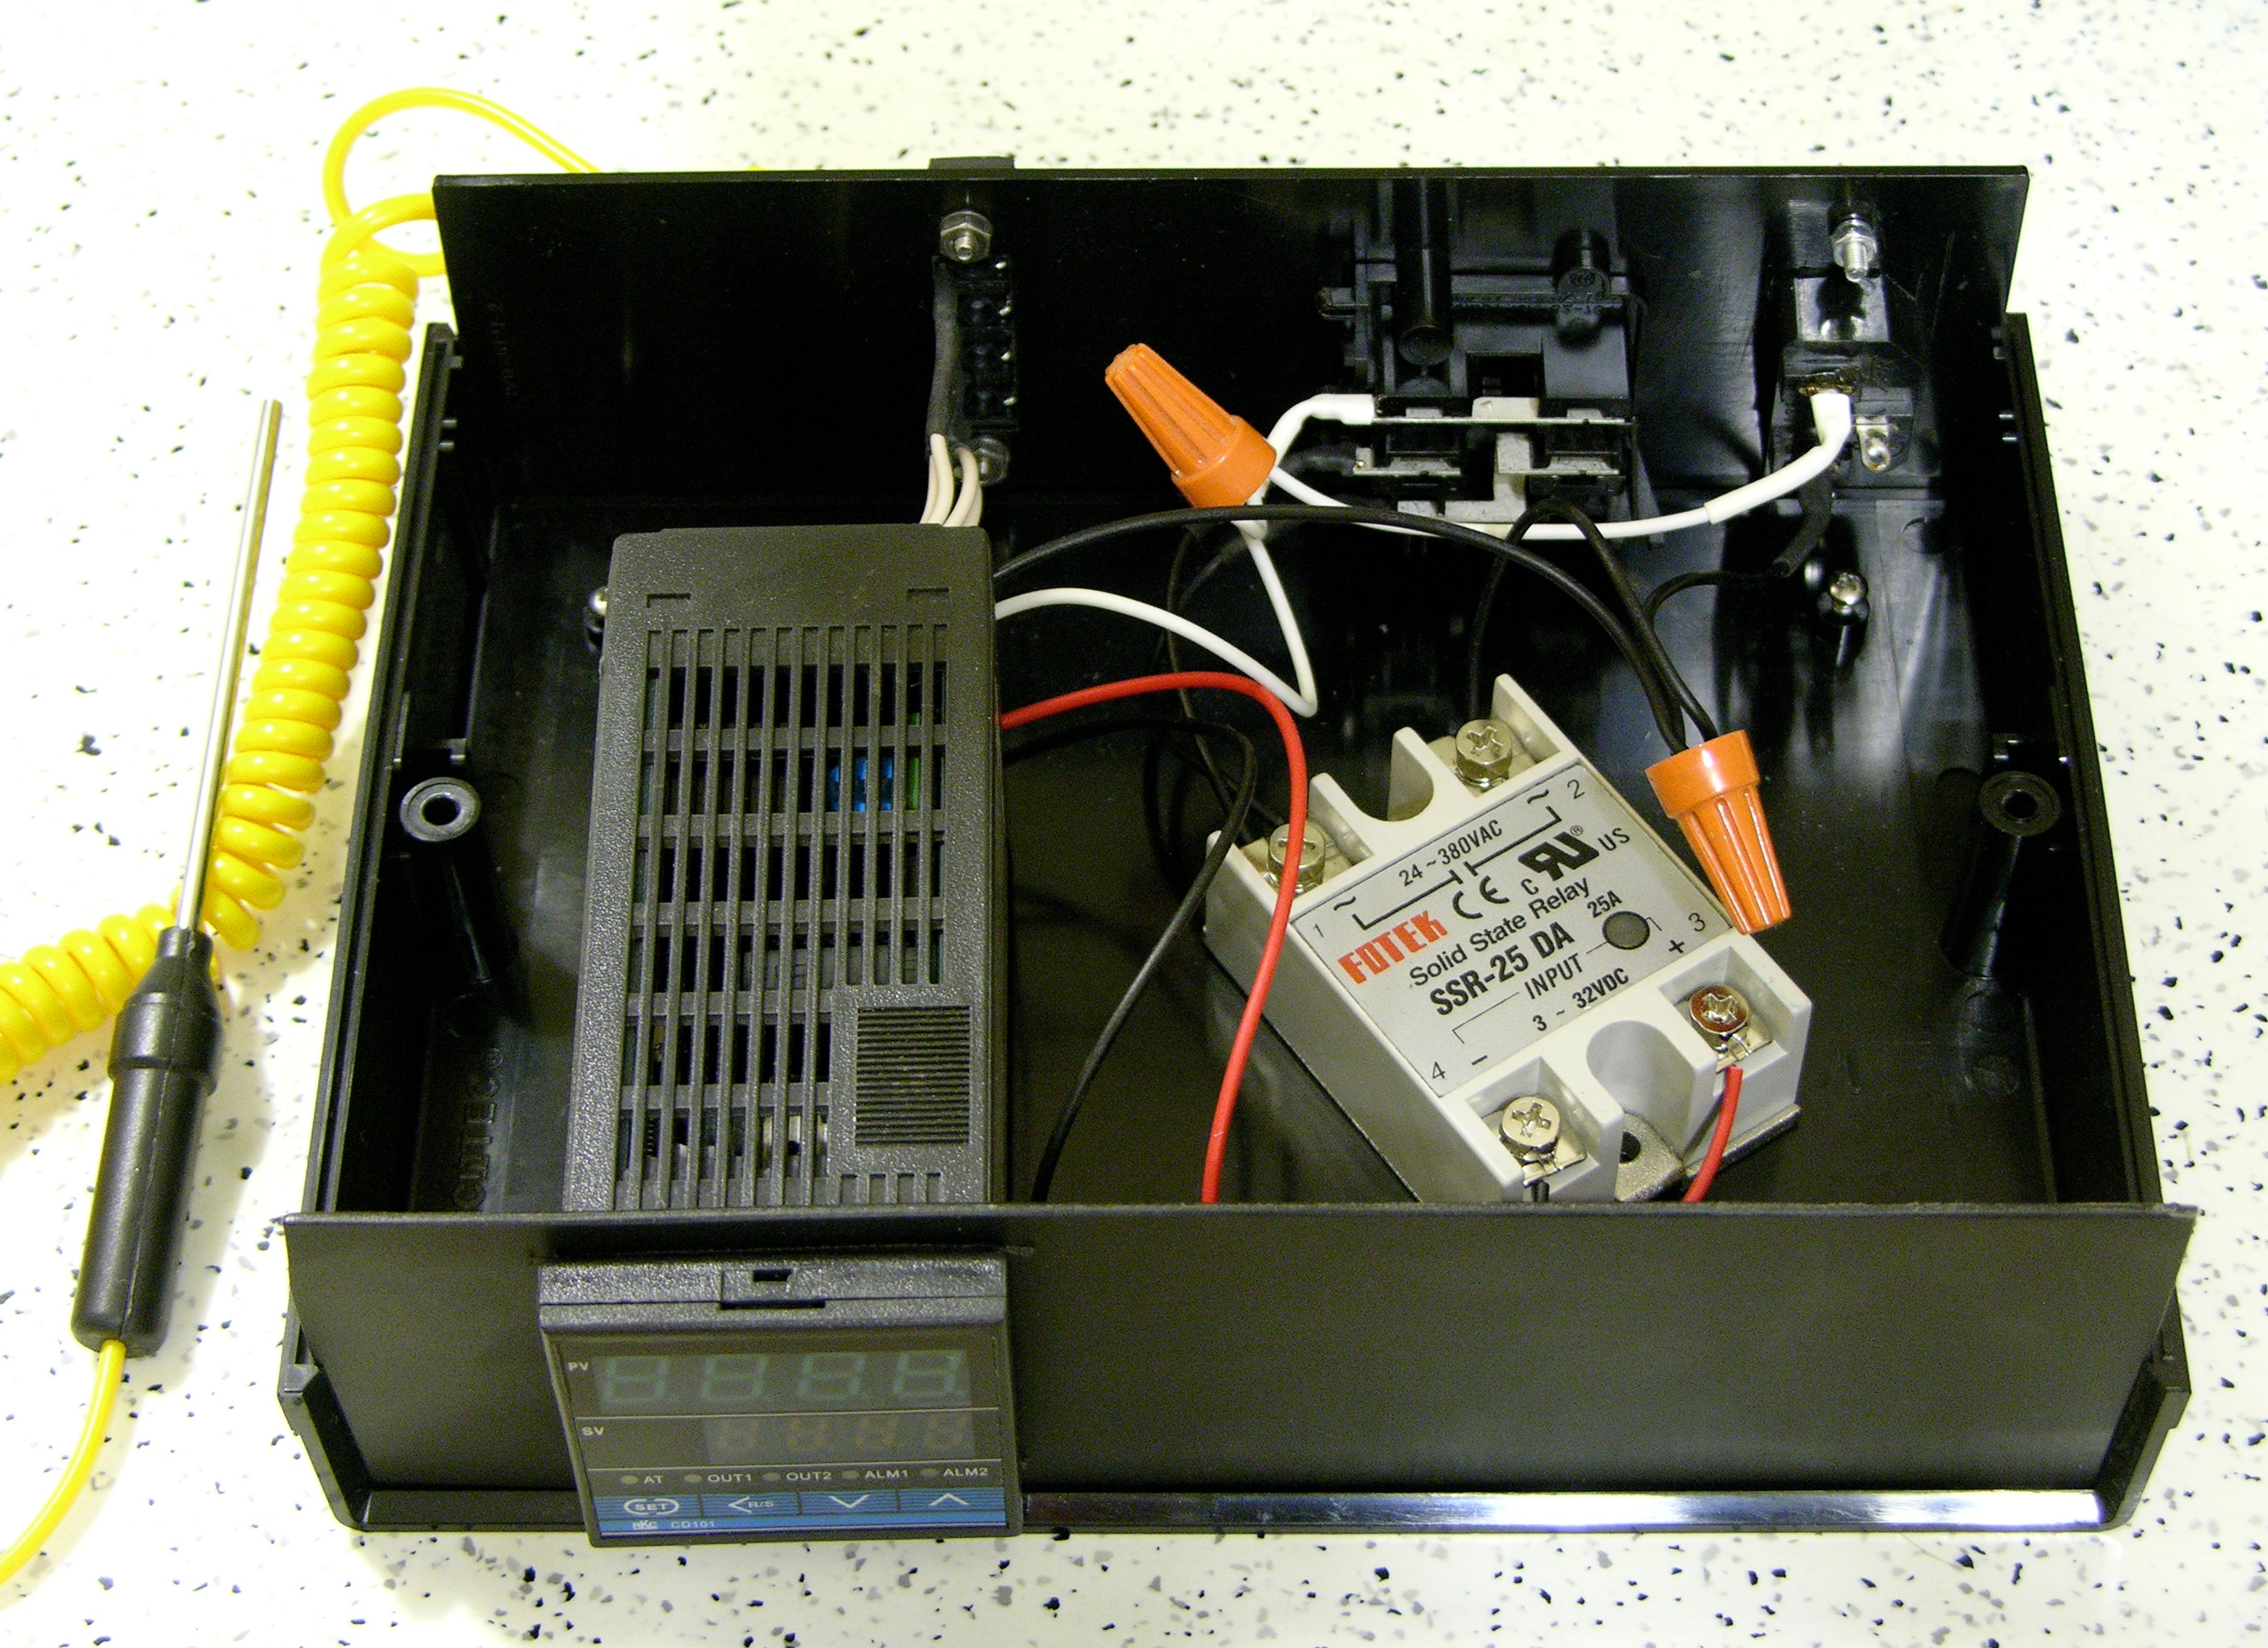
Saturday morning I made the front panel and wired it up. The PID controller runs a solid-state relay that switches power to the receptacle where you plug in the crockpot.
PID controller from Sure Electronics ($37 with free shipping and screw-in thermocouple not used here; other controllers now available for less), SSR from modders_chn ($7 with free shipping), and dirt cheap probe-style K-type thermocouple from xiao2huan ($3 including shipping), all on eBay. PacTec case and terminal strip from an ancient (by definition, I guess) RS-232 multiplexer; new front panel plastic cut from some kind of van laptop tray thing. C14 socket and internal wire from a dead PC power supply; NEMA 1 receps from a dead stereo receiver. Reuse, reuse, reuse, baby.
Choosing a Crockpot
My next step was confirming that the crockpot I wanted to use would heat to the temperatures I needed. A small crockpot seemed less wasteful of water, so I tried our 1-quart:
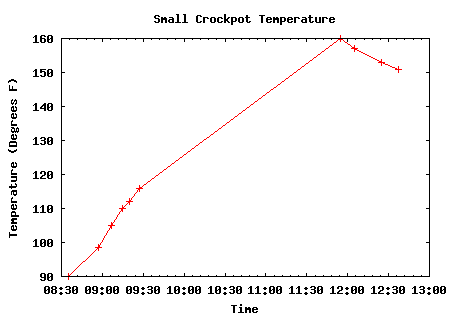
It took a long time to heat to its maximum temperature (during which time I left the house and came back); its maximum temperature is relatively low; and it had a much lower maximum temperature when I opened the lid just enough to stick the temperature probe into the water. Didn’t feel like this would be a good choice to maintain temperatures in the 150°F range, especially after dropping in food at a lower temperature.
Okay, no problem. The water in a larger crockpot has a greater thermal mass and will drop less in temperature when adding food. (Hm, maybe this is sloppy thinking — what’s really important is having an oversized heater to bring the temperature back up quickly?)
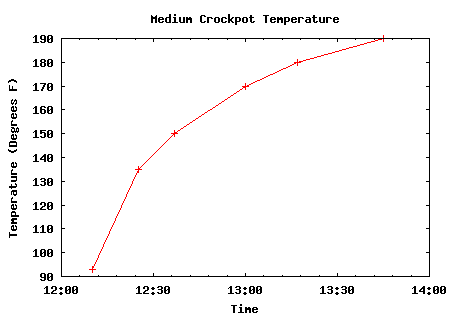
At any rate, the 4-quart crockpot heated to satisfactory temperatures in about an hour with the lid sitting partly open on the temperature probe the whole time, and reached even higher temperatures after another hour.
Lesson learned: Fill the crockpot with hot water to get a headstart.
Eggs
The French Culinary Institute’s technology blog has charts showing the results of different cooking methods on common items (thanks for the link, EMSL!), which enticed me to try cooking a couple of eggs at 64°C / 147°F.
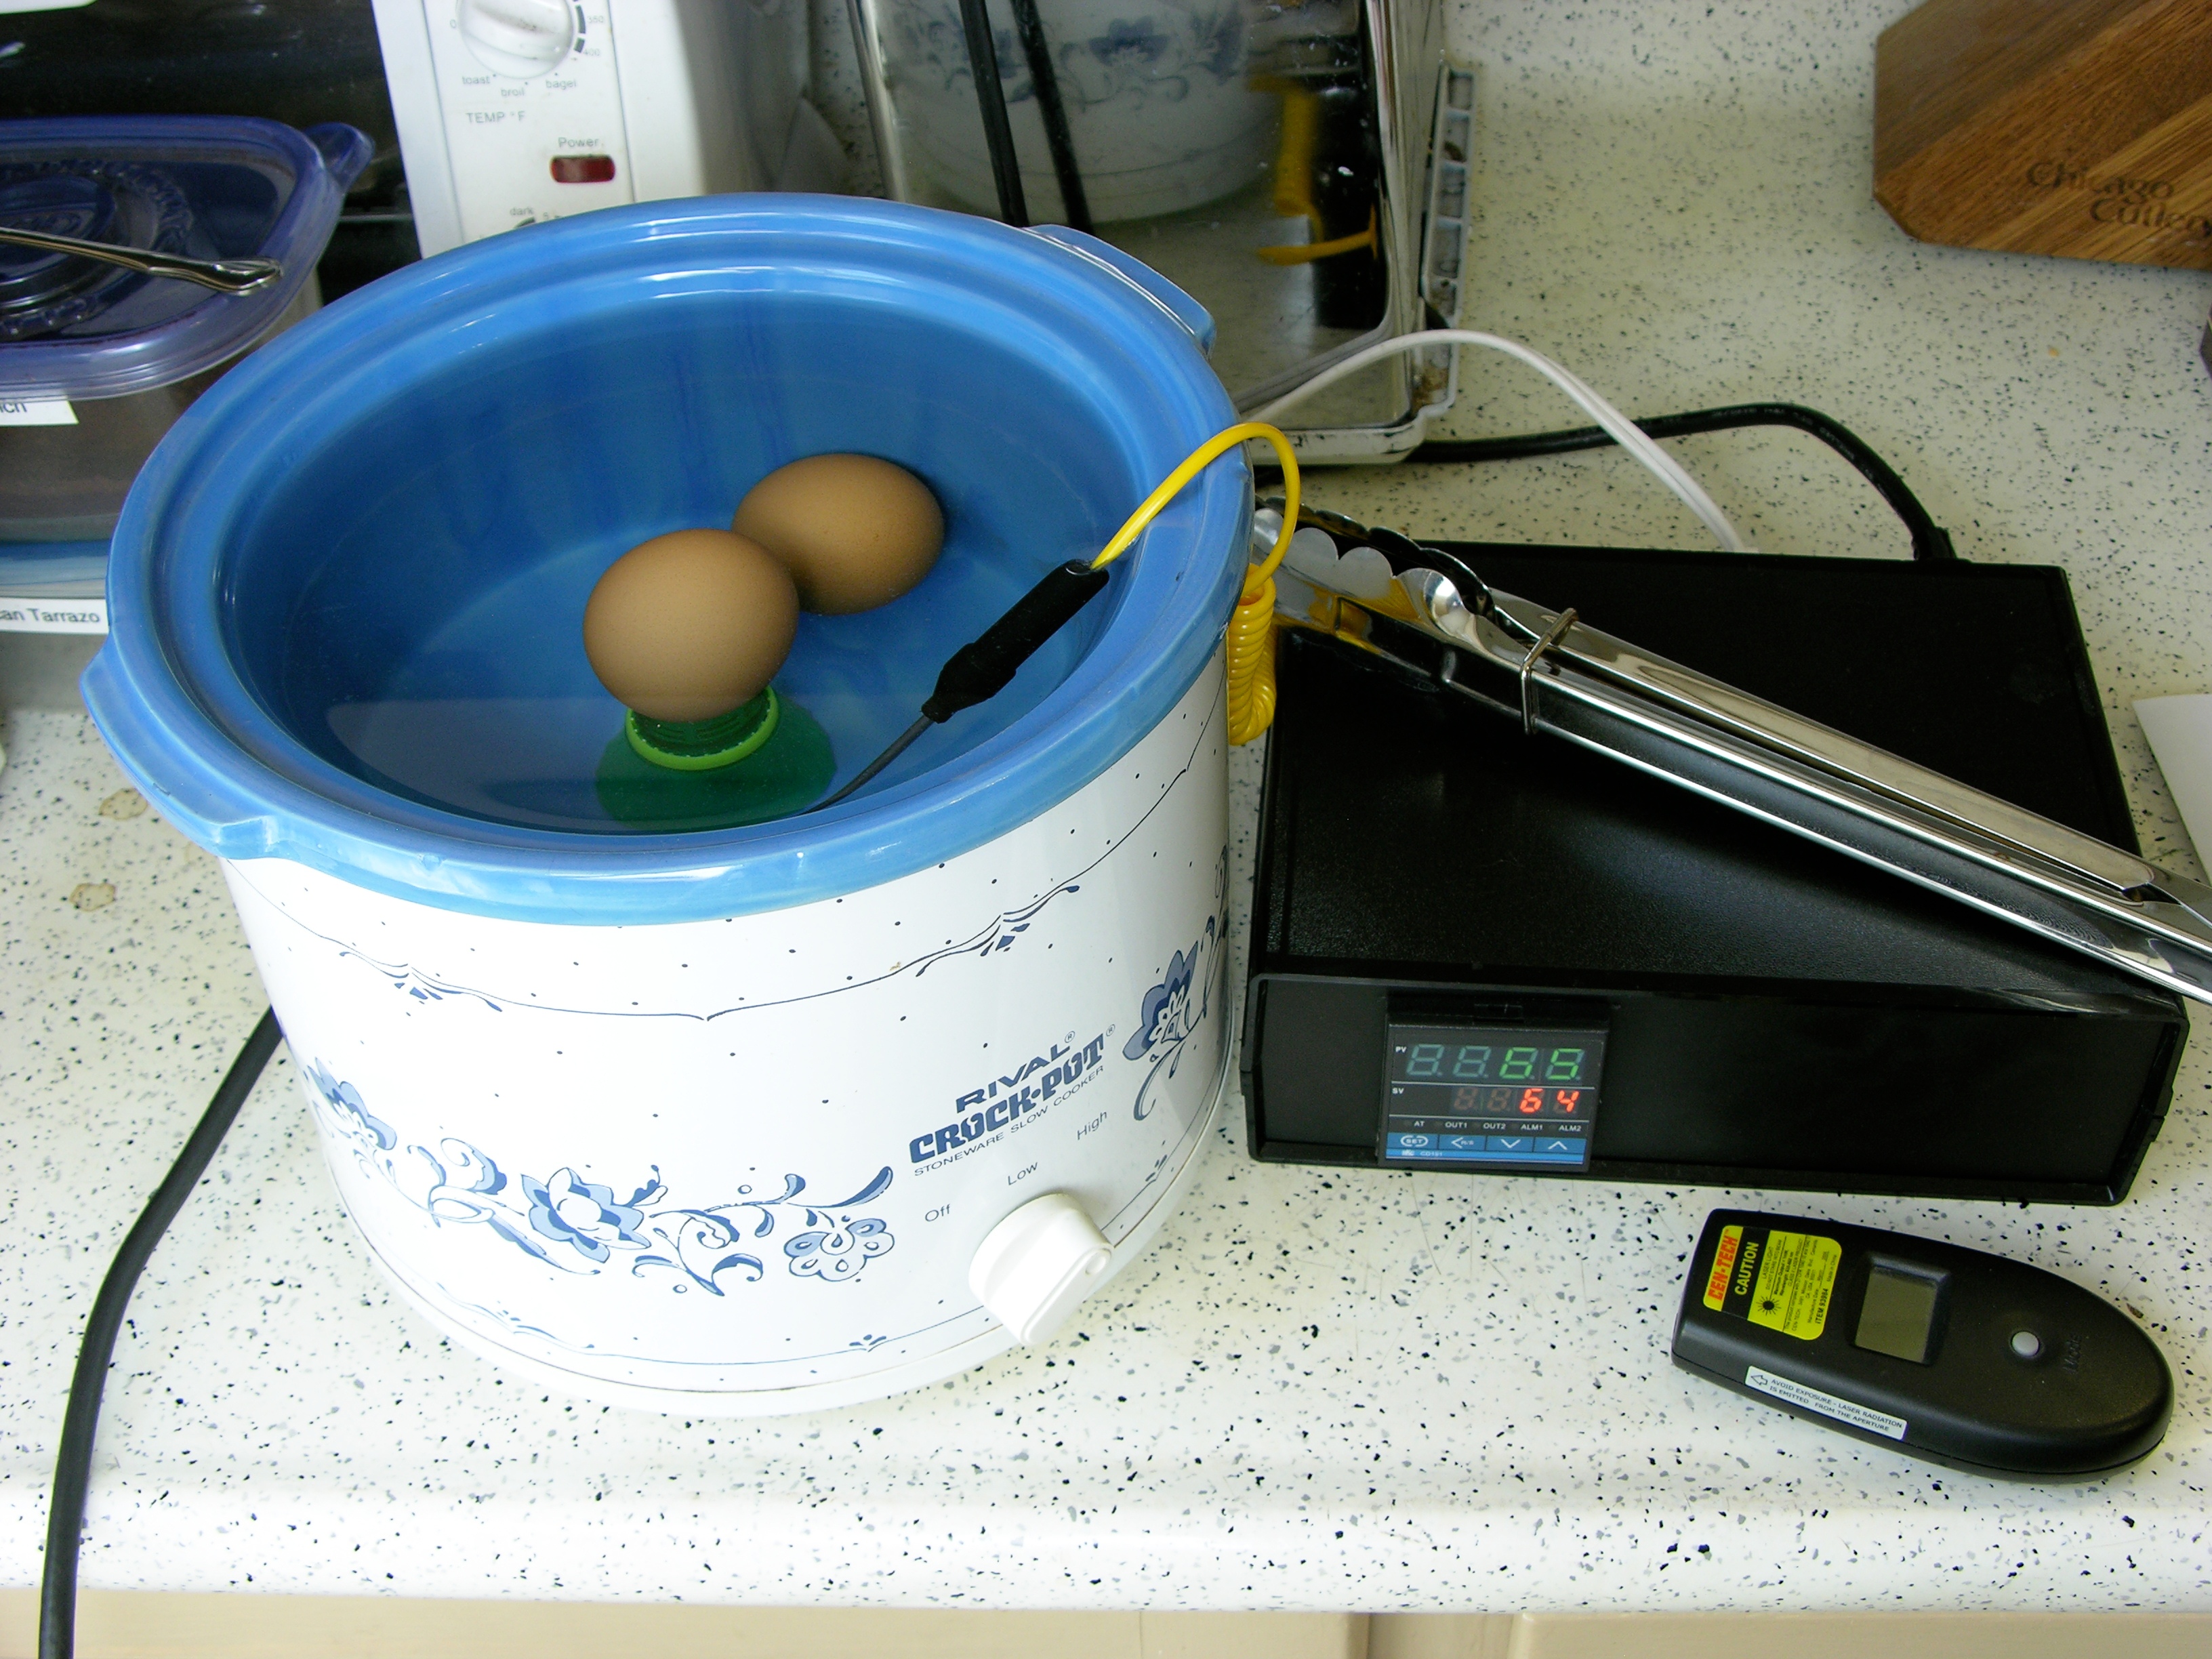
As seen in the very first picture, I set one egg directly on the bottom of the crockpot and put one on a pop bottle top to raise it and see whether the water temperature was significantly different in the middle than on the bottom.
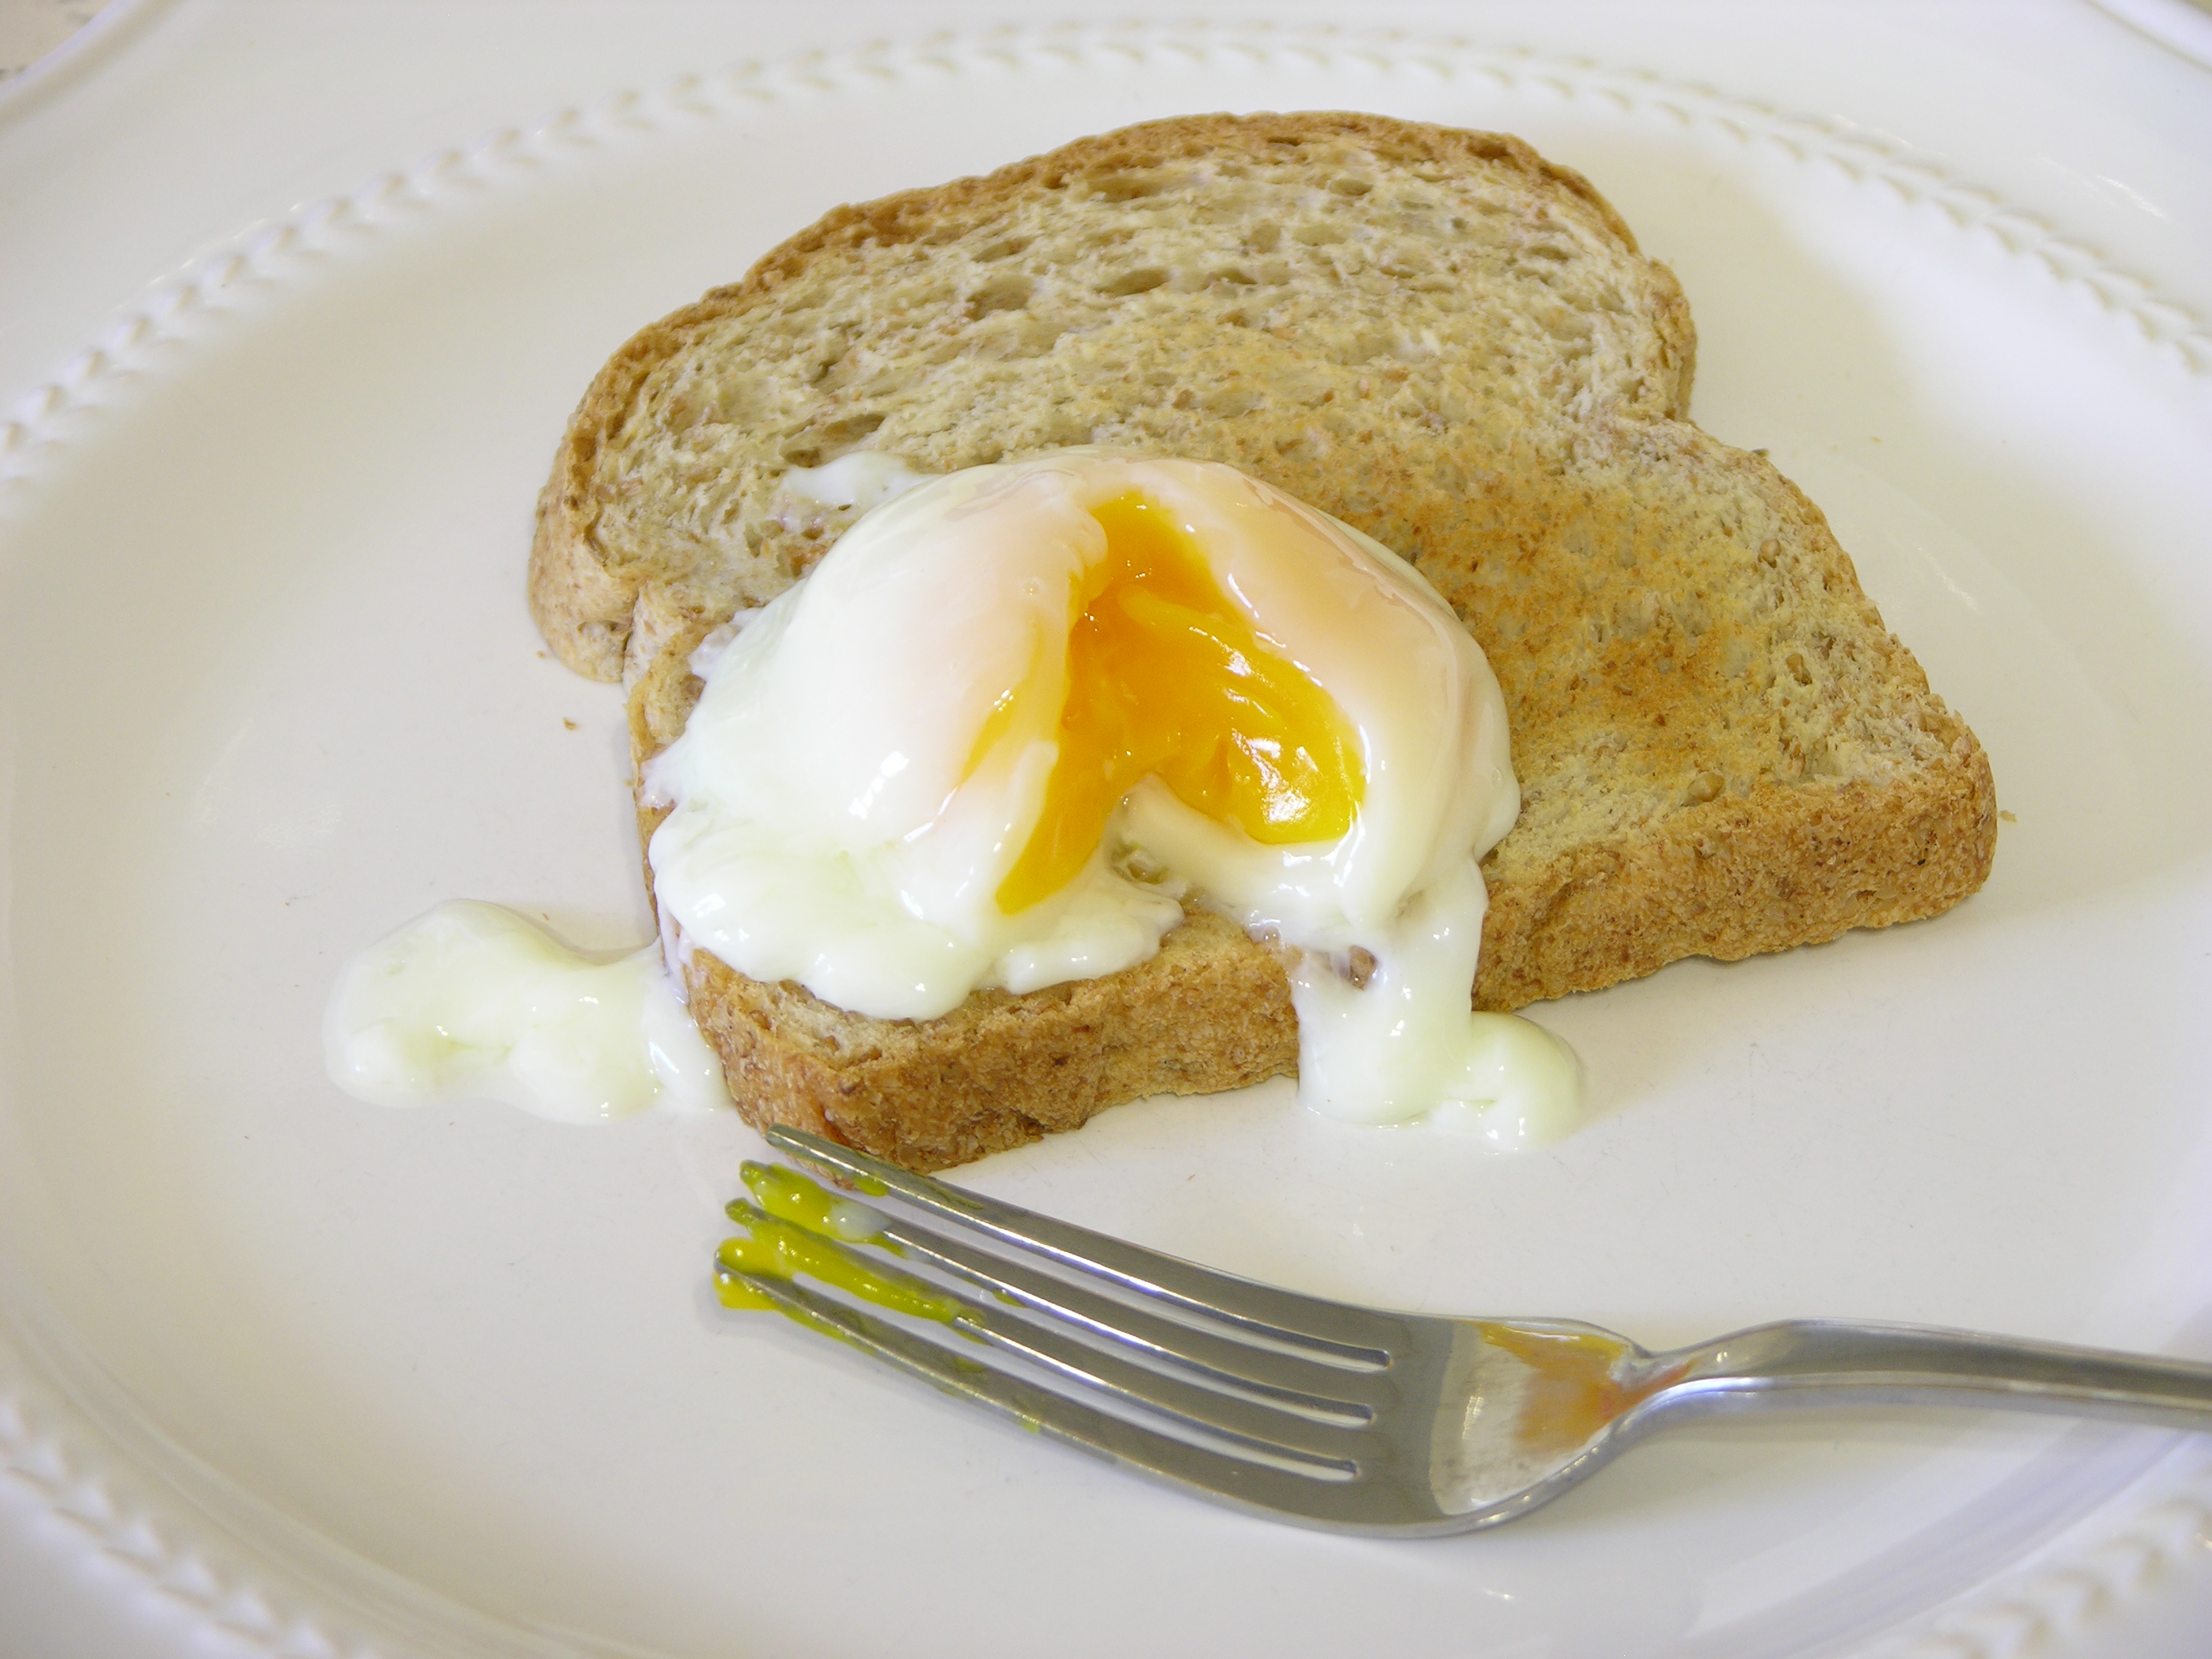
I removed the raised egg after 75 minutes at 64°C. The yolk was just beyond soft-boiled, but the white was also quite soft — something you don’t get when the egg is cooked in boiling water and sets from the outside in.

Mashed on toast, it had a consistency somewhere between jelly and preserves — quite soft, but with variation in firmness between the softer white and the slightly firmer yolk.
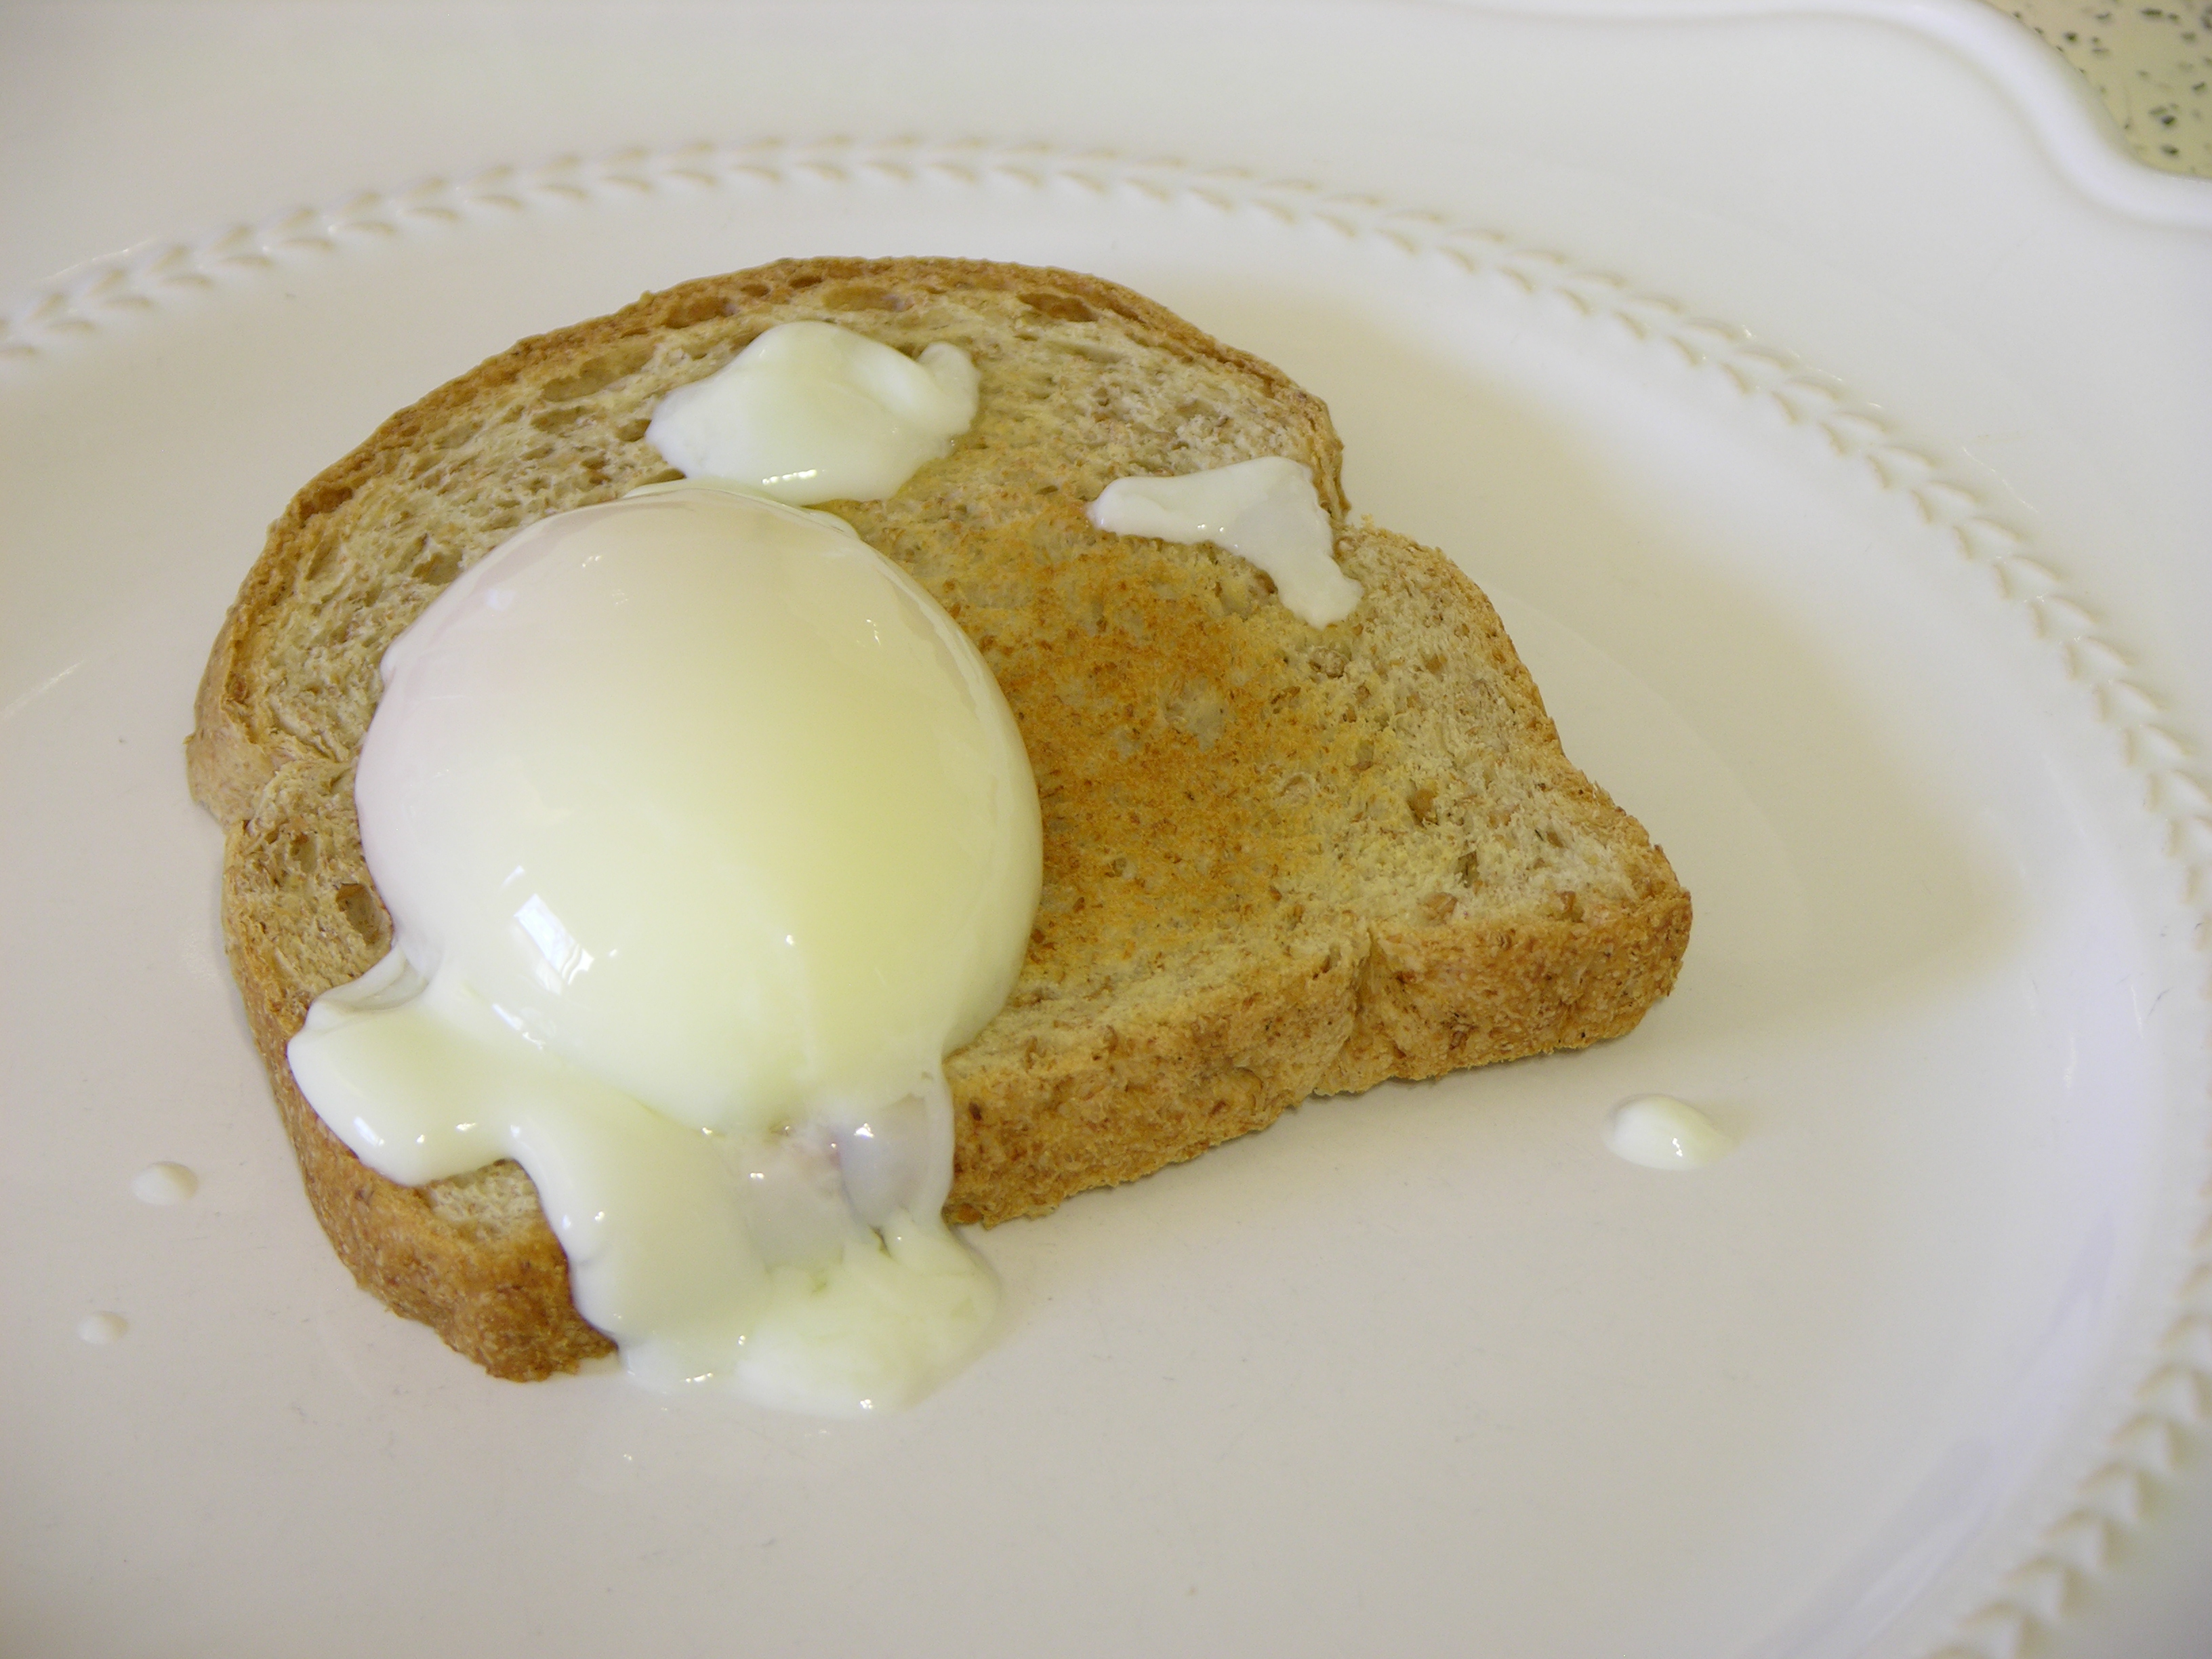
I removed the second egg from the bottom of the crockpot after 90 minutes at 64°C, and it was softer than the first. Not only was the white runnier,
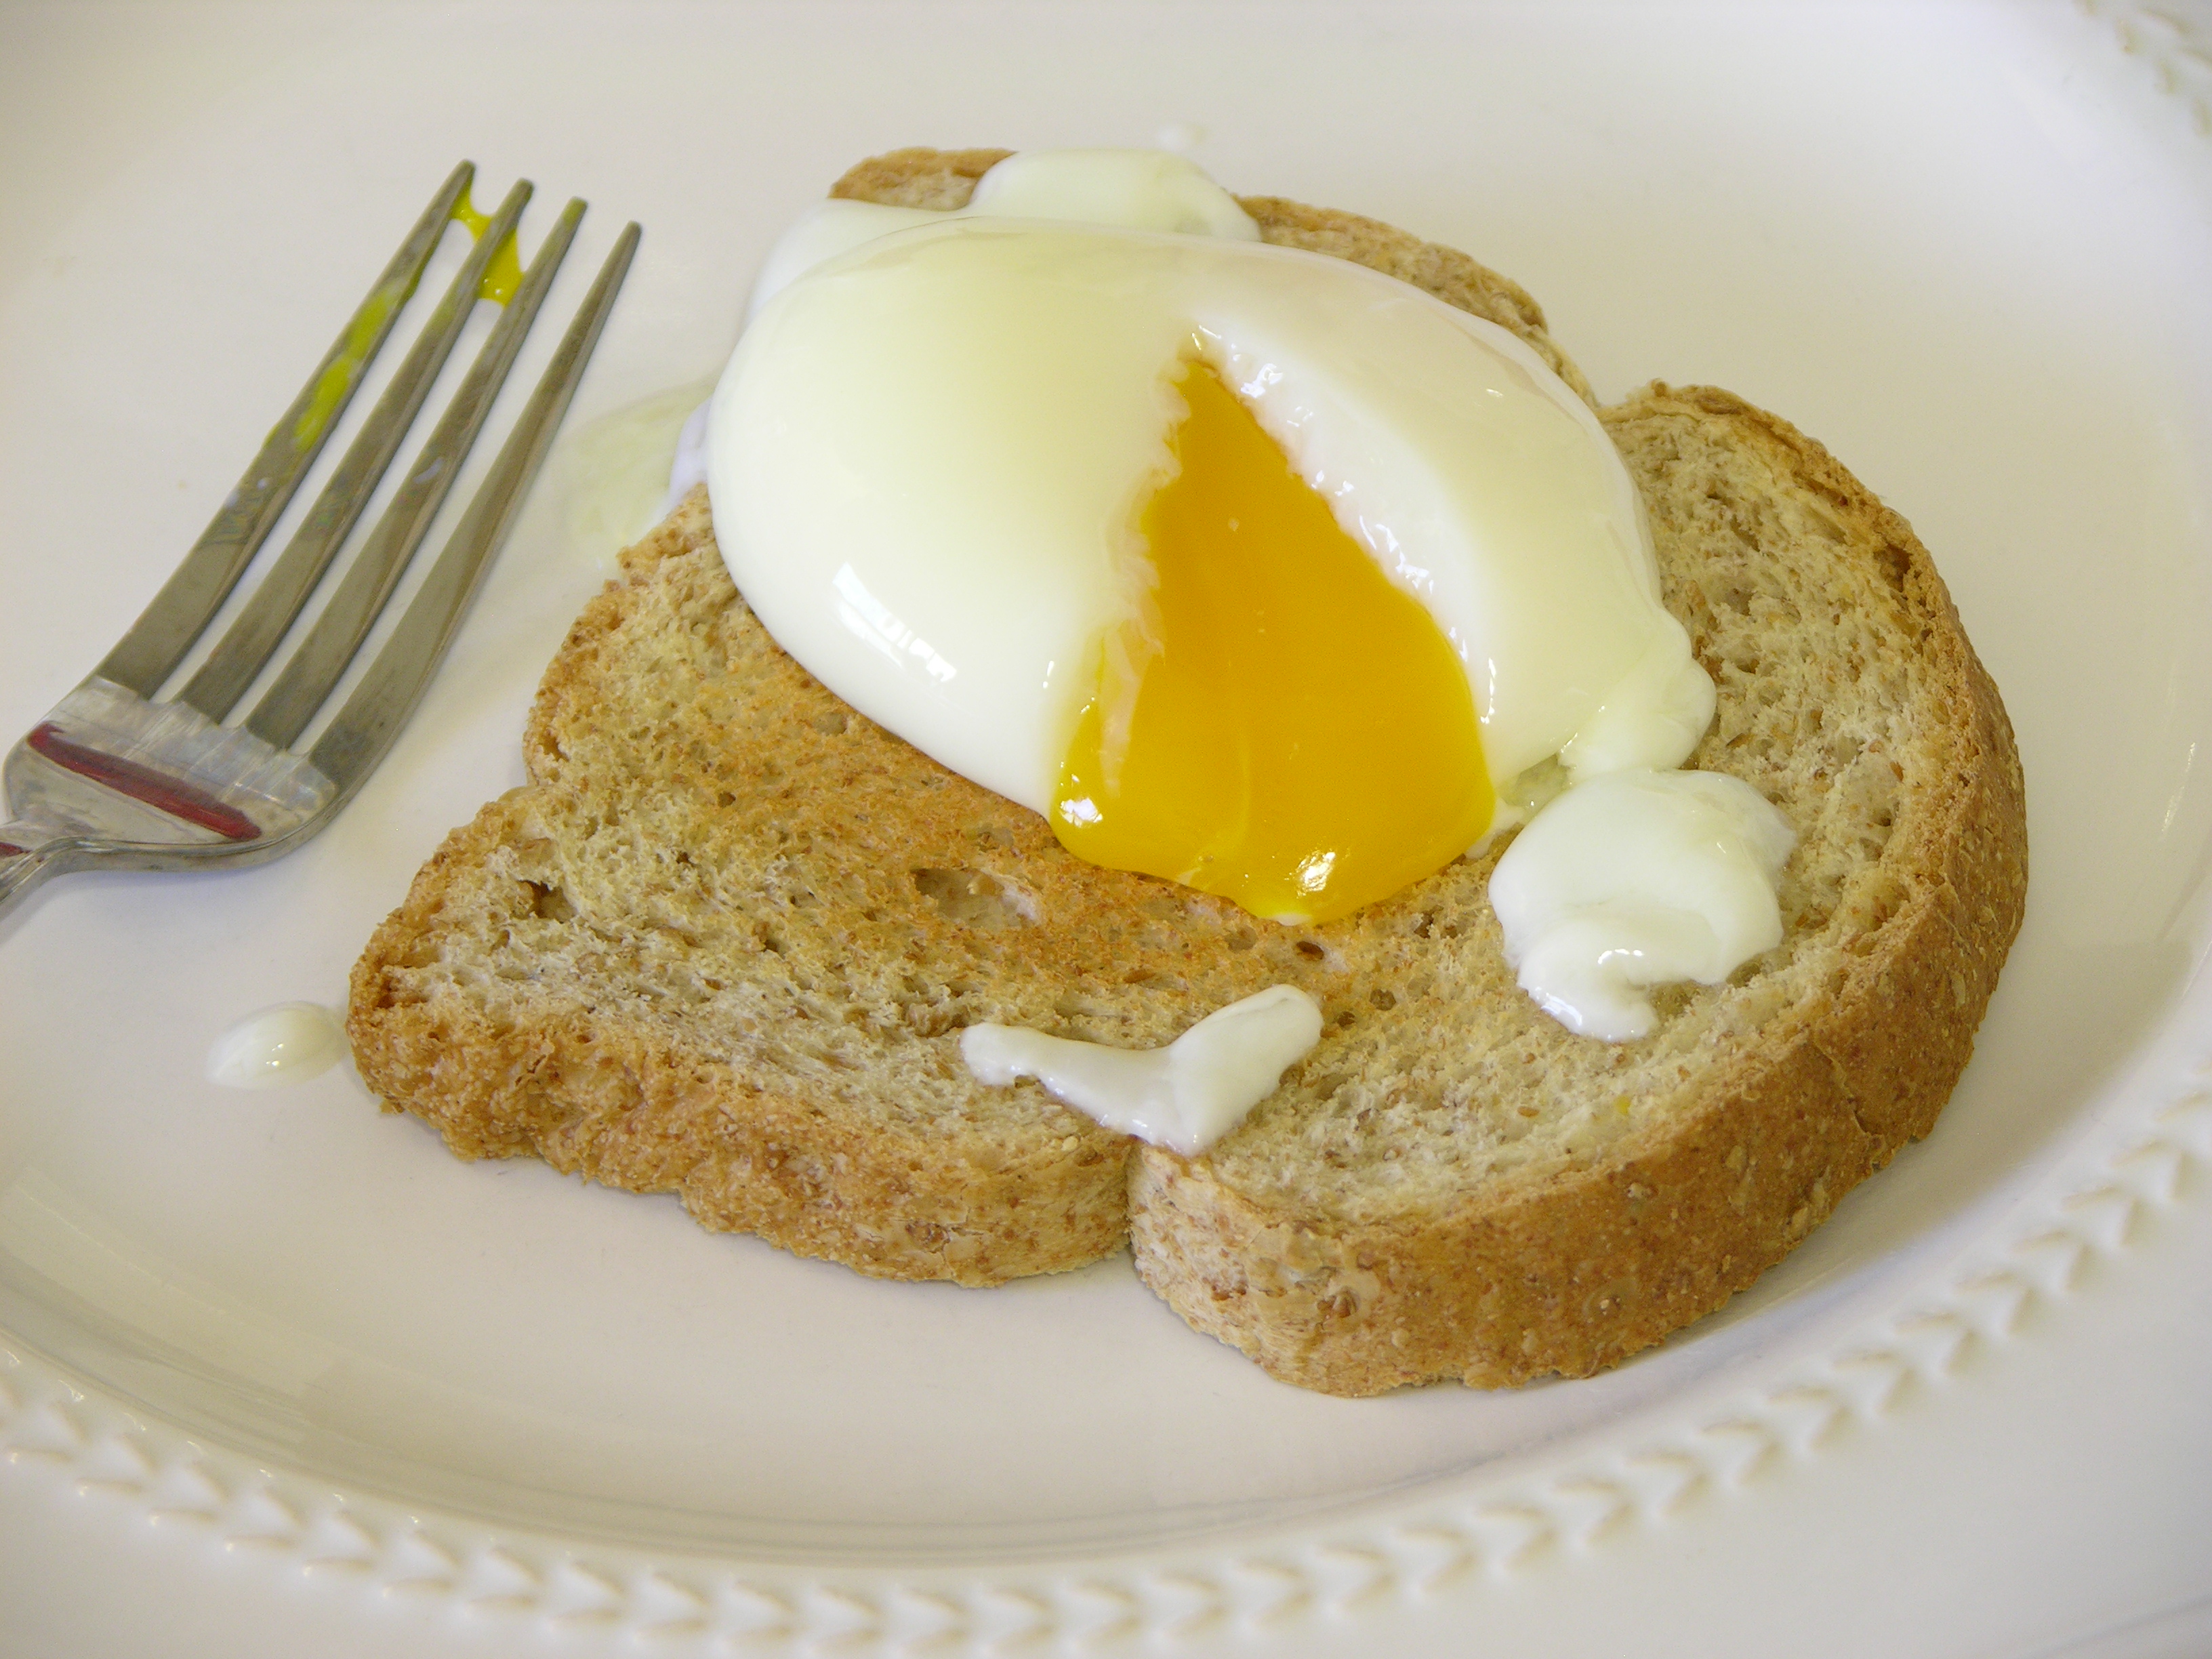
but the yolk was still (barely) liquid.
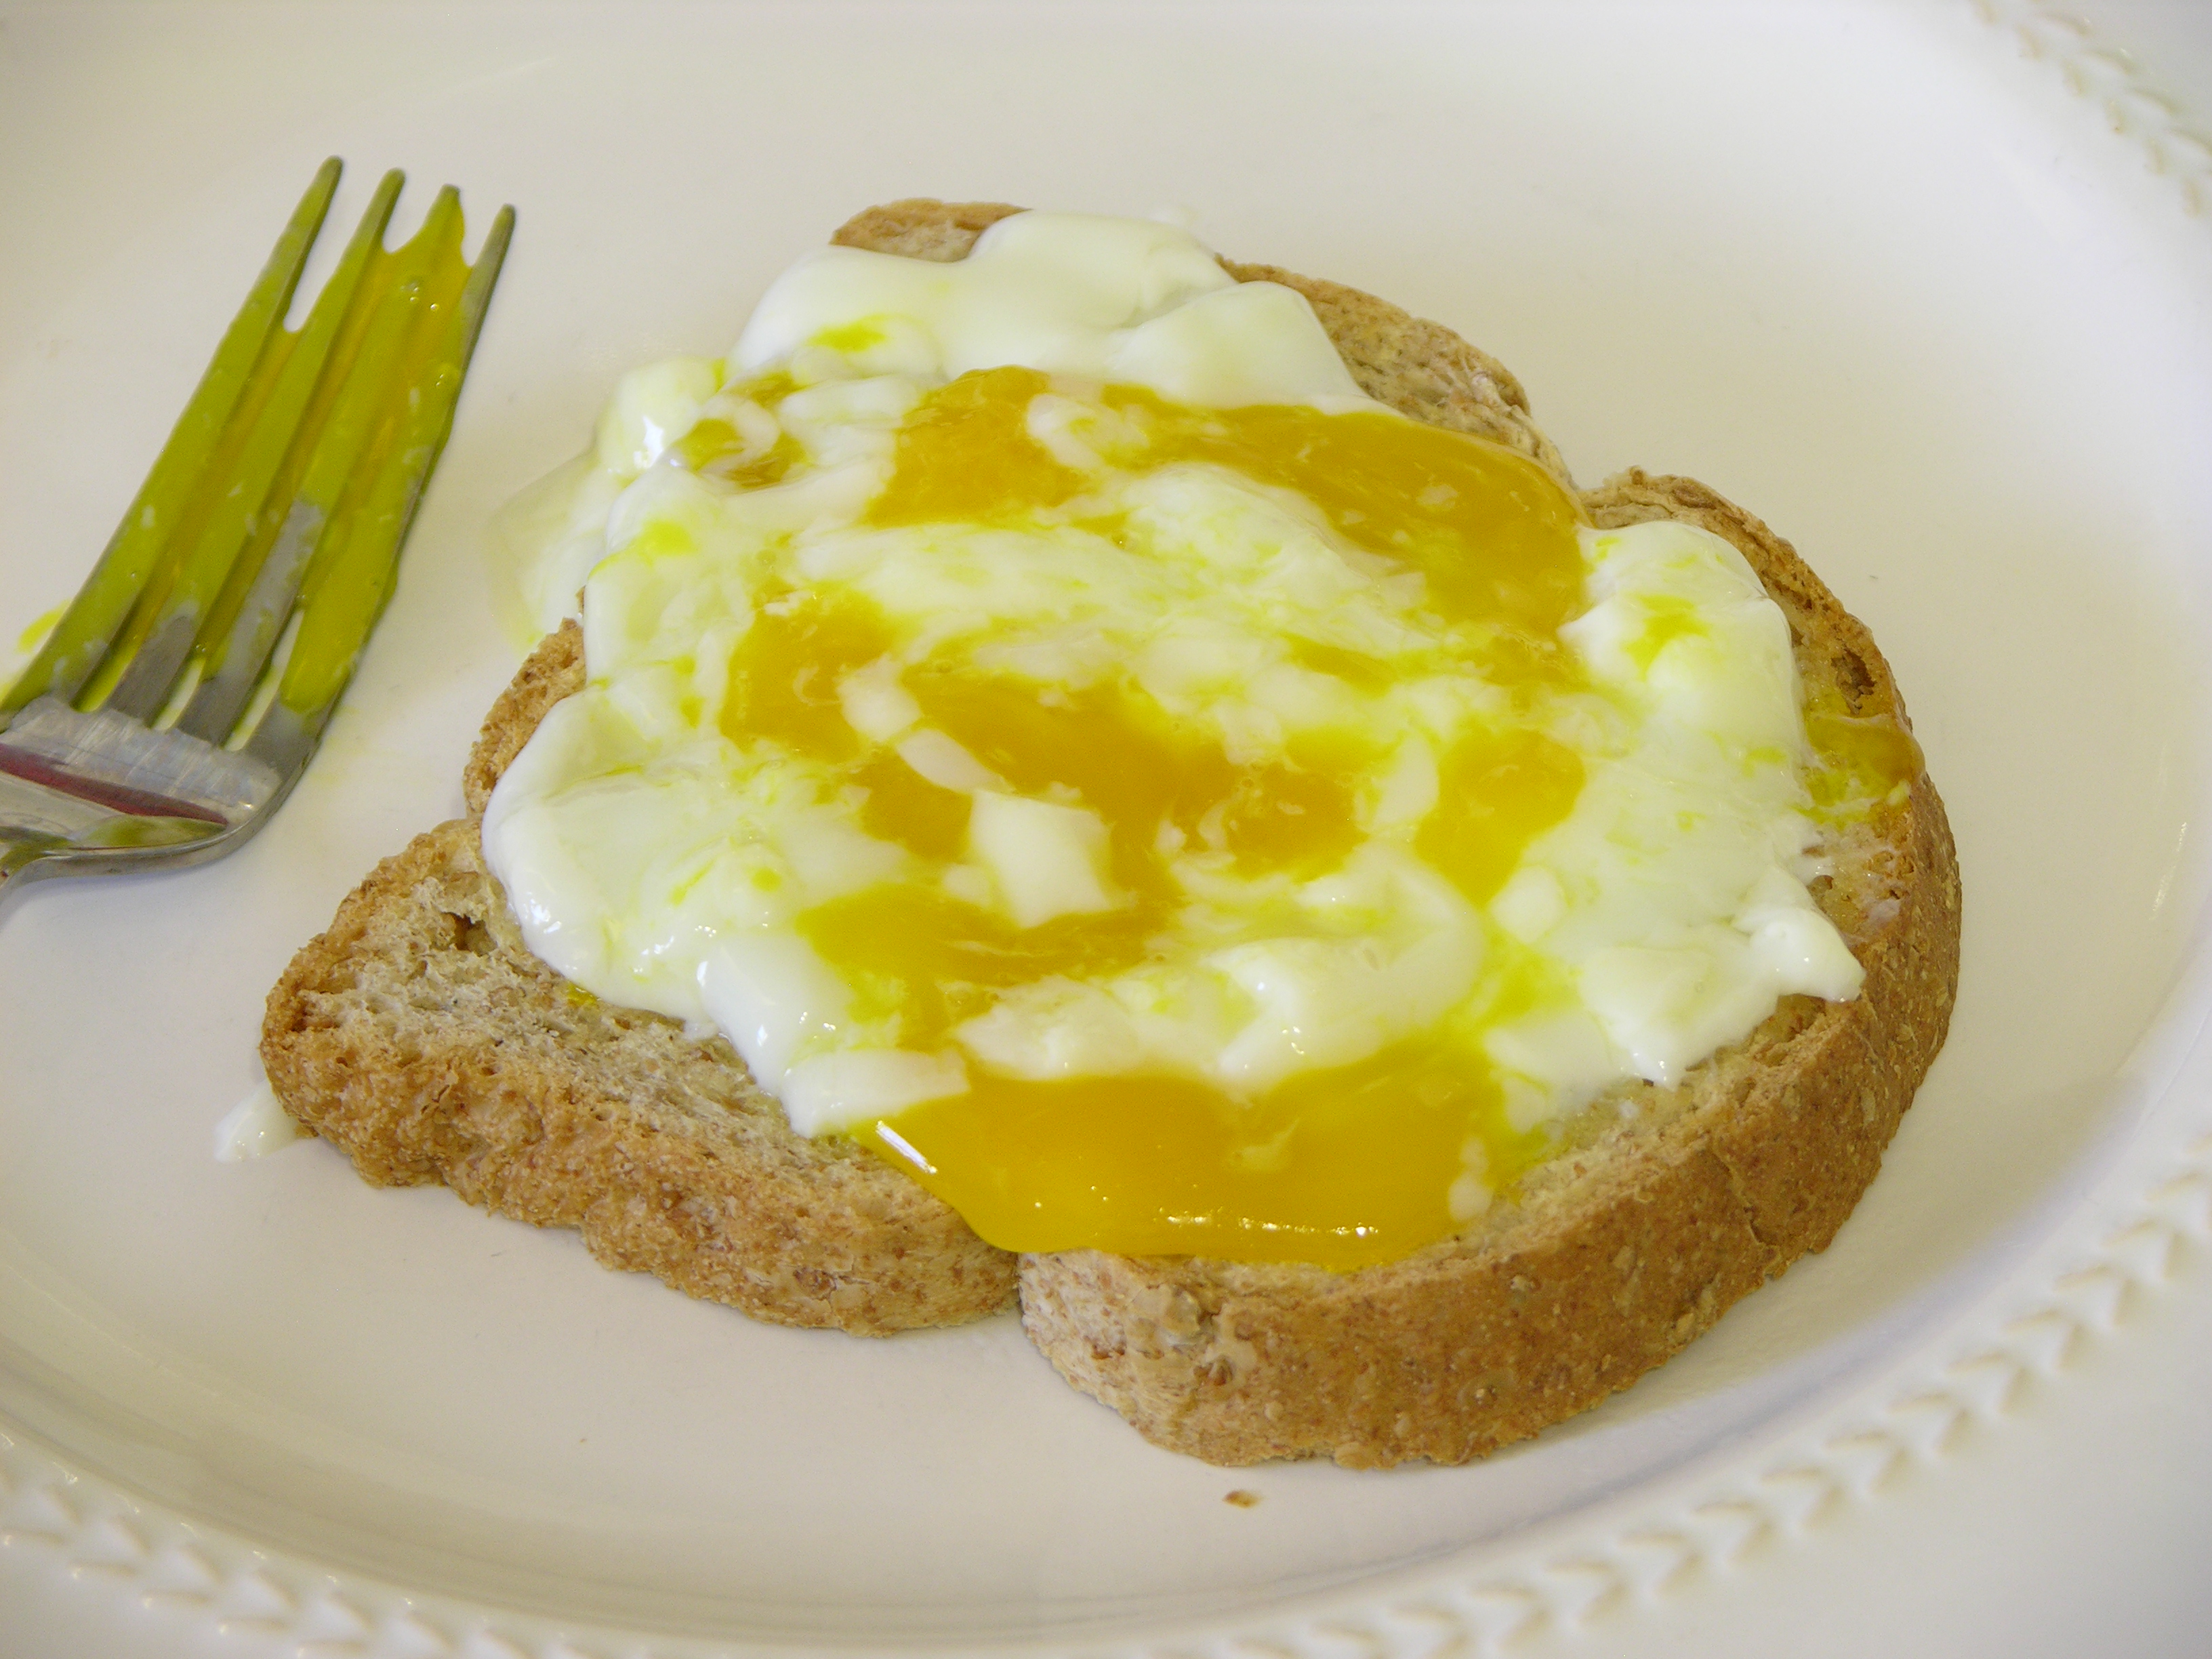
I find it interesting that either I had that much variation between two eggs of the same age from the same package, or that the bottom of the crockpot was that much cooler, that the egg sitting directly on the bottom was so much softer after 15 additional minutes of cooking.
And how were the eggs? In spite of appearances in the photographs, completely cooked. You’re likely not used to eating eggs with the whites still liquid, but they weren’t underdone.
They were incredibly mildly flavored. Part of my interest in cooking low-temp eggs was that I’ve had a lot of overcooked eggs in my life and I’ve grown to detest the sulfuric flavor of overcooked yolks and the greasy plastickiness of overfried whites. I make fast-cooked scrambled eggs that are constantly in motion in the pan and which don’t develop a sulfuric taste at all, and I had hopes that low-temp cooking would also avoid the sulfuric taste altogether. Not only did they exceed my expectations for no sulfuric taste, but they surprised me by having so little taste at all that I could hardly tell they were on my toast.
So, not a huge win for my particular cuisine, but a significant proof of concept for the controller. It works!
Temperature Regulation
When heating up, the egg batch actually overshot the 64°C setpoint all the way up to 70°C, at which point I added some cool water to help bring it back down.
I was using the factory settings for the PID control, and of course it can regulate more effectively if tuned to the characteristics of the particular system being controlled. Saturday night I ran an autotune (not just for pop music) over the same temperature range, which generated the following changes from factory defaults and appeared to provide greater stability:
| parameter | description | factory | tuned |
|---|---|---|---|
| P | proportional band (whatever that means) |
30 | 3 |
| I | integral time (seconds) | 240 | 592 |
| D | derivative time (seconds) | 60 | 148 |
| Ar | reference value (0-100%) “After AT, set automatical” (whatever that means) |
25 | 100 |
| r | heat-reset proportioning cycle (1-100 seconds) (whatever that means) |
20 | 2 |
| Pc | cool-side proportional band (1-1000% of heat-side proportional band) (whatever that means) |
100 | 1 |
Lesson learned: Autotune the PID controller at least every time I use a different crockpot, and might as well on every batch, while warming up the water bath before adding the food product.
Next Steps
I need to glue or bolt the solid-state relay in position. Right now it’s an electrical short hazard loose inside the case. I really only put the case together to keep furry little paws from shocking themselves on the counter when this was running; but the closed case now presents the deceptive appearance of a finished, safe product.
I intend to try steak this weekend, sealed in a zip-lock baggie with all the air squeezed out.
I need to add an agitator to circulate the water in order to keep moving warm water next to the cooler food when first added and to avoid cold spots like I suspect the second egg inhabited. I’m thinking about a small propeller at the end of a long plastic shaft run for a few seconds every minute or so, but I’m open to other ideas.
I should really calibrate the thermocouple in freezing and ideally boiling water, especially given how cheap it was. I wonder whether its low cost makes its measurements less repeatable, off by an absolute amount, off of the expected response curve, or some combination of all of the above. Maybe it’ll just fall apart sooner. Nothing about my experience makes me suspect it; it’s just general leeriness of the low bid.
I want to add a proper thermocouple socket on the back of the case. The screw terminals on the barrier strip are okay, but they weren’t made to hold the thermocouple’s prongs and a proper socket would be more reliable.
Great entry & excellent timing – Just ordered a PID controller + thermocouple + relay yesterday & can’t wait to give things a try! I’m interested in just how much of an effect some kind of circulater will have on maintaining temperature.
I have to ask the question….
Did you find the hot plate for soldering not so useful after you tried it?
Good food can’t be so important that you’d cannibalize a useful tool for the controller
Jon, too funny!
The hotplate is fantastic, but I’ve had other things going on (some of which I may catch up and post) and haven’t been doing SMT soldering. Also I have a secondhand PID controller that doesn’t fit into the crockpot case but will do fine on the bench if I want to use it for the hotplate.
Extending the thermocouple leads with copper wire and terminal posts might cause measurement errors due to the additional dissimilar metal junctions you create along the way. Ideally you want to use thermocouple wire for the extension, along with a proper thermocouple connector (which is made of the same metals as the wire, I think) to minimize error. I think if the temperature of all of the junctions is close to the temperature of the PID controller, you might be able to get away with it, but you might want to double check the accuracy of the PID controller’s temp reading vs. the actual temp of the water, as measured with a 2nd meter.
Jeff, you’re absolutely right about the additional metal-to-metal connections likely impacting the thermocouple readings.
I didn’t have the right materials at the time — they have since arrived. Also the screw terminals on the PID controller itself are most definitely not chromel and alumel, so I’m not sure what that bodes for my project.
Since the eggs, I’ve had some significant temperature variation that I think stems from trying to run too low a temperature on the high heat setting. I’ve designed an alarm latch board for the front panel, and I’ll be building it and then spending more time calibrating and monitoring the control system shortly.
Your comments in the hot plate article about the instructions for this controller being somewhat lacking are right on the money!
I happened to have the same controller on hand to build a soldering hot plate but my partner is interested in sous-vide (and is the ultimate foodie), so I finally installed the controller and an SSR in a box. Very similar to yours except I added a toggle switch between the controller and SSR to kill the power if desired. I also added a 120V pilot light across the output to provide an indication when the power is enabled. The LEDs in the controller aren’t visible unless looking straight at the controller.
Our controller doesn’t seem to want to go into autotune – at least it’s not apparent that is does. Pressing SET for several seconds gets into the setup mode, then pressing set once or twice more brings up the autotune option. If I set it to 1, which should mean enabled, nothing appears to happen. The AT LED never illuminates. But we think the PID values get changed. Can you shed any light on this?
Somehow, our self tune option has fallen off the menu too, not that I know quite what self tune vs auto tune means. The lock value is 0000, which means everything should be unlocked.
I tried my controller with a different cooker, and autotune seems to do its thing, so apparently, the LED just doesn’t work……
We were in Lowe’s yesterday and found an awesome solution for the heating unit. A crockpot is kind of small for many things, and the small heater limits how hot it will get.
At Lowe’s they had the Butterball Indoor Electric Turkey Fryer on clearance for $25. The list price is nearly $200 and it can be had for about $100 on ebay. It will handle a 12 pound turkey so it’s pretty good size and it has a 1500 watt heating element that will handle anything. It looks nice and has some amazing features as this video will show:
http://www.youtube.com/watch?v=xF3xQmtFyz8
It has a mechanical thermostat that is supposedly accurate to fairly low temperatures. It works beautifully plugged into the PID controller with the thermostat on the turkey cooker cranked up higher than the desired PID temperature.
Dinner is cooking in ours right now at a temperature of 74 C, where it’s been for the last 20 hours. It should be tasty!
Jon — many thanks for the tip on the electric fryer at Lowes, just picked one up!
Out of curiosity, did you autotune & if so, what did the PID parameters look like afterwards?
I did autotune; I think the settings are a mess, but it certainly worked….
AR = 25
P = 5
I = 144
D = 36
YMMV. I’m using a K-type thermocouple, and need a 3 degree offset (!)
Jon, have you still been pleased with the temperature regulation on the turkey fryer? Have you had a chance check accuracy of regulation at lower temperatures?
I ask because when trying to cook KC strip at 55°C, I kept finding the actual temperature at 59°C (future post). I speculated that the crockpot’s dumb high setting was high enough that the PID controller needed to turn it on so seldom that it couldn’t adapt and ended up running it too often.
My next attempt will be running it at 55°C using the crockpot’s dumb low setting and monitoring it closely. I’ve laid out and had milled a PC board to latch the controller’s over/under alarms but haven’t had a chance to assemble it yet. I’d be very interested in hearing whether your fryer works well with its own thermostat fighting the PID controller.
I posted this on the old hotplate thread, but hopefully noone will mind if I post again here:
Has anyone been able to get the “stop” feature of the CD101 working? Mine keeps cycling the outputs even if stop mode is turned on. According to the (pretty horrible) manual, stop mode should disable the outputs. I was able to figure out how to change the display from F to C, and disable the output 2 relay by messing with the settings, but this one has me stumped.
Eric, who posted above, is my partner and the chef. We cooked the turkey at 74 C and the controller held the temperature perfectly. The controller would cycle the heating element on for just seconds at a time. Using a k-type thermocouple, the controller’s readings are a couple degrees off…there’s an offset setting to adjust this.
We haven’t tried using the turkey fryer’s built-in thermostat – it was just turned higher than necessary and never entered the picture.
Eric’s read some posts that suggest a crock pot doesn’t work so well because the heat comes from the sides rather than the bottom. With heat from the bottom, convection results in better circulation.
Regarding Jeff’s question on the stop feature of the CD101: It does not seem to work on ours. I added a toggle switch in series with the connection to the SSR so the output can be shut off. Better there than on the load side as the switch only has to handle a few mA.
Also, don’t forget to keep the bags vertical – horizontal bags impede convective circulation.
I’m sure you’ve seen the sous vide threads at egullet.org, but if you haven’t, check them out. There are some of the world’s experts on sous vide posting in there, including Nathan Mhyrvold, author of the soon-to-be-released _Modernist Cuisine_. They’re found in the Cooking forum – there’s one from 2004-2010, and one just a week old. VERY helpful information, especially now that there’s an index!
E
Jon and Eric, would you be willing to try to run it at 55°C for a day or two? Don’t even need food in it — just water — and tell me if it regulates properly?
Hey Keith
I just want to encourage you sous vide efforts. I just finished my build which is a bit different since it uses a IKA ETS-D5 laboratory thermometer with Fuzzy logic instead of the PID controller. I connected to a relais exactly like yours with an arduino built on perfboard. This relais then switches the heating element of an immersion circulator which rests within a cooler with a 35 L volume and an aluminum lid with a cutout for the heater. In the bottom lies a small modified aquarium pump. Although some people (ie. Jeff Potter) expressed concerns about whether those could withstand those high temperatures I have no problems. I got all the elements really cheap on ebay (100 Euros all in all) and now have an apparatus that, after about an hour can hold a temperature to +-.1 degree C without problems. I’d like to share some things I noticed as I went through several versions of the device:
1. a lid makes total sense, putting foil on the water also helps a lot as does reducing the surface area of the water by using an appropriately sized container (to prevent water loss, you definitely don’t want the thing running dry, although my thermostat would see this and switch off, it would ruin the )
2. Using a cooler (doesn’t make too much sense if you use a crockpot thoug) is totally cool. Having isolated surface markedly enlarged the intervals in which the thermostat had to apply heat. Totally energy conserving.
Also some empirical observations I’ve made that you’ll want to try too:
- First and foremost, a well marbled (!) prime steak like a rib-eye, 56 deg C, 2-3 h, (THE best thing I have tried yet, better then lower or higher temps in my opinion. You will get even the religious raw eaters with this.) I also like putting some honey on the steak before searing proces very delicious results.
- The cheapest piece of beef you can find, 48h straight, great with a salad or with fries. Gets this really really soft texture and sometimes even a delicious chicken-y sort of taste.
- Lamb filet at 64 degrees for a an hour or two. Best. Lamb. Ever. Maybe even better then the prime rib… I’ll never eat another lamb again that wasn’t prepared properly.
One more thing: When searing the meat it is easy to transgress the line between applying too little heat too long and overcooking the meat and letting it sit not long enough and not having a satisfactory browning reaction. What worked best for me is to take the steaks out 10 min in advance to let them cool down just a bit, heating the pan to about 230 deg (use an infrared thermometer, if you don’t have one, you can wait until the oil just so starts to smoke) then put the Steak in. Don’t poke!! Just let it sit there, moving it after you put it in disturbs heat transfer. If you want, you can press it down with a weight, but don’t move it around during sear. Use your nose: When it just smells (some 30-60 sec) like it’s starting to get burned, turn it around. Only sear it once from each side, otherwise the meat will be largely overdone.
What I haven’t tried yet is fish. I did try duck but that didn’t work out too well. A little on the dry side.
I wish you best of luck with your sous vide experiments. They have the upside that you will find yourself eating a lot of very very delicious meals. On the downside, most trips to a restaurant will disappoint you and you can forget about ever going to a steakhouse again and really enjoying your Steak, because it will all suffer in comparison to your home cooked most awesome super meat. Also it is very expensive because all your friends will want to come to your house all the time to eat you 24Euro per kilogram prime rib…
But when you take your first bite of that delicious steak, and you weep a little inside because it is so, so good. Then you will know that it will be totally worth it…
We’ll be happy to do that for you Keith in the next day or two…
Just thought I’d share my turkey fryer experience so far…
Thought I’d let the autotune run overnight, and maybe try Keith’s temperature regulation test.
Got everything hooked up, hit the power and the fryer’s 1500 watts promptly blew the fuse in my PID wiring…
Oops! Better the fuse than letting the smoke out. I think my SSR is ok for 1500 watts; it’s in good contact with a metal enclosure for heat-sinking.
To be truthful, I was a bit worried about how much current my SSR can handle. Just checked the specs…25 amps, up to 40 with a heat-sink. Whew
jon refuses to believe that I’m not spectacularly stupid (I’d already looked at the SSR rating).
I’ll get about 10 hours of 55C operation. I’m doing Yet Another Turkey for a card party on Sunday. If you’ve got a Kroger-operated store near you, check the frozen meat case out for these Ready-Roast turkeys – not worth the normal $40 price, but well worth $20, and ASTONISHINGLY good value at $15. Ignore the printing on them, and put the drumstick ends facing down into the bath.
Well, I’ve got some numbers, but it’s not the best test I’ve ever run….
I didn’t get the controller set to 55, it was set to 75 degrees when I looked at the PID display and saw that the temperature was already at 54. I quickly set the controller for 55 and made sure it took this time.
Despite telling my laptop not to sleep, it did, but I managed to log nearly 2 hours of data before it shut down. I took data using my work-in-progress thermocouple board, which at the moment reads to the nearest degree. The data shows that the temperature was actually centered around 53 degrees, (confirming our belief that the PID controller is reading 2 degrees high) with short excursions +/- 1 degree. My resolution is only one degree so the controller looks pretty consistent to me.
I recorded a measurement very 5 seconds. From the flat part of the curve after the slight overshoot caused my my failure to get the temperature set on the PID (55 degrees max, which was 2 degrees higher than the average), about 80 readings were recorded at 52 degrees, 730 at 53 and 43 at 54 degrees.
The indicated temperature on the PID controller was never seen to vary from 55 degrees. Right now, with cool ambient temperatures in the house, the PID controller is turning on the power for 1-2 seconds every 15 seconds.
I’ll try to get some better results and make a graph when we do a turkey overnight starting later today.
Jon,
Thanks for the confirmation that STOP mode doesn’t work on these controllers. I’m sort of happy it’s not just me, but overall disappointed that such a simple feature doesn’t work. Oh well, I guess that’s what you get for buying a $40 PID controller.
I created a Wiki page for the CD101 that includes links to both manuals that I’ve seen for this controller, as well as some undocumented features (such as the ability to switch between Celsius and Fahrenheit display). You can find it here: http://mightyohm.com/wiki/resources:cd101
Also, I wanted to mention that there’s an article on making a Sous Vide cooker with the CD101 in the most recent Make: magazine (vol. 25).
Jeff,
Don’t tell me you canibalized your soldering hot plate to cook sous vide too?!?
My PID controller was appropriate by my partner for this
I’m working on a circuit to read thermocouples using a TI TMP513 Power Monitor chip. It’s got built-in temperature measurement that’s perfect for the cold junction reference and it has a 12-bit ADC designed to measure current in a shunt resistor with a 40 mV maximum range. It’s working great in my tests so far.
http://digital-diy.com/forum/electronic-projects-and-gadgets/thermocouple-measurements-t1150.html
Hi guys, sorry for being a dumbass, but I just bought a PID controller, SS relay and RTD sensor, and have absolutely no idea how to set it up and get it running with my rice cooker! I’d really appreciate it if someone took the time to walk me through this. Here is the PID I’ve got: http://www.sure-electronics.net/measure,tools/TE-MT007_Ver1.0_EN.pdf
THANK YOU!
Hi, Keith,
I’ve just built a similar circuit, using a rice cooker instead of a crockpot but using the identical CD101. Oddly, setting SL6 to 0001 (i.e. heating mode, time scale output) results in OUT1 never being turned on; setting SL6 to 0000 results in OUT1 turning on and staying on (and eventually bringing the rice cooker to a boil, independent of the value of SV).
What are your settings for the CD101 on sous-vide?
Thanks very much,
- Raffi.