Spotted at a thrift store.
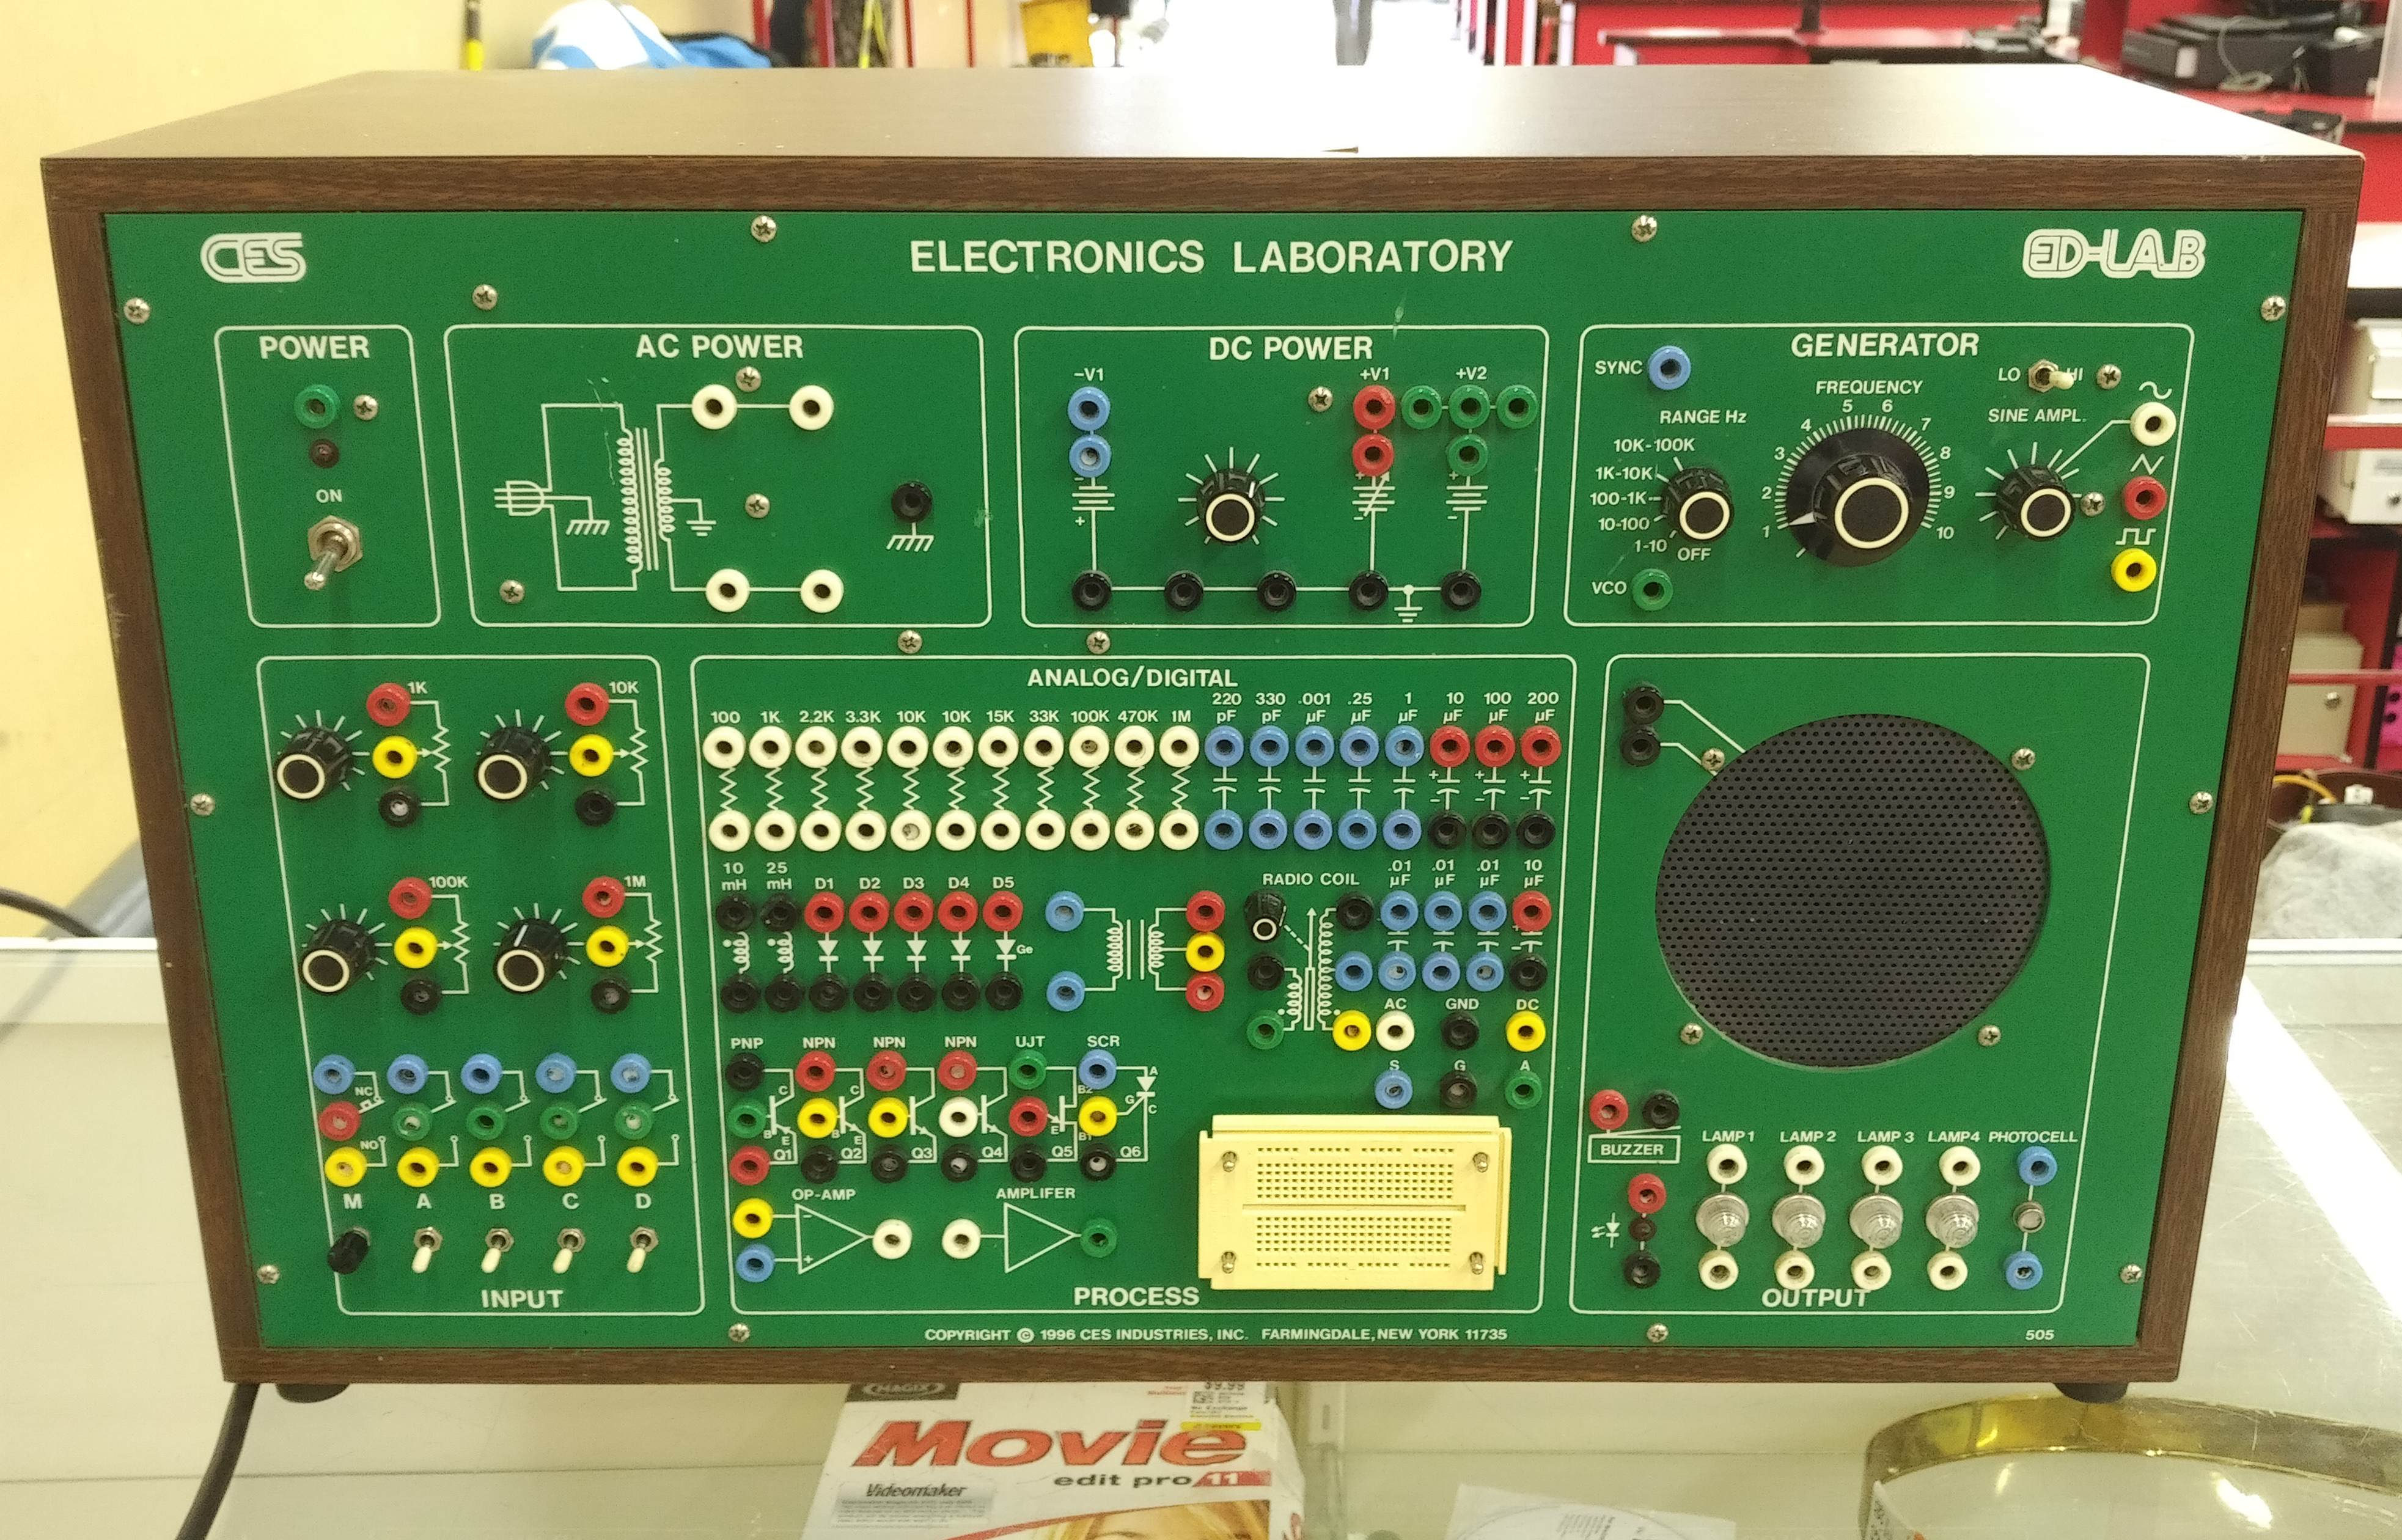
Of course anything with that many knobs and jacks caught my eye, and it’s in fantastic cosmetic condition.
Looking more closely, the function generator would have been a dream to have when first learning about op amps!
Spotted at a thrift store.
Of course anything with that many knobs and jacks caught my eye, and it’s in fantastic cosmetic condition.
Looking more closely, the function generator would have been a dream to have when first learning about op amps!
I’ve achieved some promising results from my battery desulfator / dewhiskerer / whateverer … and some less promising results.

The smaller the battery, the more important it is not to forget that the desulfator / dewhiskerer is on. This was, as I recall, only about a fifteen-minute overdose. The magic smoke, I assure you, got out.
And Linux. And old, high-programming-voltage EPROMs. And USB, naturally. If you know of such a thing, give me a shout in the comments — I can’t find any on Google, and I find plenty of links to other people who also couldn’t find them.
A couple of weeks ago, I went to an annual holiday lunch with former coworkers and got to visit with an old friend. He was reminiscing about 6502 assembly programming on the Apple ][ and wondered whether I'd know where he could get one. I told him that I could probably loan him one or two; but (with a mischievous glint in my eye) that I have a couple of upright Asteroids arcade games and they run on 6502s and I’ve always wanted to reprogram one and write my own game.
Bump, set, spike. Yeah, he’s interested.
It’s not a completely impractical idea. I have a large schematic set that includes the addressing of the memory-mapped I/O and some rudimentary information on the operation of the vector generator board. There’s even a project to comment the disassembled ROM, which would give further hints about how to interface to the hardware.
If one were to undertake such a project, one would really like to use a USB-attached EPROM emulator so one could dump new code into the machine frequently and rapidly for testing and development. But at a bare minimum, one would need a stack of EPROMs and a programmer and ideally a ZIF-socket daughterboard to fit into the original EPROM socket and make it easy to swap EPROMs. As I have no Windows machines and do my electronics development on a synchronized fleet of Mac and Linux machines, a commercial EPROM programmer that I can use is going to be a little bit hard to come by.
Yes, I could run Windows under virtualization on my Mac; I think I may even be able to get a legal copy through my campus’s license agreement. But I’m not interested in going that direction unless I have to.
Isn’t it about time the world had a cross-platform EPROM programmer?
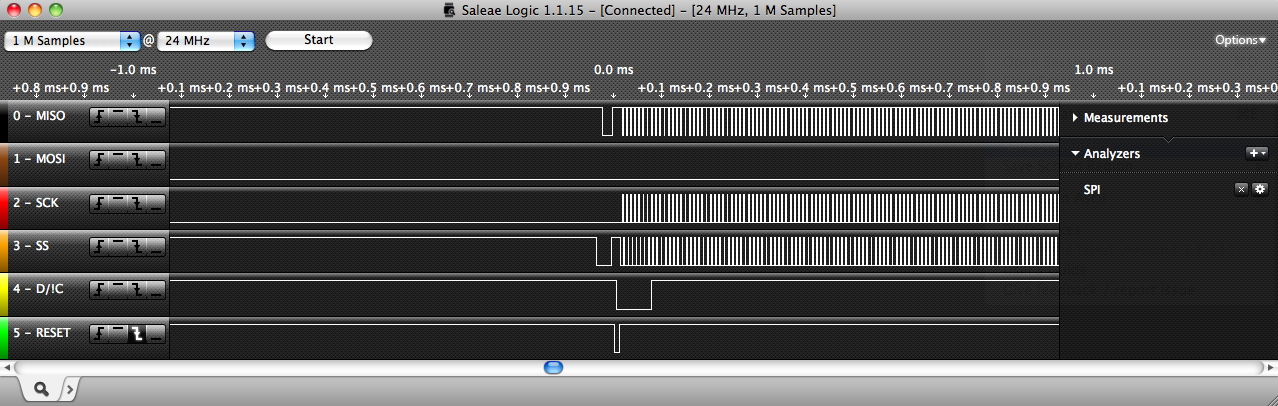
I just rewrote the Arduino Playground Nokia LCD screen code to use hardware SPI instead of ShiftOut(). (More work to do before releasing the code back to the community. And I know, not everyone will want to use the hardware SPI, but it should be an option.)
It looked like a trivial change, but after making it, the display’s screen remained blank.
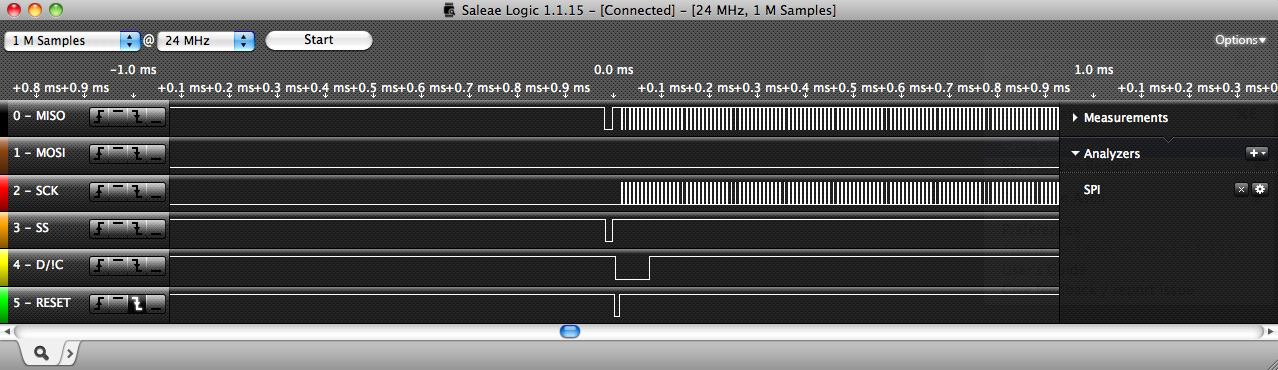
But … but … but … the slave-select line is supposed to be held low during each byte of transmission. I know the ATmega’s SPI hardware doesn’t manage it for you, but surely the Arduino’s SPI.transfer() function does, right???
No. You have to manage it manually.
void LcdWrite(byte dc, byte data) {

  digitalWrite(PIN_SS, LOW);

  digitalWrite(PIN_DC, dc);

  SPI.transfer(data);

  digitalWrite(PIN_SS, HIGH);

}
SPI support is a perfect candidate to be a real object-oriented class rather than a functional library in OO clothing. Instantiate objects that know which slave-select pin is theirs, which may have different bit orders and clock rates and clock modes, and provide a transfer() method that sets all the registers, twiddles SS for you, and transfers your byte.
Sigh.
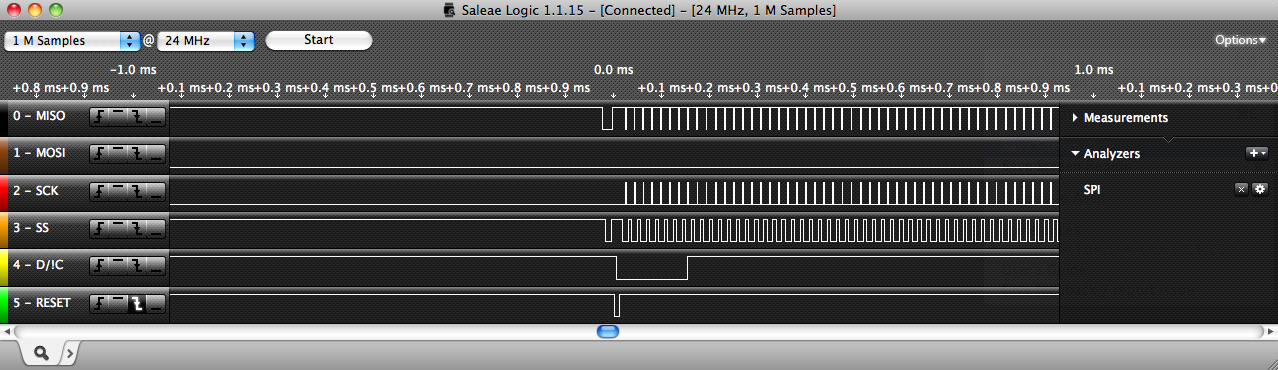
BTW, notice on the second capture that manually bouncing SS using two digitalWrite()s takes longer than transferring eight bits of data using the hardware SPI. Start to understand why I want to transfer data using hardware instead of bit-banging?

Manipulating the SS bit in the port register directly is much faster … at the cost of being much less clear what’s going on to non-native speakers of C.
void LcdWrite(byte dc, byte data) {

  PORTB &= ~ (1 << 2);

  digitalWrite(PIN_DC, dc);

  SPI.transfer(data);

  PORTB |= (1 << 2);

}
The C-based bit manipulation code above is already fast enough that the timing constraint has moved back to the programmer-selected SPI clocking speed and the ultimate solution -- using the ATmega's hardware-based pin toggle feature -- doesn't save any noticeable time, but the code sure looks cool but it's the right thing to do and it's a risky game to play to assume you always know correctly the logic level of the pin when you enter the function.
void LcdWrite(byte dc, byte data) {

  PINB = _BV(PINB2);

  digitalWrite(PIN_DC, dc);

  SPI.transfer(data);

  PINB = _BV(PINB2);

}
(BTW, I had a dream recently -- which I did not know was not real -- in which the latest Arduino release added digitalWrite(pin, TOGGLE) to do the above. Imagine my disappointment tonight to learn it was only a dream. And no, I'm not the first to suggest that feature, by a long shot. Just, maybe, the first to think it had actually happened.)
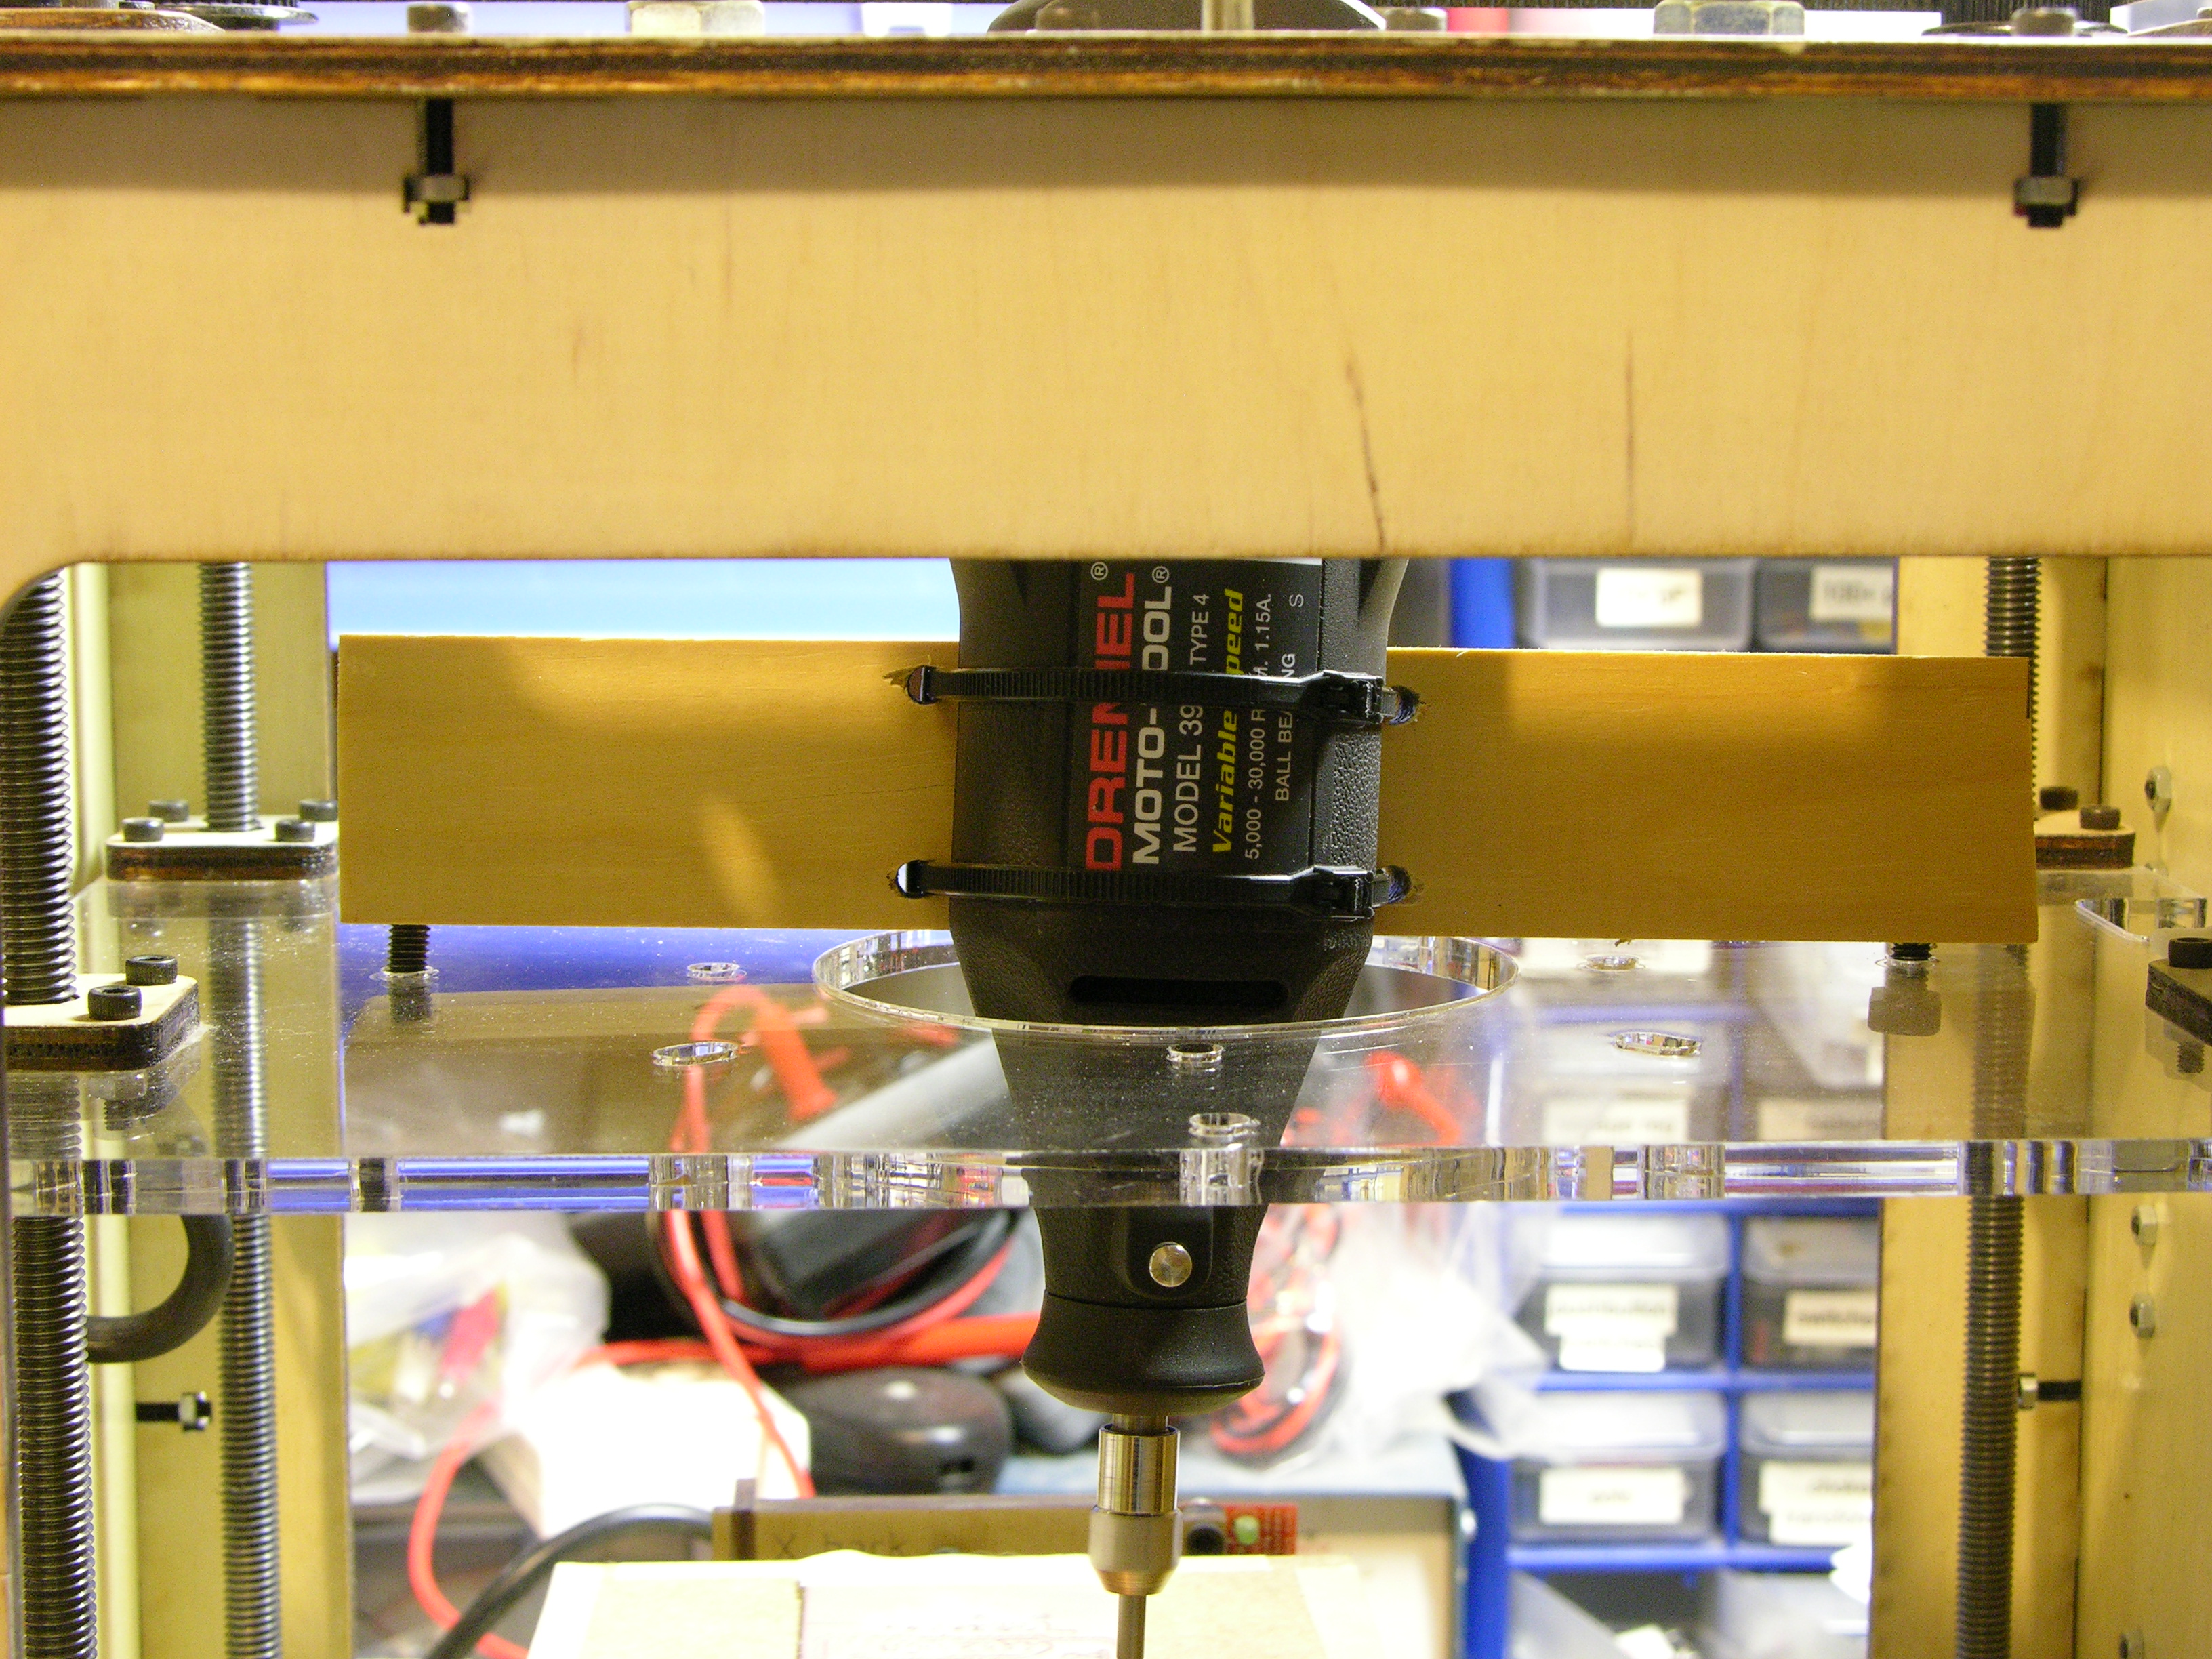
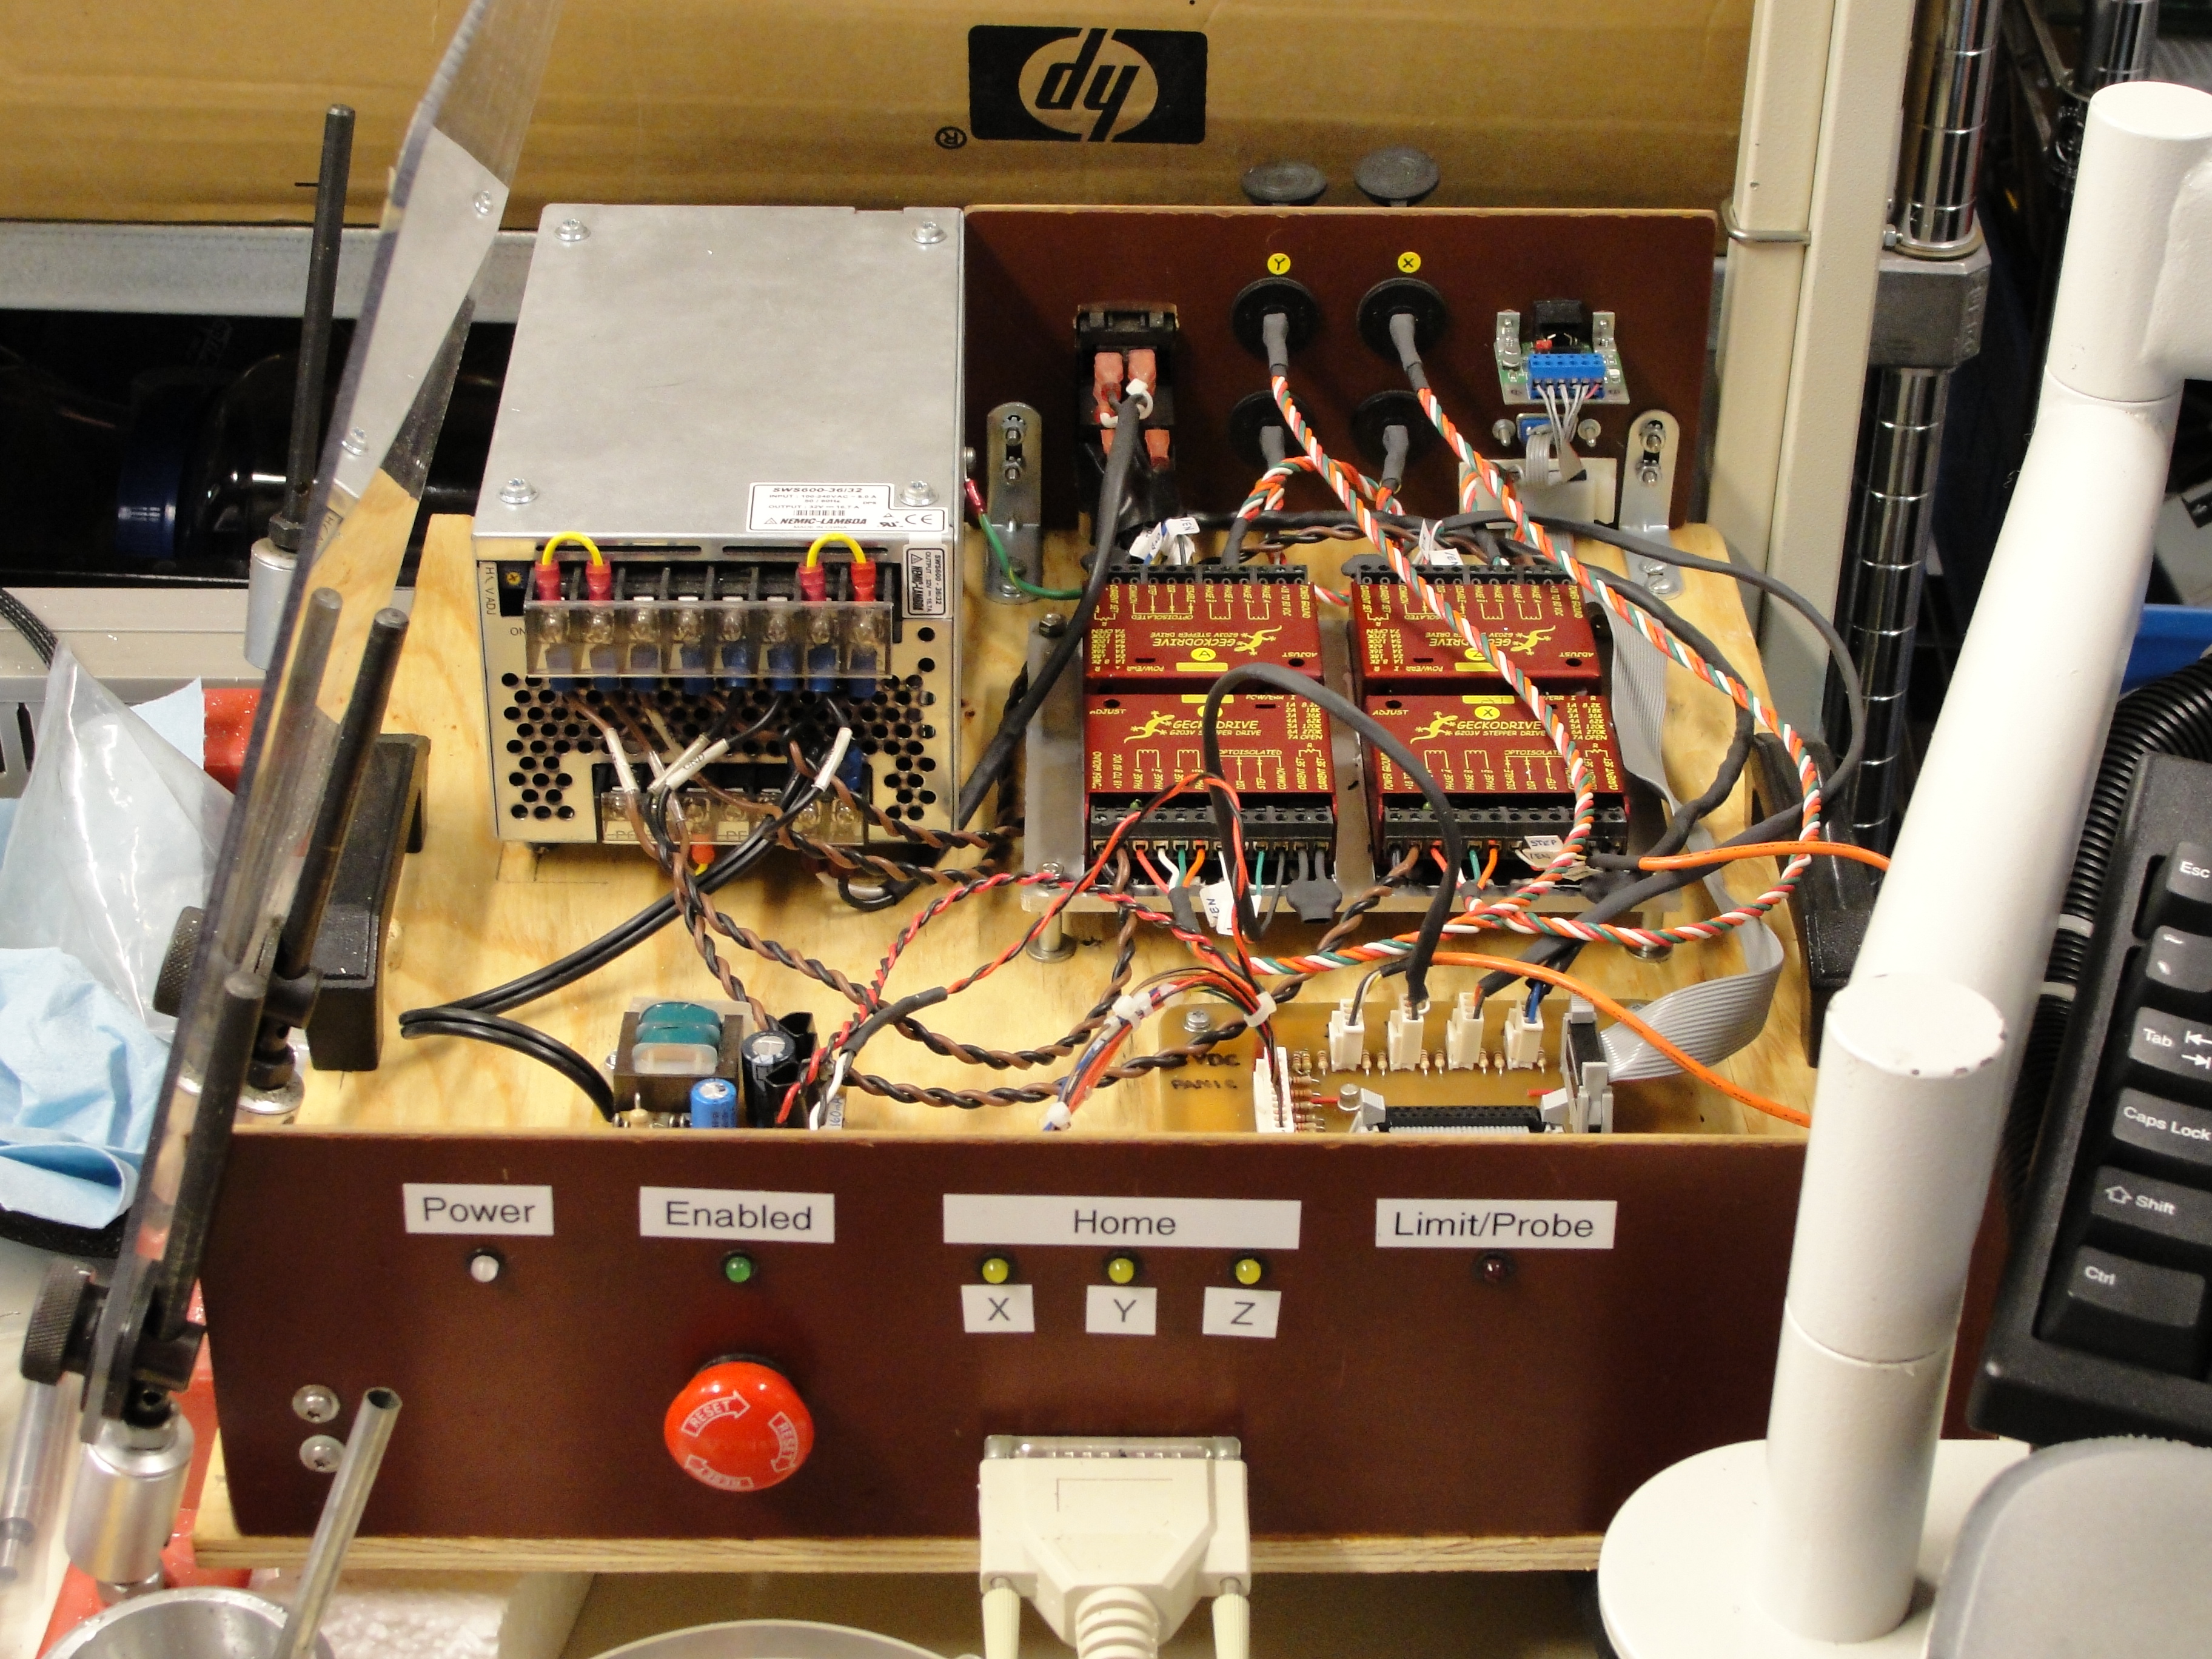
Last weekend I got my Dremel rigidly mounted in my CupCake for PCB milling, but the platform holding the PCB was attached with double-stick foam and was being deflected by the milling bit cutting the copper, causing considerable deviation from the intended milling path.
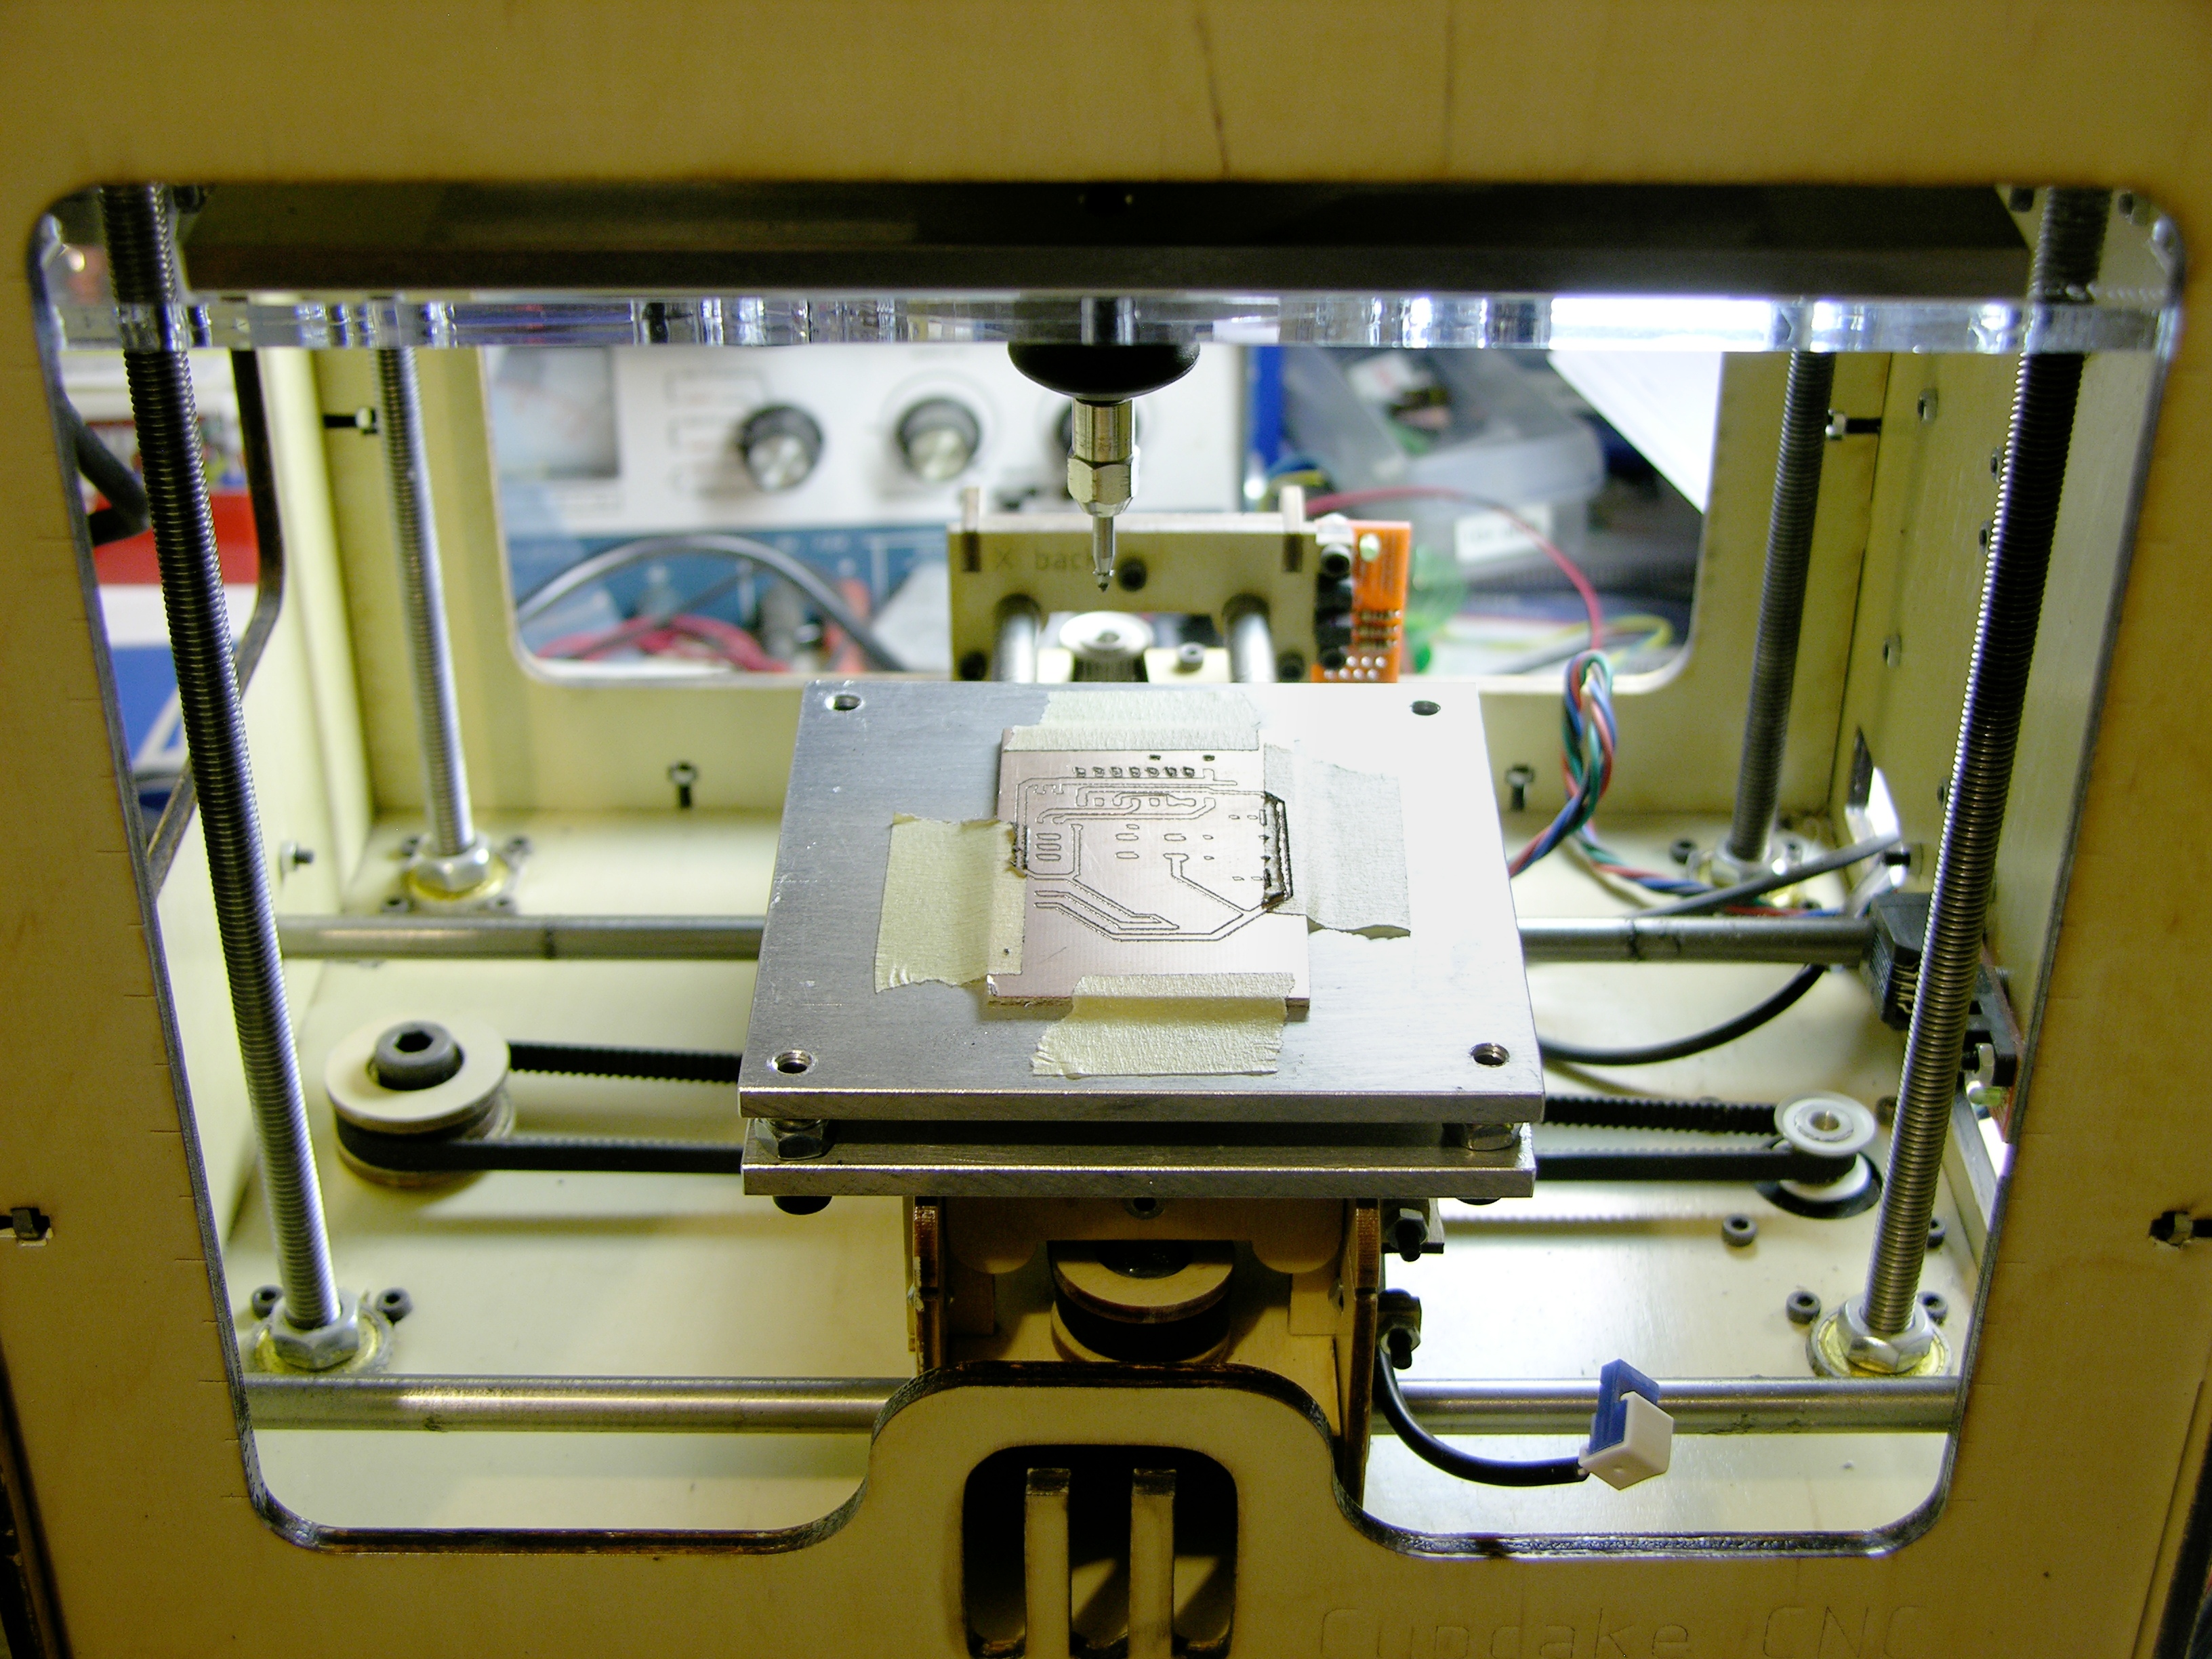
Last night Steve cut some more aluminum plate for me and today I assembled a rigidly-mounted leveling platform to replace the stock build platform. The lower plate has holes matching the machine screws attaching the top of the Y stage, and I used slightly longer screws to bolt through both the aluminum plate and the original wood top into the Y carriage.
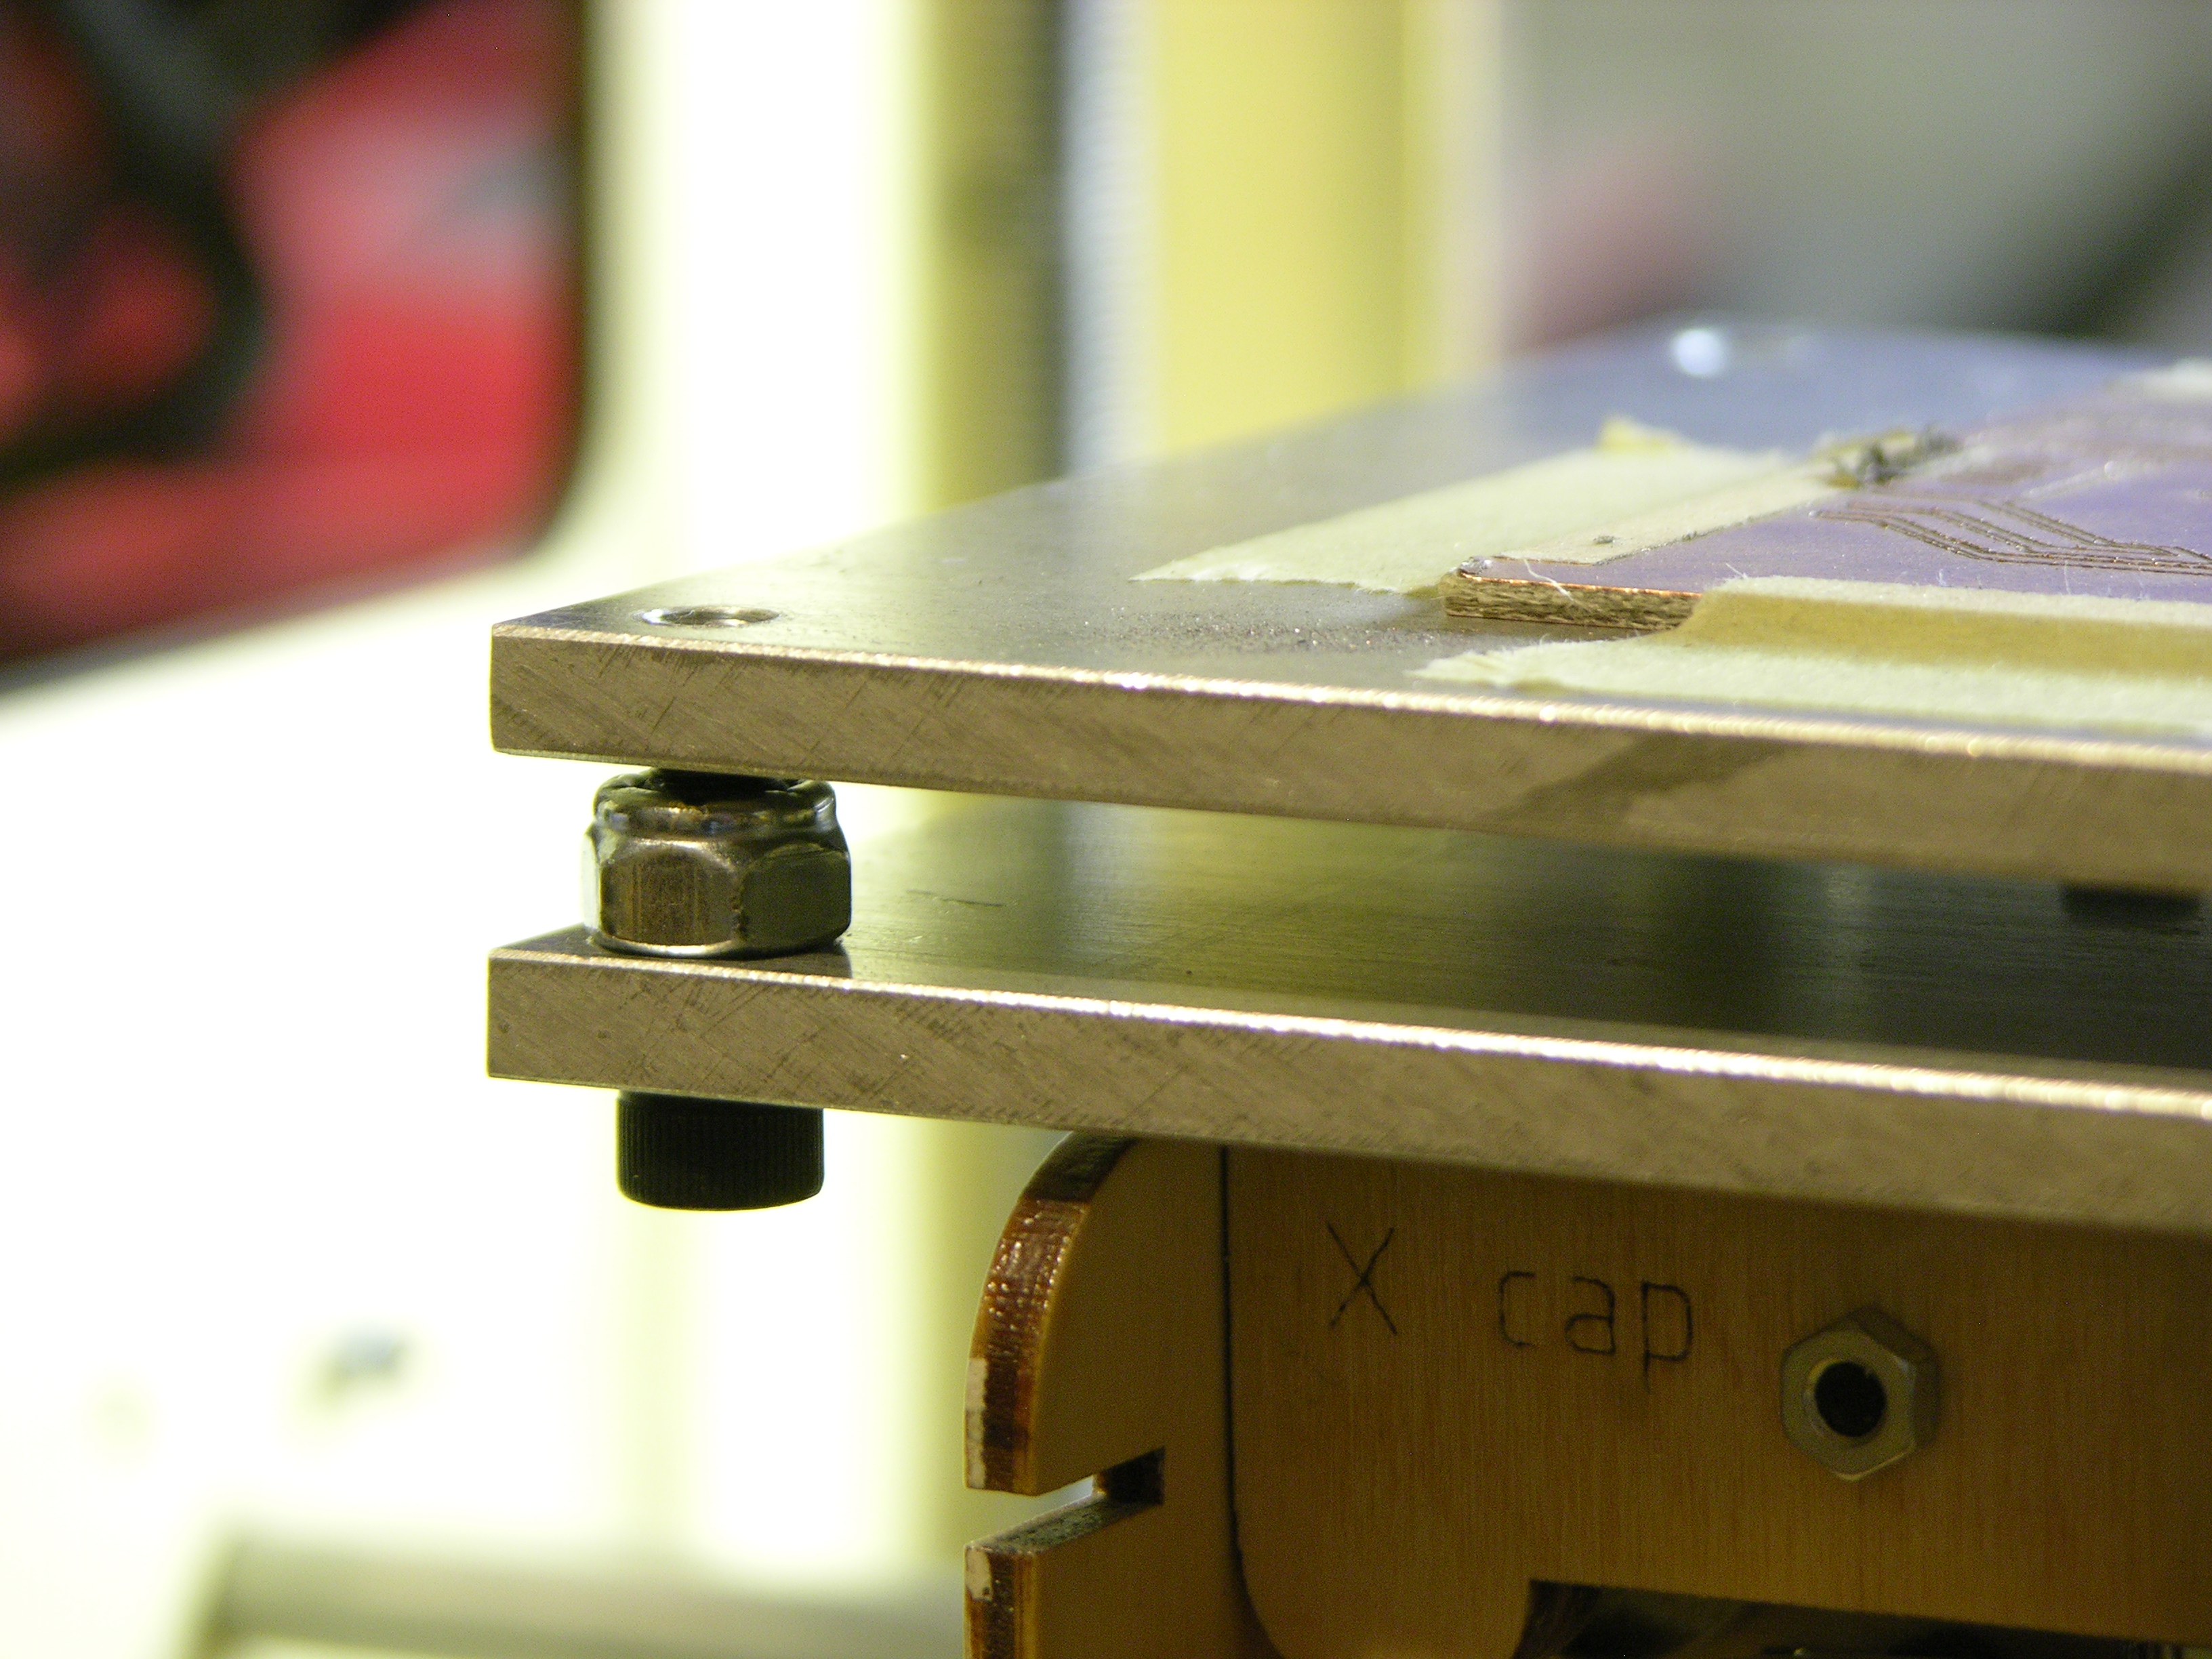
I drilled holes in the corners, tapped the upper plate, and enlarged the holes in the lower plate. The socket-head cap screws spin freely in the lower plate while adjusting the upper plate’s height (I used a continuity meter to check when the milling bit was just barely touching the plate in each corner); then the nylon-insert nuts lock the screws in position. The whole assembly is quite rigid once tightened.
A number of designs for leveling build platforms use only springs between the two plates. I was concerned that without a nut, the machine screws might back out under vibration. Also, when extruding, having a platform with some give reduces the damage if you miscalculate the Z position and gouge the platform; but for milling, the whole point of this replacement is to remove any play in the platform.

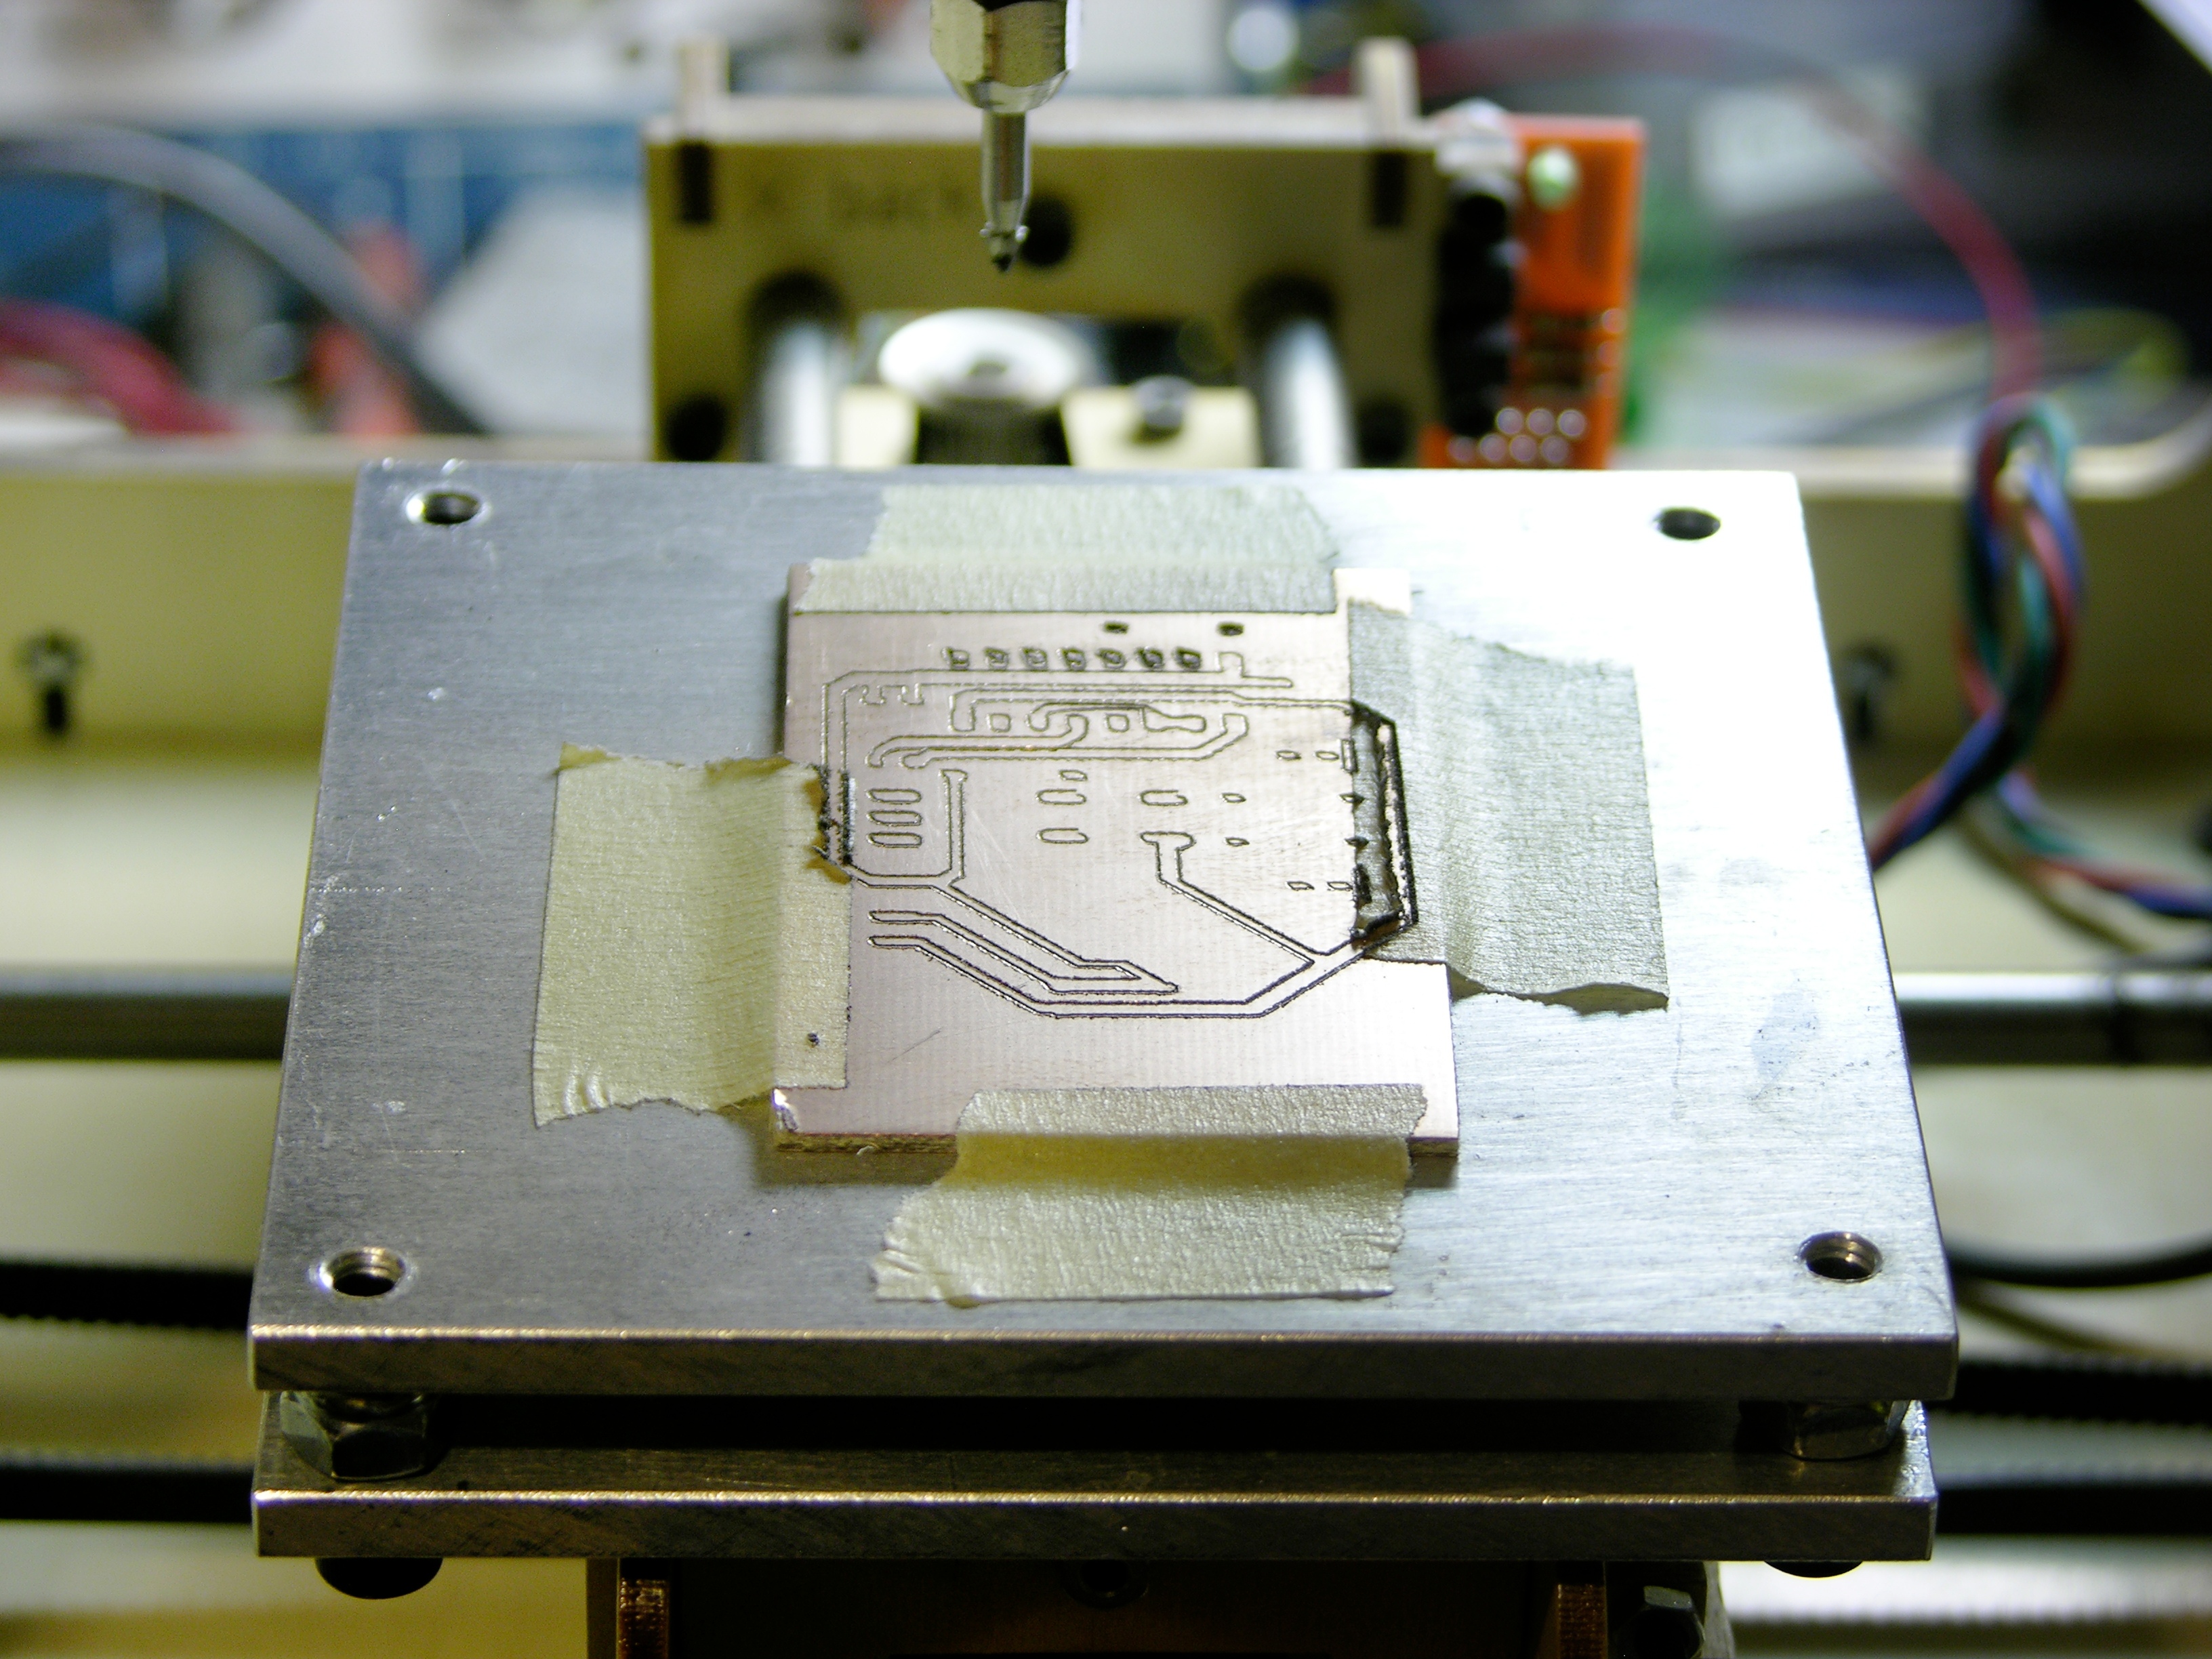
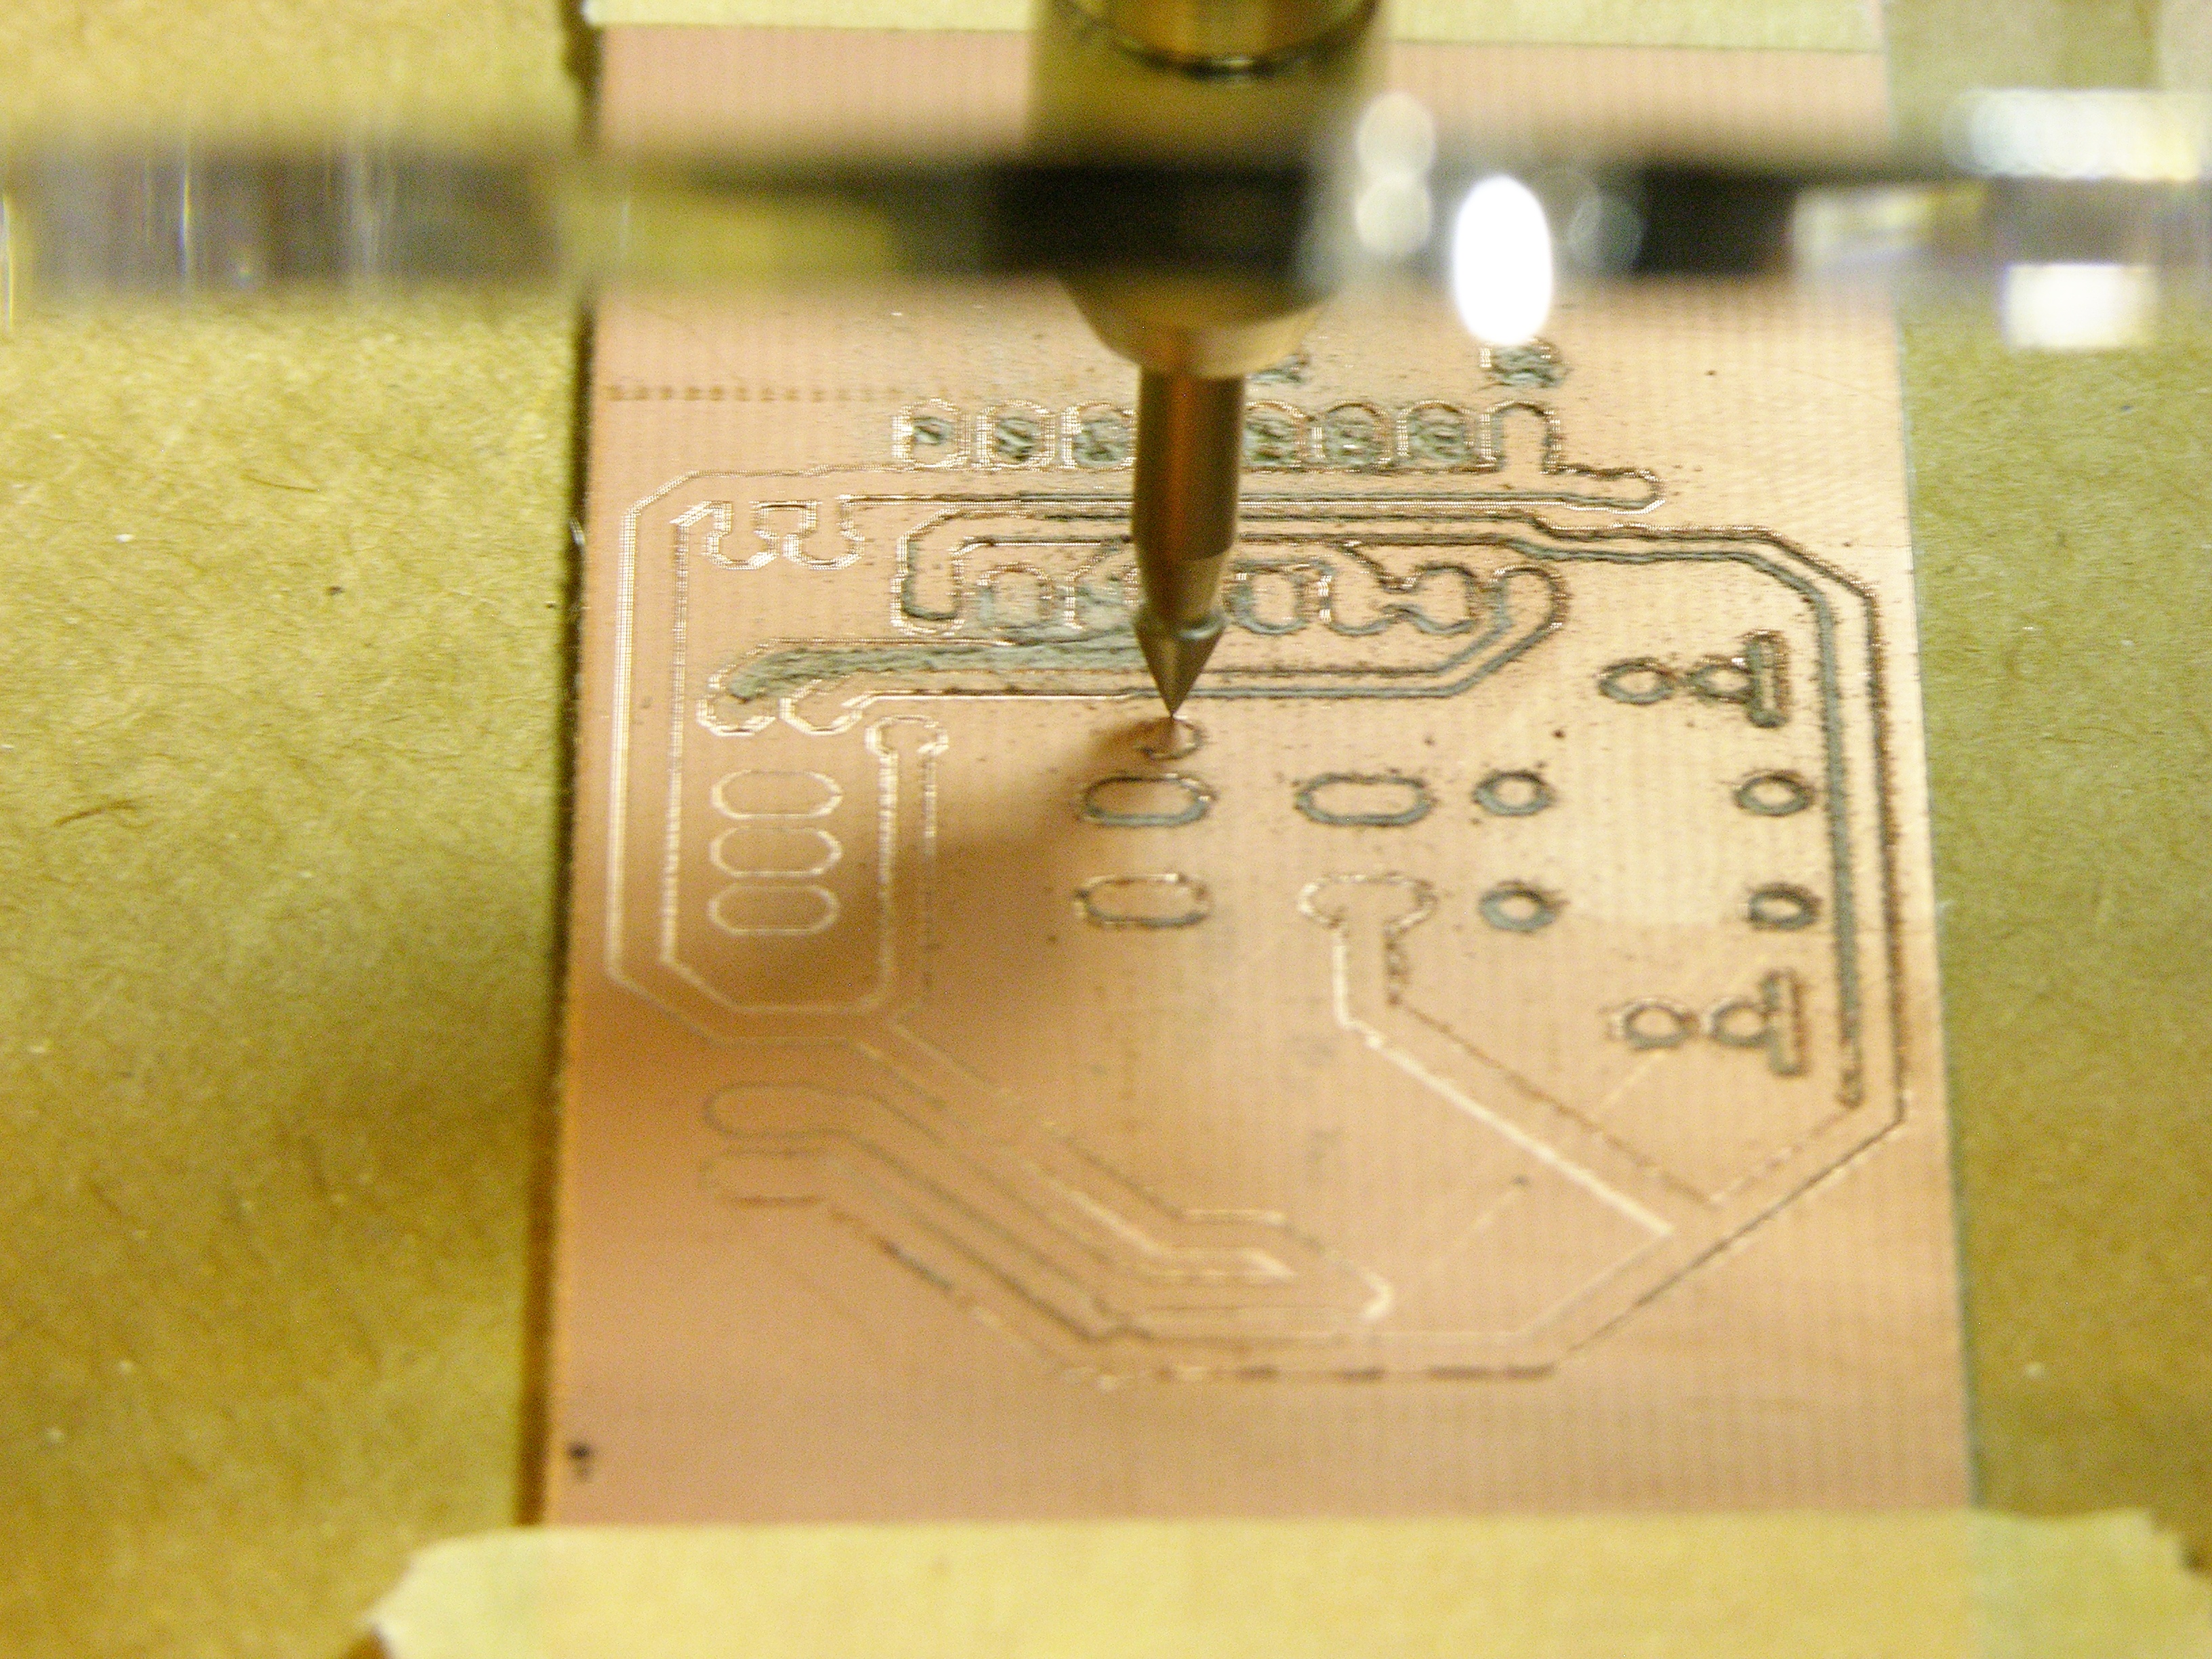
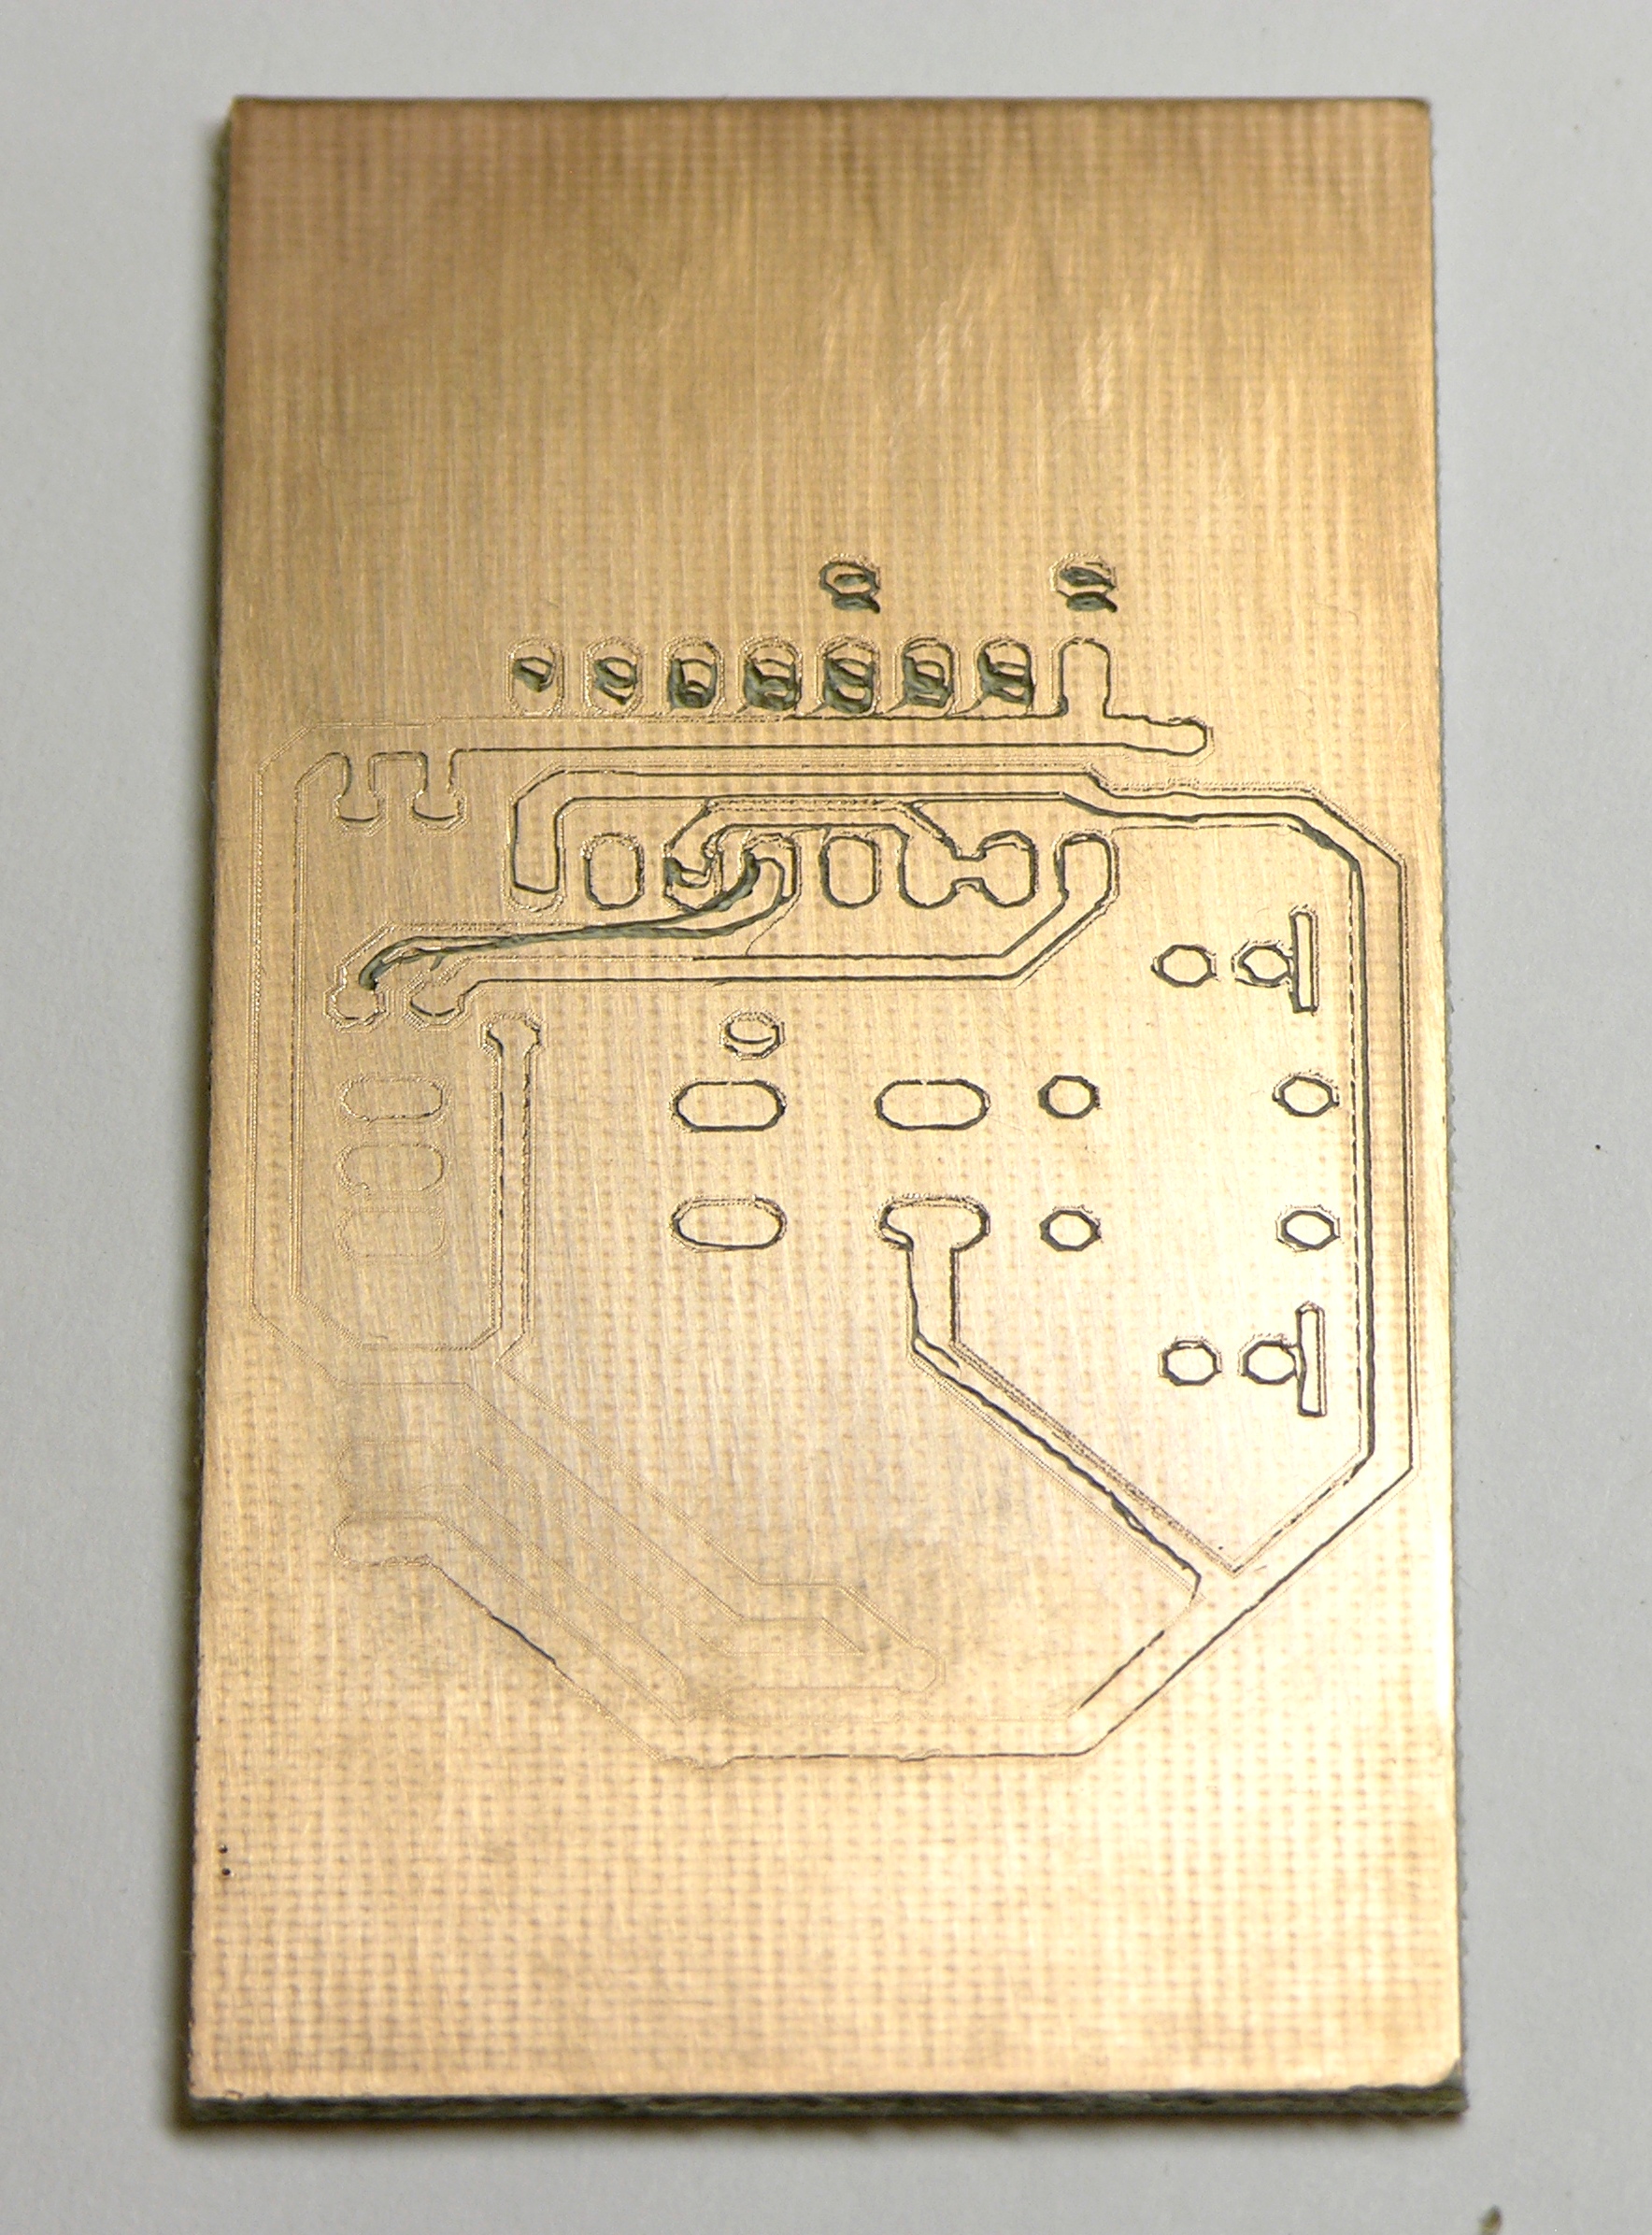
The results were not tremendously better than before (left board, top row of pads; right board from commercial mill for comparison), so I slowed the feed rate to .1″ per minute and let the mill finish the rest of the board for five hours, just to see whether I could produce usable traces. The traces cut at an outrageously slow feed rate are much better than previous results, but still a bit, shall we say, interpretive for my taste.
Having watched the Dremel bit trying to cut the copper and having tested it handheld out of the machine, I do recognize that it’s not the right bit for this job. I have some carbide engraving bits recommended by Pierre (exuinoxefr) on the way from Hong Kong, and I think they’ll make a significant difference. In April.
Meanwhile, note the three pads in the center of the board. Even at only one stepper motor step per second, the board took a very consistently incorrect path under the toolhead. Also note that the diagonal lines look like they were drawn with a left-handed quill pen — NE/SW lines are thicker than NW/SE.
I believe this is caused by the considerable play between the original CupCake bushings and the guide rods. Tighter bushings would cause more friction, so they were chosen for a bit of a loose fit. Even though the platform is now rigidly mounted on the Y carriage, the Y carriage wiggles on the Y guide rods and the X-Y carriage wiggles on the X guide rods.
I’m extremely interested in the Mendel-inspired replacement X-Y assembly by Thingiverse contributor “twotimes.” It replaces the bushings with sets of roller bearings spaced around the guide rods; the bearings can be tightened against the rods and still roll smoothly. I intend to get in touch and ask whether it successfully removes the play from the carriages.
Although my immediate interest is whether I can use the CupCake that I already own as a PCB milling machine, the enhancements I’m making will improve it as a filament deposition machine as well. The lack of leveling in my heated build platform prevented me from printing larger models; I’ve already drilled my heated platform to fit interchangeably into this new system. Smoother X-Y action from a replacement carriage can only help, too.
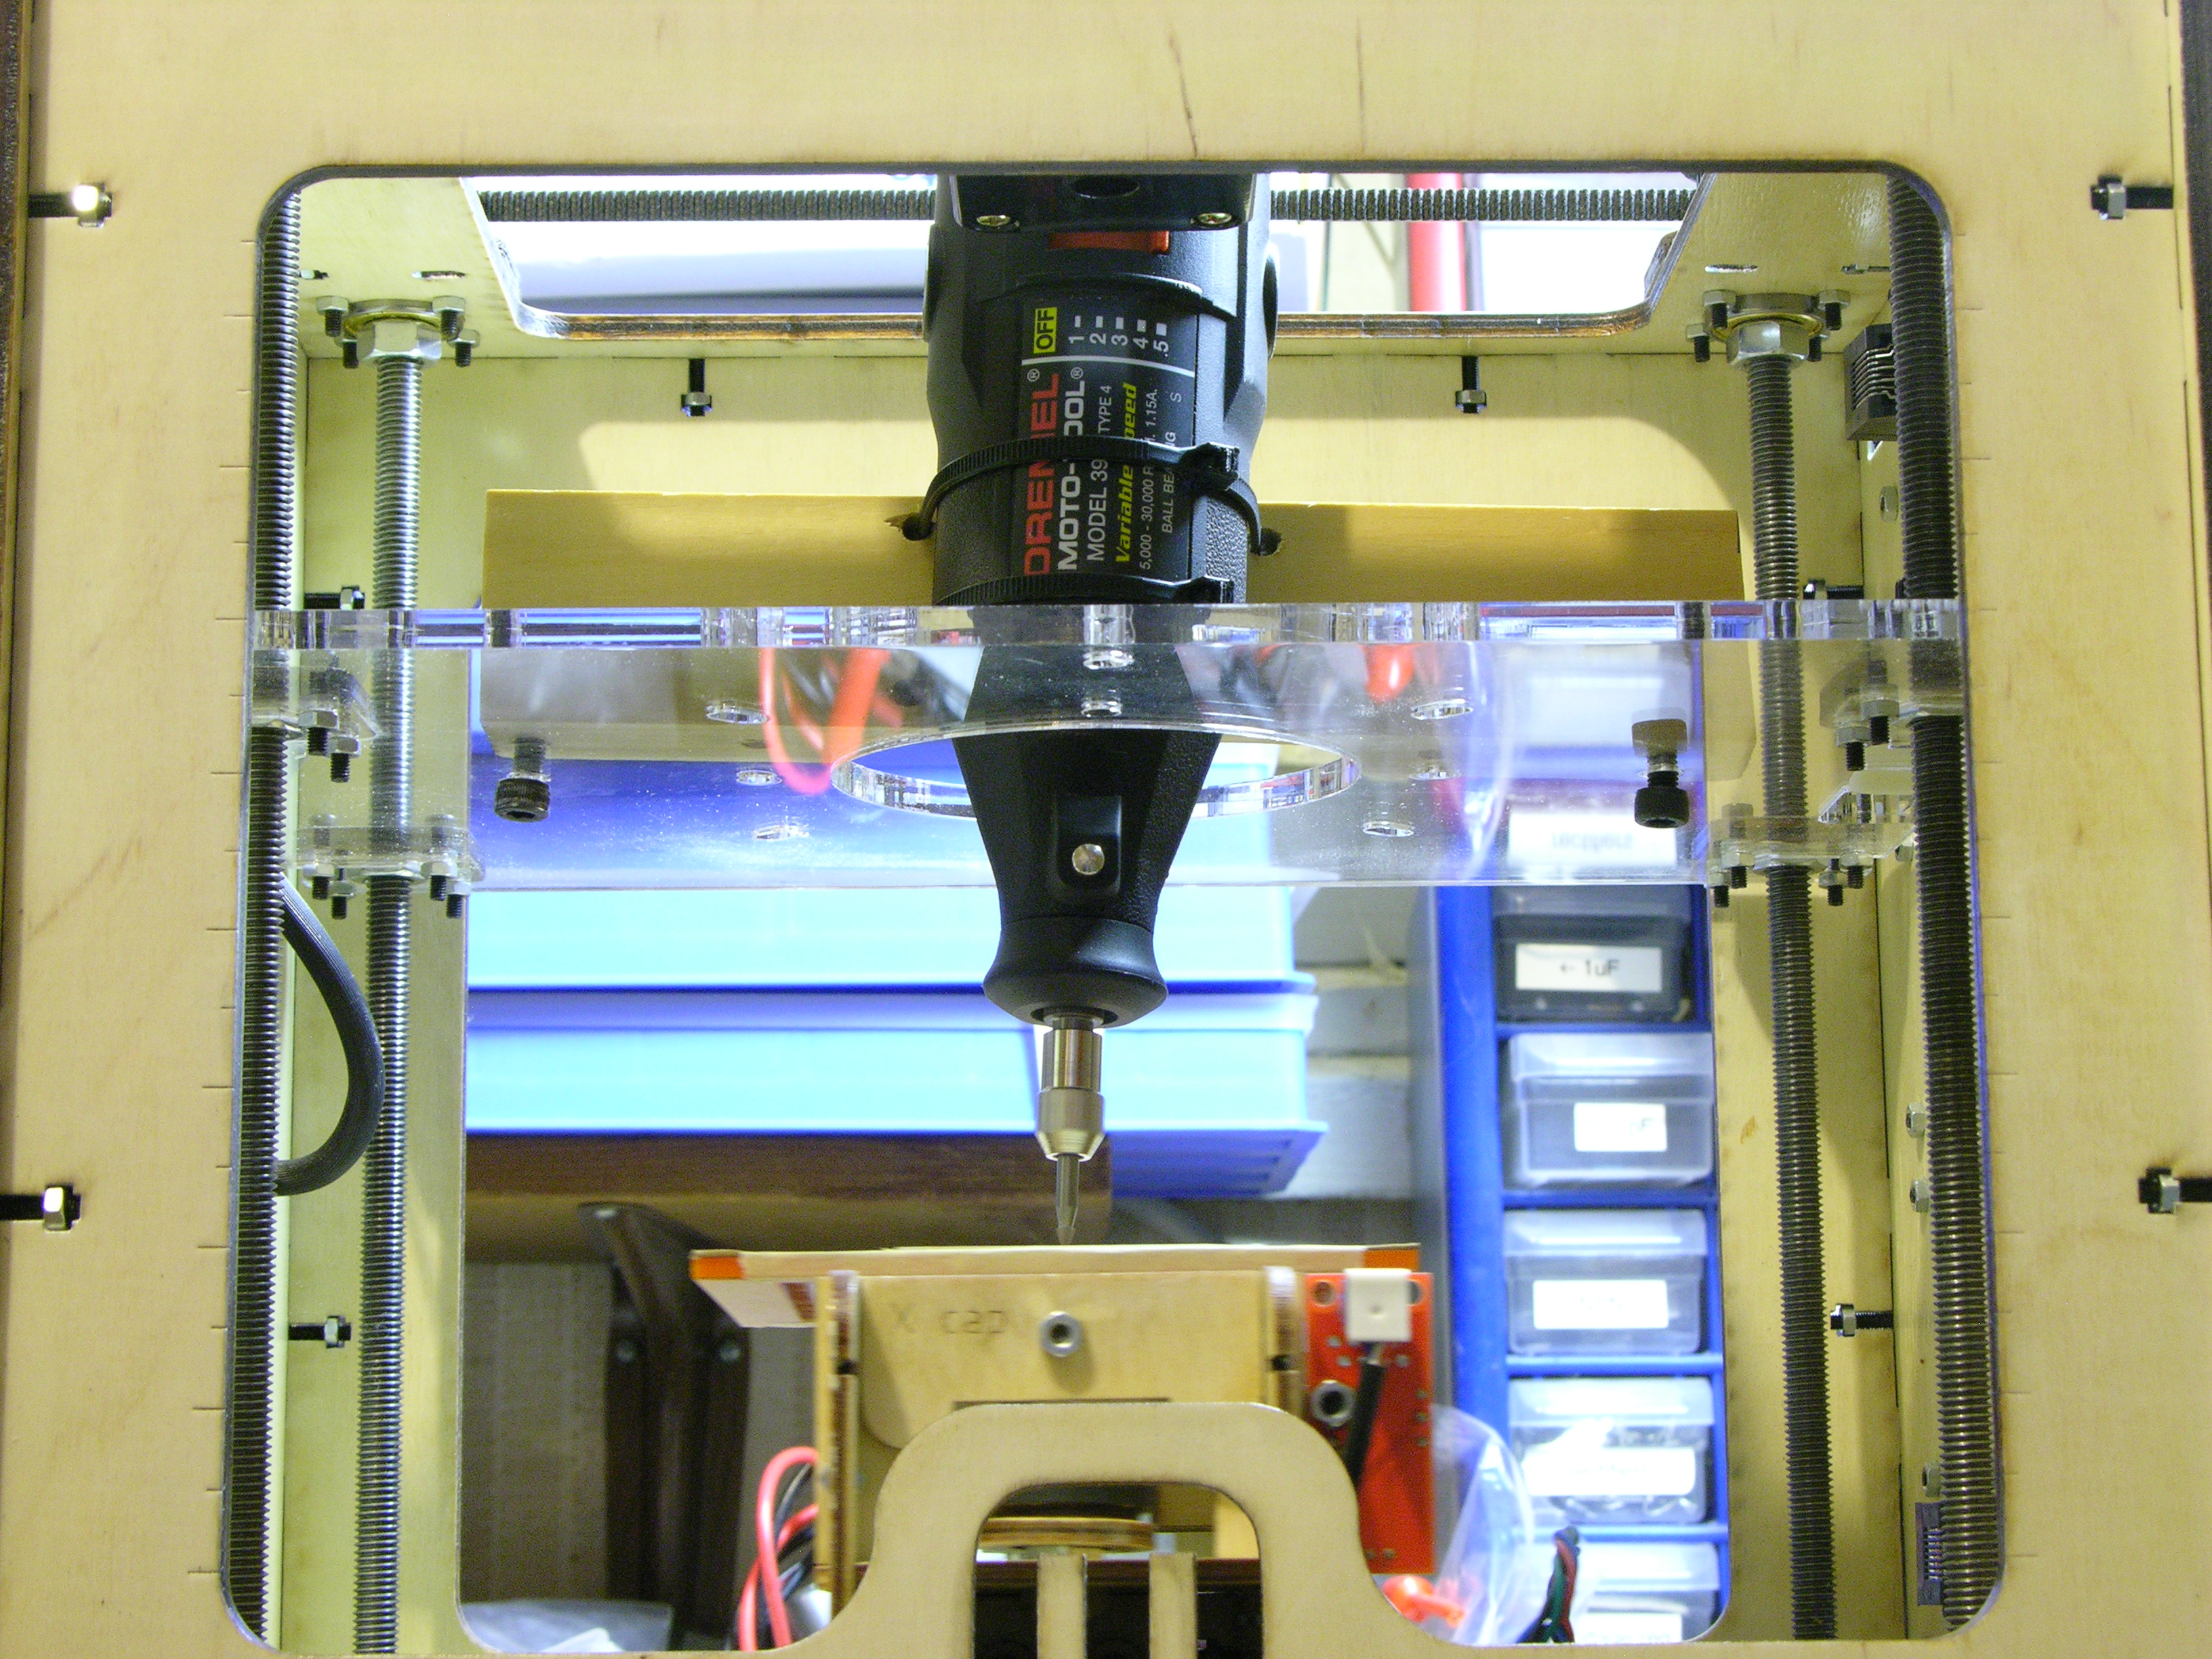
My Dremel’s spindle had much more solid bearings than the Handy Grinder, so I mounted it in the CupCake tonight to try milling with it.
It fit even worse through the Z stage than the Handy Grinder, but I remember having said something about the drill not even needing to be vertical as long as the bit’s tip made contact with the workpiece.
The XY platform wasn’t quite level (deeper cutting on the right than the left); but the real problem was that the Z stage was flexing. Not lifting off the Z stage guides — I could feel the acrylic bending as the tool direction changed. This demanded backing off the Z axis to an extremely shallow, ineffective cut to keep the milling tip from tracking the cutting direction as it did with the Handy Grinder.
Increasing the rigidity of the Z stage by bolting a large plate to it while mounting the Dremel is my top priority for getting closer to usable performance.
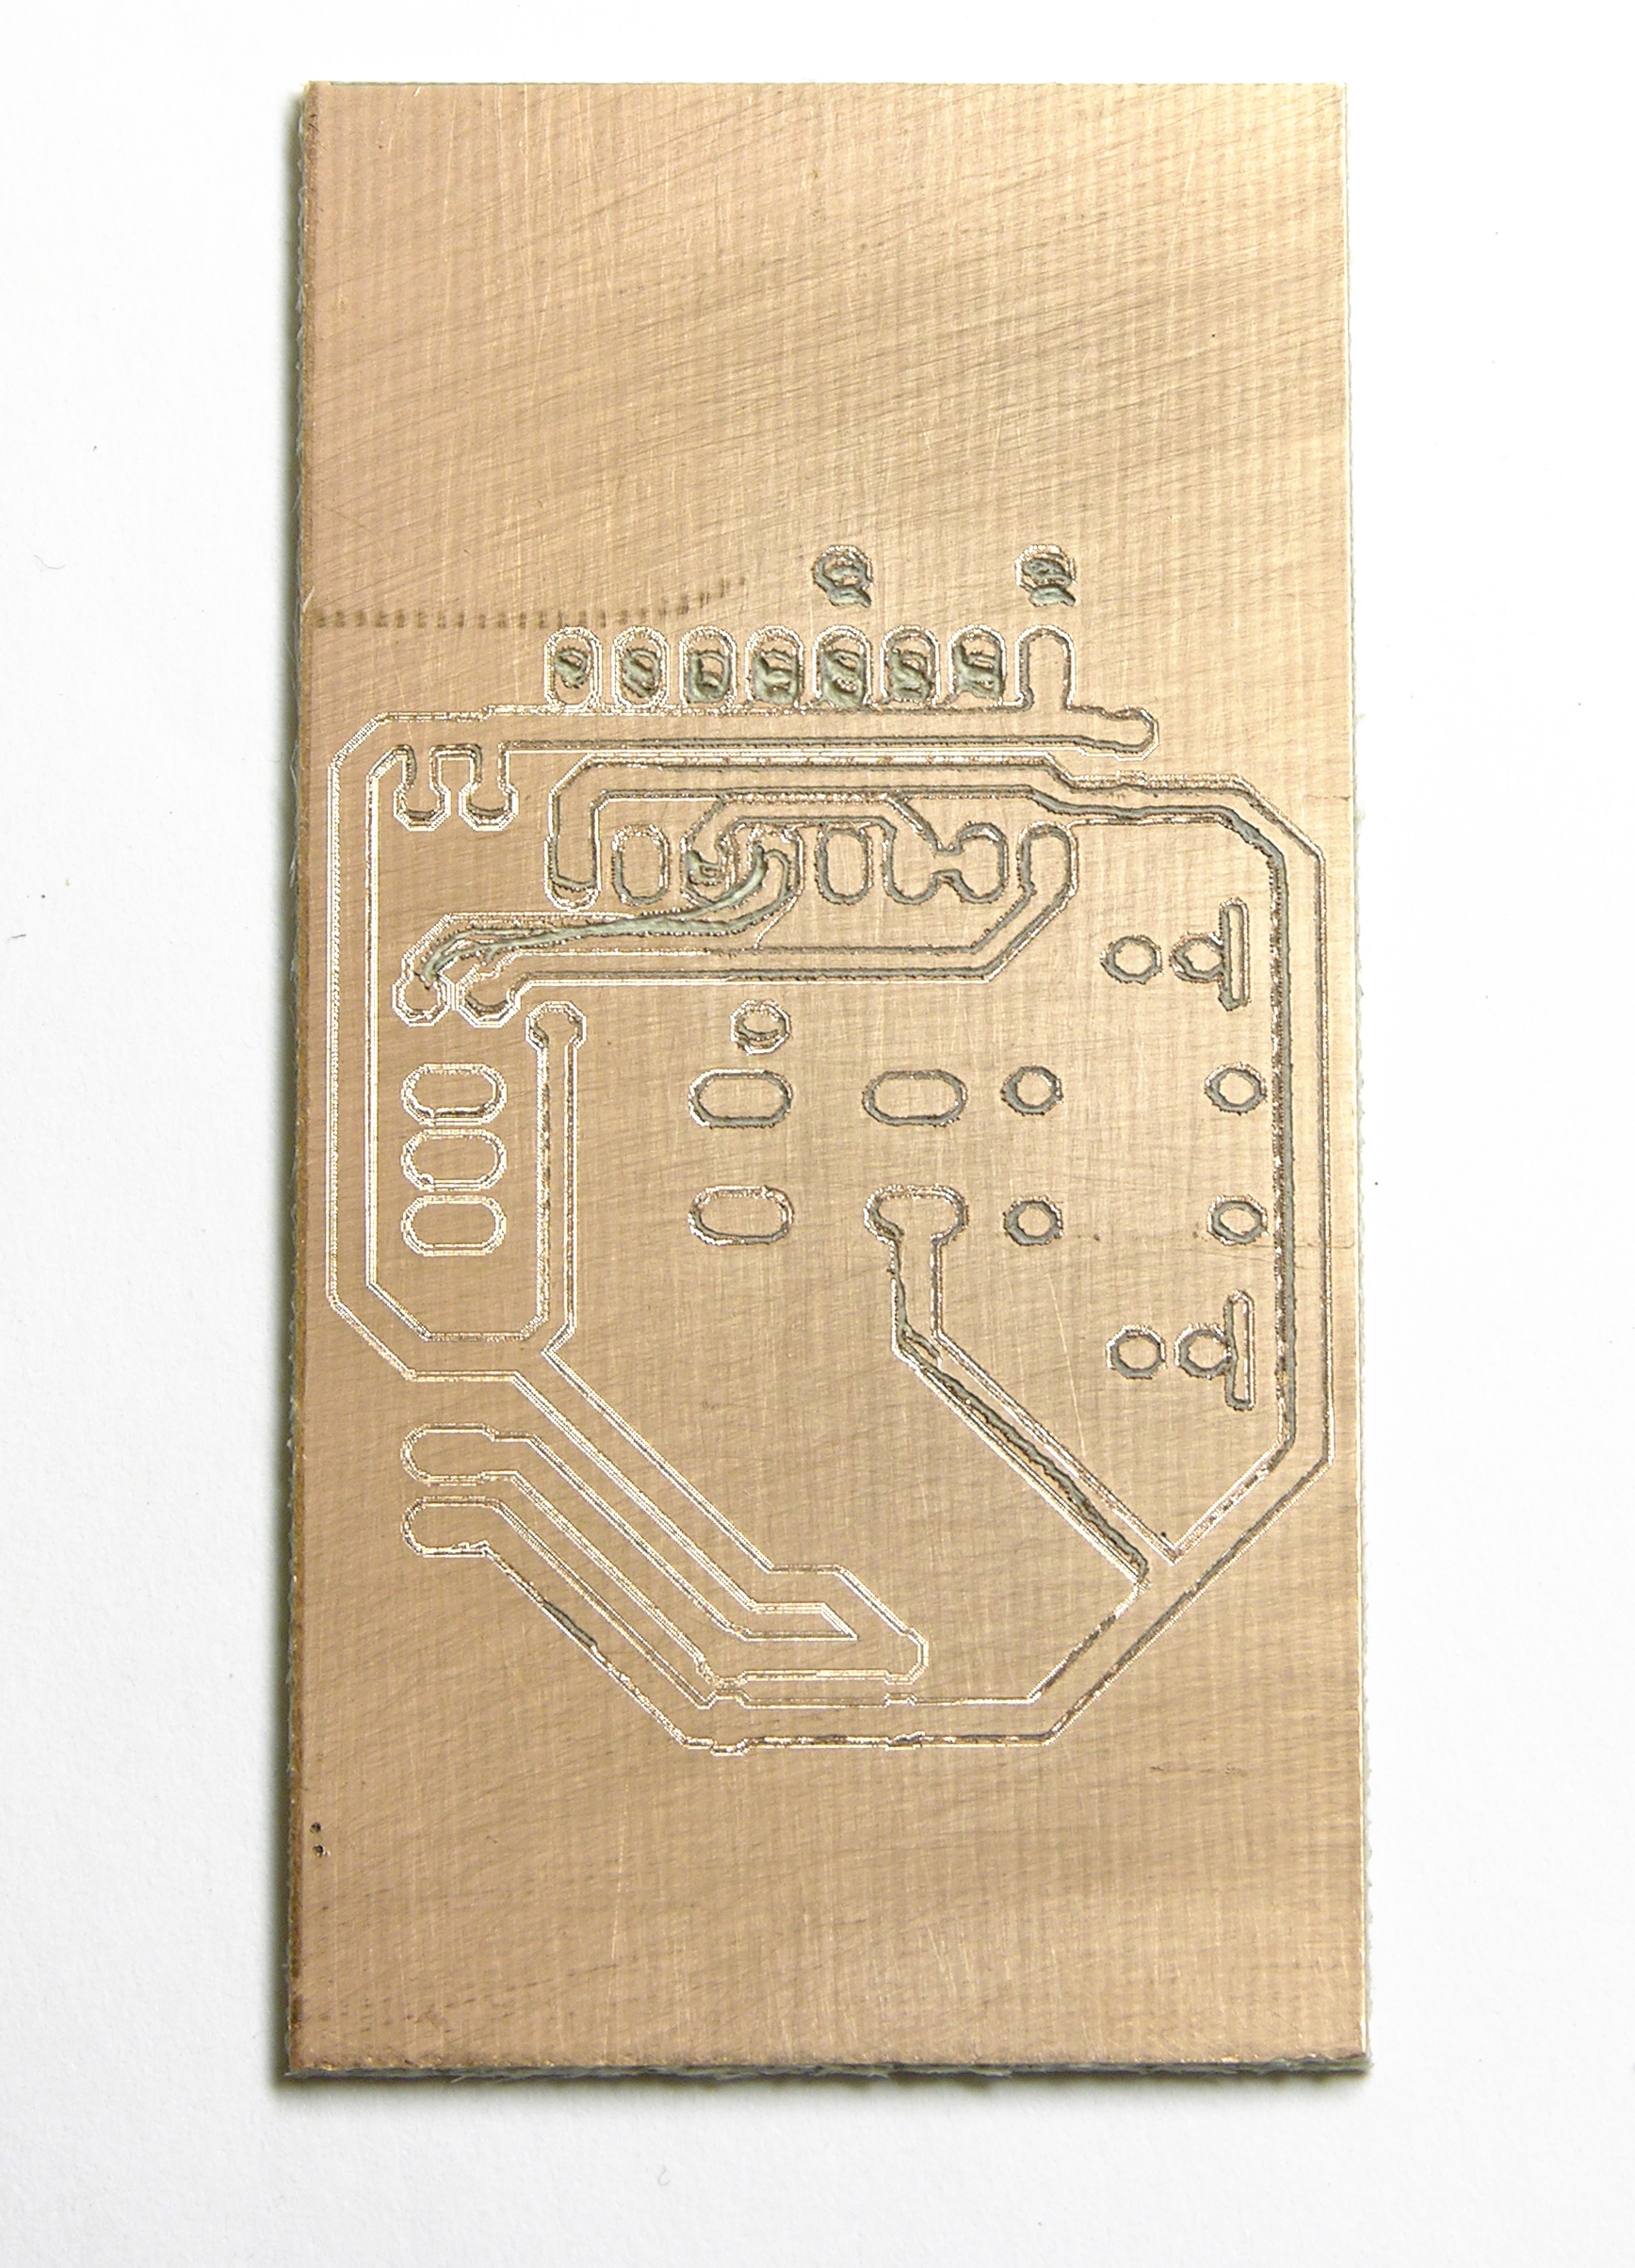
Straight off the mill after a variety of different attempts on the same workpiece. Parts of it almost look usable …
But sanded, it’s clear that in most places the bit barely scratched the copper and wasn’t even close to scoring through, because of the obligatory shallow cut.
I crave a CNC mill for trace-isolation milling prototype PC boards and I haven’t managed to get my CupCake filament deposition machine calibrated so I can use it. (Build platform leveling and filament feed are my current showstoppers. I’ll get back to it.)
I knew that someone had proposed mounting a Dremel in place of the CupCake’s extruder and that MaskedRetriever had modeled a mounting bracket; but curiously, I haven’t heard any more about using the CupCake for milling. Surely someone has done it; I just haven’t run across it.
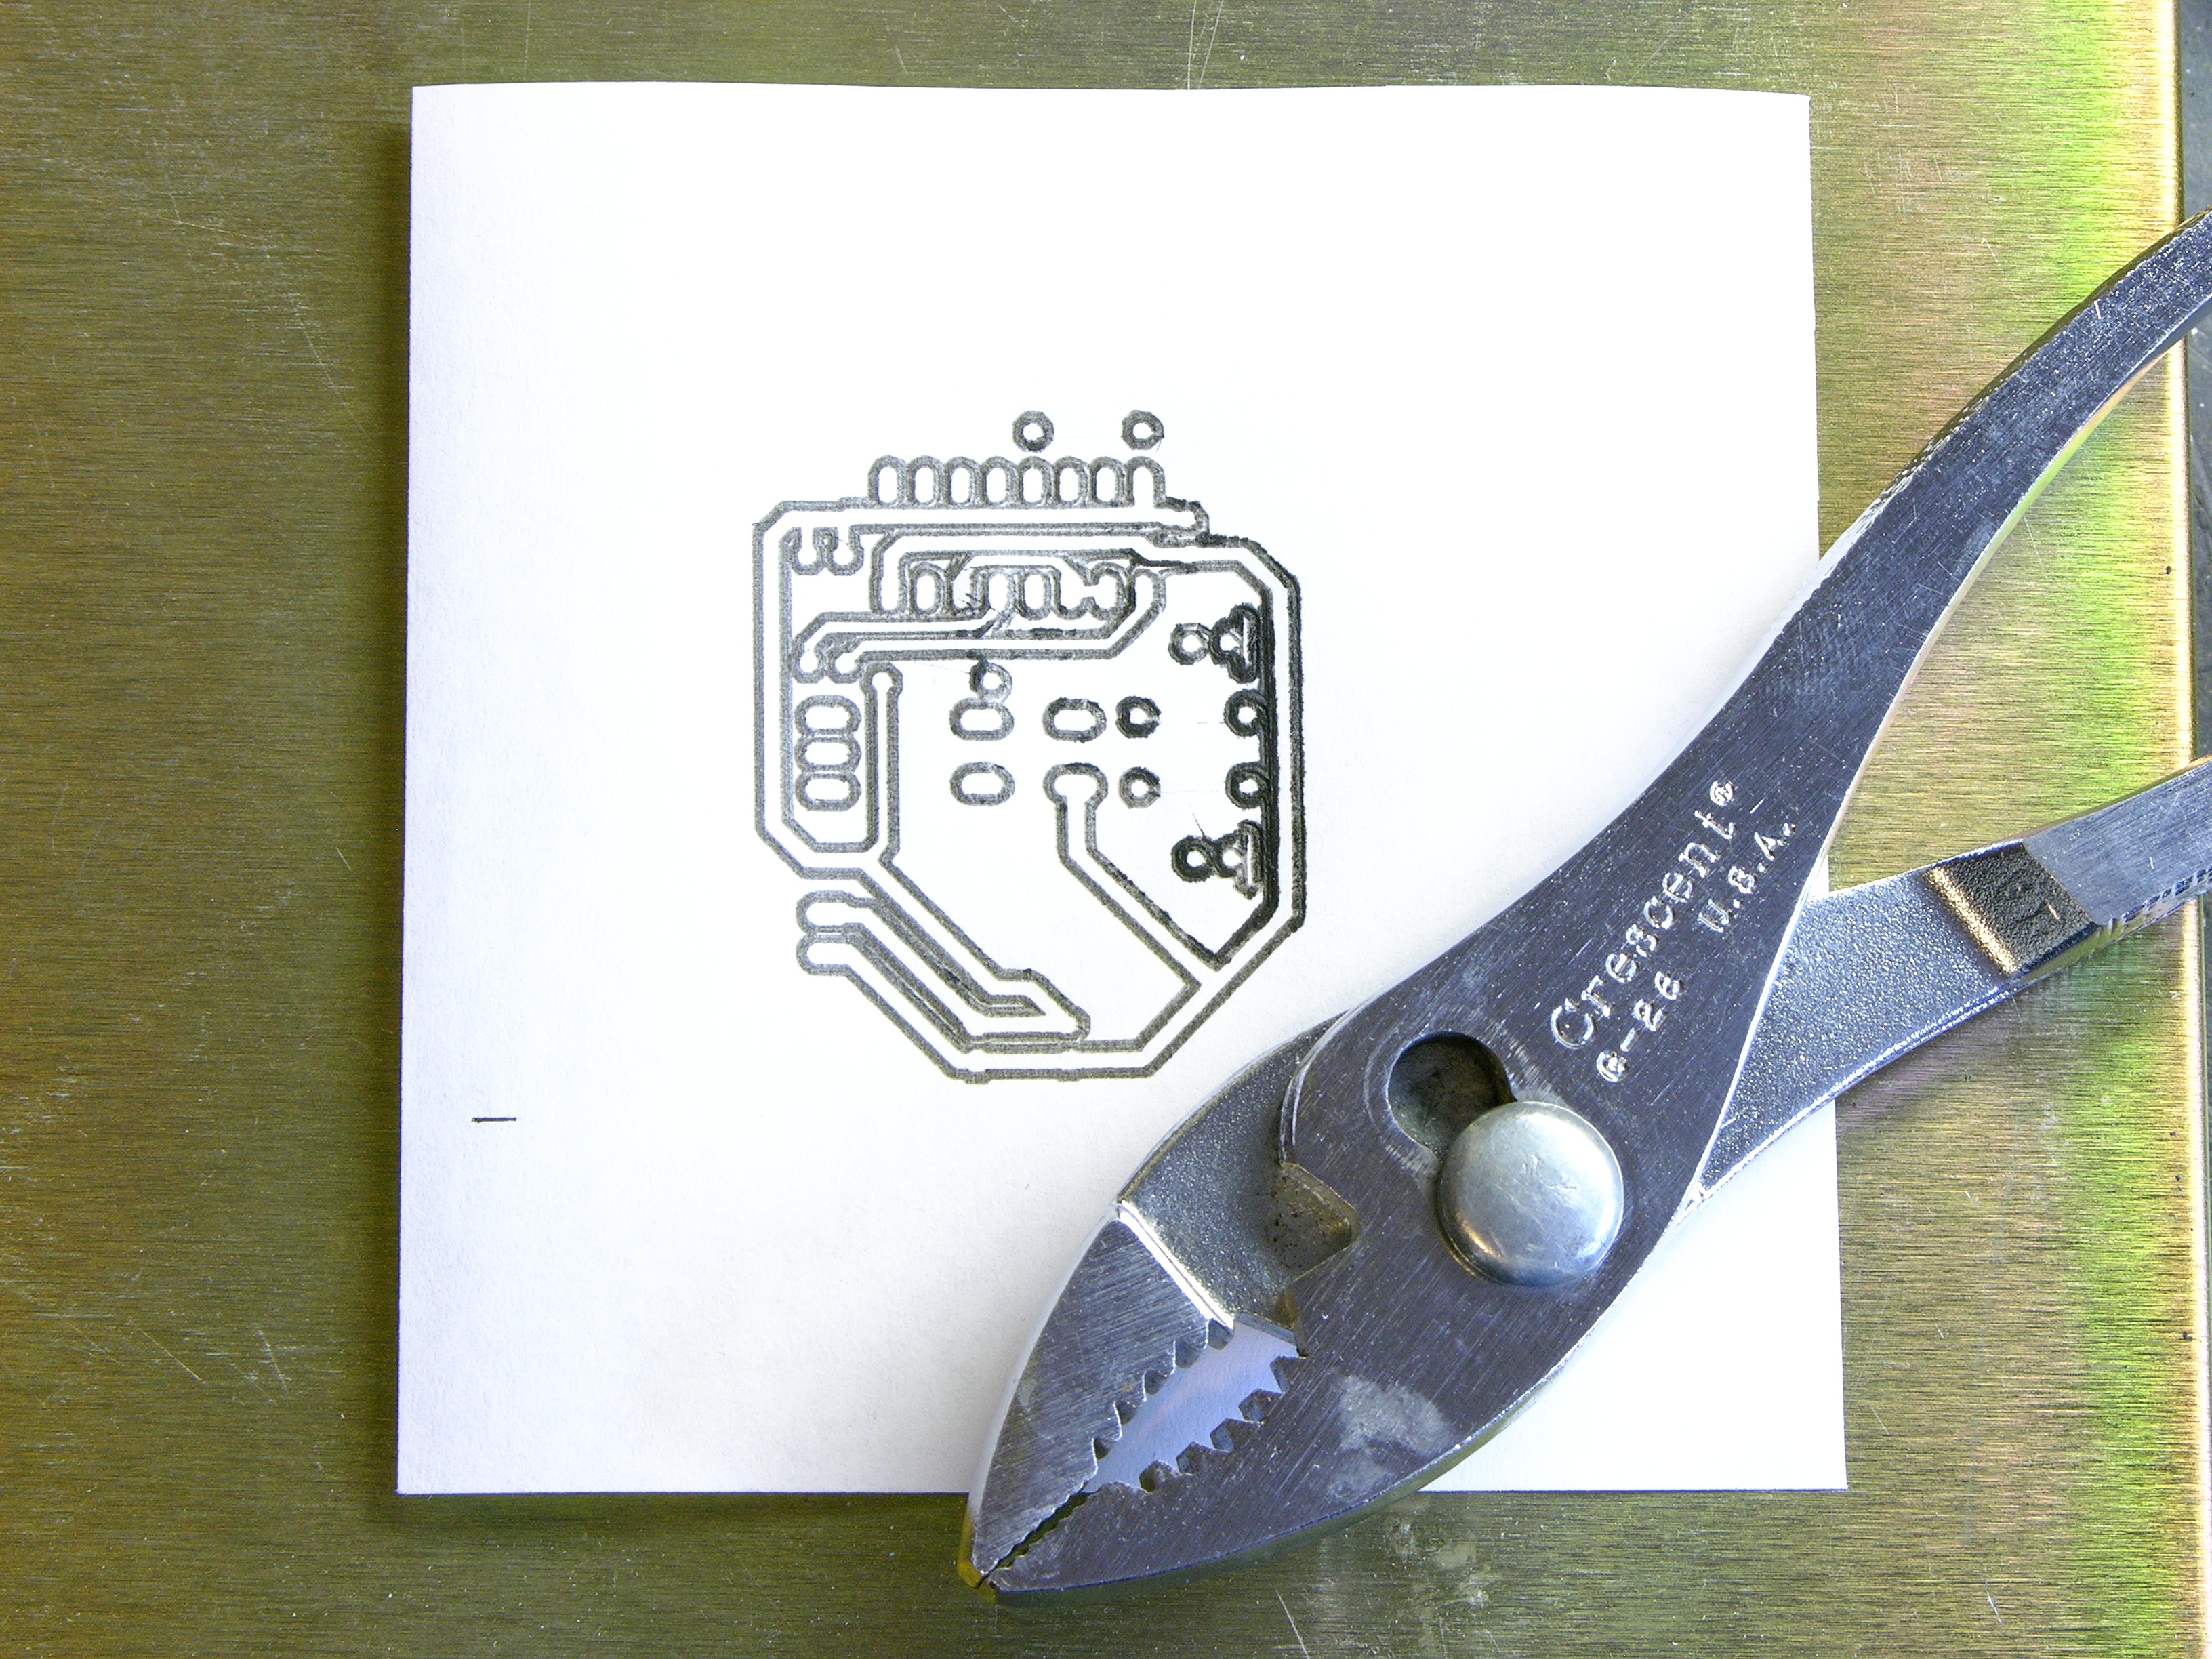
Last night while I was asleep, the facts and the immediacy of the situation came together: EAGLE can output trace-isolation g-code and ReplicatorG reads g-code and drives the CupCake. Really??? PCB trace-isolation milling is that simple???
Yes. Yes it is.
The web is ablaze with projects for sous-vide (vacuum-sealed) and low-temperature / long-duration cooking. For those not familiar, the basic idea is that if a perfectly-cooked medium-rare steak is 120°F / 49°C in the center, by cooking traditionally on a grill, you overcook it everywhere but the center. Instead of cooking at a higher temperature and waiting exactly the right amount of time for the inside to warm up to the desired temperature, cook the entire piece in a water bath at the desired final temperature for a long time, then sear the outside to make it extra yummy.
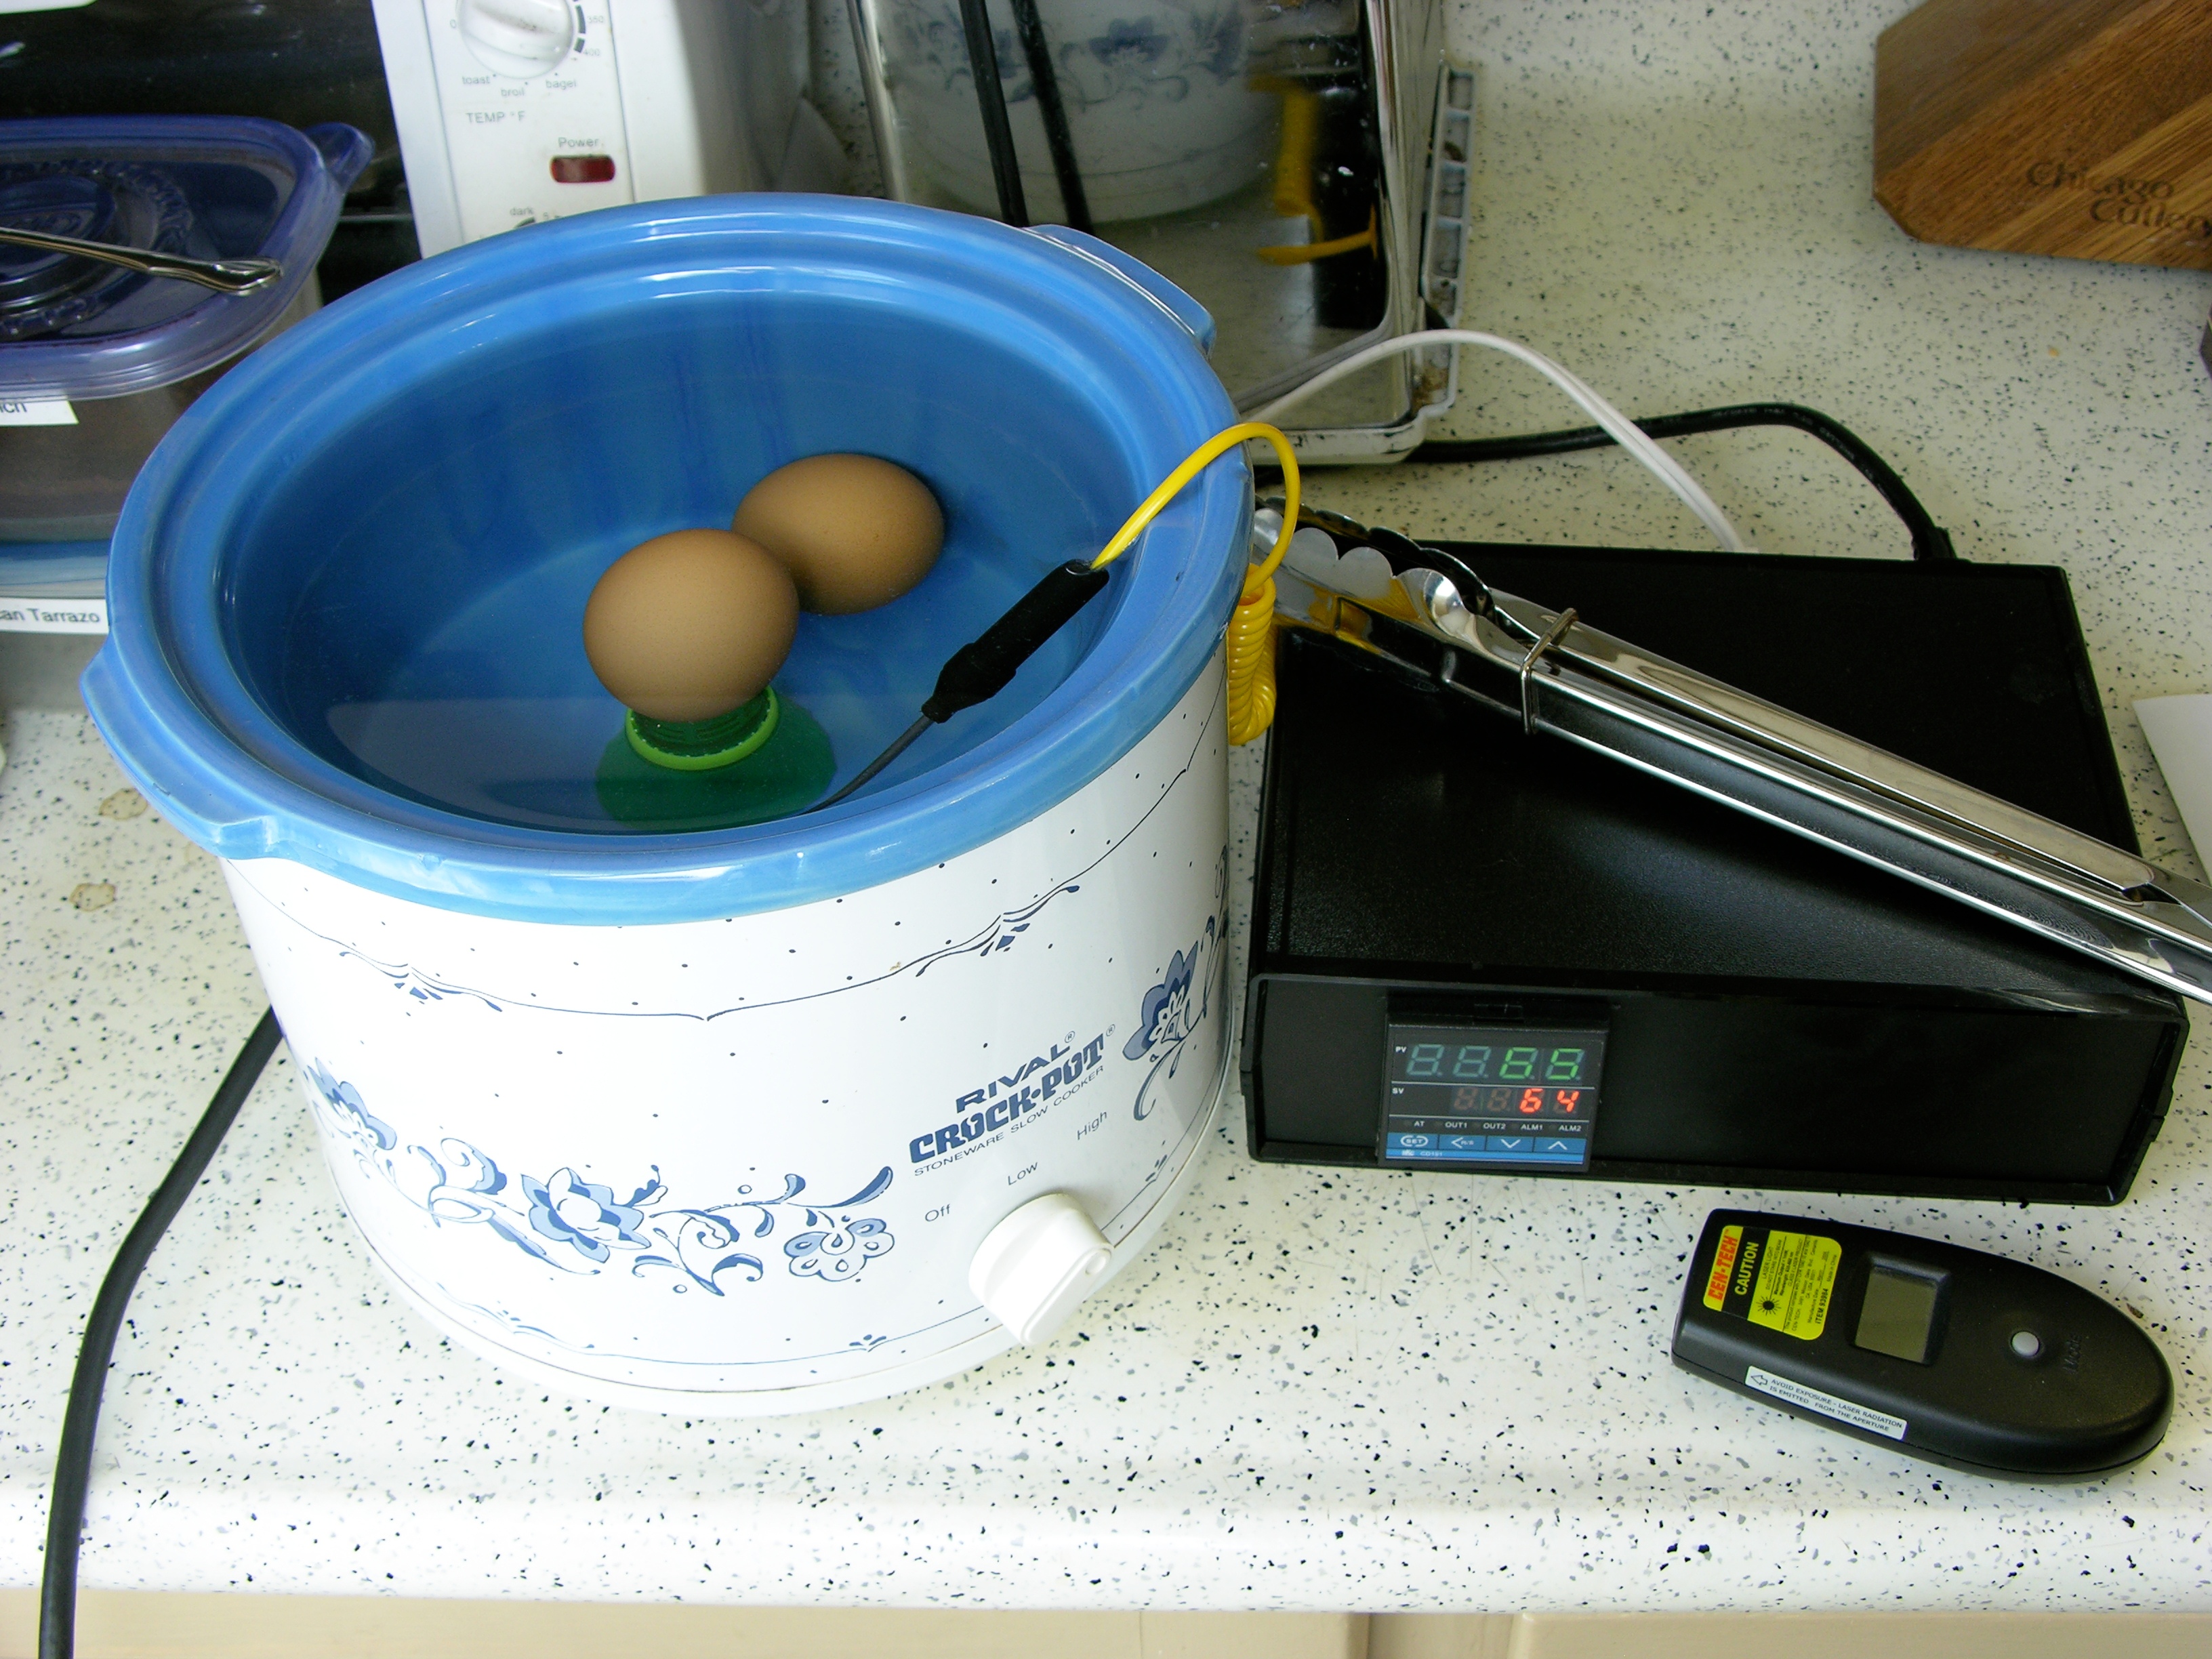
My project this weekend, rolling around in my head for way too long and finally kicked into motion by EMSL’s omelette-in-the-shell post, is nothing new nor revolutionary; it’s merely mine. Like many others before me, I plugged a crockpot into a PID controller to turn the crockpot’s heating element on and off and maintain its temperature precisely over a long period of time.
I’ve been in Anaheim, California for a conference this week, and I had the happy opportunity over the weekend to drive down to San Diego and meet in real life a couple of long-time blog friends, Scott and Ben.

I knew I was in the right place as soon as I looked out my hotel window.

Scott is building a copy of bdring’s DIY laser cutter, which looks fantastic. Over the weekend Scott was assembling the sleds that transport the mirror over the workpiece. It’s a very nice design — everything is modular and everything is adjustable.
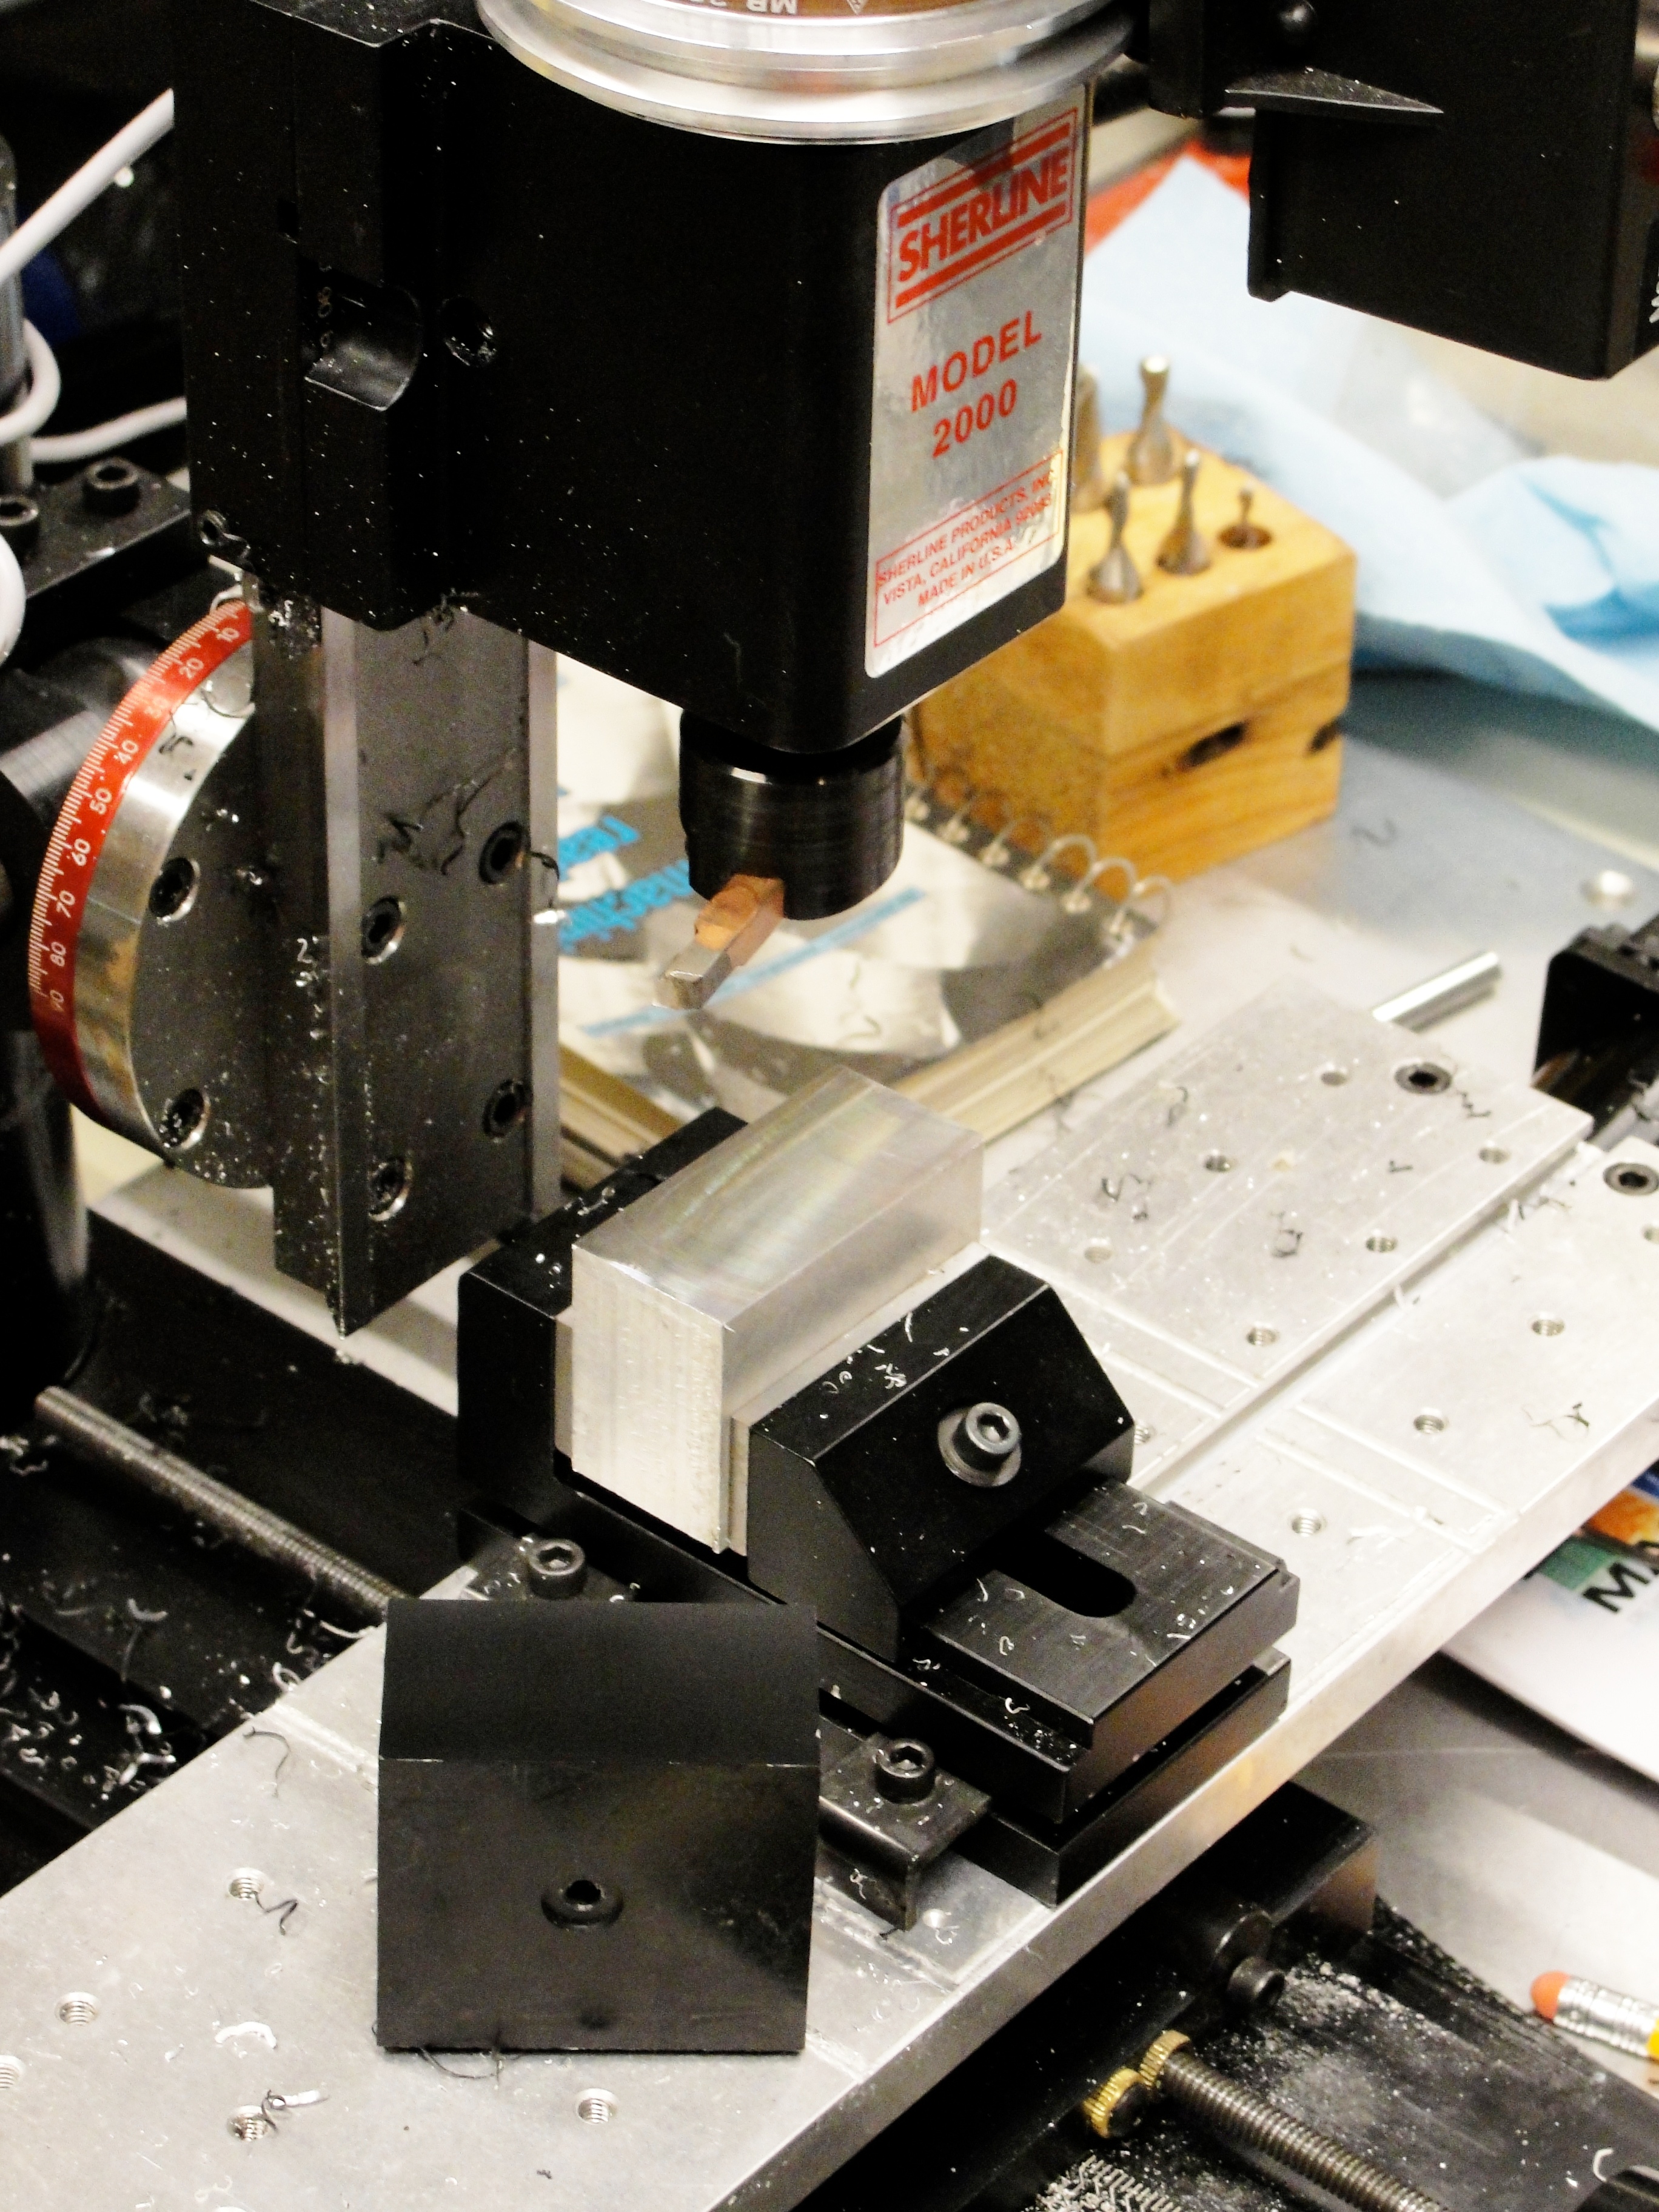
Scott and his machining mentor Peter generously demonstrated milling techniques on Scott’s Sherline mill. Shown is a fly cutter that was just used to smooth the surface of delrin and aluminum blocks. Although it’s not mirror-shiny, I was impressed at how easy it is (with the right cutting and feed rates) to clean up a face. Peter also demonstrated the use of an edge-finder to precisely position a hole drilled into the edge of an acrylic plate for the laser cutter.
Scott’s mill came CNC-ready with mounts for stepper motors on all of the axes. Scott designed and built his own interface between the PC’s parallel port and the stepper controls, adding indicator lights and the all-important stop button.

California is full of things I’ve never seen before, like lemons on trees
and people other than me

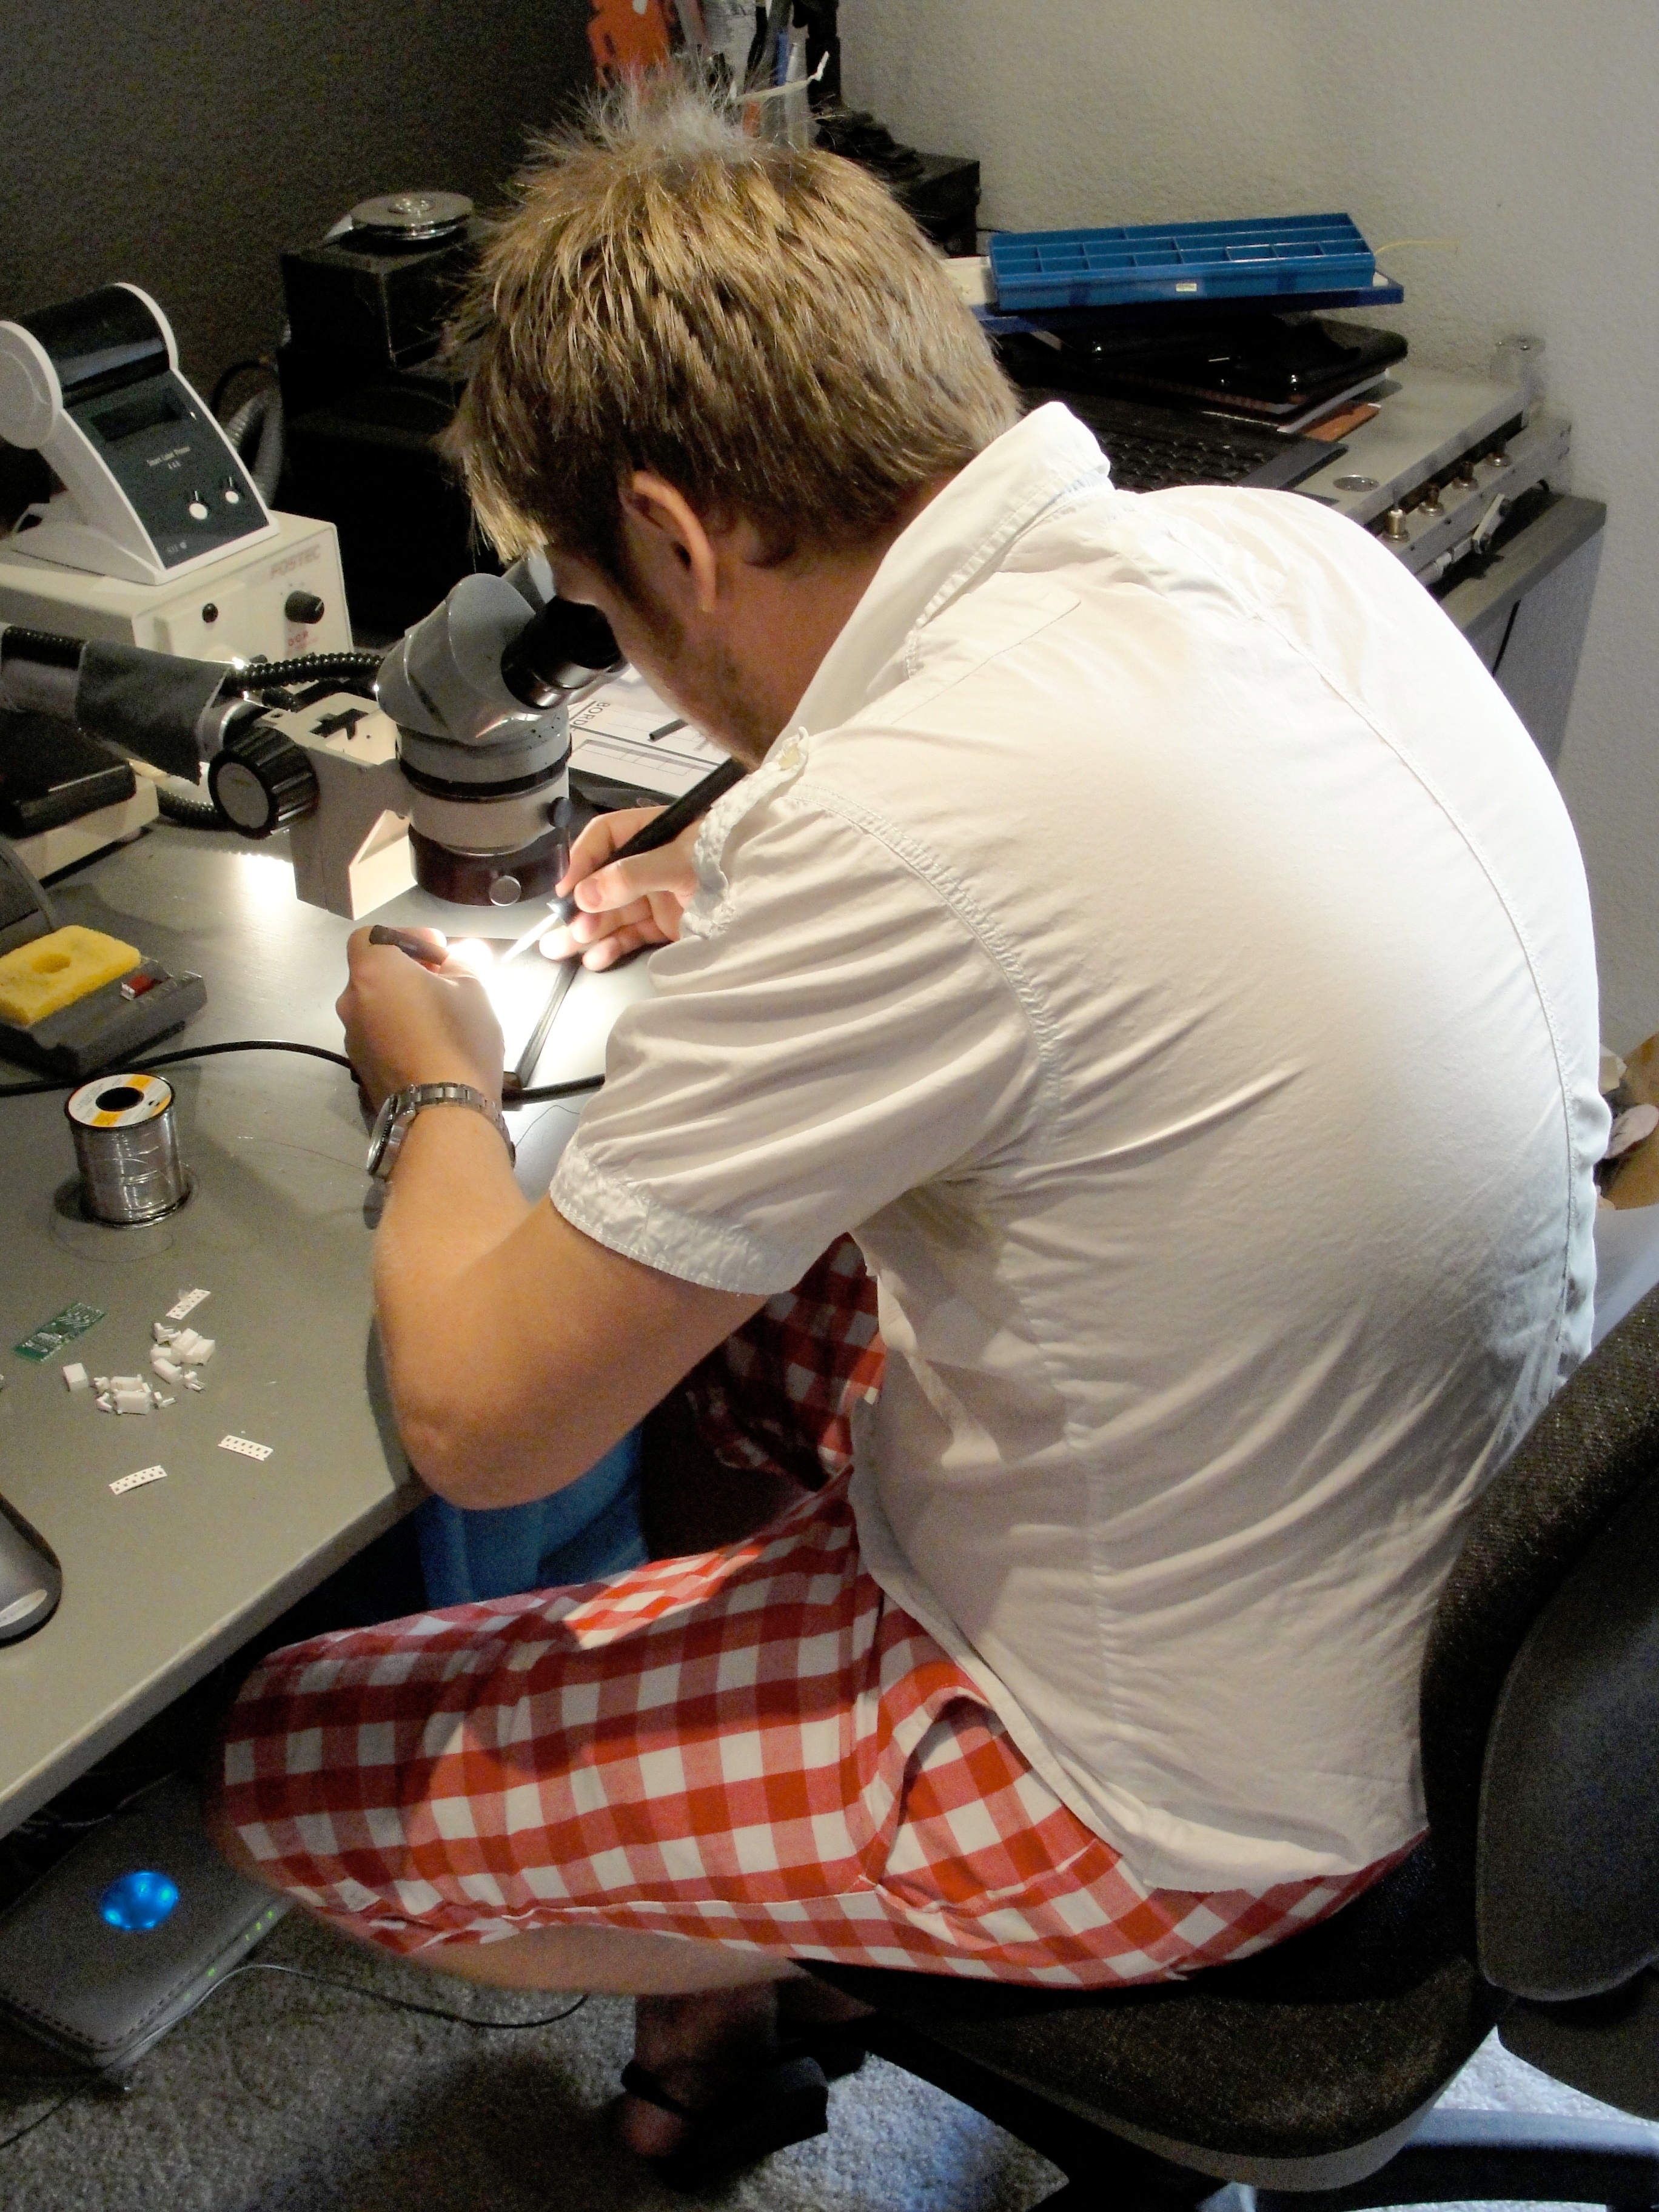
soldering together EasyBrights. I don’t have the microscope, though, so I don’t have to make the squinty face.
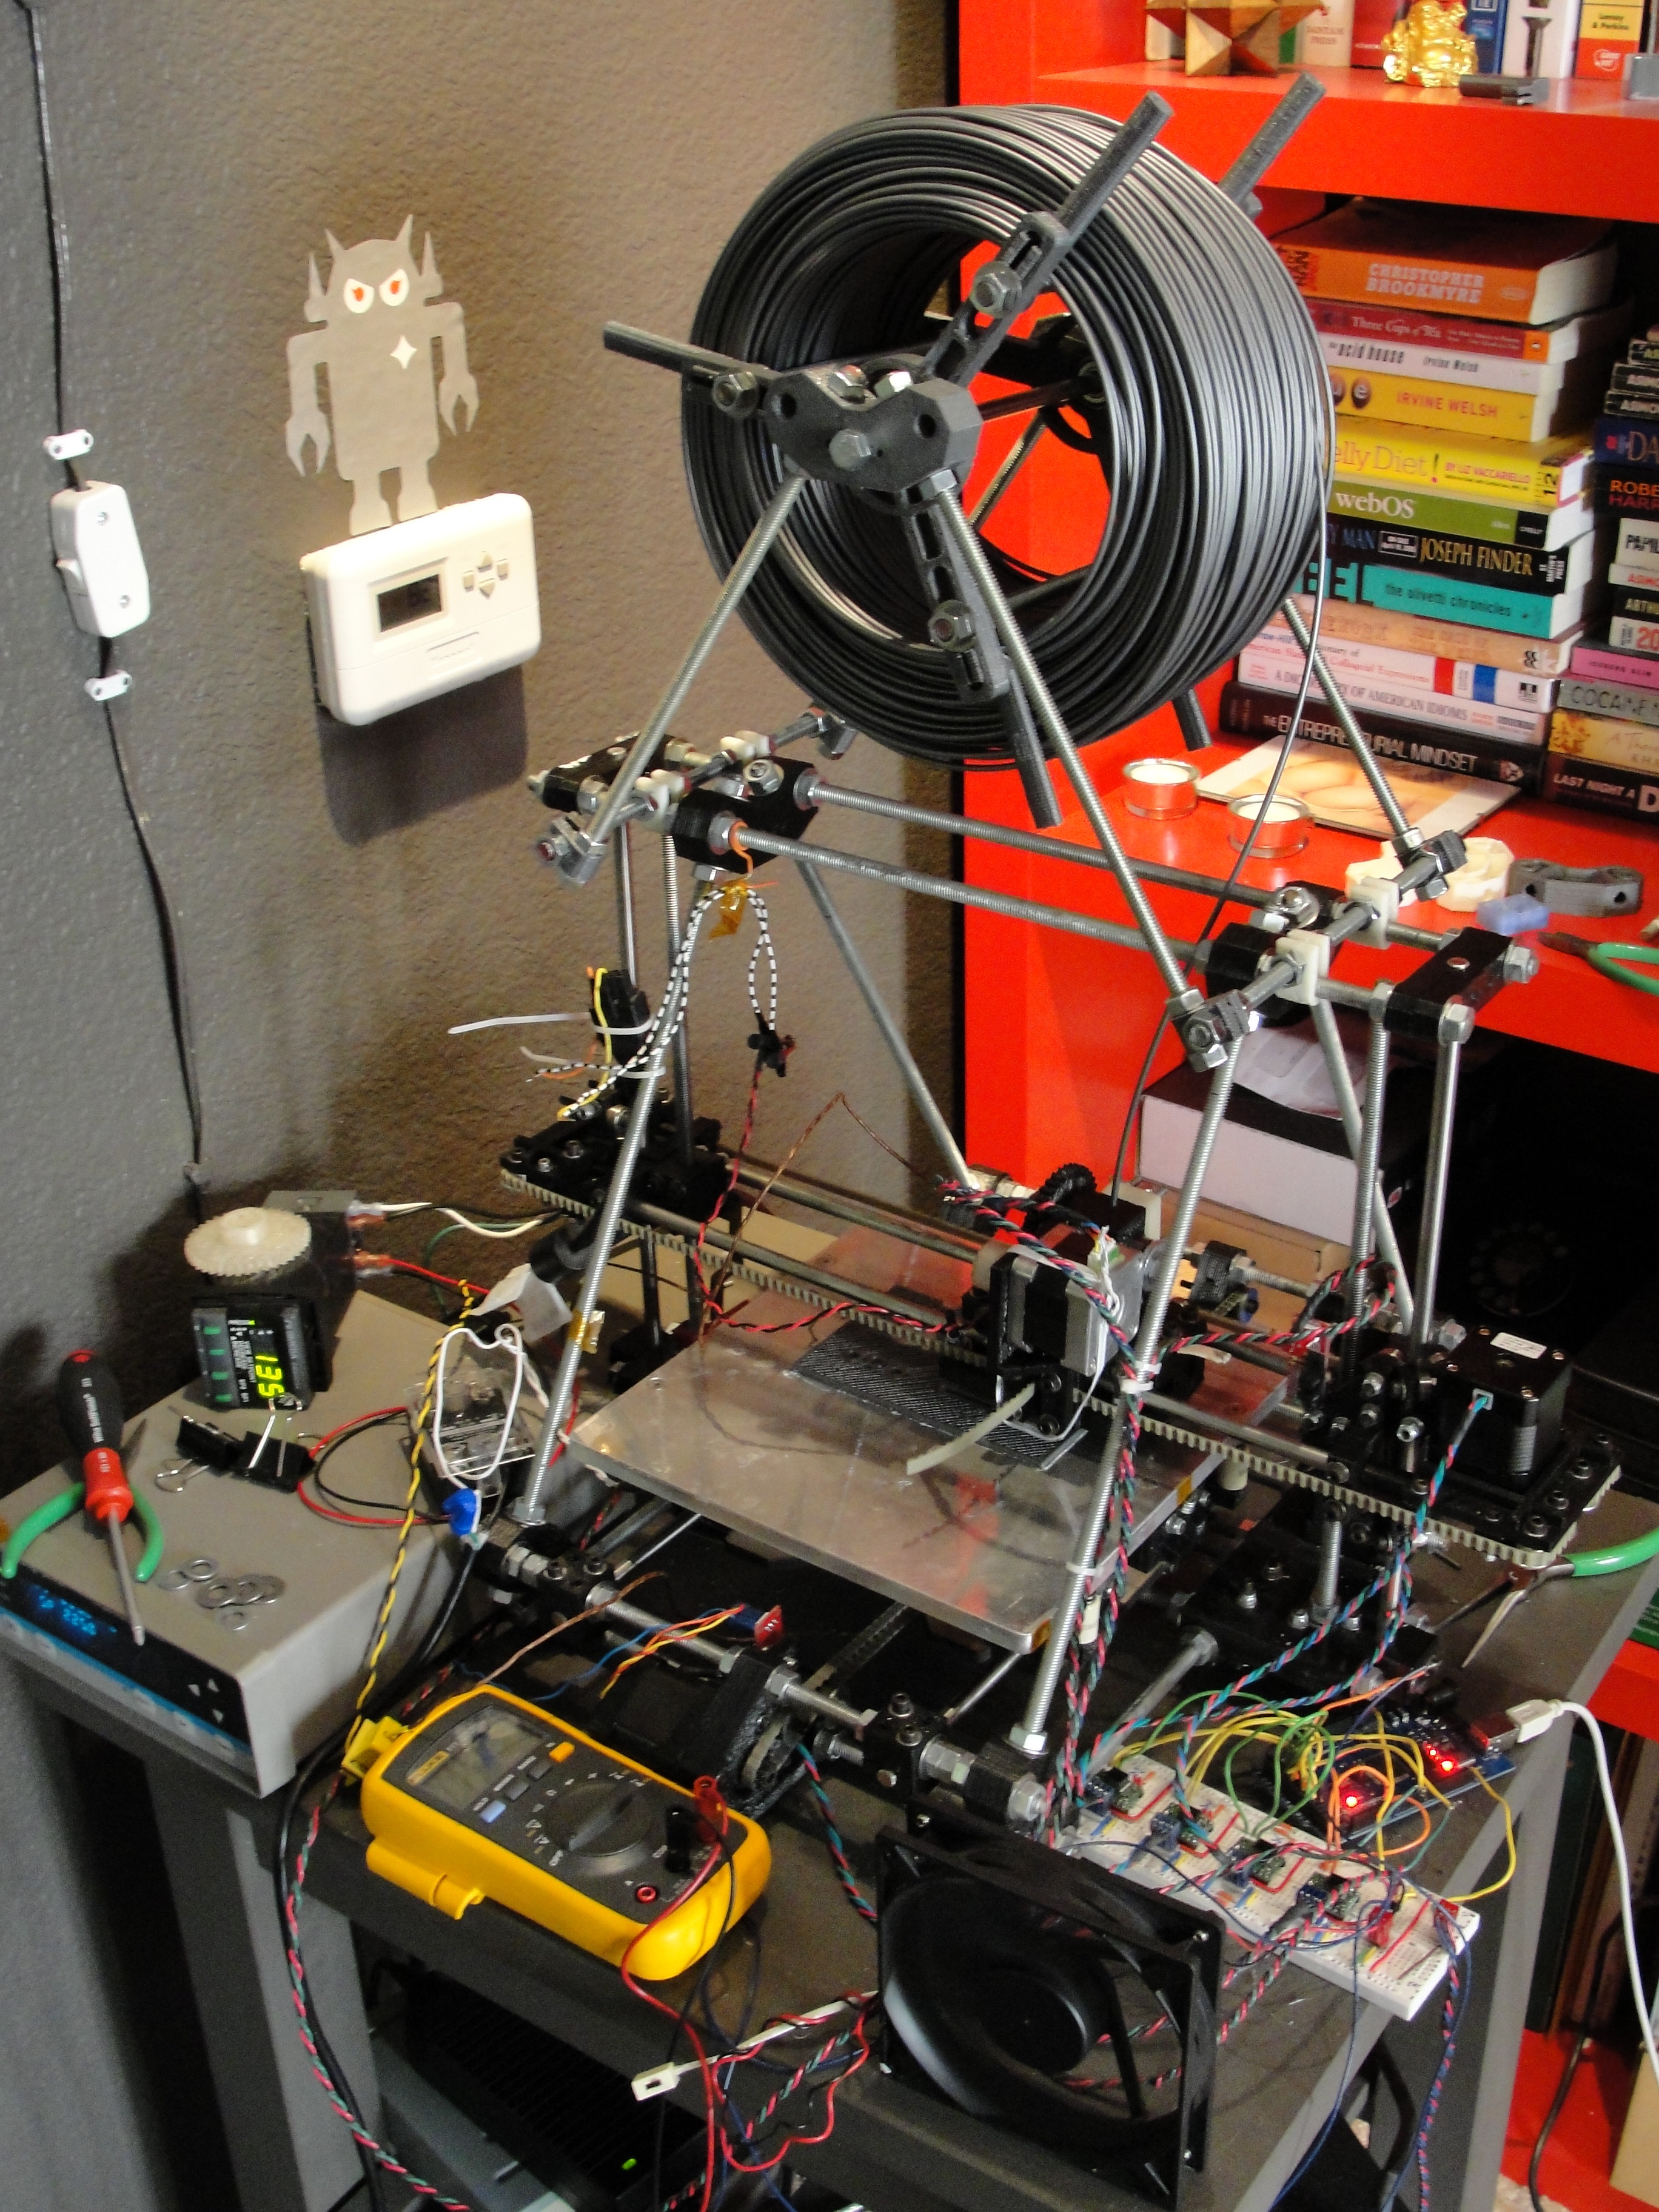
Scott and Ben have both been interested in my progress (and lack of usable results) on my MakerBot CupCake and Ben had just finished assembling a RepRap Mendel when I arrived. It’s much more interesting in person than any picture or video I’ve seen has captured. Compared to the CupCake, it’s incredibly smooth, quiet, precise, and easy to calibrate. On day two, Ben was already churning out prints I envied.
Between Scott’s mill, Ben’s RepRap, and Scott’s laser cutter, they’re set to prototype just about anything. I did suggest that Scott should build a water-jet cutter next, but he wasn’t having any of that. I may need some time to warm him up to the idea.

We paid a visit to Fry’s Electronics, a legendary California electronics components and computer retailer. Although they’ve transformed into primarily a big-box electronics store, I was still impressed with their hobbyist / components section, including a larger variety of project boxes than I’d seen in one place and a good selection of components, including SMT passives, right there on the rack for the buying.
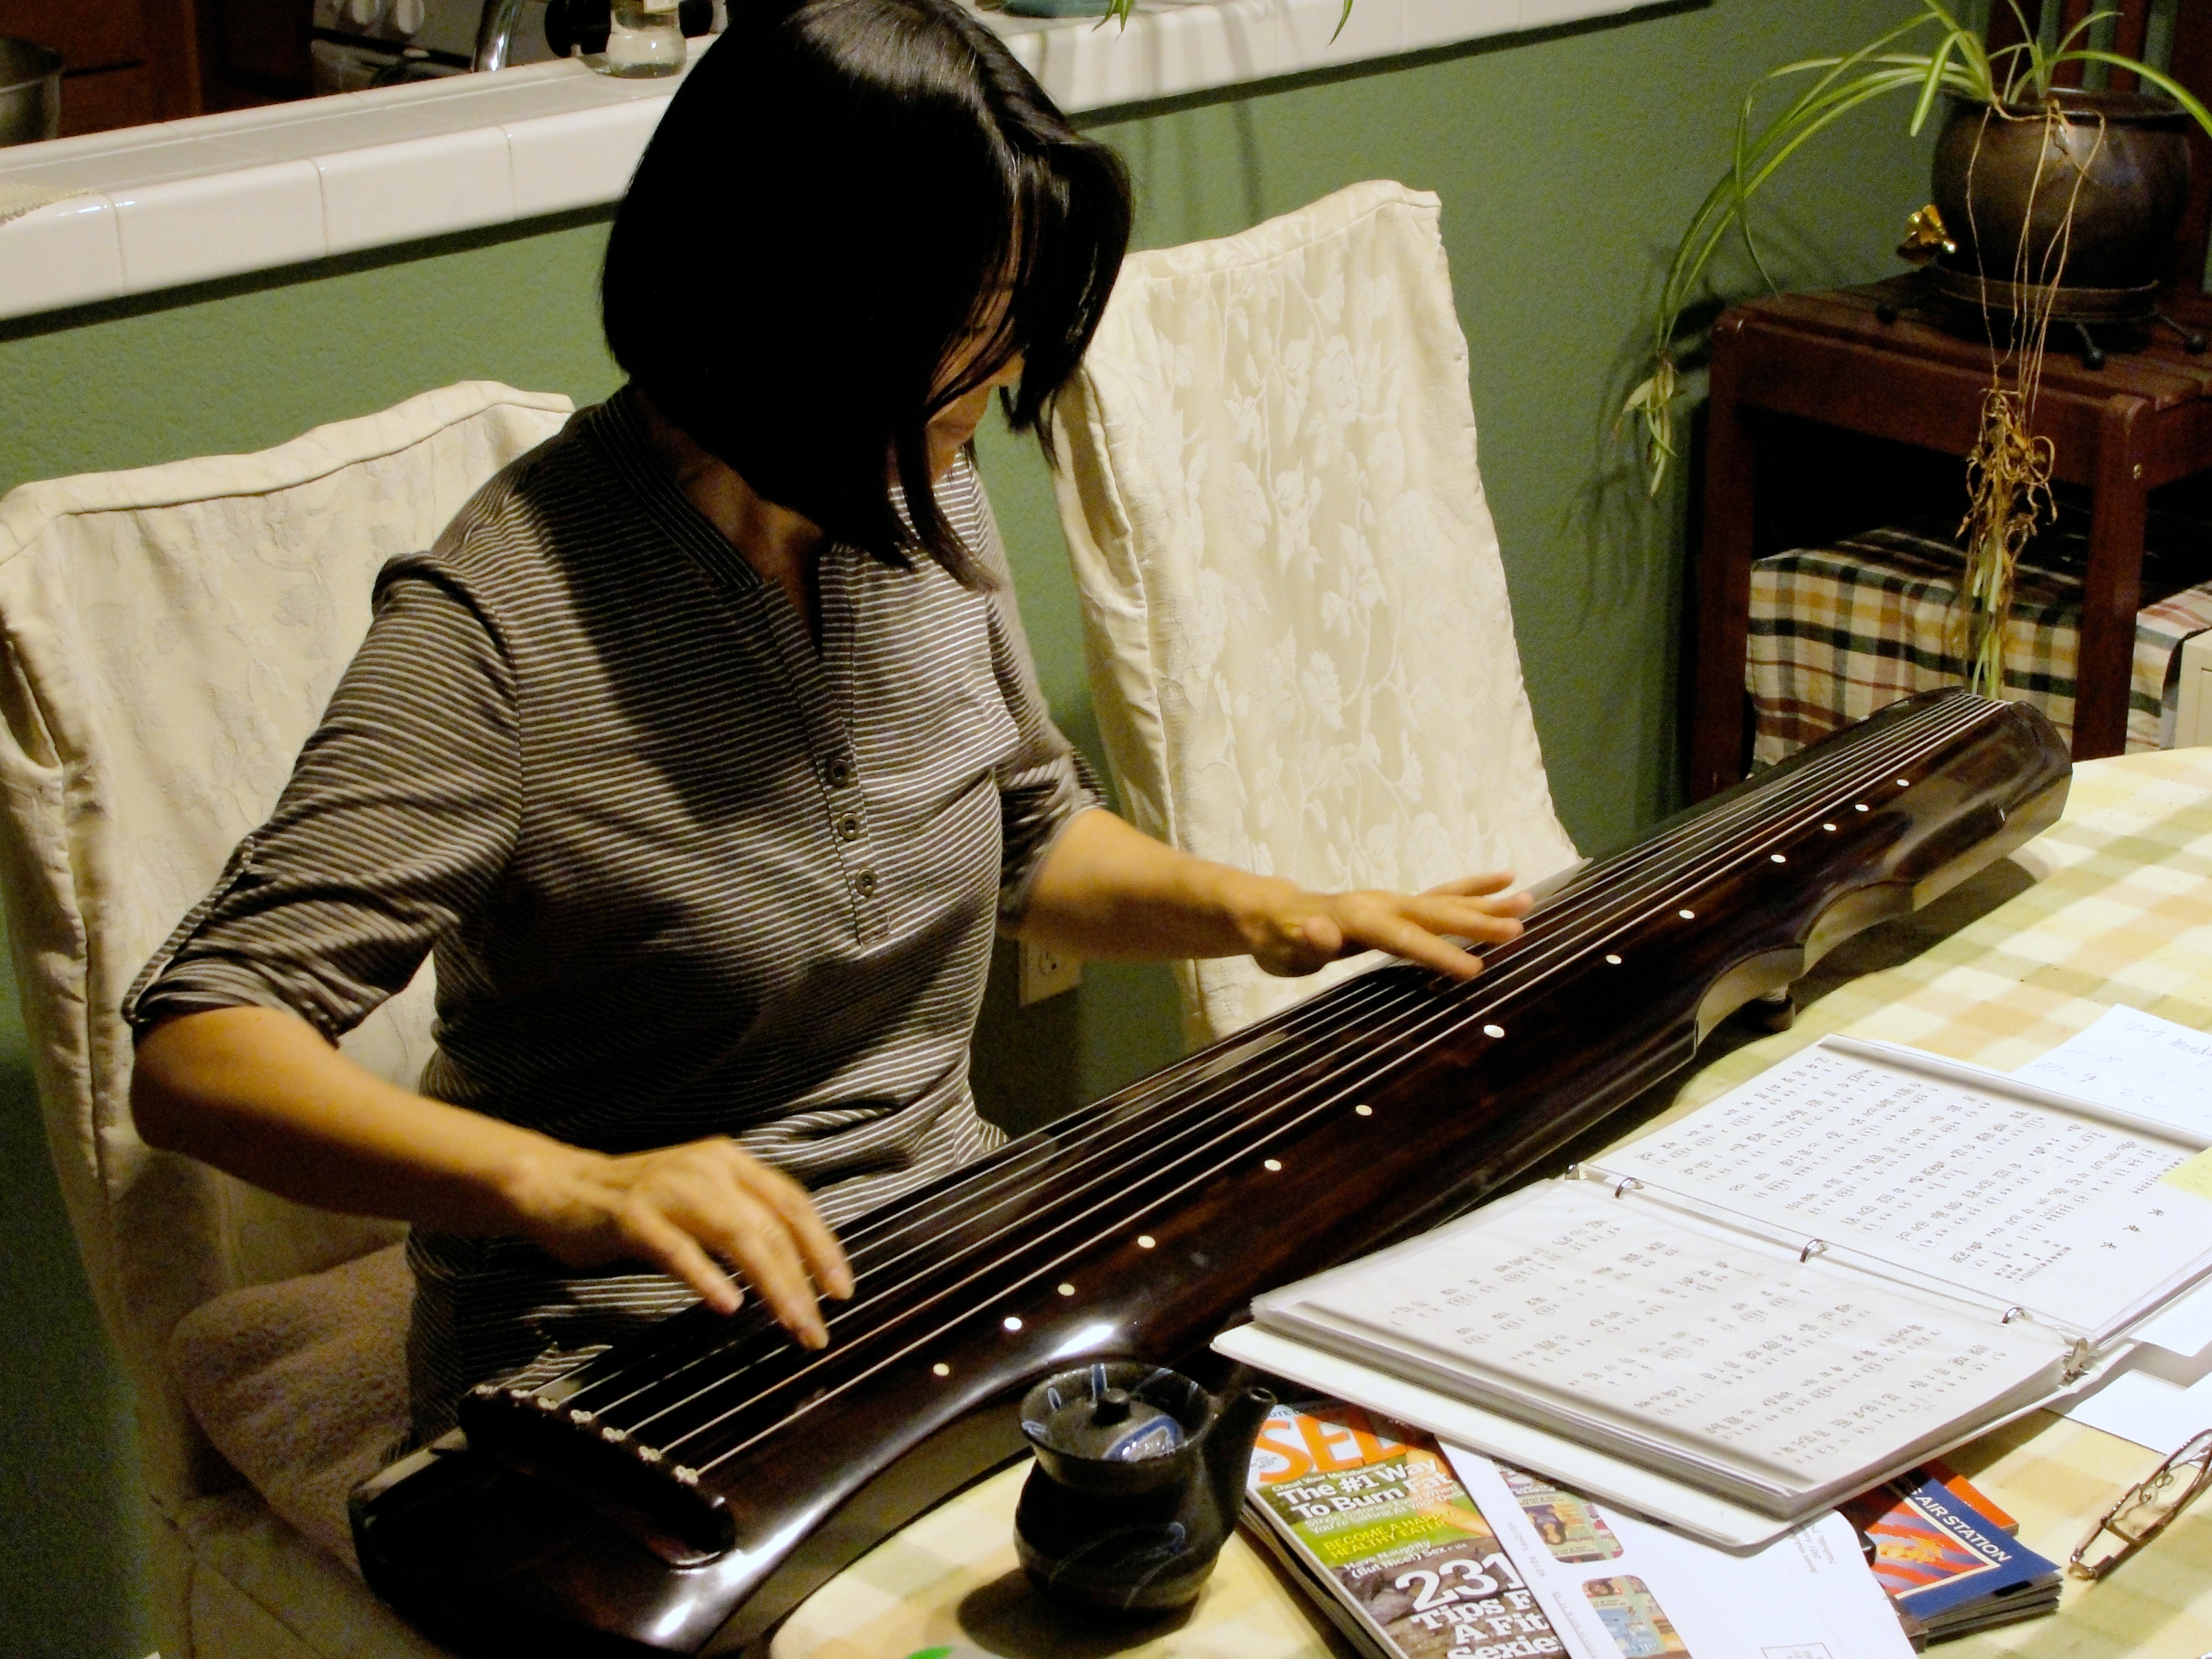
Back at Scott’s house, his wife Min was practicing her guqin, a Chinese instrument you may remember from a Jet Li movie. Having been raised listening almost exclusively to western music (“We have both kinds!” — no, not that western music), I found its tuning even more unfamiliar than that of the guitar — it’s not tuned in regular intervals.

To top it all off, we had time to wander down to the beach for a California sunset. Thanks, Scott, for an excellent visit with good electronics, great food, and local sights!
A while back, I bought a secondhand Liebert GXT2-2000RT120 uninterruptible power supply (UPS) on eBay. The GXT2 is a series of online UPSes, meaning that the output power always comes from the inverters off the battery bank; it doesn’t switch from utility power to battery power like an offline UPS. Besides eliminating any possible switchover glitches, online UPSes always deliver conditioned power at a constant voltage. The 2000RT120 is a 2000VA unit with 120V output — large enough to power all my servers for a good little while.
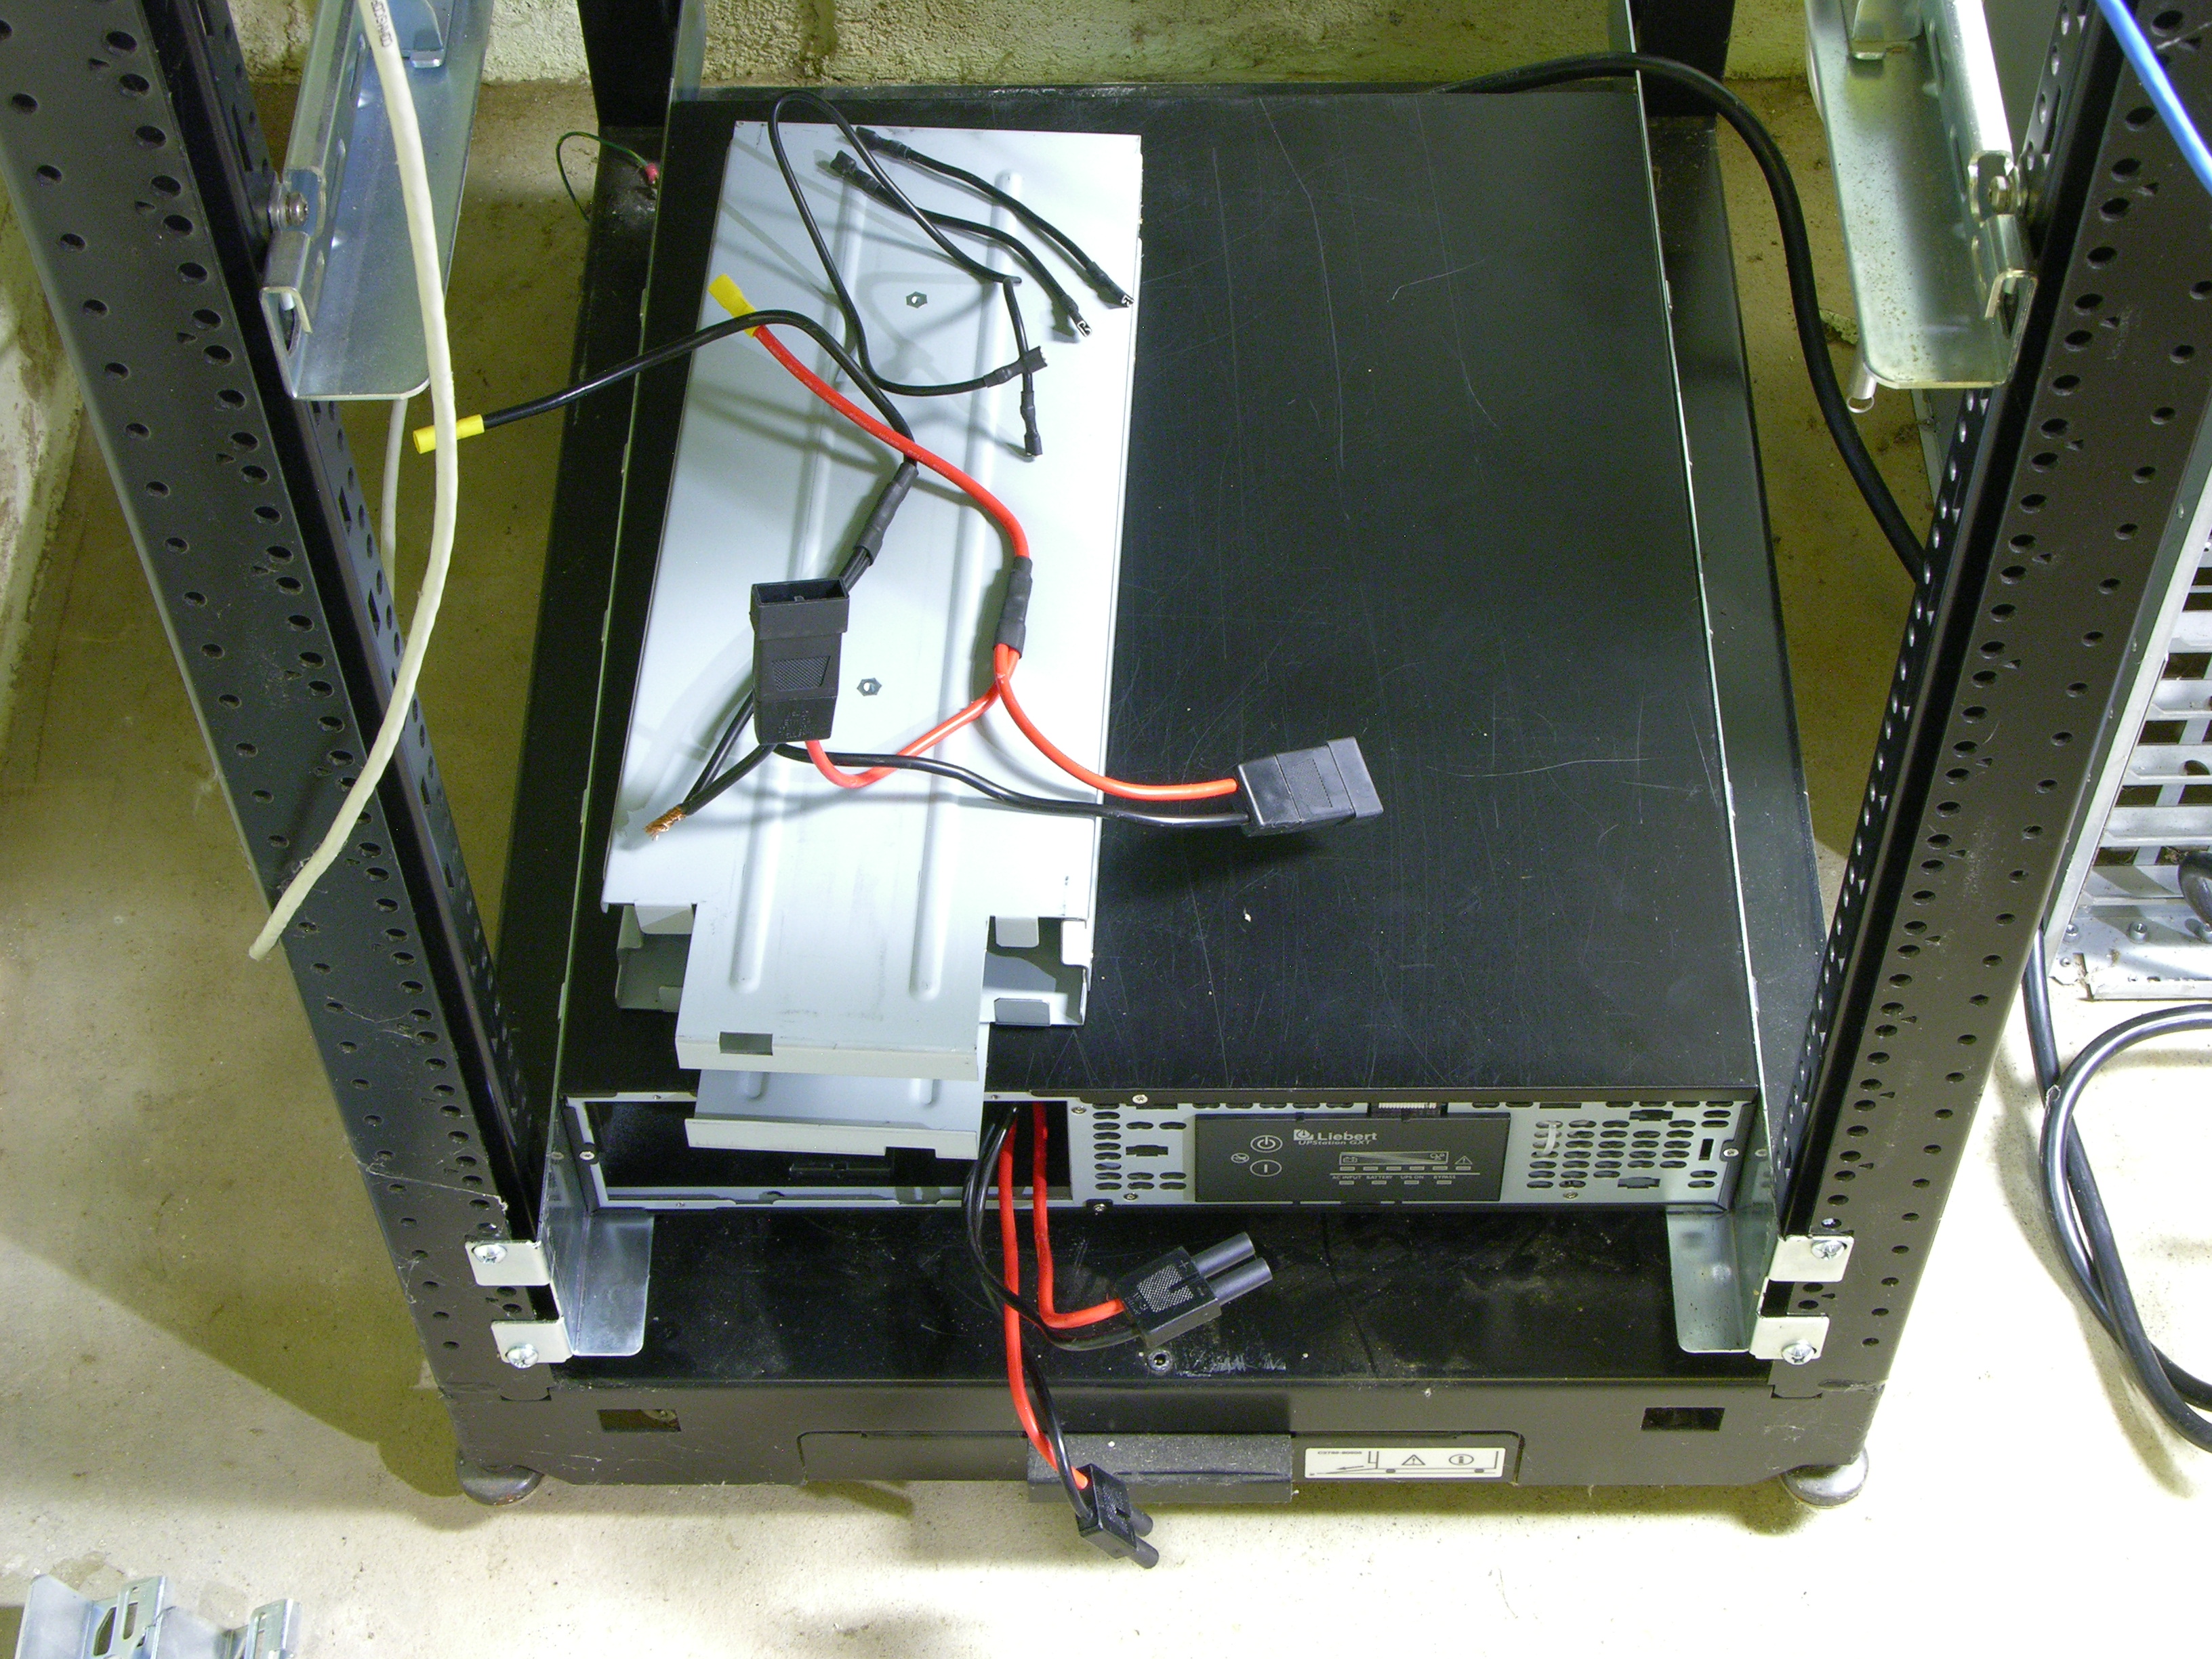
The batteries were due for replacement and the seller removed them to save on shipping costs. I got a UPS with a set of wires and no instructions on how to connect them.
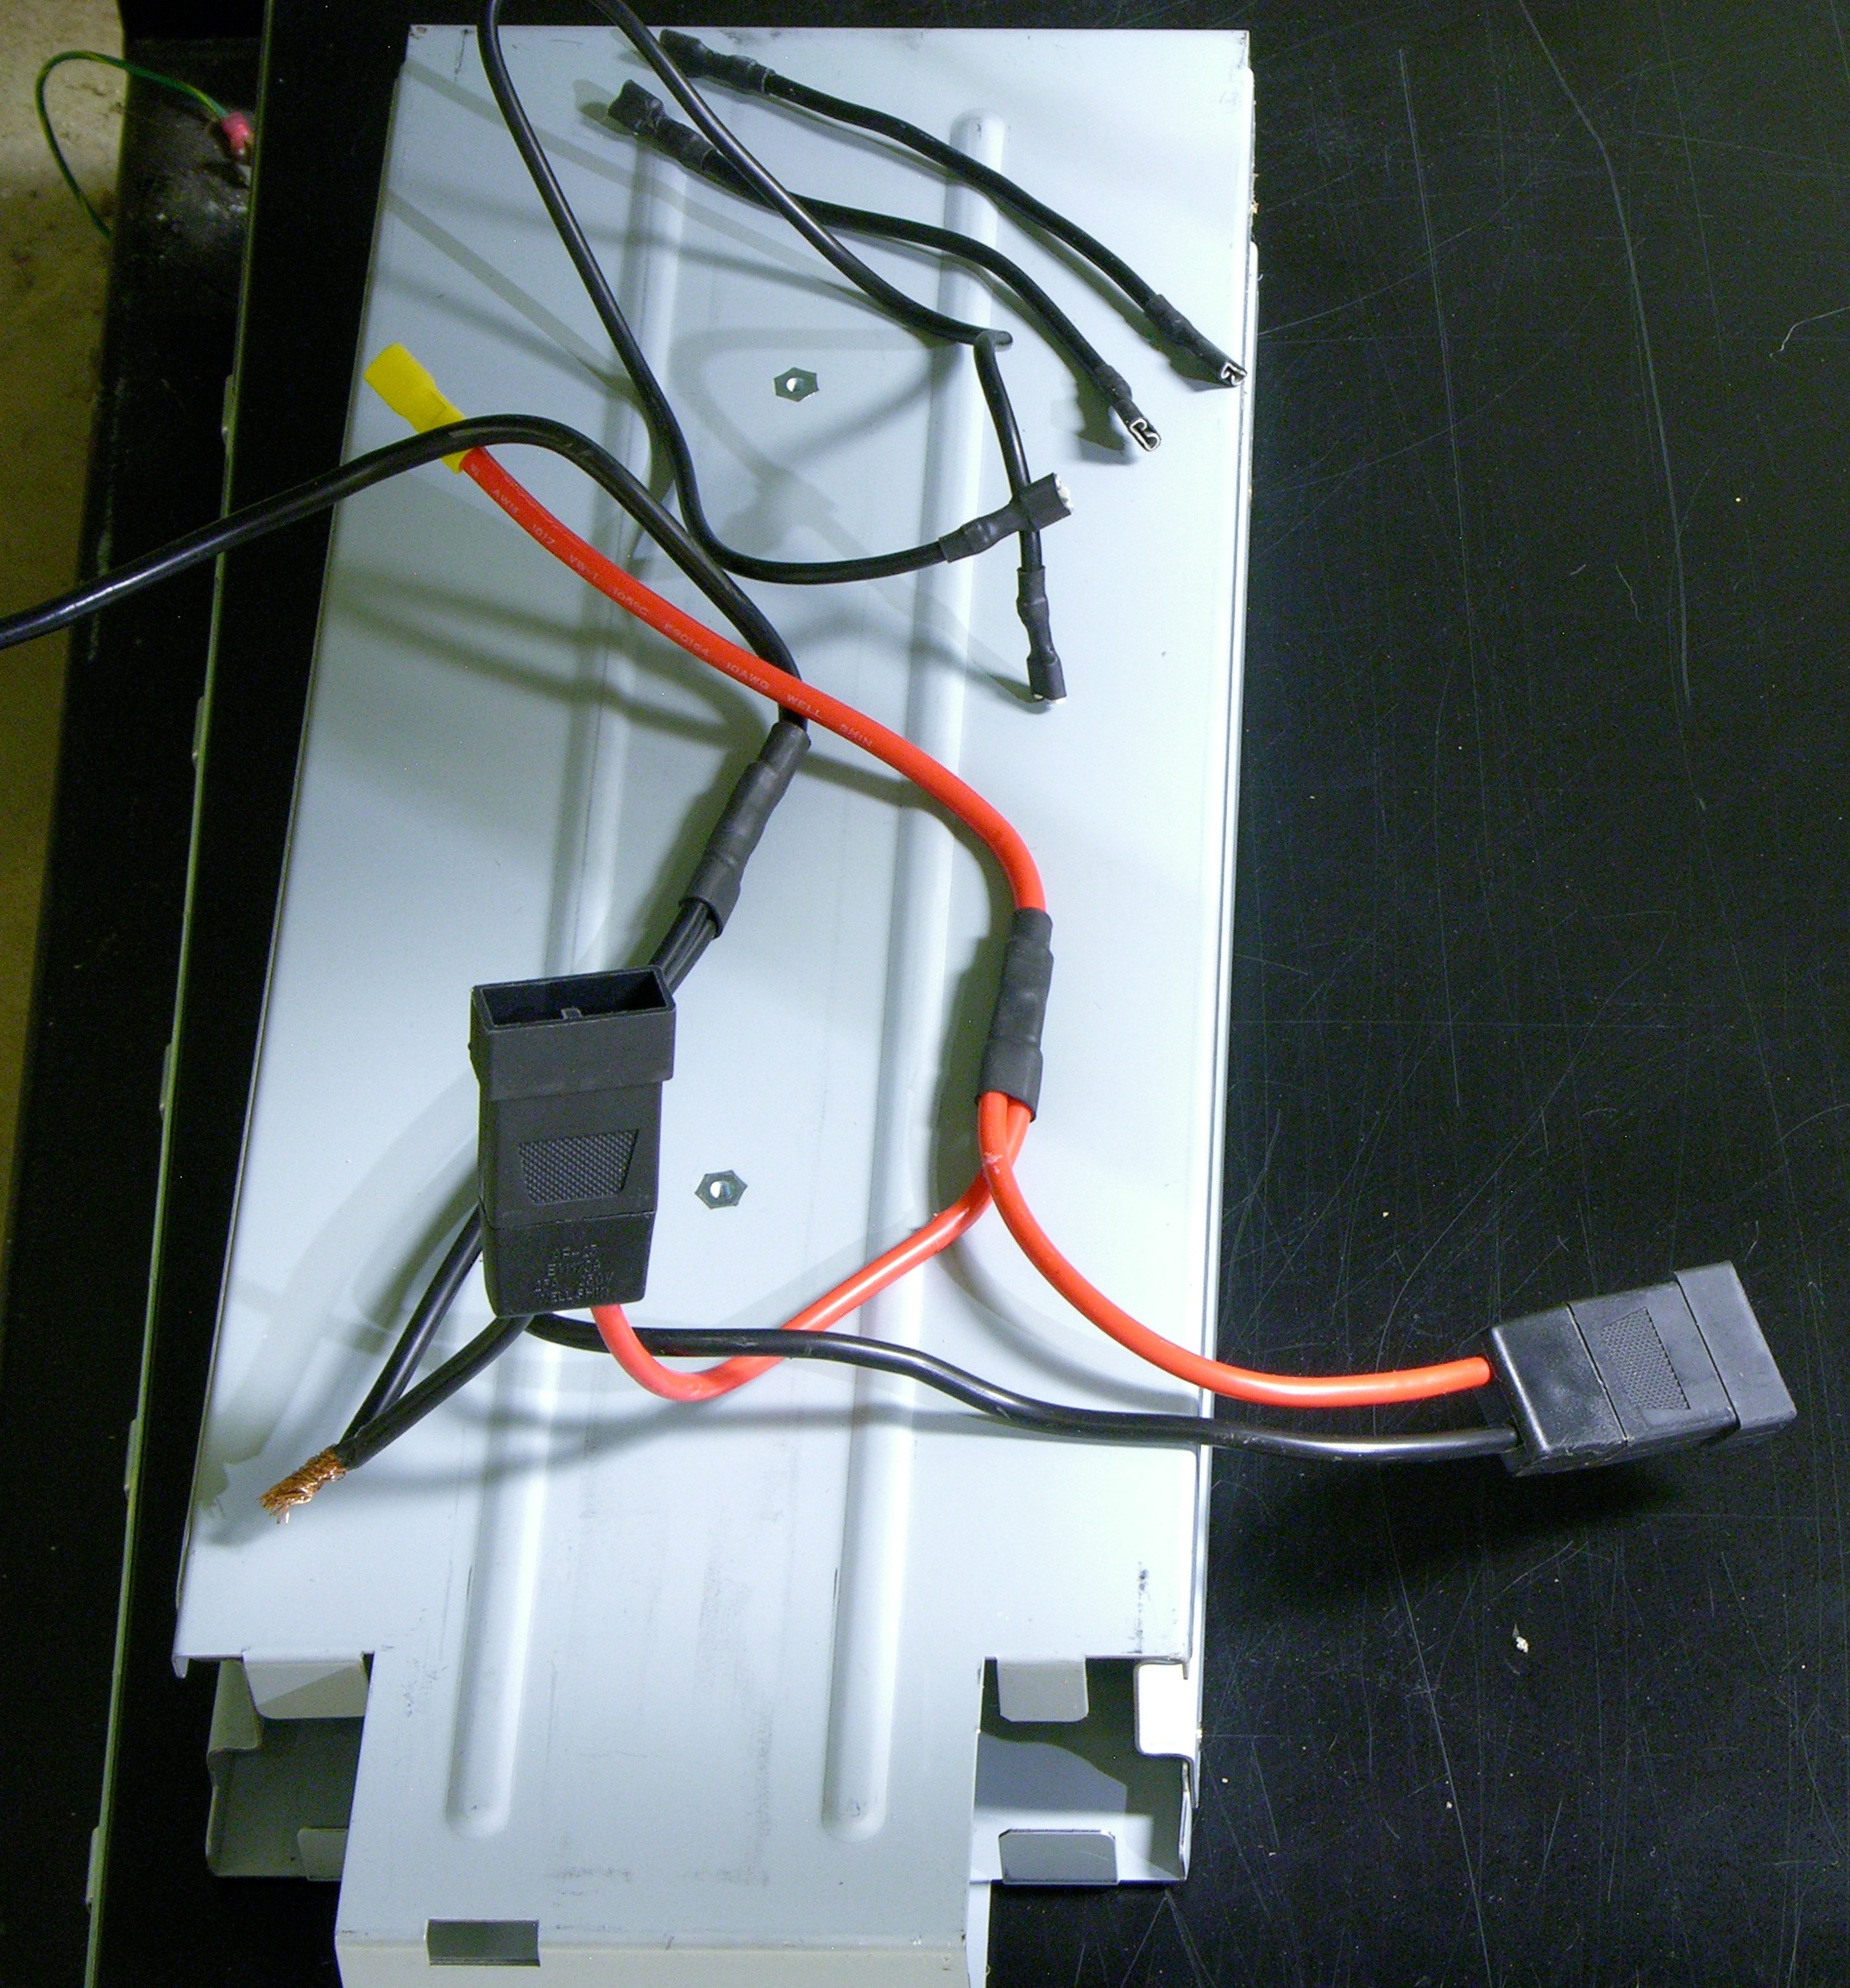
Also one of the wires was compromised … but since it appears to be a ground wire, I figured no big deal if it shorts out against the cage. KIDDING!
Yesterday I figured out the wiring, installed batteries, and got the UPS set up in my server rack.