Archive for June, 2012

If All You Have Is a Logic Analyzer, Everything Looks Like a Timing Problem

Wednesday, June 27th, 2012

I just rewrote the Arduino Playground Nokia LCD screen code to use hardware SPI instead of ShiftOut(). (More work to do before releasing the code back to the community. And I know, not everyone will want to use the hardware SPI, but it should be an option.)

It looked like a trivial change, but after making it, the display’s screen remained blank.

Logic analyzer capture of bad SPI communication

But … but … but … the slave-select line is supposed to be held low during each byte of transmission. I know the ATmega’s SPI hardware doesn’t manage it for you, but surely the Arduino’s SPI.transfer() function does, right???

Working Arduino SPI Transfer

Logic analyzer capture of working SPI communication

No. You have to manage it manually.

void LcdWrite(byte dc, byte data) {
digitalWrite(PIN_SS, LOW);
digitalWrite(PIN_DC, dc);
SPI.transfer(data);
digitalWrite(PIN_SS, HIGH);
}

SPI support is a perfect candidate to be a real object-oriented class rather than a functional library in OO clothing. Instantiate objects that know which slave-select pin is theirs, which may have different bit orders and clock rates and clock modes, and provide a transfer() method that sets all the registers, twiddles SS for you, and transfers your byte.

Sigh.

Faster Arduino SPI Transfer

BTW, notice on the second capture that manually bouncing SS using two digitalWrite()s takes longer than transferring eight bits of data using the hardware SPI. Start to understand why I want to transfer data using hardware instead of bit-banging?

Logic analyzer capture of working SPI communication with fast SS manipulation

Manipulating the SS bit in the port register directly is much faster … at the cost of being much less clear what’s going on to non-native speakers of C.

void LcdWrite(byte dc, byte data) {
PORTB &= ~ (1 << 2);
digitalWrite(PIN_DC, dc);
SPI.transfer(data);
PORTB |= (1 << 2);
}

ATmega I/O Pin Hardware Toggling for Fastest Arduino SPI Transfer (That Isn't Any Faster)

ATmega I/O pin hardware toggle diagram

Logic analyzer capture of working SPI communication with fast SS manipulation

The C-based bit manipulation code above is already fast enough that the timing constraint has moved back to the programmer-selected SPI clocking speed and the ultimate solution -- using the ATmega's hardware-based pin toggle feature -- doesn't save any noticeable time, but the code sure looks cool but it's the right thing to do and it's a risky game to play to assume you always know correctly the logic level of the pin when you enter the function.

void LcdWrite(byte dc, byte data) {
PINB = _BV(PINB2);
digitalWrite(PIN_DC, dc);
SPI.transfer(data);
PINB = _BV(PINB2);
}

(BTW, I had a dream recently -- which I did not know was not real -- in which the latest Arduino release added digitalWrite(pin, TOGGLE) to do the above. Imagine my disappointment tonight to learn it was only a dream. And no, I'm not the first to suggest that feature, by a long shot. Just, maybe, the first to think it had actually happened.)

Arduino-Compatible “Practice”

Sunday, June 24th, 2012

I’m trying to get my LED calculator out the door this summer, and that requires embedding an Arduino-compatible “core” into my own system. Yes, yes, I could use a microcontroller without the Arduino environment; but if I actually get this thing ready to sell, I want my customers to be able to reprogram it (apply firmware upgrades or enhance the feature set) in a comfortable environment. Hence an Arduino-compatible core.

I haven’t made an Arduino-compatible before, and the only two things I found daunting were the crystal, which I understand has to be exactly matched to its supporting capacitors or the circuit won’t resonate, so it was important to find the same one used in the Arduino; and the resettable polyfuse on the USB power lines, which doesn’t (in the Arduino circuit) specify whether 500 mA is the hold current or the trip current.

I found an Arduino playground post by Tom Igoe giving Digi-Key part numbers for a bare-bones breadboard Arduino-compatible and chased the out-of-stock crystal to the equivalent Digi-Key catalog number 887-1019-ND. I searched far and wide for information on the polyfuse and gave up, settling on 500 mA hold current, since that’s permitted (after negotiation) by the USB spec and surely we wouldn’t want to trip at the maximum permitted current.

With that data in hand, I still had a healthy dose of uncertainty about my likelihood of building a working Arduino-compatible. I prefer to develop and test modularly, so I wanted to assemble a working proof-of-concept Arduino-compatible before diving into the LED calculator project. And as it happens, I had a perfect project waiting in the wings — an Arduino-compatible board with ground and power headers surrounding the normal I/O headers (like servo connectors), to make it easy to connect external sensors without going all-out and buying a sensor shield (which actually has the I/O pin at the end of each connector rather than in the middle, whatever). I want to build my own version of my friend Trevor’s household temperature-monitoring system, and such an Arduino-compatible would be a great platform for terminating the three-wire temperature sensors.

To speed the process, I started with the EAGLE schematic of the Freeduino through-hole design, ripping up the board and laying it out mostly from scratch to make room for my extra header rows. I had the board produced by BatchPCB, I received it last week, and I have now assembled it into a working Arduino-compatible.

But not — this is going to sound soooo familiar — without some snags along the way.

Testing the FTDI USB-Serial

The one component not available in a through-hole package was the FTDI USB-serial chip; and I planned on hand-soldering it; and that’s way easier to do without other components looming over it and getting in the way of the iron; so I attached it first. And that led me to test it first as well, since I test as I go.

Arduino-compatible with USB-serial components installed

(more…)

BatchPCB

Sunday, June 17th, 2012

My academic background is in mathematics and computer science and I’ve picked up electronics as a hobby along the way, primarily self-taught through excellent books by Forrest Mims, the easy crossovers from math and CS to digital logic and digital design (still my strongest area of electronics), a stubborn willingness to read datasheets, and a constant desire to learn.

For the last two years, I’ve been supplementing that with a formal background from my university’s EE department, taking first one and recently two classes per semester. The education is interesting and enlightening, but it does take its toll — at least forty hours a week of work, six hours of classes, and (say) twenty hours of study and homework, plus some volunteer work unrelated to those, doesn’t leave me with a lot of free time; and you can see it by the decline in my hobby activity.

I don’t want to lose sight of what I love, though; and I hope to make a small business of electronics and make a few products available for sale. So this summer I’m devoting every spare moment to get some projects off the ground. And my ally in that plan is BatchPCB.

Why Have Boards Manufactured?

In the past, I’ve done a lot of circuit prototyping on breadboards. For some types of circuits, though, the needed prototyping has more to do with physical form factor and less to do with circuit validation. (I hope to show some examples in the coming weeks.) I’ve etched my own circuit boards; I’ve imposed on friends to mill prototype boards for me; and I’ve hoped to build my own milling machine to prototype my own boards at home.

The drawback of all of these methods is the lack of plated through-holes. I’ve heard of DIY hole-plating methods, but I found them to require a prohibitive setup for chemical processing. I’ve asked everyone I know whether they can think of any source for 1.5-ish mm (60 mil) OD copper or silver tubing, thinking of making a small riveting press to flare tubing onto the PCB surface both top and bottom — and even found very small silver crimp tubes used in beadwork and jewely-making, but none as small as 1.5 mm OD, nor in a consistently appropriate length.

I’ve worked around the lack of plated through holes by laying out boards that don’t require them, always carrying a signal from top to bottom using a component lead that can be soldered on both sides. But this means no vias (soldering pins top and bottom just to change layers is a pain) and only crossing layers at resistors and diodes. It means always routing connections to electrolytic capacitors on the bottom, ’cause you can’t get to the top side of the board to solder unless you stand the capacitors way up on their leads. It means routing traces to headers only on the bottom, or sliding the plastic guide up on the pins to solder the top side and then sliding it back down. It means a dozen little design compromises for a prototype board that don’t need to be made for a board I’m going to have commercially manufactured later. It means not only extra effort to accommodate my prototyping methods but also extra effort to undo that work before going to manufacturing.

SparkFun Electronics created BatchPCB as an offshoot of their own PCB prototyping contract. They aggregate orders from multiple users, tile them together onto standard-sized panels, upload the panels to Gold Phoenix, get the boards manufactured, receive the shipment from Gold Phoenix, sort out the boards, and send them back. They charge $2.50 per square inch, which is higher than you’d pay if you were ordering 100 square inches — but far less than you can pay anywhere else if you only want a few square inches of prototype. And they charge a flat $10 handling fee per order, regardless of how many designs you include in your order.

They suggest it’ll take about three weeks to get your order. My experience has been two weeks. It sounds like a long wait, but as they say:

As we develop projects, we always get at least one PCB design onto the week’s batch panel. While one design is being fabbed, we have new PCBs for another design already arriving from a previous batch – we always have new PCBs to play with!

My Summer with BatchPCB

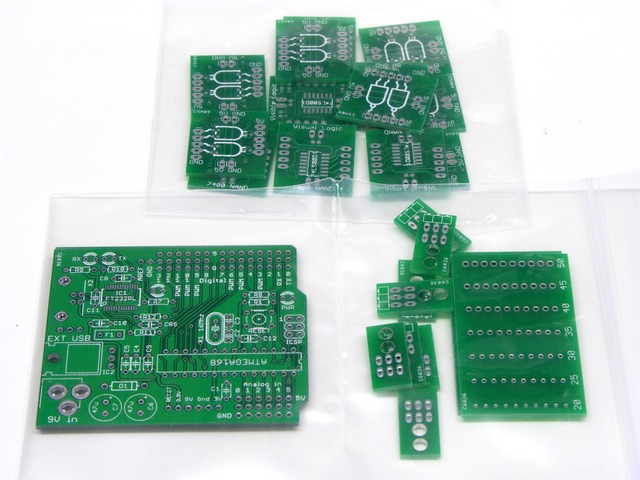
I’m trying to place an order every two weeks and to order boards for multiple projects each time. I’ve received two batches so far and I submitted a third this weekend.

Circuit boards from BatchPCB

I’ll say more about these designs as I work on the projects, but starting at the top and progressing in reading order:

  • Logic gate boards to help bridge the huge gap between what happens in the digital design lecture and lab. My classmates with no prior experience did not gain much academic value from poking opaque ICs into breadboards.
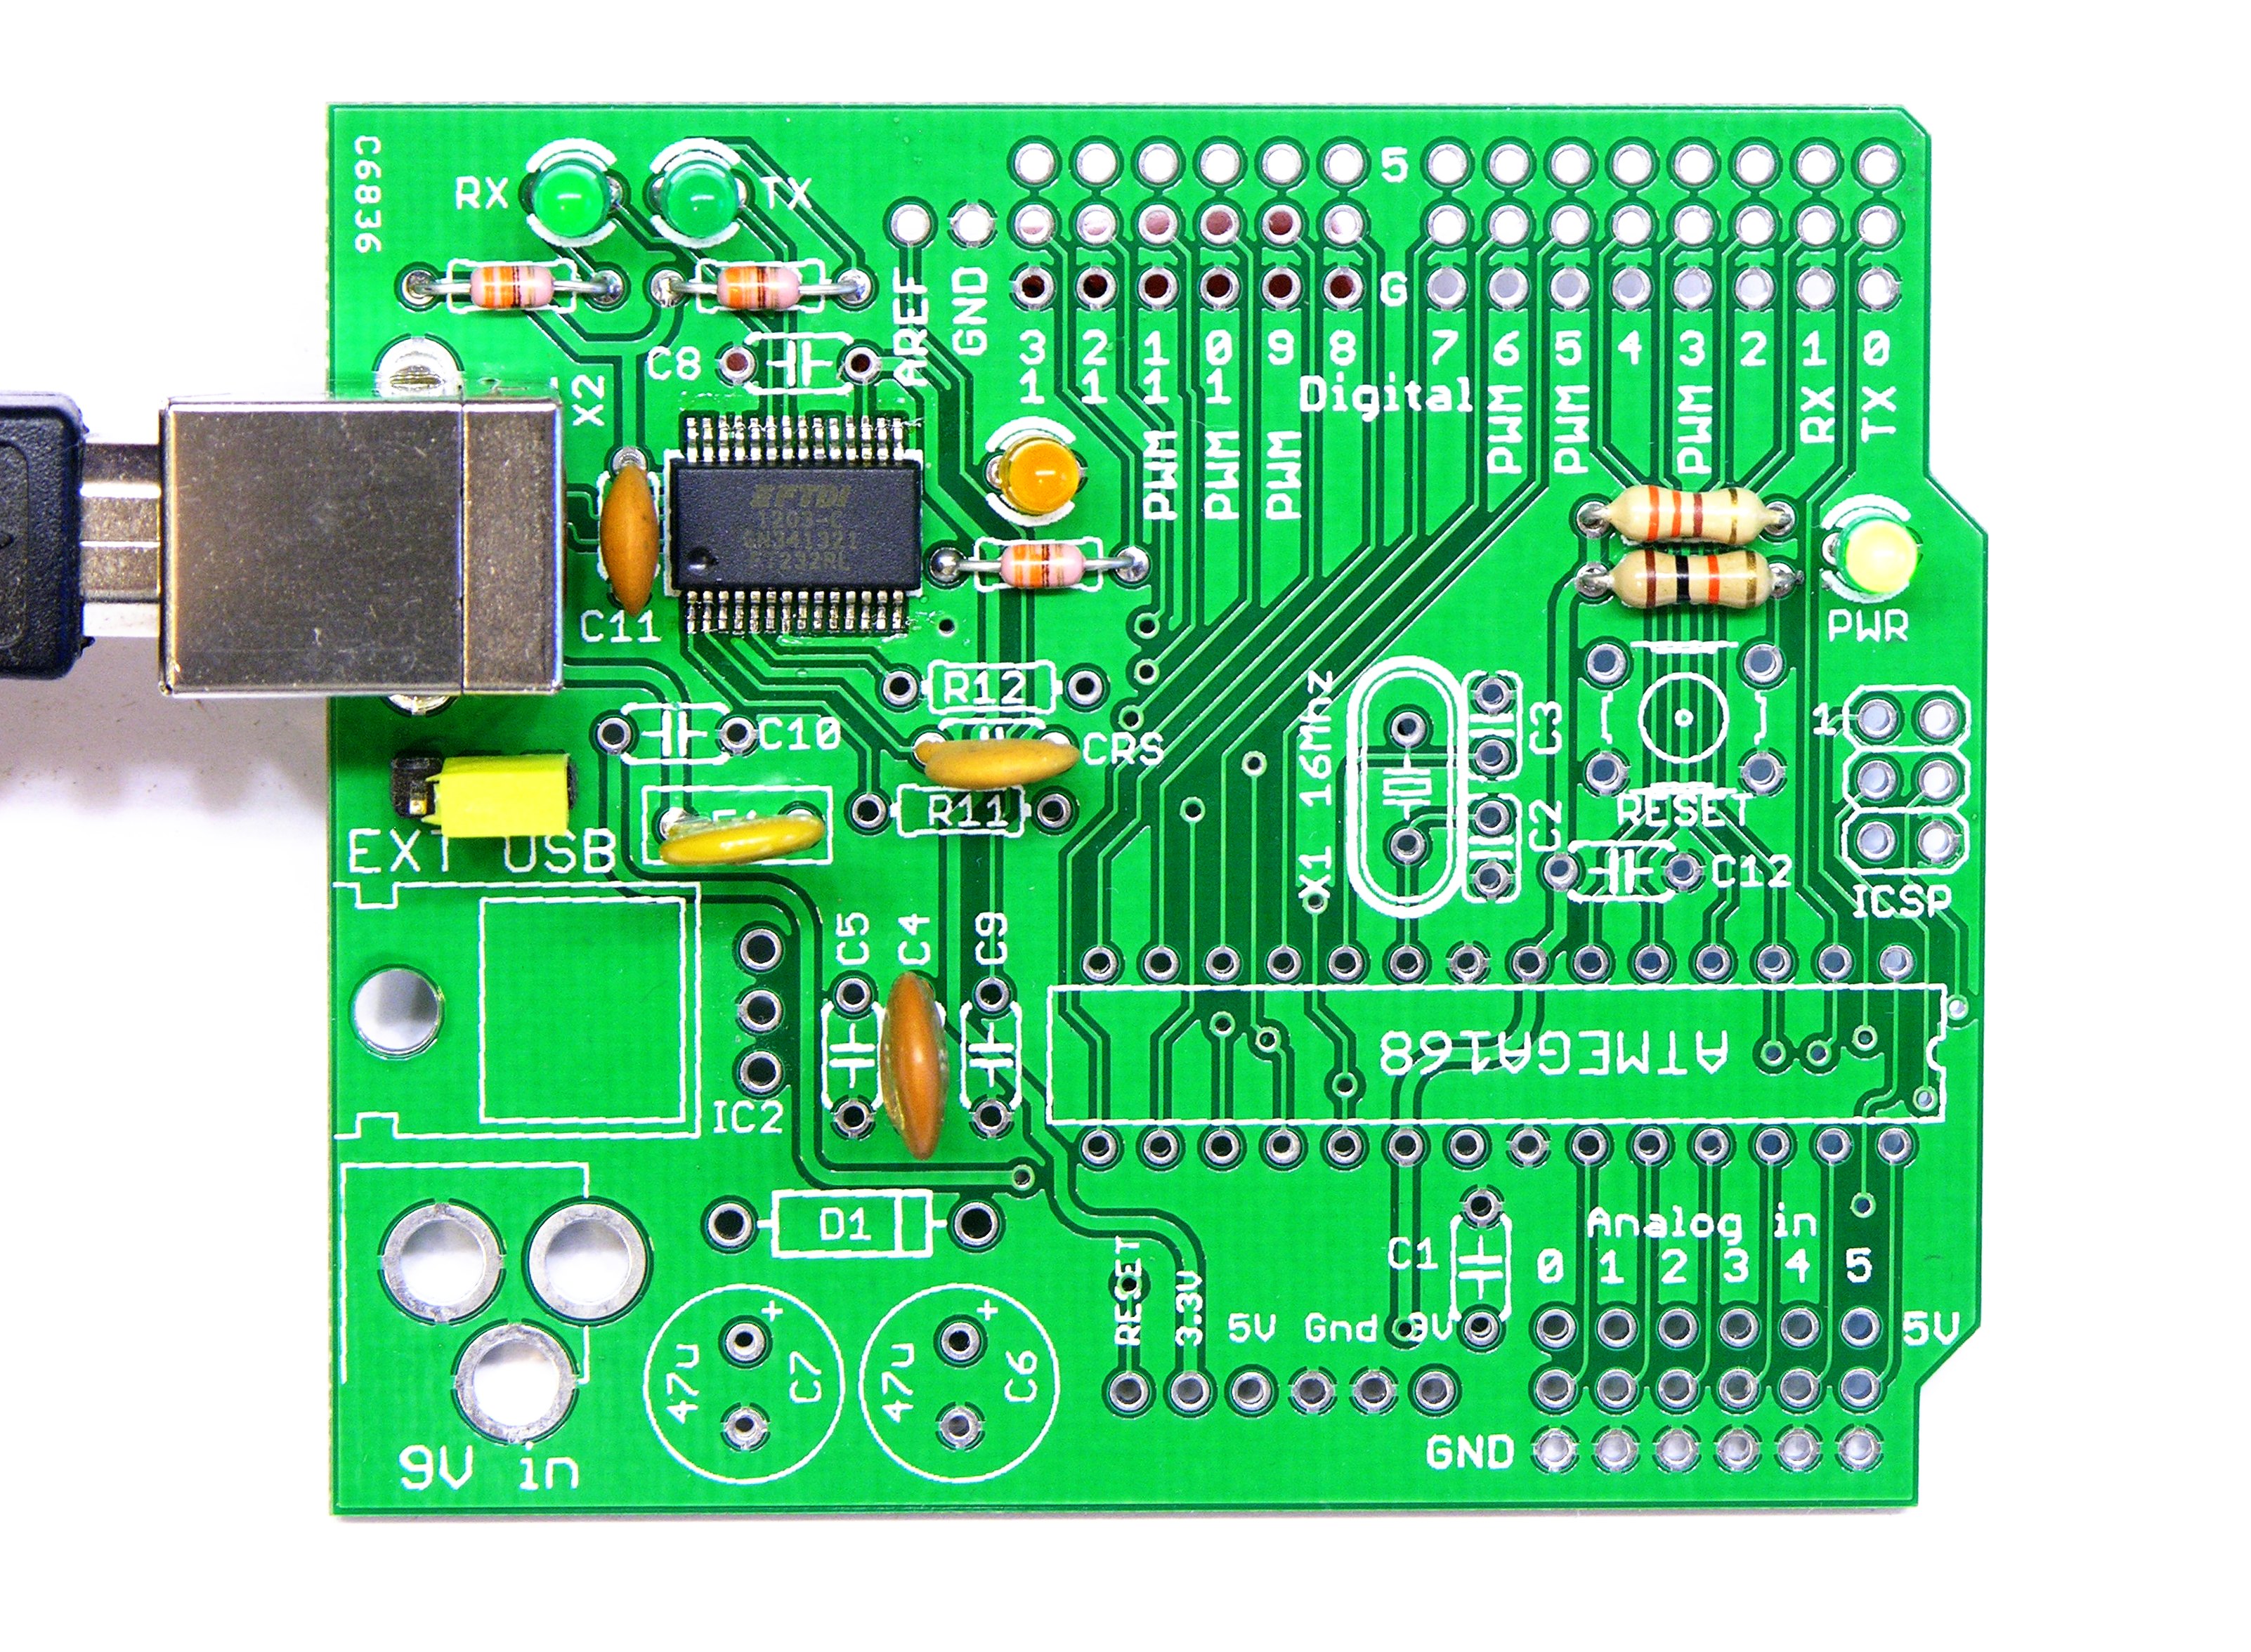
  • A Freeduino-derived board for my personal use, manufactured as a proof-of-concept that I have the right components and schematic to embed an Arduino-compatible core into projects of my own. (I will of course publish all source files for designs that I distribute to anyone other than myself.)
  • The first half of a pair of boards to breakout a headphone cable and jack for breadboarding, to plug an iPod’s headphone output into op-amp filter circuits and listen to the results.
  • A board for testing component lead fit against through-hole sizes. To date, I’ve used calipers for measuring lead sizes for PCB design. I’m curious whether testing against a physical board gives me any different expenditure of time or quality of results.

The logic gate boards were my first batch. I ordered four each of two variants of the boards, assembled a few, and discovered that I don’t like soldering 0603 SMT as much as I thought I did; so if I make more, I’ll be changing the boards to use 0805 components.

Lesson learned: Order only one of your first prototype, regardless of how sure you think you are that you’ve finalized the design.

So why so many of the other boards? I did order only one of each … but SparkFun, bless their hearts, appears to fill wasted space in each panel with small customer boards that they give back to their customers as a bonus; and I happened to have small designs in this batch.