A few months ago, I bought an InFocus video projector on eBay, still hoping to watch movies on the wall of the family room. It’s about 1/12 the size of the behemoth Sony projector I was trying to repair earlier, and quite a bit sharper and brighter; so if I can get it going, it’ll be a nice replacement.
When I received it, I immediately noted two problems: It shuts itself off after anywhere from seconds to hours; and it has a yellow silhouette running up the middle of the picture, kind of like the face/vase illusion.
I’ve taken some time this afternoon to disassemble and diagnose the projector; so although it’s not fixed yet, here’s what I know so far.
Chasing the Yellow Blob
In which Keith removes Crusty Gummy and washes a filter carrier
From the looks of it, I was pretty sure that the blob was going to be something wrong with, or wrong on the surface of, one of the lenses, mirrors, or filters. Yes, it looked a little like an LCD ruined by being left in a freezing car overnight, but not quite. So I dug in to follow the light path through the projector and see if it would be apparent what was wrong.
After popping the cover and removing the main circuit board, I could see most of the periscope-like light enclosure. I removed a couple of lenses that dropped in from above, which were clean, and looked at a couple of mirrors, which were also clean. The next thing I wanted to check was the LCDs.
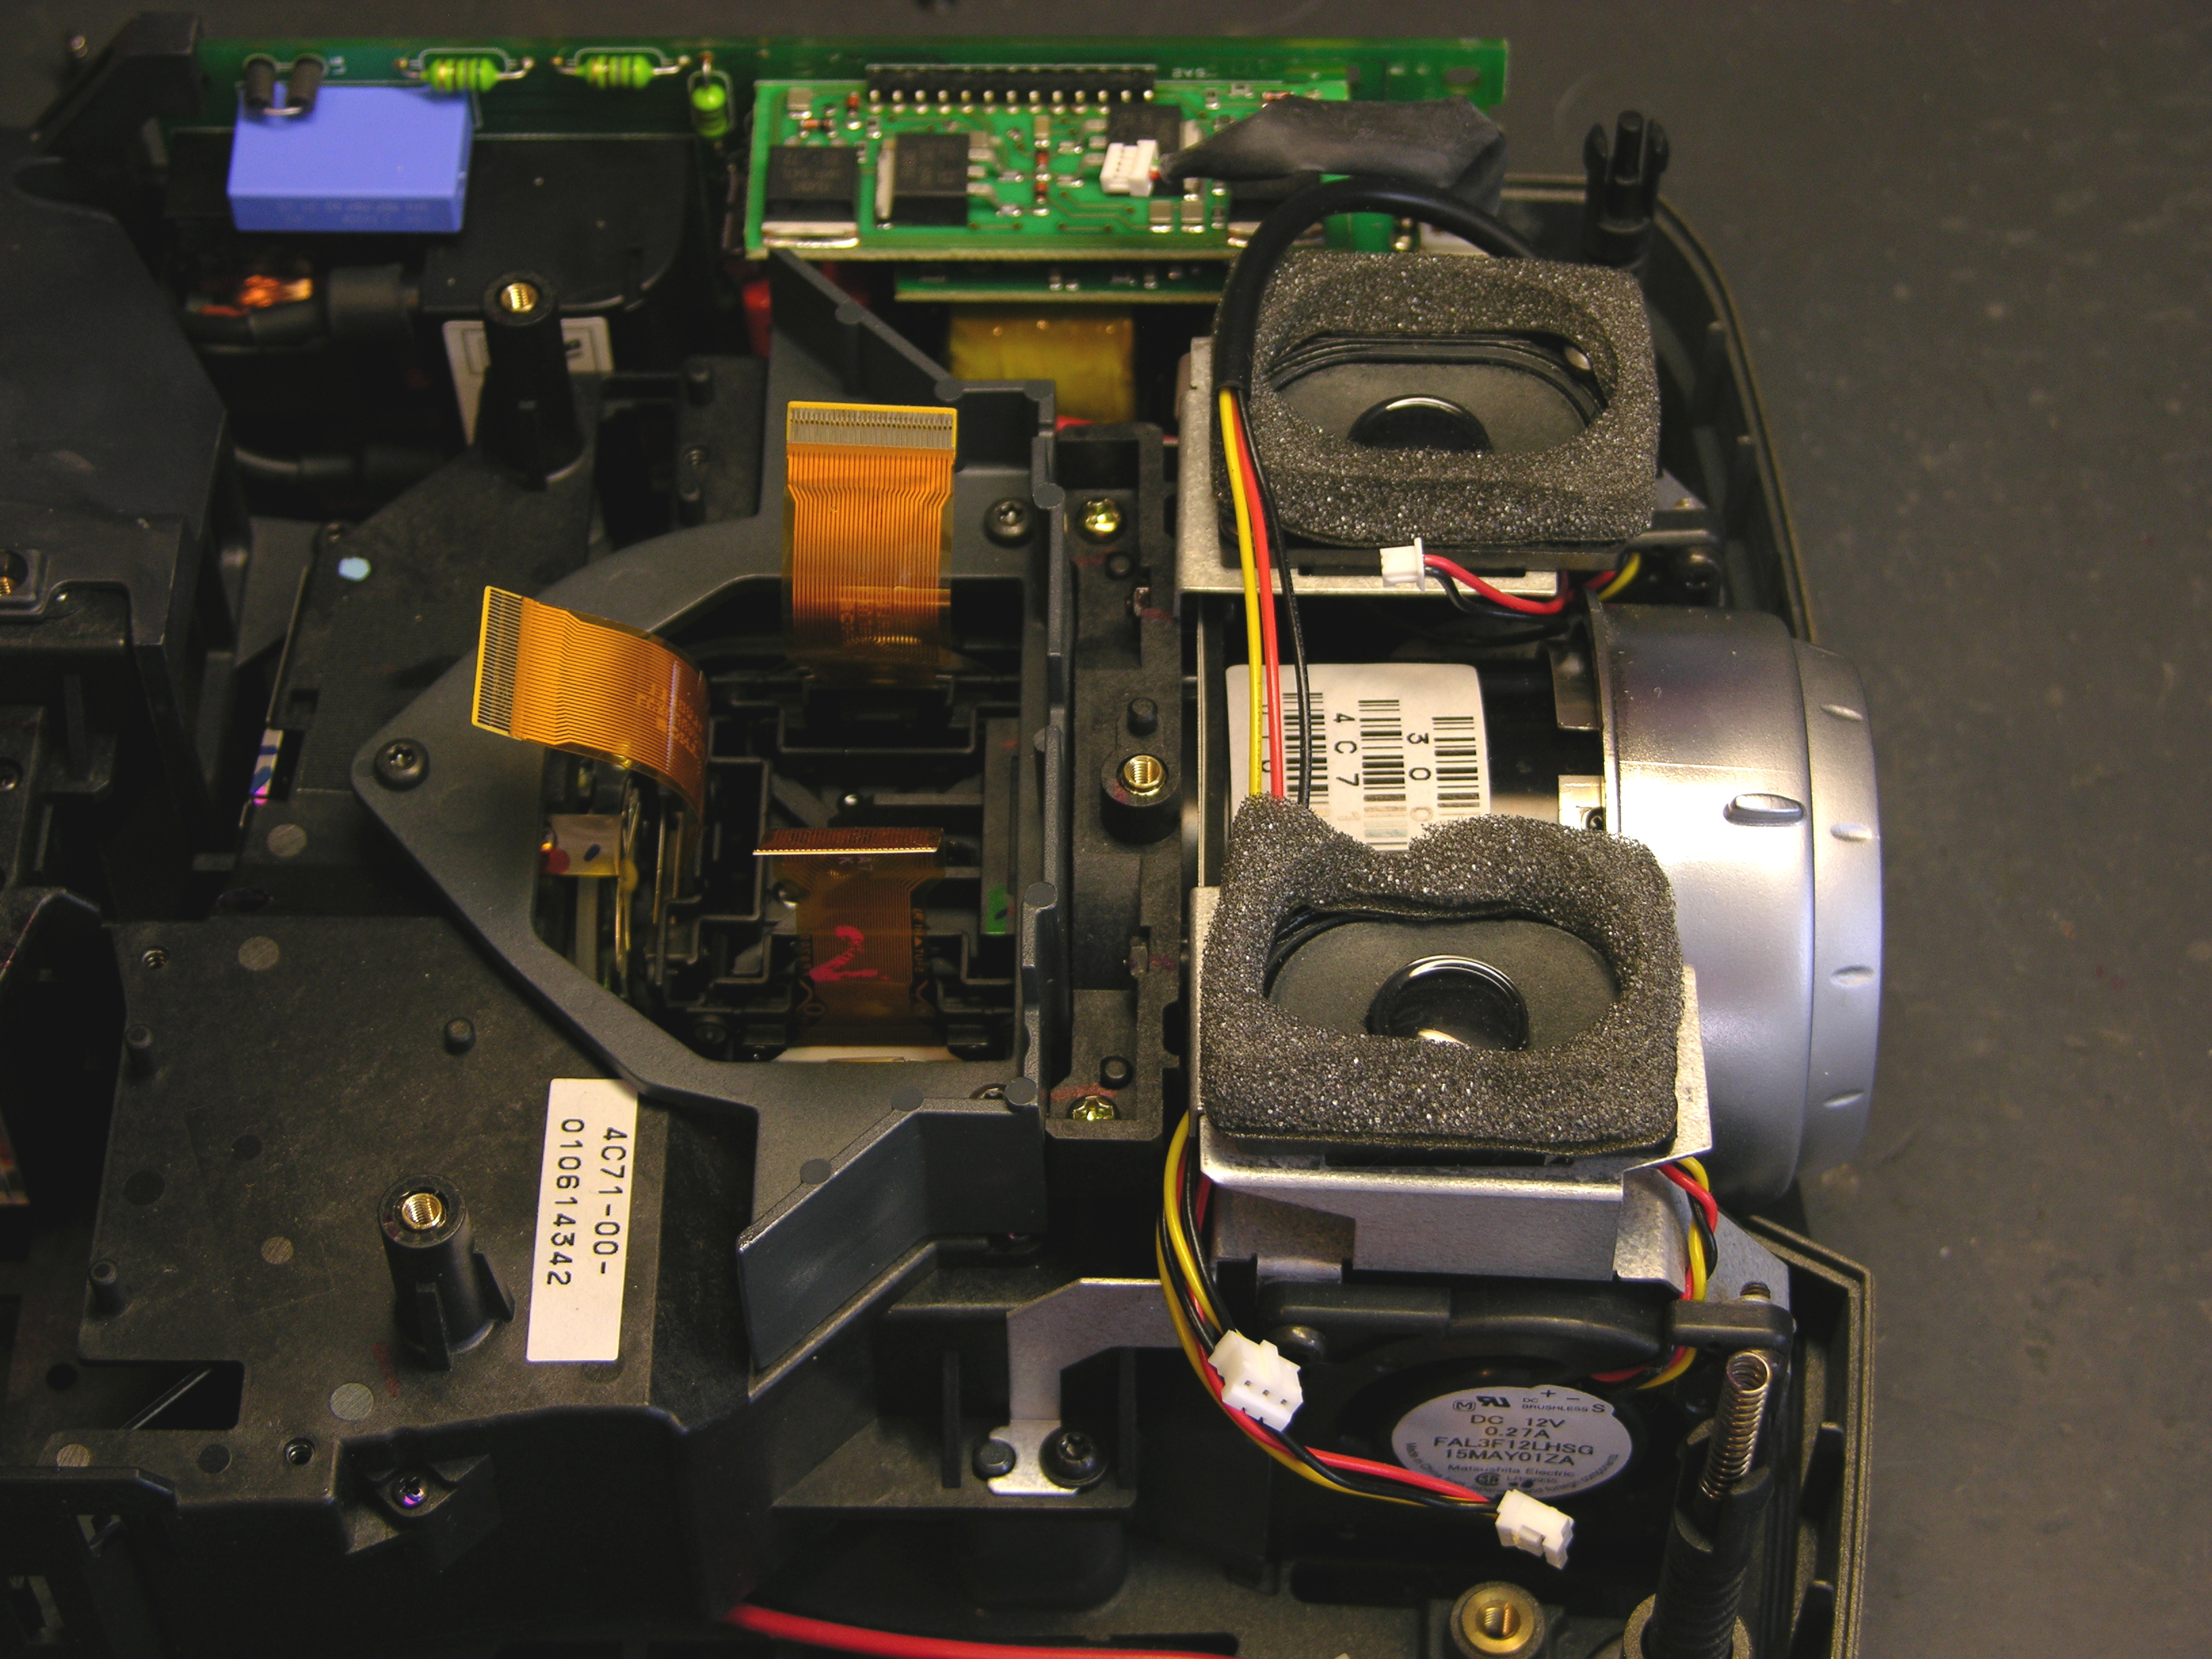
In order to get to them, I had to take off the collar above/around them, remove the two cooling fan / speaker assemblies, and remove the main lens. The LCDs were mounted to the lens carrier and looked fine; their removal left access to this cavity where the RGB light paths converge.

I didn’t notice it until later, but someone had already been here before. Loctite on the RG screw tabs and missing from the B tab.
From a different angle, the problem was obvious.

The filter between the blue light path and the blue LCD is all melty. Bad.
First things first. I gently peeled off the Bad, scrubbed all the goo off the glass carrier with Goo Gone, washed all the Goo Gone off with Dawn, rinsed the Dawn off with water, and dried the water off with a paper towel. (Life is sooooo complicated.)

Here it is all shiny and ready for . . . whatever comes next.
While I was in there, I detached and examined the other two filters. They didn’t look colored, just a light neutral grey in a very familiar sort of way. Apparently the filter isn’t what makes the blue blue (that’s the blue half-mirror further upstream), so maybe I can just put it back together and see what happens.
Reinstalling the Filter Carrier
Assembly is the reverse of disassembly.
The projector is back together and emitting blue light when it should be emitting black. The Bad was the polarizing filter that makes the LCD do its thing, so I’m going to have to find another one and put it back. It’s still emitting shades of blue; it just puts out quite a bit of blue when it should be going all the way to black.
I’d welcome donation of a spare polarizing filter from a differently-ruined LP290, and I’m shopping for a broken one. But partly for sheer “I can’t believe you did that and I can’t believe you got it to work” value, I’m sorely tempted to get a polarizing filter somewhere else and see whether it’ll do the job. Like a photographic filter. Or an LCD from dead equipment. Or sunglasses. ![]()
Of course, none of those are good ideas. It obviously gets hot inside the projector, and meltage problems are going to avalanche as the filter warps and discolors and becomes less transparent and absorbs more energy from the light and heats up and warps and discolors. So I’ll at least look around for a spare projector to cannibalize.
Power Supplies
The projector has the lamp cover interlock switch and AC-DC power supply on the starboard side and the DC-DC power supply and lamp ballast on the port side. The AC-DC supply is always on, and the DC-DC supply appears to be under control of the microprocessor that runs the soft power button and monitors the sensors scattered throughout the projector.
The AC-DC power supply checks out okay, as far as I can tell. All of the electrolytics test good with my Capacitor Wizard, and the three voltages (16.5V, 6.6V, and 3.3V) are present on the edge connector that plugs into the main board.
I took the projector parts over to Ron Tozier, and he suggested testing all the voltages with the projector in standby, with the projector on, and after the projector shuts itself off. That should help determine whether the failure is in the AC-DC power supply board (probably not), in the DC-DC board, or quite possibly with one of the sensors. He also noticed that the main board has nicely labelled test points for lots of voltages, including not only the raw AC-DC supply outputs but also regulated and switched voltages under microprocessor control.
I printed out a digital pic of the main board, highlighted all the power supply test points and wrote the standby and on voltages next to them, and am now waiting for the projector to shut itself off. Of course it would pick now to stay on for hours.
I do note that every time I turn it on, as it powers up the lamp, I hear a chittering sound like an ultra-high-pitched buzzing. I think it’s the ballast going out, and I’m pretty sure the projector would sense a ballast failure and shut itself down. So I suspect I have a pretty good idea what I’m going to find is causing that problem as well.
hello
my videoprojector lp 280 works now, it was the power supply connector and motherboard, I also clean the fan, the default is not reappeared
thank you
Hello Keith,
Thanks so very much for your advice. I needed this Thanksgiving day off to finally tackle the projector problems. I must say that I think I’ve reseated the connections – if that means reheating each solder point until it melts. I did not take anything out though as I felt like I was at the edge of my limitation as it was and I did not want to make things worse.
I cleaned the jacks and conncetions too – they seemed fine.
The color shift problems continue though and as much as I don’t want to, I think the lure of a new projector is on the horizon.
Thank you again for your time and interest,
Nick
Hi,
I have an Infocus Screenplay 5700 and the lamp suddendly shuts off, and now doens’t start, the fans sounds working it have a noise like a relay trying to start but never happends. An electronic service center guy told me it has the Ballast damaged due to electrical issue in the house. I don’t know if my projector could be repaired since that ballast is hard to find.
thanks.
Dain, I don’t know what to suggest — I don’t know much about the ballasts and I don’t have a 5700. Your best bet might be to shop eBay for broken ones and hope that the brokenness is in a different part.
Hello, an update of sorts – and I don’t intend to slight any of your fine work because I truly admire your “hands on” approach of keeping these faithful projectors going. It’s just that because my skills with this are not keen enough, I finally did have to buy a new projector. I purchased a Mitsubishi HC6800 from Bestbuy to replace my Infocus LP290. Bestbuy beat an online price I showed them, lowering theirs by $400 and with three years to pay for it interest free. This projector came out this September and when paired with a Blu-ray player the results are truly amazing. I did think the LP290 played regular dvds fine – but this new projector is superb. Thank you again for your help!
Nick
Hi,
I have an infocus LP540 and there is a problem in projector as it is not switching ON. I found that the problem is having with power supply board in CR 500 IR 3J component. I would like to know what is the function of this component and voltage output..? Is there any equavalent for the same…?
Thanks in Advance…
I’ve applied Zach Side’s fix (ZPack, 22nd Sept above) with apparent success.
Just a few points to note:
1) The case top is held on with 7 torx screws, 3 at each side and one at the back. Note also that the knurled ring on the 3.5mm jack has to be taken off before the case will budge.
2) The power supply board is a long narrow one vertically mounted at the right hand side when the projector is view from behind. It’s easily identified as the mains power socket is mounted on it.
3) To access this the top circuit board must be removed, as it is connected to it via an edge connector. There are also a couple of cables that need to be disconnected from the power supply board and also an earth connection.
4) When removing the top circuit board the connectors to the three LCDs must be disconnected. This is done at the board, not the LCD, by loosening a connector that clamps onto the flexible connector. Do this by moving the lug at each side of the connector out about 3mm until it stops.
5) When replacing the LCD connections make sure they are pushed well in before clamping, or you will have colour and banding problems like I did!
6) When replacing the capacitors make sure they are not so big that they don’t allow the board to fit back in. In particular the 470uf 16v one nearest the mains connector should be quite squat.
Thanks to Zach for the fix.
Hi Keith,
Found this post very interesting, thanks! I currently have an infoucus LP280 which looks identical to the 290 and have a problem with it. It powers up and stays on (no random shutting down) however, there is a red/purple tint to the whole image. I’ve done some research and concluded this is something to do with the green LCD not working properly; I tried to project a green image and it just displays as black.
Does the green LCD need replacing or is it more complicated?
Thanks
James.
HI Keith,
I have an lp280 which has a red/purple tinge to the whole screen which makes me think there is a problem with the green LCD? Can this be repaired?
Many thanks
James.
I have a problem of a different kind. My son brought home an LP280 yesterday because his friend is apparently upgrading to something HD. I was told it worked great, but noticed that it was quite dusty. Without trying it out, I began dissecting, and cleaning as I went, when I got distracted by a phone call. By the end of the call, the projector was completely disassembled and wiped or blown clean. I then began the reassembly, only to discover that I can’t remember nor figure out the path of the Red/Blk wire with the carbon tube thing on it. You can probably tell from my technical jargon that I’m an electronic rookie, but I’m going to bet that this wire assembly is likely the the power wire (pulling from the electrical knowledge I do possess) and the placement of that carbon doohicky in the case may be paramount to the proper function of this projector. I was hoping that you might have a few more pics of the inside of your LP280 from your repairs that I might get a better look at the wire placement and the carbon thing. I would just hate to waste a perfectly free home theater addition for the fam because I inadvertently replace the carbon thingy wrong and blow up the entire projector.
I don’t know a lot about small electronics…yet…but I’m learning as I go and I’m intrigued to the point of obsession (taking most things apart to see how they work) and stubbornly determined not to allow these gadgets to get the best of me!! Rest assured, I do know the working end of a screw driver as well as most other tools, currently building my kids a treehouse, rewired our entire house and re-piped all copper throughout, just finished adding a laundry alcove for my new washer and dryer. All those skills were researched, self taught, and picked up along the way…but DAMN InFocus for with holding the service manuals and schematics on it’s products. Is it me, or is this some ploy to force you to upgrade to the newer more expensive model?? God Bless you Keith, for your willingness to share your wisdom, and all your helpful followers, too. I’m so glad I stumbled on your sight…I see a few more projects/ideas of mine launching in the near future with all the great information you post here…almost serendipitous.
If you could describe the path of that wire and placement of that carbon thing…I would forever be in your debt…and if you happen to have any more shots of the inside of the case from a different shot or not cropped as close…I’d be your best friend…
Looking forward to Projector Reassembly Completion,
Teri : )
Teri, the carbon thing is presumably a ferrite bead or tube, which is magnetically saturatable but non-conductive. It’ll be there to suppress power spikes on that wire.
My projector is still apart and I’ve been meaning to put it back together. So send me a link to a picture of your red wire and I’ll look for something similar in my projector and post pics.
I did have everything BUT that wire back in the case, but decided to take the whole thing apart again and “inspect” the entire case…mainly because the pics you posted of your unit showed enough of the wire to suggest that it may go under the main component.
So once I had the whole thing in pieces, I took pictures of each piece and the case. Sure enough, I noticed that on the lower case there is a spot that had very small indent for something round and what looked like tiny clips. I pushed the ferrite bead into the spot and it clicked in perfectly!! Yeah!! I continued to rebuild the projector and took pics of each step before and after as I went. With all the pieces back in the the lower case and the rear fans in place & plugged in, I pulled the buttons out of the top case and laid them onto the main board in place, plugged in the unit and hit the power button. It worked!! So I let it cool itself down and shut off, put the buttons back in the top case and screwed it all closed.
The Fair is in town here, and I’m headed out to there in a minute so I likely won’t be watching movies on it tonight. But I think I’ll test it out tomorrow AM to see just how bright the lamp is. I was told that it does need a new lamp & the previous owner preferred to spend that money on a new system with HD capabilities, than sink $200-$400 into an older unit that is getting harder to find parts for. On that note…do you know of or have you yourself found a way to hack/mod a bulb(s) that is bright enough to work inside a projector like this…any ideas?? I guess coming up with an “eco” friendly version is out of the question!
I will keep coming back to your site to see what you have going on…I’m intrigued! If you need any pics of the inside of the LP280, let me know I’ll shoot them to you.
Thanks for all your help,
Teri
I’m glad to stumble into this website and post. My Infocus LP280 also has a busted power supply. The 12NM50 mosfet is shorted and R8 and R9 resistors were burned. I have removed them sometime ago and can’t recall their correct values. The SOT transistors (or MOSFET?) that connects to the HEF4069 Hex inverter IC have been removed and need to be replaced. Can anybody please help with the schematics or advise me the part numbers to replace the missing parts? I feel bad throwing away a good projector that just needs a few parts to fix. Thank you.
Where can i get polarizers???
Hi Keith,
I have a LP290 Projector that would shut off a few seconds after power up, sometimes I could get a minute or two out of it at most. I have found that removing all the foam filters inside causes the projector to function normal 95% of the time. I still hear the chitter on startup and it appears to be moving air just fine with and without filters but a few seconds isn’t enough time for it to actually overheat. Does your projector appear to normally run hot?
Scott, it certainly runs warm; after all, there’s a big electric heater in there.
I just bought an LP540 that won’t power on in any way shape or form. Any ideas?
Hello i have recently got a second hand InFocus LP290 projector and i seem to have the following problem.
The projector turns itself off at random times. To turn it back on I have to unplug it. To turn it on again, i have to plug it back in from which you hear the fan cooling it down, once the fan has finished, it is free to turn back on. When turned back on for the first time from the crash a loud sparking noise is made for a few seconds which i assume is from the ballast this then stops and all is fine until another random shut down.
As stated above i have no experience with projectors so any help would be appreciated.
Hey Bluehomer, I posted a while ago about having the same exact problem with my LP290.
Here is what worked for me:
>>>I’m new to repairing electronics, but I have repaired several LCD’s and a couple projectors.
My Infocus LP280 was overheating and shutting off anywhere from a few minutes, to over an hour.
When it did this, I would have to unplug the power from the back and plug it back in.
One other Infocus Projector at my work wouldn’t even turn on at all, so I did some research… And it was one of the capacitors that was by a transistor (Transistors get hot), and was only rated at 85 degree celsius.
I replaced the bad one with a high temp 105 degree cap, and it works great.
Ok, back to the LP280.
I took it apart and nothing looked bad/burnt.
I went ahead and replaced the 6 capacitors that were on the power board (I’m assuming that the LP290 looks the same), with good caps and it has been running for a couple hours without any problems.
This isn’t a confirmed fix, but it has lasted longer than it ever did, and hasn’t shut off yet!
The 6 caps that I replaced are :
2x – 1000uf 10v
3x – 470uf 16v
1x – 470uf 25v
You should be able to get these at your local Radio Shack, or online at http://www.parts-express.com.<<<
The power board is the only circuit board that the power plug plugs into.
Just replace all of the above capacitors on that board and that might be your problem.
If you don't know how to replace capacitors go to youtube or google and look that up, there are some very helpfull vids/info on there.
Good luck!
Hello Keith thank you very much for your email i shall order these parts and give it ago. Once again thank you for informative and quick response. I might be in touch again if i run into any problems.
Hello keith just to let you know i have got the parts and soldered them in and all seems well thank you very much as it seems to be a successful fix so far. I have however got one question as i don’t have any knowledge of projectors what so ever, i was wondering if you could help me, i seem to be getting a blue line on the left hand side of the projection. Any information would be useful.
I was given an old infocus Lp250 by a friend, the problem is that it gives an error message that one of the fans is not working. I have a little knowledge in electronics so I took it appart and tested the fans with an external 12v supply, they all seemed to be in order. I took an electrical meter and measured the voltage on the fan connectors only to realize that the rear and the front left fan were not getting any voltage, so I tested the components that are inline with the fans circuitry only to realized that two surface mount reistors were gone on both fans circuitry. I replaced them with ordinary resistors of the same resistances n powered the pj and presto, it worked. i tested it for a few hours turning it off and n off inorder to be sure it’d work and all seemed fine. I took it appart again so that I could screw everything back in place because I hadn’t put in all screws, I turned it on and… the fan error came up again. The resistors I replaced are still fine according to my meter but still it wount work, the lamp has done 101hrs only by the way, am stuck, someone please help.
Hi guys! I eventually managed 2fix my problem! It took me a really long time 2fix this yet the solution was so simple!!! I’m posting this for the sake of those who might find themselves here hoping to find solution to a similar problem. Anyway, the solution was just to clean and oil the fans!!! Surprisingly, mine weren’t dirty and they werent stuch either, but oiling them did the trick
I have been using LP720 for a long time, suddenly today non of the keys/buttons on the projector respond. Can not get into the menu, or even the help button. Anyone has any Idea?
Thanks
I recently bought a LP280 and was having random shutdown issues. After reading some of this and other places I decided to dig into the thing.
I just use it for outside stuff so I removed the filters. I also removed the main board and discovered the power supply(right side looking from the top rear) was not seated down fully in its slot. After reseating it I cleaned up the edge connector to the main board and reattached all the connectors I removed .I also removed the thermo sensor from outside the light housing (scary, I know!) It’s now hanging inside the case but not directly on the wall of the lamp housing. This may have been my problem. Anyways it’s now working reliably. Probably a aftermarket lamp I dont know but at least it works for now, and if it burns up we can have a campfire after the movie. LOL
i have a infocus lp290 it powers but the light remains yellow and it doesn’t chage into the green light nor does it show any light in the focus lens what could be the problem there please help
I have an Infocus IN2102EP with a white blob of dots on the left side of the projected image. I have replaced the bulb and tried to blow it out with a dust remover, but the blob is still there (looks like the color is faded out of the blue). Any suggestions on this problem or how to fix it? Thanks!!
I have a screenplay infocus5700 everything is working great but now we have a big black line across the screen looks like this ________ what do we need to do ?
hi keith
we have an infocus lp290 and bought a replacement bulb online (from TRATECH Switzerland) after a long time. I have just fitted it in and the beamer turns on then the green lamp blinks and after a couple of minutes a single beep sounds and then the beamer seems to attempt to power up again or at least it seems as the green lamp starts blinking again, BUT no light comes out of the beamer lens ie: the bulb is not turning on.
have you any ideas what the problem might be?
thanks for your time in advance
domdrum