My earlier edge-lit plexiglass demo was a study for an art/technology collaboration with Lisa Rundstrom that became known as “Organic Energy Cloud,” installed at Diver Studio for the November 28 Final Friday.
Lisa and I ended up agreeing on 200 LEDs (and ultimately installing 160). I had decided early on that I wanted to use two A6276 16-LED drivers to a board, for distributed LED control, all run by an Arduino. Once I got all my parts, over the November 22 weekend, I designed and began assembling the driver boards.
Schematic and Boards
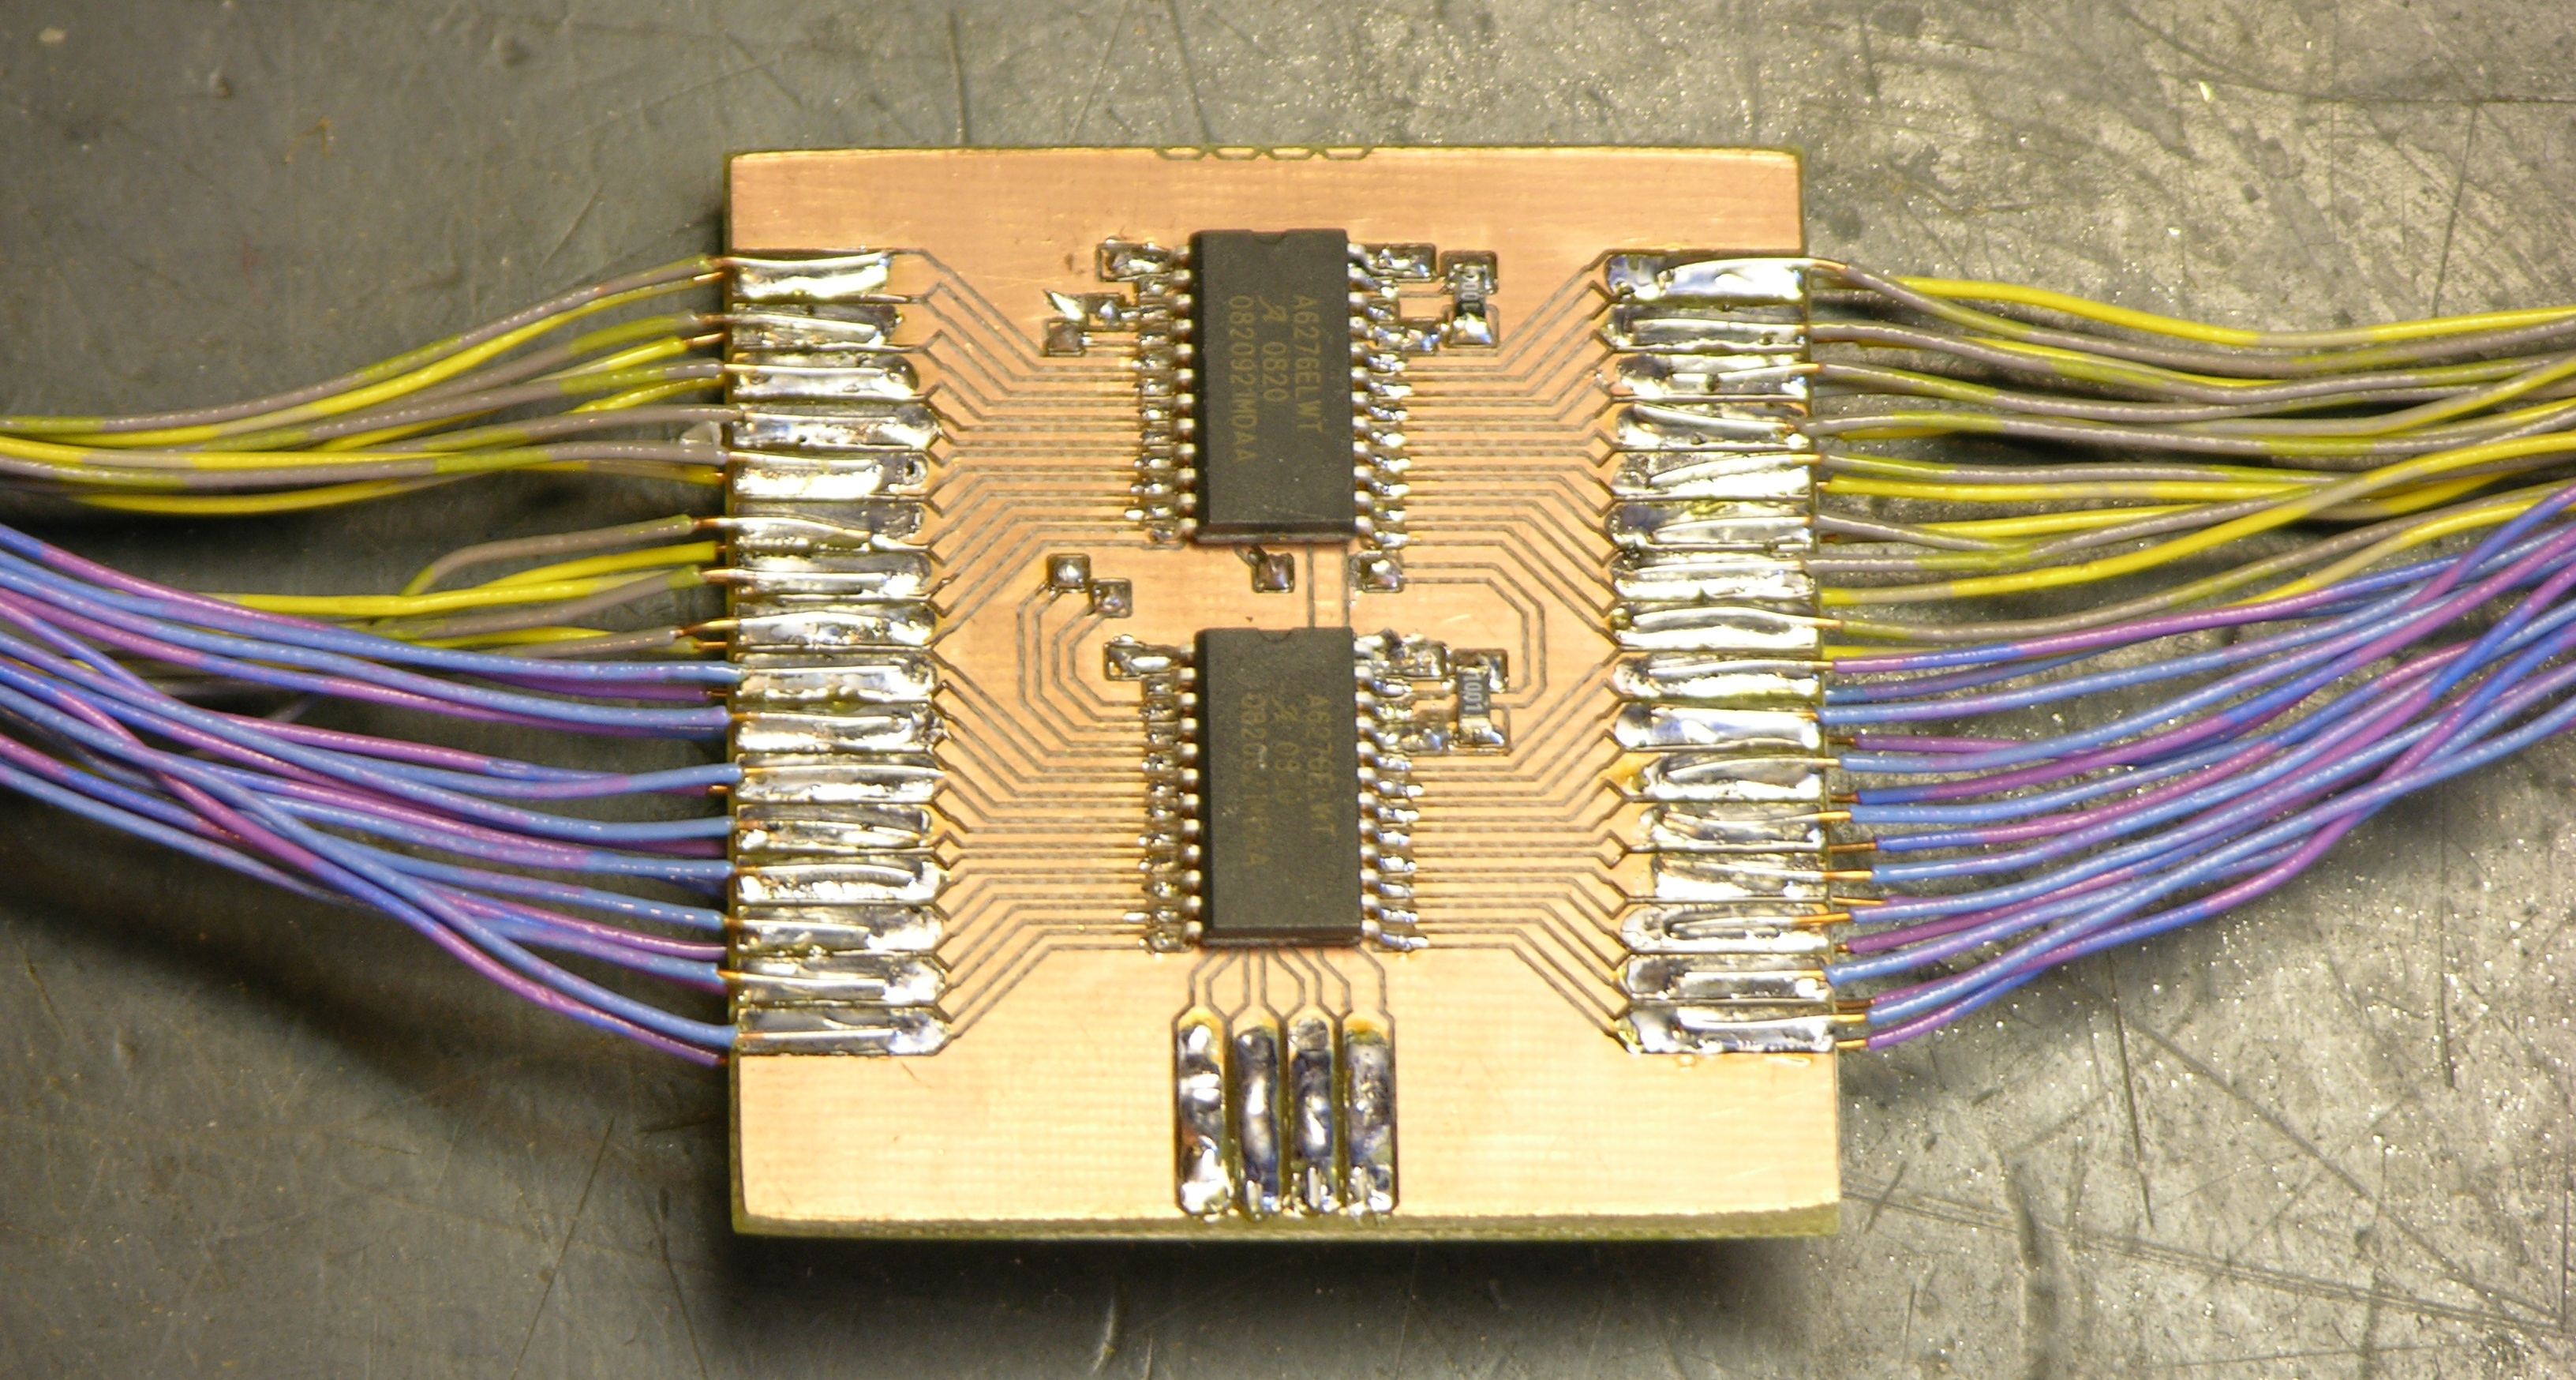
The schematic is dead simple — daisy-chained A6276es, common clock and latch lines, output enable tied active (low). For speed and cost, I planned card-edge connectors to solder all the LED and “umbilical” connections to. Although the A6276 doesn’t have separate digital and analog grounds, I used separate wires in the umbilical for digital and LED V+, and I doubled the GND and LED V+ lines for current-carrying capacity.
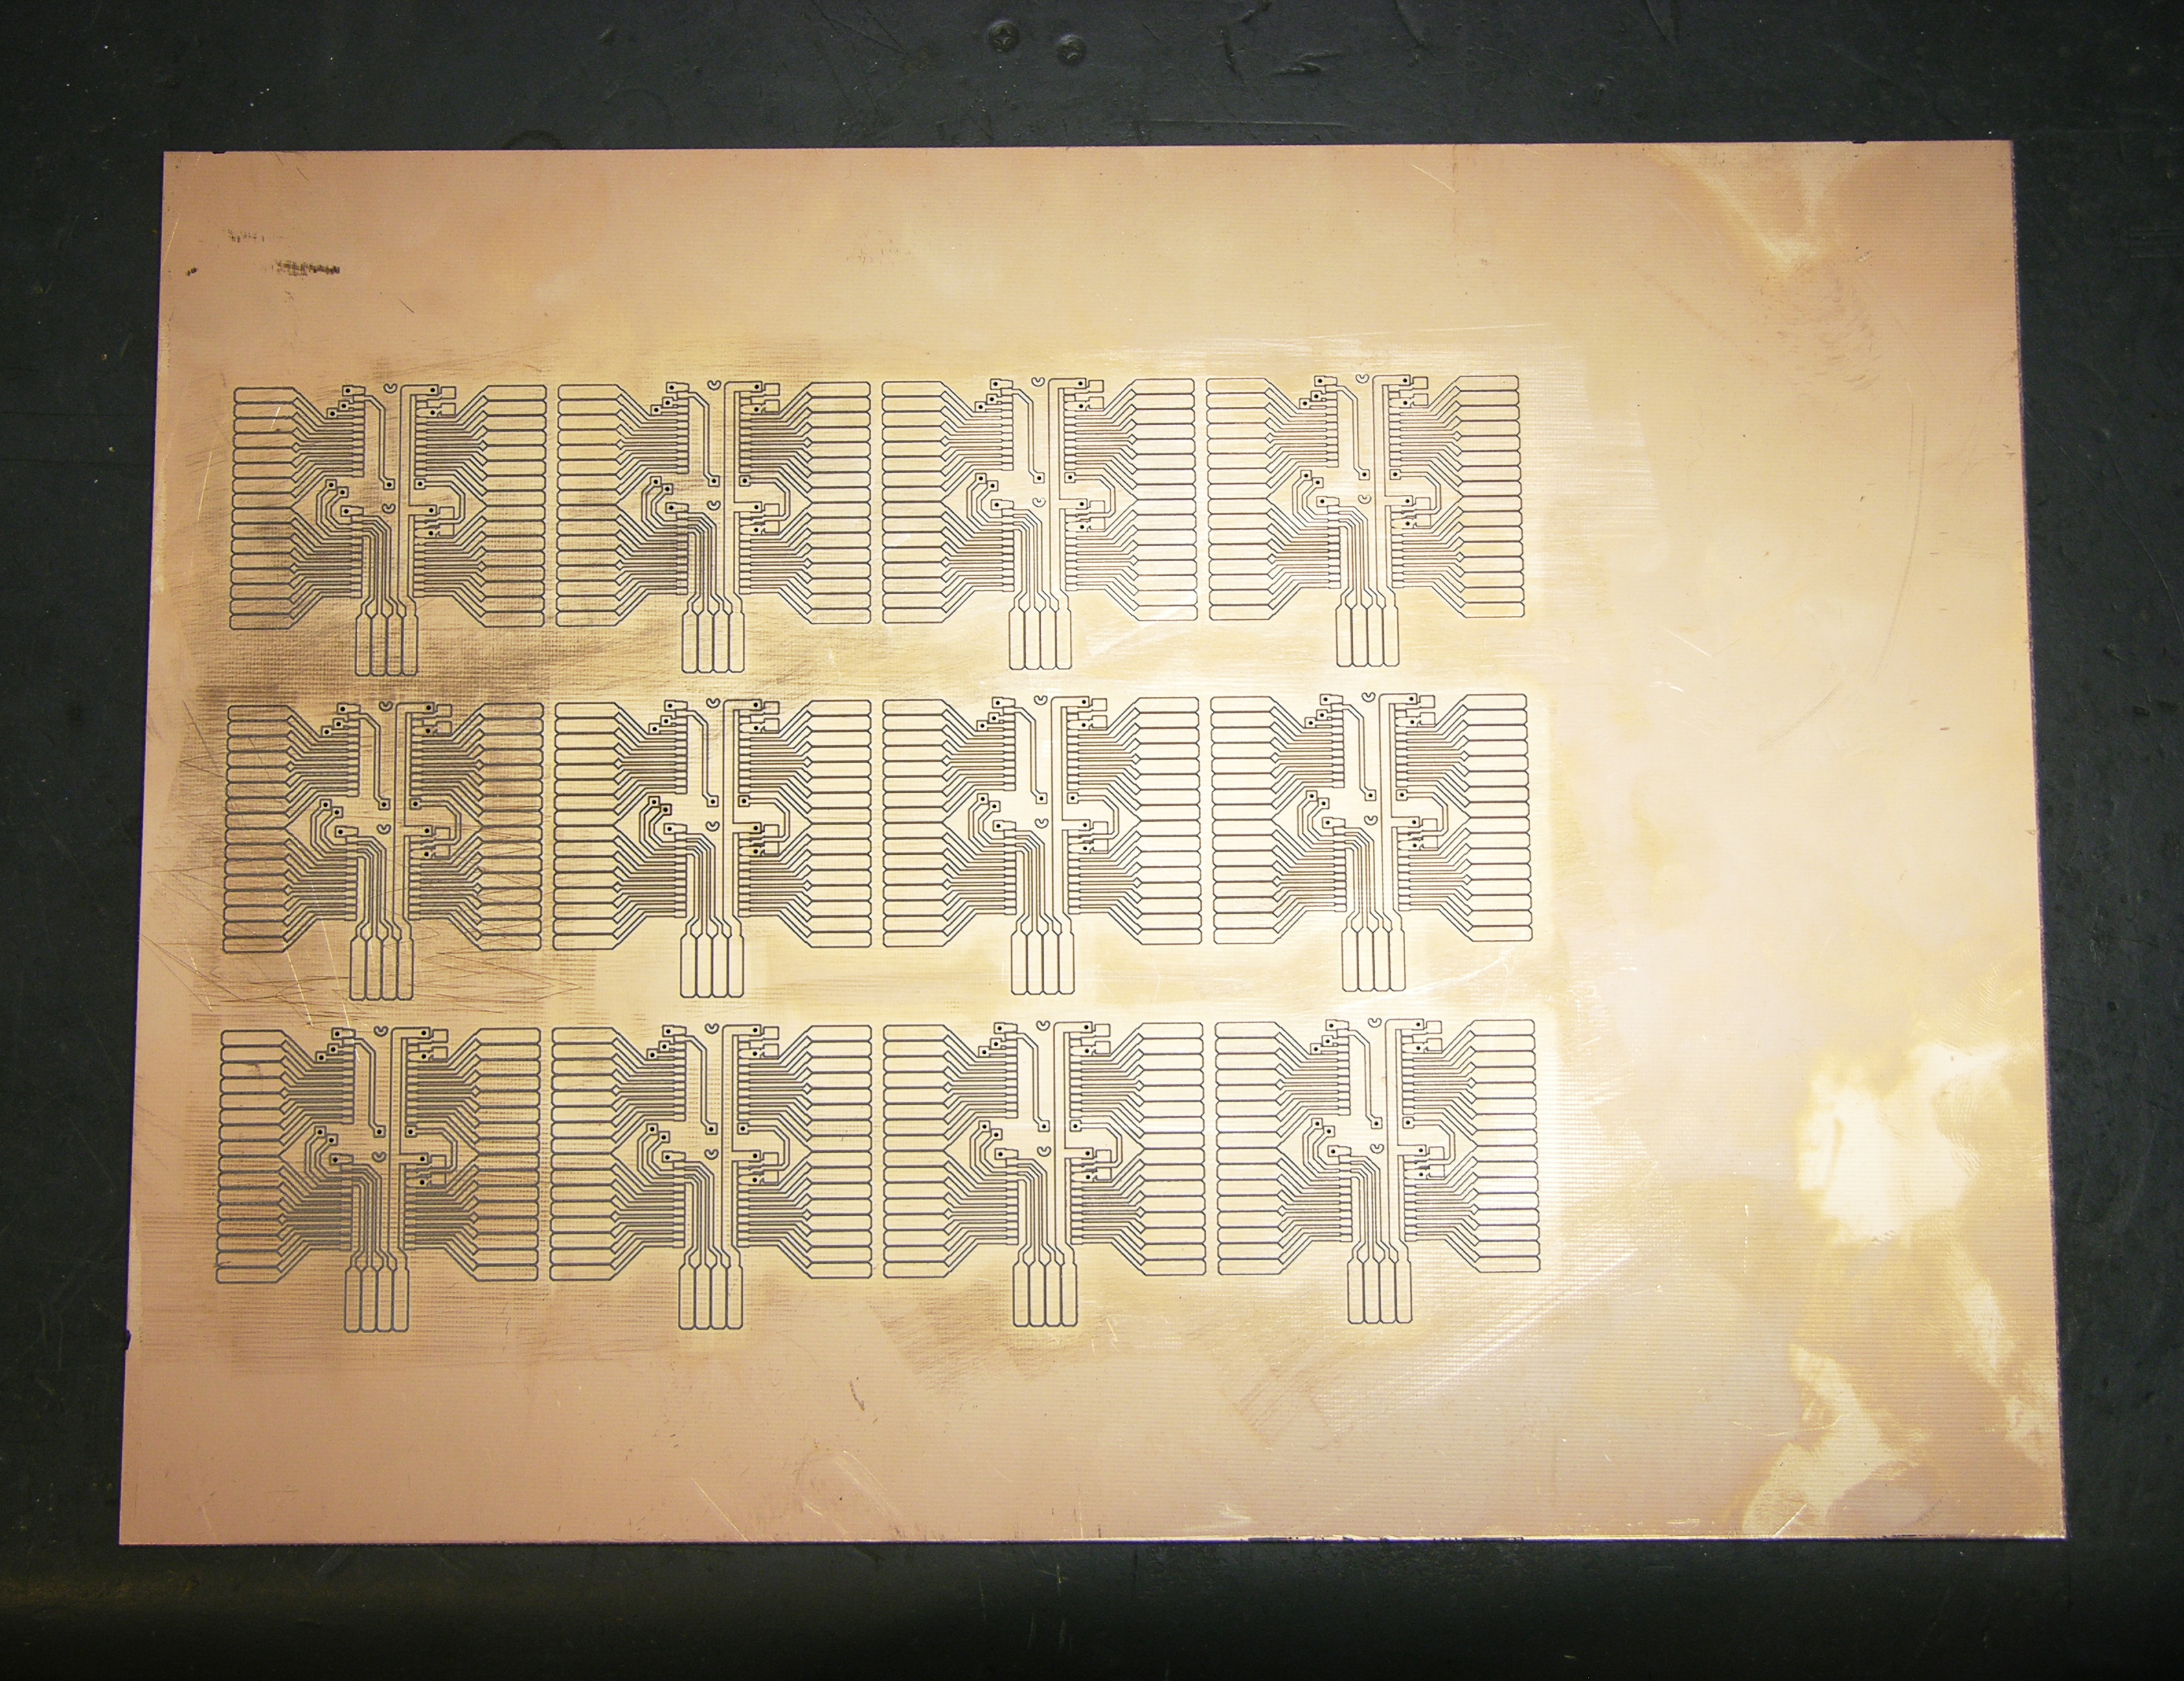
I hand-etched a prototype PCB to make sure the design worked, but it was pretty time-consuming and not my most beautiful work (especially being a two-sided board). Tom McGuire milled me a much more beautiful set of boards (although not using that mill), and did a very nice job using the drill holes as registration marks to line up the milling for the back side.
Assembly
Monday the 24th, I started pressing my friends into service for slave labor. Jeremy and Mindy were my first victims, and together we got all the PCBs and about half the LEDs assembled. Jeremy was stripping wire ends and Mindy and I were soldering — she did a fantastic job, especially for someone who had never soldered electronics before.

The key to retaining a shred of sanity while soldering wires onto SMT LEDs is a good soldering jig. Sunday night while assembling my prototype control board, I had tried to assemble LEDs with just the helping hands vise, and the LEDs kept going crooked in the alligator jaws. It took me about an hour to solder sixteen, and I knew that wouldn’t get 200 done in time.
I figured my mom still had some wooden clothespins, and after a little quality time on the disc sander, I had some perfectly elegant, incredibly functional SMT LED soldering jigs. Production speed skyrocketed; frustration plummeted; stabbiness dissipated.
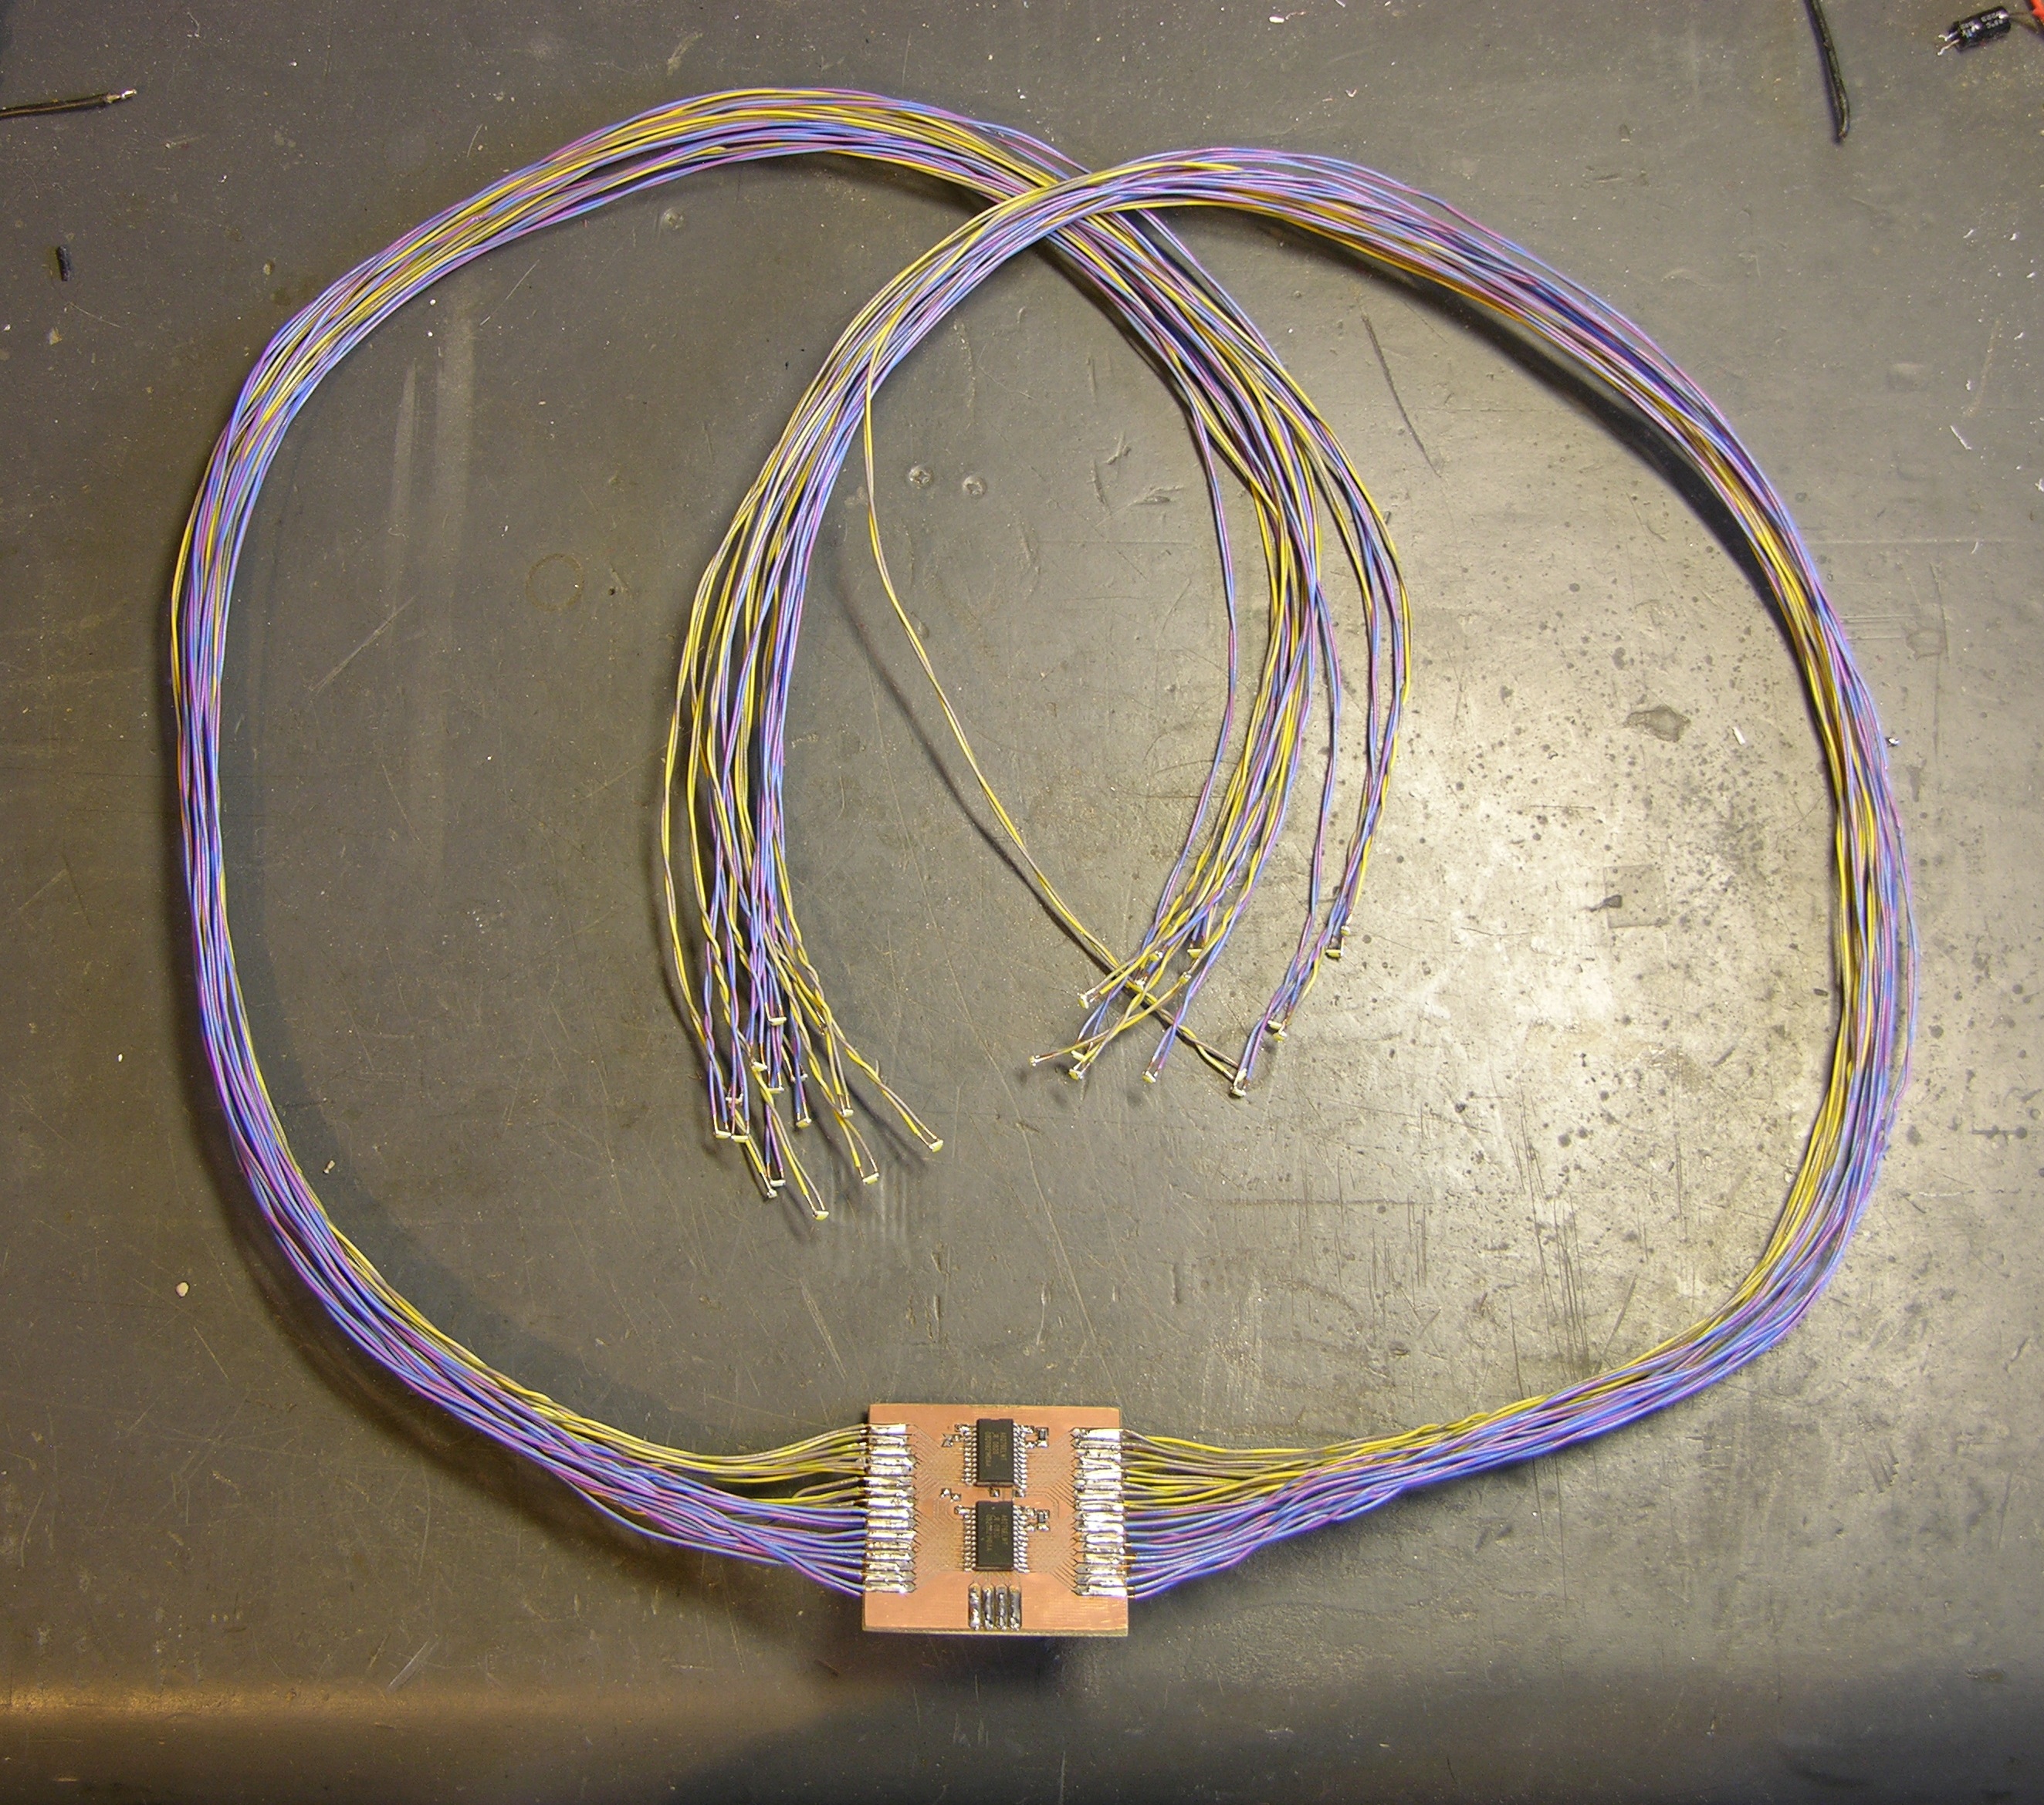
With the LED wires attached, and especially once the umbilicals were on (not shown here), the controllers really reminded me of facehuggers.
Rather than try to size LED wires specifically for LED placement within the piece, we made them all the same length. Lawrence, Gail, and the kids (especially Phill and Jake) stayed up late the next night helping me finish soldering LEDs and assembling the controllers.
Bus
I designed the controllers so that the clock and data lines would run in parallel to every board, but each board would have a separate latch line. It doesn’t matter what’s in the A6276′s internal serial buffer — it only matters when that chip gets its buffer latched to the outputs — and this arrangement made for a minimum of connections to the Arduino.
I knew we were going to be plugging and unplugging the umbilicals from the Arduino multiple times before we got everything assembled; but because of the parallel bus arrangement, there were too many wires to plug the umbilicals directly into the Arduino’s headers. I thought about plugging the bus together on a breadboard, but it would have made for a lot of jumper wires for the paralleled lines.
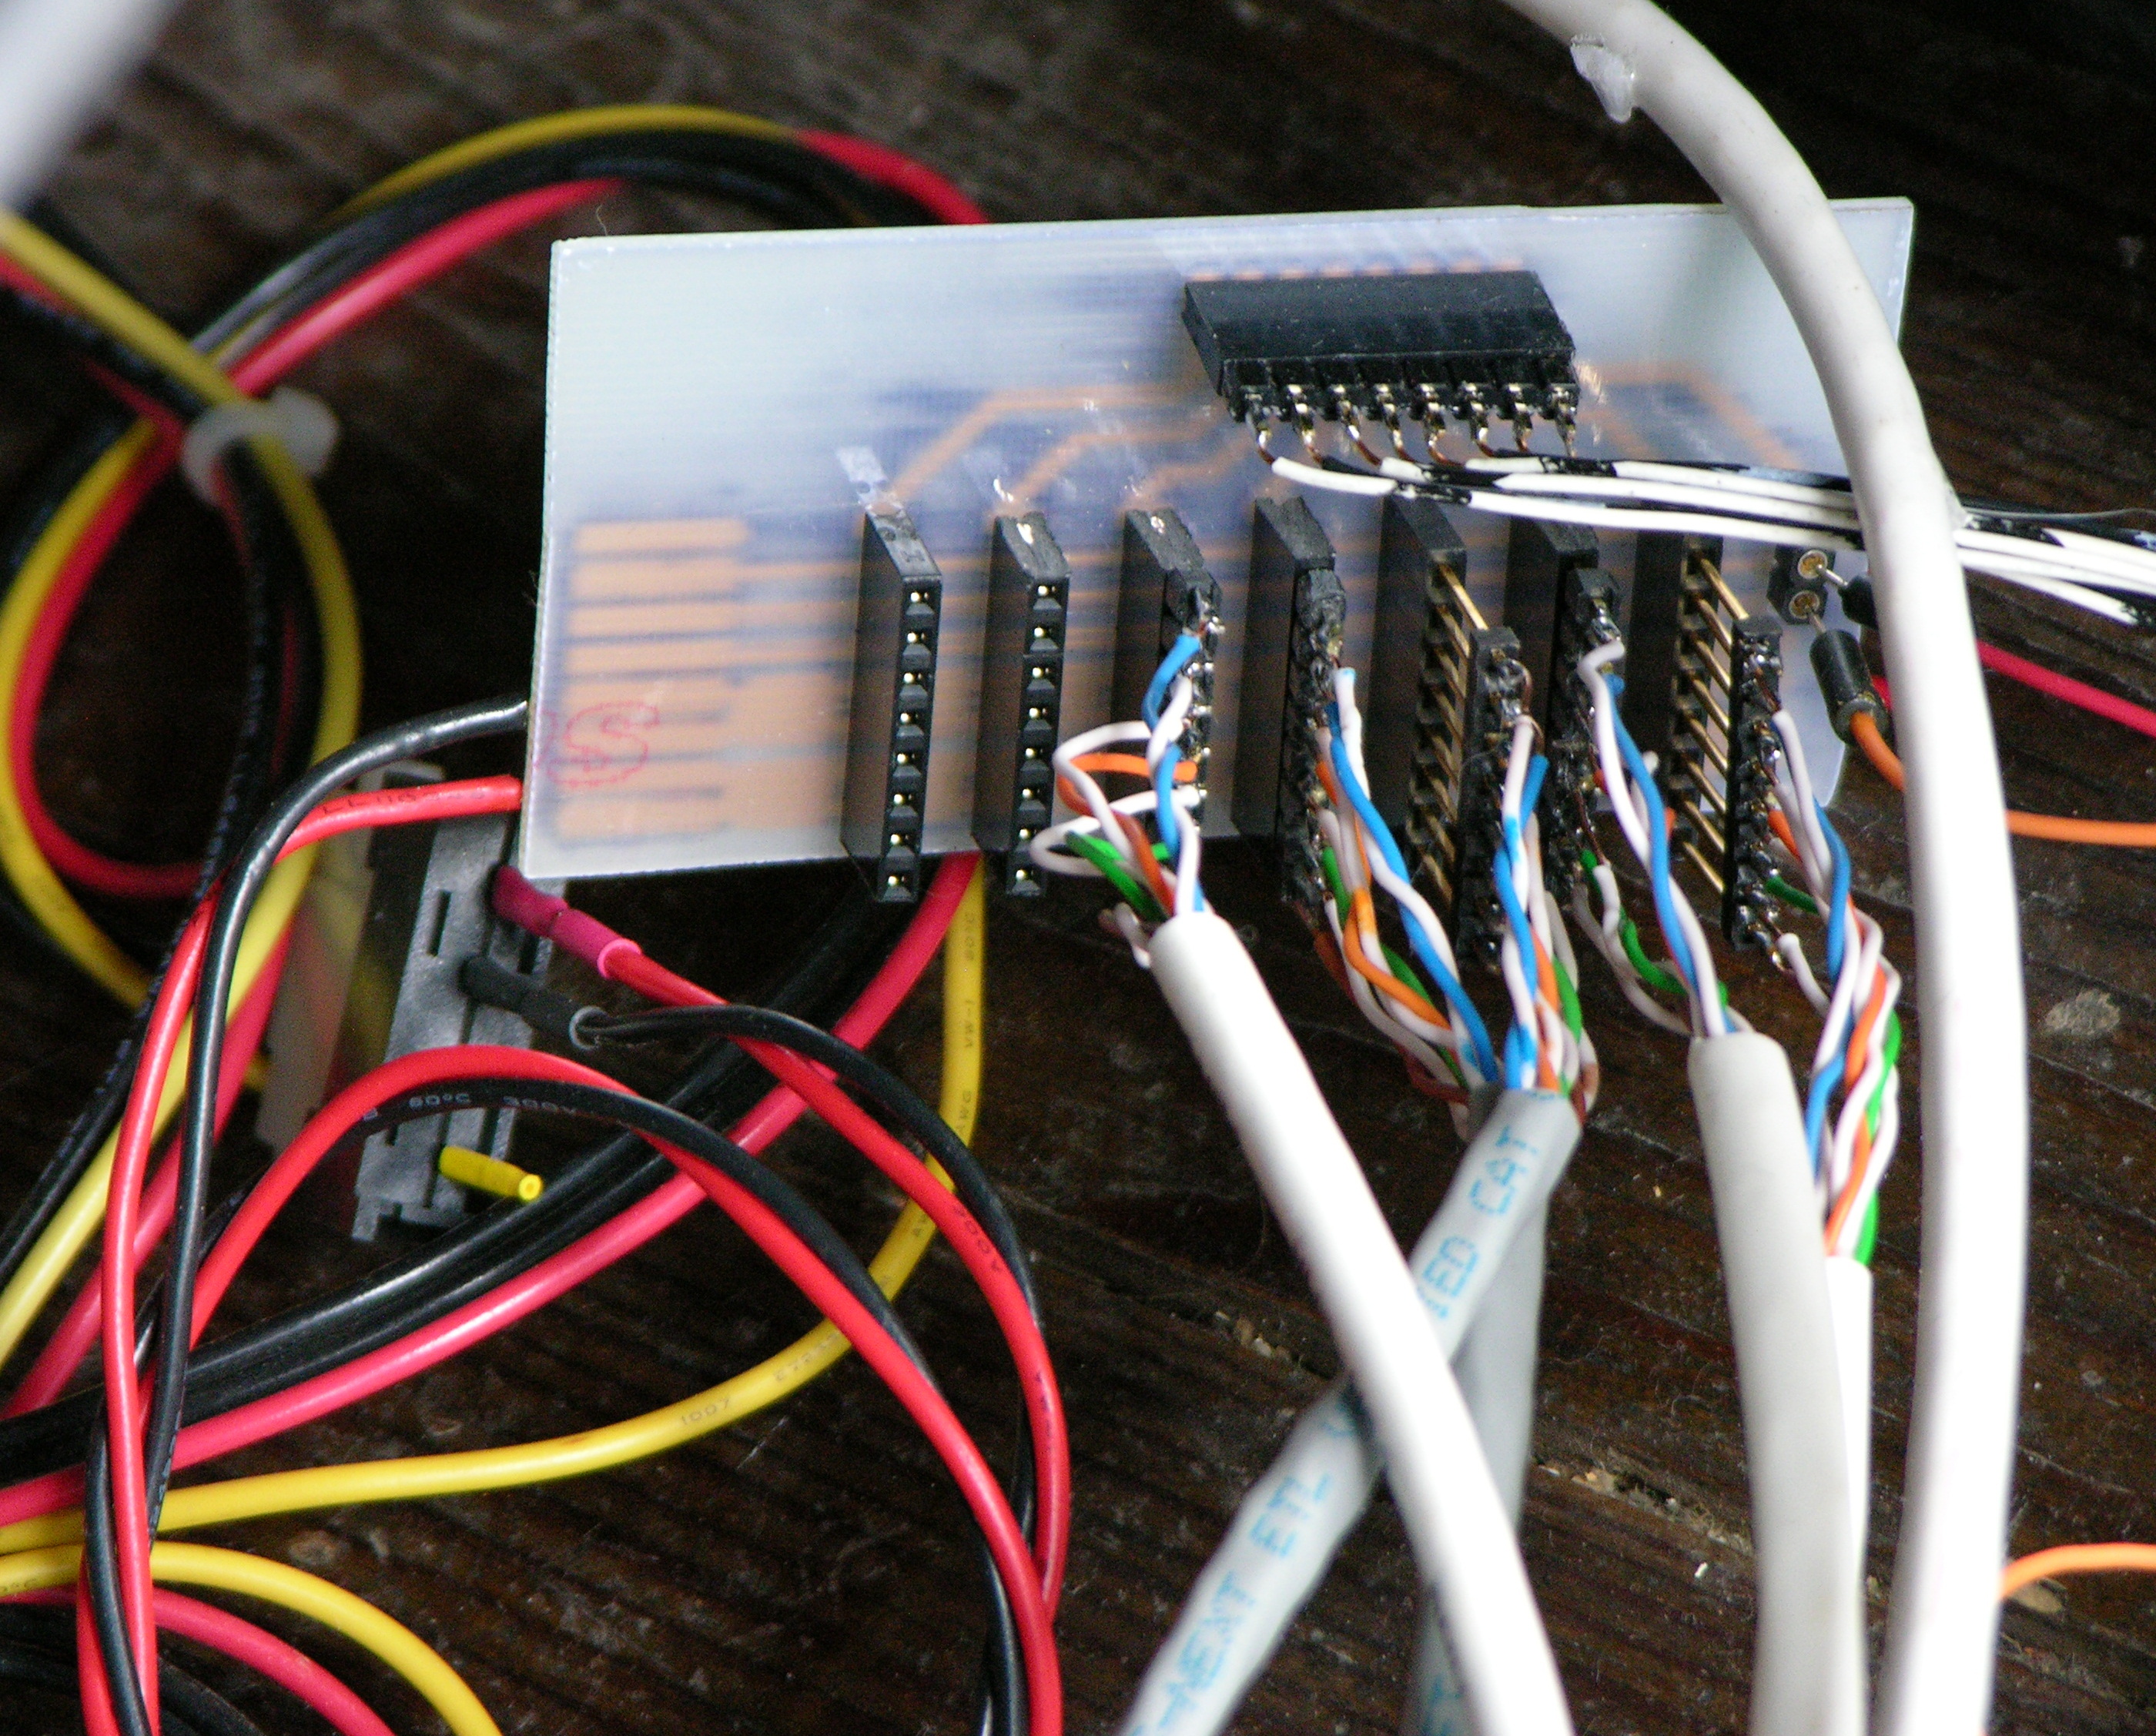
It ended up feeling easiest to design a small bus board with female headers on it, with the power, data, and clock lines bused, and the latch lines run to a separate 8-pin header at the top. (The bus board could run eight controllers — 256 LEDs — although we only ended up using five controllers.) I would have chosen to use ribbon cable to connect the latch header to the Arduino, except I forgot about that jumper and had to make something quickly out of borrowed wire while we were doing the gallery installation.
All Together
Because I was prepared to run 200 LEDs at ≥ 20mA each, the small power supplies I have weren’t going to be up to the task, and I used a PC power supply, not visible here except for its DC power cables.
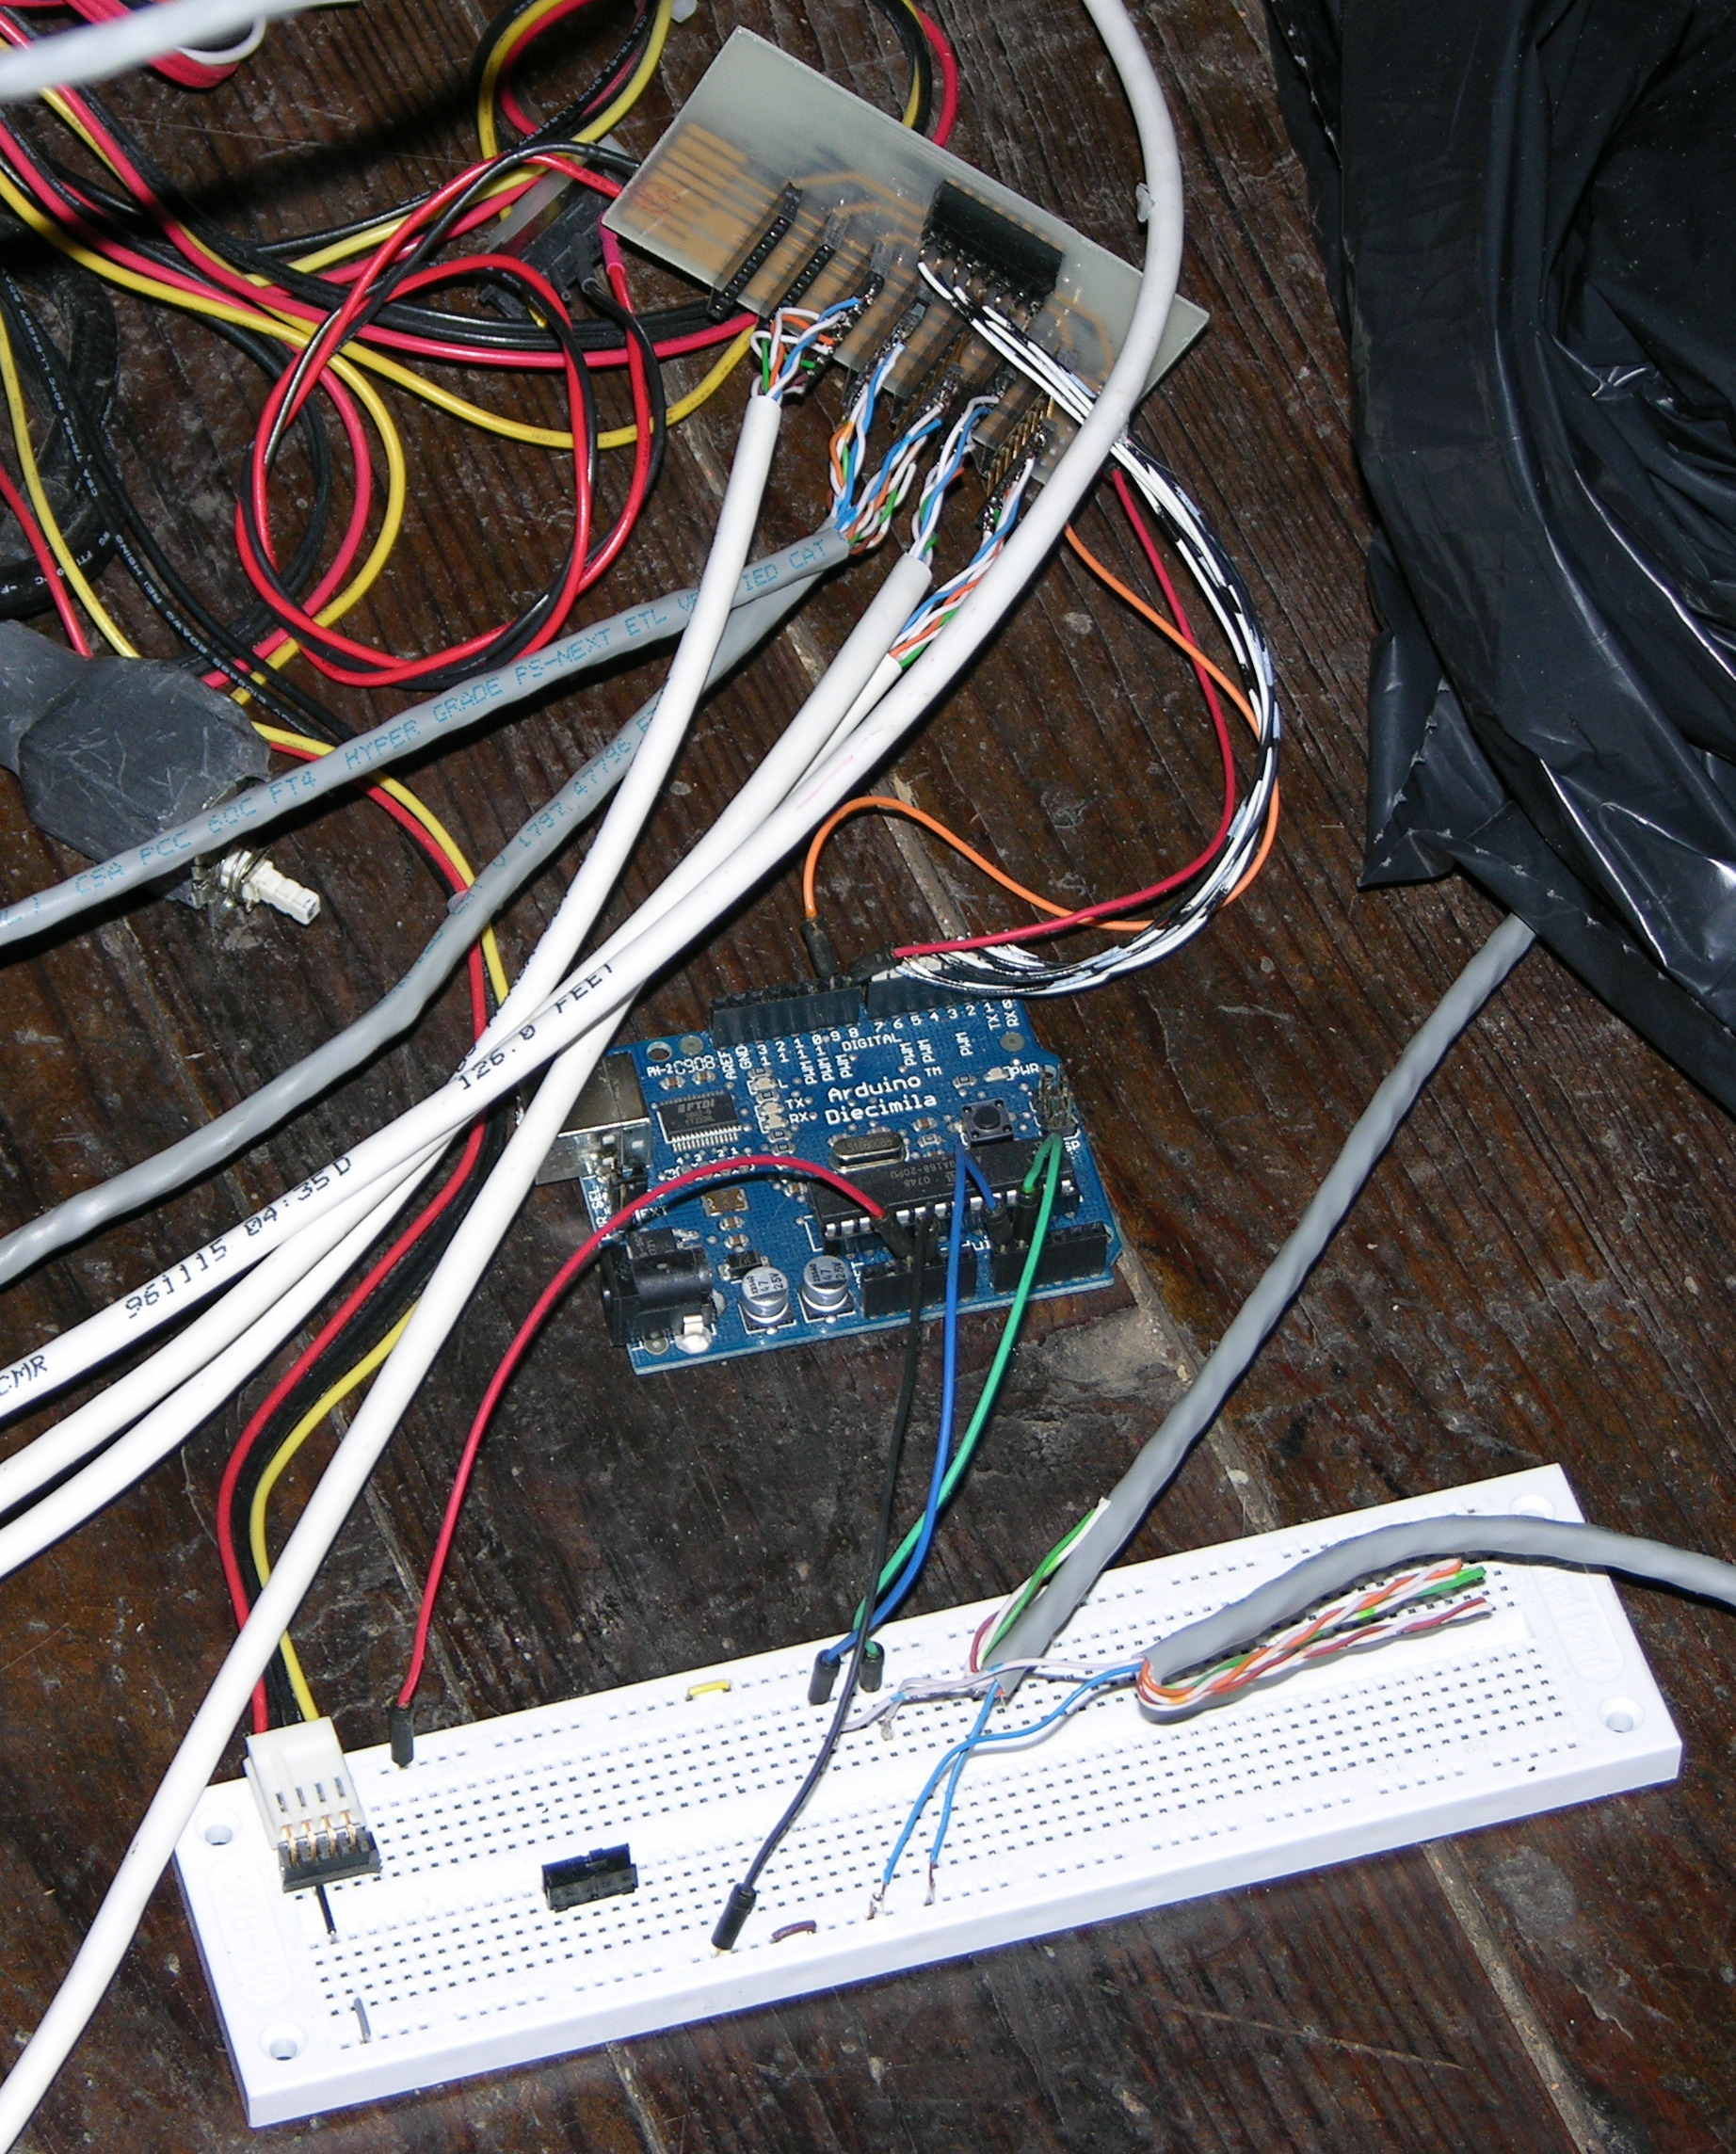
The Arduino is plugged into the bus and the PC power supply, and in the foreground is a breadboard for a part of the project that didn’t come to fruition. This is actually how it sat during the show — Lisa is fascinated by technological infrastructure, and the mess of wires was part of the “organicness” of the piece. More on that in a follow-up post on the installation.
Controller Enhancements
Soldering all the LED wires to the card-edge connectors turned out to be a bit of a chore with someone helping with two vises and a needlenose pliers, and incredibly tedious to do alone. All along, I’ve been thinking about how I could design or redesign the controllers so they’d be practical for artists to use without me there to assemble everything, and these boards just aren’t suitable. I have three crucial considerations that weren’t anywhere near met:
- Wiring the LEDs to the board needs to be easy. (Soldering individual wires was time-consuming and hard to do alone.)
- Replacement of burned-out LEDs needs to be easy. (Desoldering wires from the controller and resoldering new wires isn’t practical, especially once the board is installed in a piece.)
- Replacement of burned-out boards needs to be easy. (Desoldering all the wires from a bad board would be a nightmare.)
So ideally I’m looking for a connector that would make it quick and easy to change individual connections on the LED side, and also quick and easy to change a whole batch of connections on the board side — like a daughtercard with an edge connector on the bottom and jacks for LED wires on the top.
Coincidentally, the week after the show, I was at Anixter’s Chicago facility evaluating replacement keycard door access control systems for work, and I found what looks like the perfect connector on the back side of some HID card readers. The connector has screw terminals on the top for the wires that go to the door strike, motion sensor, etc., and plugs on the bottom to snap the whole thing into the socket on the card reader. The guys from the lab told me they think it’s called a Phoenix or Buchanon connector, and kindly gave me one to take home!

Now I just need to spend some time going through about a hundred pages of the Digi-Key catalog to see whether they carry this, and maybe to see what else they have that’s similar and might be even better.
Meanwhile, this past weekend during a scheduled power outage in our computer room for some kill switch and fire suppression work, I found this connector (upper left) inside the fire alarm control panel. (BlackBerry camera + closeup == fuzzzzzzz . . .)

I really like the orange quick-release levers on this — it’d sure be handy for hooking up the wires in the first place (presuming, as with the screw terminals above, that one is using a large enough gauge of wire that one can clamp them and make good contact). I also love that the wires feed out the top of the connector instead of the side. But it doesn’t offer bulk plug action like the above Phoenix-or-Buchanon connector.
Especially if the two had the same pin spacing, maybe one could offer boards with choice of connector. I think I’d pick the quick-release connector for use in a project with only one or two controllers, and the two-level connector for use in a project with lots of controller boards.
More quality time with Digi-Key for me.
The .200″ screw terminal blocks we use in RepRap are mouser part number 571-2828374, url http://www.mouser.com/search/ProductDetail.aspx?R=571-2828374
Octopart gives us a lot more results: http://octopart.com/search?q=282837-4
Mouser call it a “euro-style terminal block”, which would be a good lead for something with more time than I.
bbot, I have screw terminals with solder leads galore — I’m looking for mini screw terminals with a plug connector on the bottom for quick changeout of a whole strip. Or quick-release lever/cam terminals like on the fire alarm panel.
Keith,
These connectors from Sparkfun (and other sources I’m sure) look like they would be perfect since they each have two leads, one for cathode and one for anode:
http://www.sparkfun.com/commerce/product_info.php?products_id=8613
They also have these lead wires to go with them:
http://www.sparkfun.com/commerce/product_info.php?products_id=8671
Maybe not long enough, but… I’m sure there’s a creative solution or something else off the shelf that would be nice.
David
One more thing I forgot to mention – there are many “cable houses” in the industrial automation world that would put together a run of connectors/cables for you even at very small volumes. Google could find you some local suppliers I’m sure.
Not sure where your make/buy line is but worth looking into, especially if you want to save some eyestrain.
David
For the header connectors (the ones visible in the photo in the “Bus” section of the post) I’d recommend using crimp-on connectors. The male pins would be soldered on the board, and the female connectors are crimped directly onto the wires (no soldering) and then inserted into a housing.
See the photo on the left here for an example:
http://www.saccade.com/writing/projects/NecTilt/Tilt.html
You can buy a decent crimp tool for $30 or less. The crimped connections aren’t as brittle as soldered ones, every bit as good electrically, and also grip the insulation, making them mechanically stronger. They also work well with stranded wire.
(make that “…photo on the right…”)
David, J. Peterson –
Thanks for the comments, but I’m not looking for two-wire connectors for the LEDs, and I’m definitely not looking for something that requires crimping.
My target audience for this controller is the local Wichita-area artists I work with who have no electronics background whatsoever (but are very interested in picking up new techniques), and certainly don’t have a crimper.
Regarding the two-wire connectors, if I found a connector like the Phoenix / Buchanon that had two-wire jacks on the top and still came in a long strip that could be unplugged all at once, I’d be a little more interested; but it’s still crucial that it doesn’t require crimping. And to reiterate, it needs to unplug in a whole strip. If a board goes bad and has to be changed out, all the LEDs will have to be unplugged and replugged in the same order. I don’t find that practical with individual wires (or wire pairs).
I have a suspicion that the connectors I’m looking for are going to be targeted at fire, safety, and/or industrial control market segments — places where technicians skilled in the maintenance of their machines or systems but not necessarily in the maintenance of the controllers need to be able to swap out control cards rapidly, with a minimum of hassle and specialized tools, and across a wide range of possible local installation techniques.
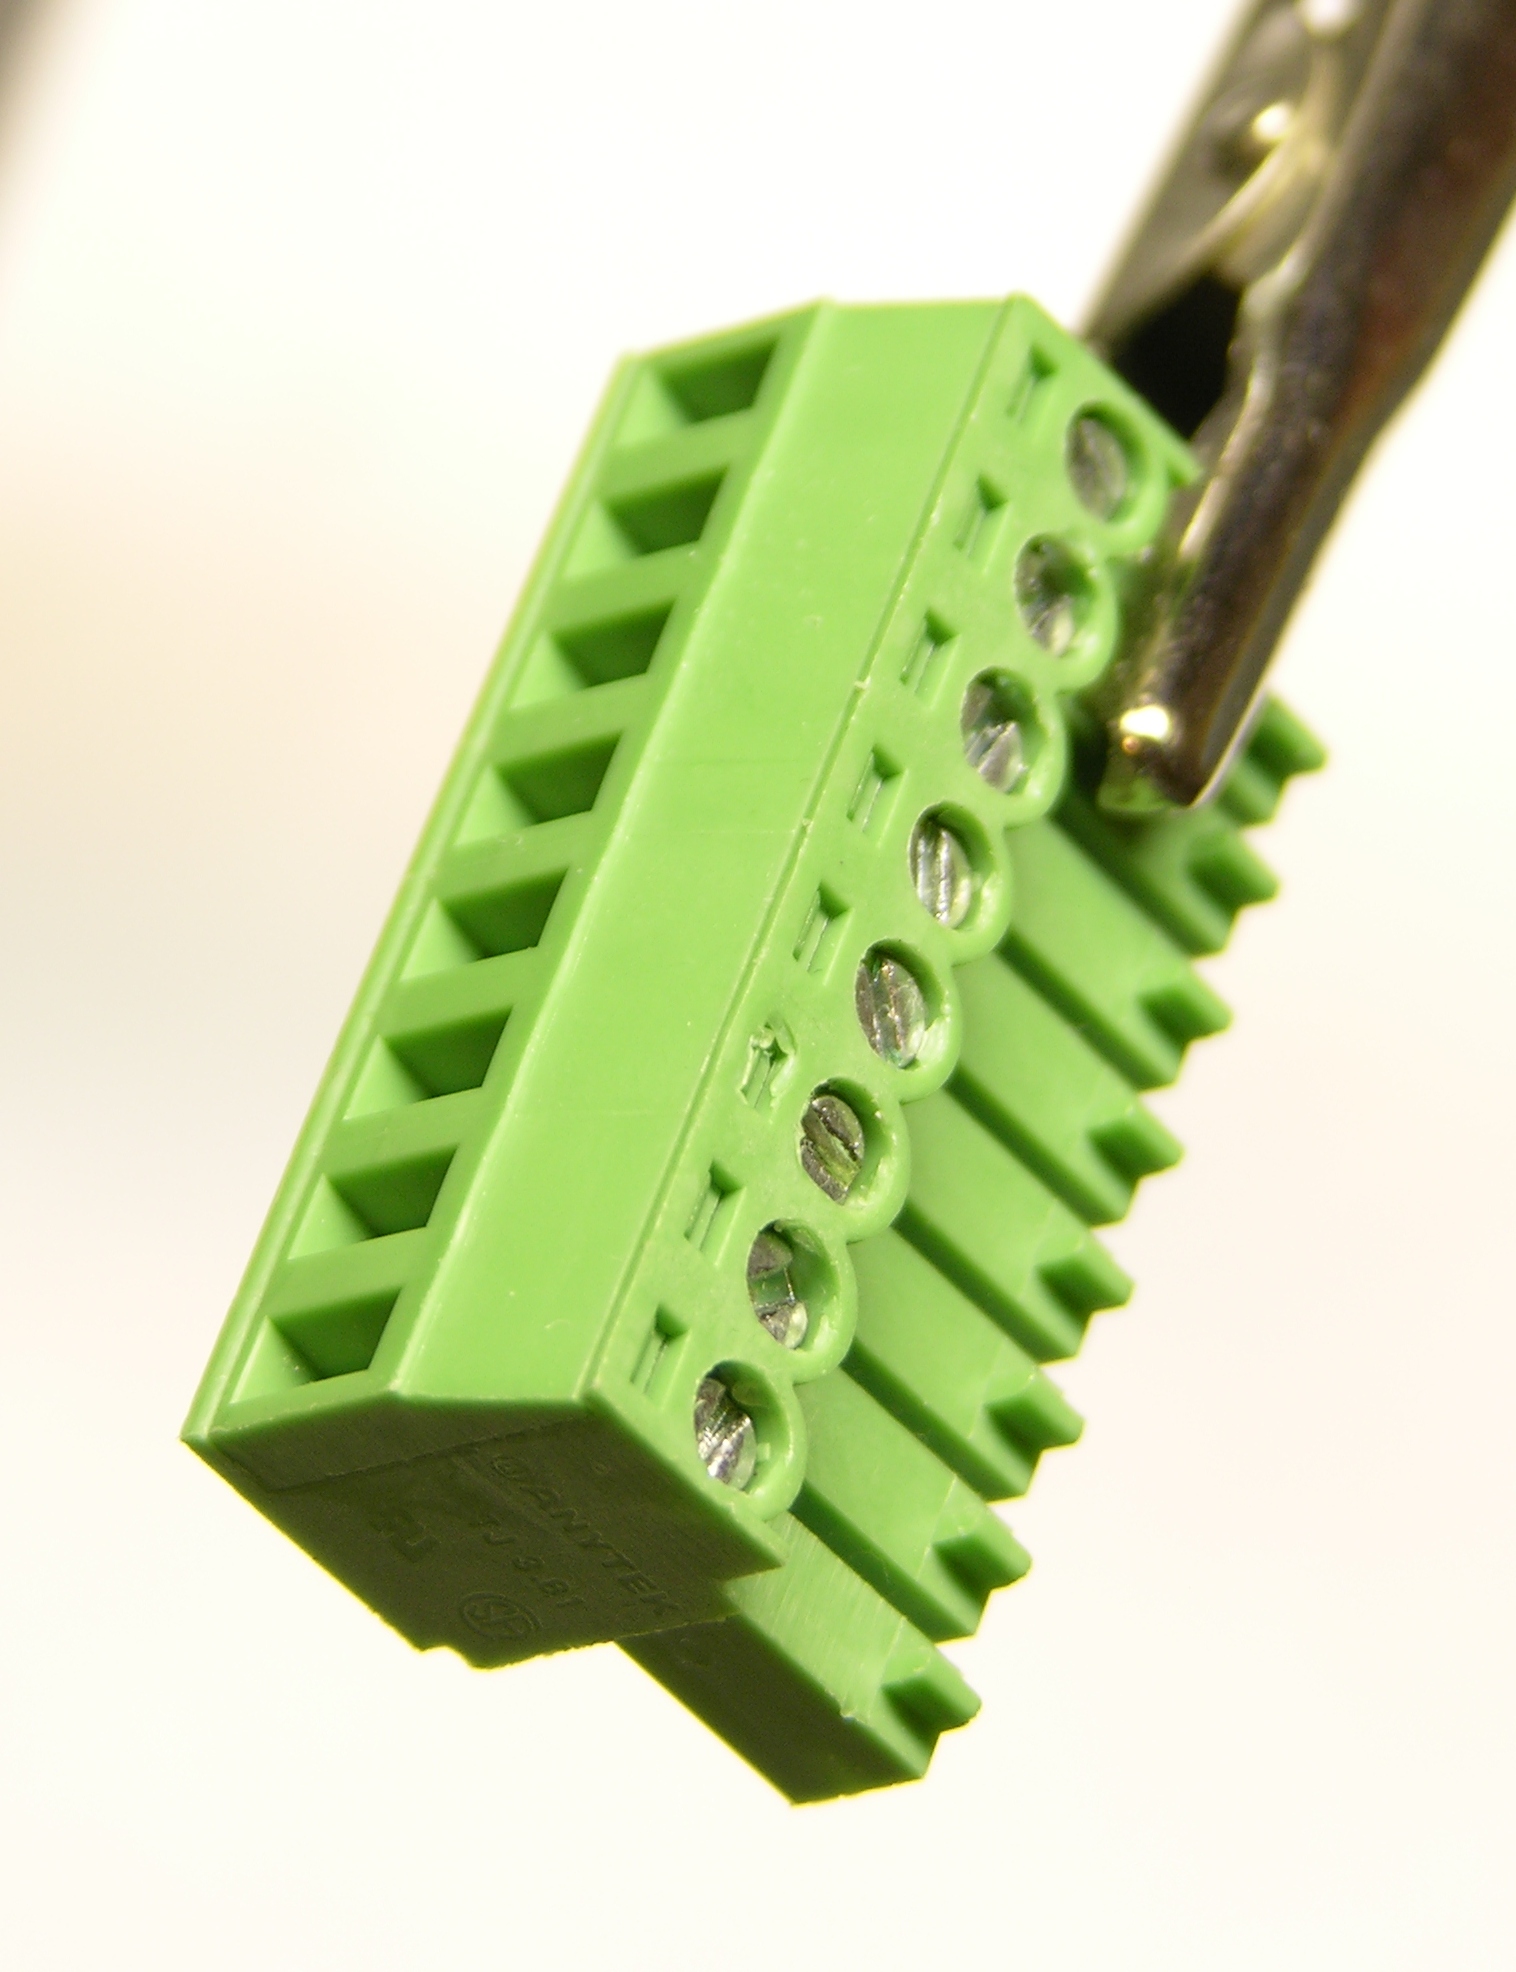
Looks like the part number for the connector you have is Phoenix Contact 1840421 (Depending on pin spacing). ( http://eshop.phoenixcontact.com/phoenix/assets.do?action=basisdaten&artnr=1840421 )
The board side connector for that would be part number 1897157 for a parallel to the board connection or 1911075 for a vertical from the board connection.
I’m sure you could find the two-wire type connectors in the Phoenix line with a little research.
You are correct in your assumption of the industrial controls sector for this type of a connector. Phoenix Contact is IMO the best way to go as they have just about every type of connector you could think of and they are of good quality.
For complete ease of use I would go with a spring clamp type connector instead of the screw type. The screw type is good for an application with lots of movement or vibration but the spring clamp would be good for a static environment and would require no tools to change the wires. (The screws require a smaller than 3mm screwdriver to operate easily)
Alex, that is awesome, thank you!
Okay, so I was now able to find this part on Digi-Key, and it’s about $6 for an 8-position (just the wire-side connector), which is $48+ for just the connectors for one board ($4 per connector / $32 per board in larger quantities), which dwarfs the cost of the other components. Don’t suppose you happen to know some place I could buy these more economically?
I work in industrial automation and it’s common for companies like Phoenix to go to market through multiple distribution channels.
Digikey and the other online houses are also known for charging above the typical list prices.
These connectors are not going to be cheap, but I would recommend inquiring with their other distribution channels, which you can probably find here:
http://www.phoenixcontact.com/order/7119.htm
You could either spin this as a big future potential in order to motivate them to give you a discount (usually humans are making a decision about that at industrial automation distribution houses) or you could just assure them that you’ll not be calling up for any support ever and if they would just handle the order at a discount it would be really appreciated. Good luck!
David
I’ll look into pricing through my company’s distributors. I would imagine (at least hope) they can provide better pricing than Digi-Key for that type of connection. What quantities are you thinking of ordering these connectors in?
Alex, I need to take some time to look through the different Phoenix connectors to figure out which one(s) would be best suited for this.
As to quantity, the trouble is I’d be inclined to start with a small batch of ten boards (so ten sets of 64 pins worth of connectors) to see how it catches on. And it strikes me as the kind of thing likely to only need a few dozen at a time — so right now I can’t imagine wanting to buy more than one or two hundred connectors at a time. I know that’s an awfully small quantity to try to entice a manufacturer to offer me better pricing.
But I definitely appreciate your offer to look into it, and I’m curious to hear what you find out.
I like David’s idea of pointing out that I’ll never be asking for any kind of support for these connectors. I don’t work in the right kind of market to have thought of that line of reasoning myself, but it does make sense.
Thanks, guys!
I put in a quote request for 8 connector sets (1 board worth) as well as the required quantity/pricing of any volume discount.
That can provide a basis of comparison to any distributors local to your area once it comes back.
Looks like it would be $6.02 for the wire side connector and $3.02 for the board side from my distributor so $72 for a single board. He said there would be volume discount based on the quantity ordered but that would have to be determined at order time. Usually that is invoked around the 500 mark for this type of thing. So probably a no go there. I second the idea to look more in depth at the different styles they offer, you may find something better for cheaper.
Usually I don’t scoff at the price of these types of things since clients usually buy them in the thousands of units, but the tough part of the small scale stuff is the non-volume discount pricing.
I recommend calling a distributor in your area and getting a physical copy of the Phoenix Contact “Combicon” Catalog if at all possible. The physical copy is an order of magnitude better than the online version especially if you are just looking to find a part to meet your needs. Graybar is usually very helpful with that sort of thing.
Thanks for the blog, helping out is the least I can do for the value I get out of the site.
Good luck!
Keith,
Since I know you are an avid scrounger, why not call a local alarm company or two and see if they have any pull-outs the are throwing away?
At the price these connectors are going for it is almost economical (almost).
Also, I am doing a year-in-review of art/tech projects for the January Seattle Dorkbot meeting. Do you kind if I show the video of “Organic Energy Cloud”?
Josh, nice idea about alarm companies! It’d certainly be worth it for a prototype; but of course I’m trying to come up with something that makes a reasonable business model to make more LED controllers for other folks.
How’d you find the Vimeo video so fast??? I just added it this afternoon!
No problem at all if you show it. I have the framework of a blog post written about it already, so that should be posted soon. Note that the video was shot by Tom McGuire and he’s already posted it to YouTube, but a lot of detail was lost in the compression.
I would consider using 8P8C (RJ45) connectors, You are already using wire that is the right size, and the parts are fairly cheap. Depending on how you wire it up, you can get 4, 7, or 8 LEDs per connector.
For 8 LEDs, you would use either two LEDs wired parallel with opposite polarity.
Thanks Keith.
I found the video through the normal channels, google is my friend
Hi Keith Neufeld, how make your pcbs? Laser Printer? Photosensing? Pcbs very perfect. Do you have tutorial about this?
Thanks
Cassiano
Cassiano, the LED puck prototype PCB that you viewed before this post was made with iron-on toner transfer and etchant. The LED driver board in this post was milled for me by Tom McGuire, as I mentioned above.
Ok thanks!
EZ-RJ45
http://www.action-electronics.com/ez45.htm
http://www.elexp.com/tel_pezr.htm
Hey Keith, I use a lot of phoenix connectors in AV installation for audio and control lines. Sorry that I don’t have a source for cheap ones. The cool thing about them is that the males fit the matching females, without having to fill the whole header, ie, you can use 2 @ 2 terminal, or 1 at 4… or any combination. With a little careful cutting, it is fairly easy to make a smaller one from a bigger one, too.
I’ll second brad with the idea of using the ezrj45. Everyone I’ve shown this tool to goes and buys it. You will never want to terminate rj45 without it again. (doesn’t solve your inexperienced/unskilled user problem, I know.)
But the main reason I posted to this old thread was your clothespin clamp. The variation I’ve used for years is to take the wooden sides out of the spring and reinsert them the other way ’round. This makes a more “needle nosed” clamp and reduces the clamping pressure alot (which is a good thing.) http://img.photobucket.com/albums/v642/zukworld/general/IMG_2842Large.jpg
Love the blog, keep it up!
z
Nice!
Do you get discreet control over each LED?
I saw another Arduino-based project that almost does the same: Lightuino – http://code.google.com/p/arduino-m5451-current-driver/wiki/Lightunio_V20
I thought the Lightuino’s maker decision to use IDE headers was a sweet idea
GOwin, yes, every LED is individually controlled.