Archive for the ‘Mechanical’ Category

Rebuilt Brake Hoses

Tuesday, March 6th, 2012

The bus being a mid-80s Chevy chassis, the theory is that the front right brake seized because the clamp that anchors the flex line rusts; the surface rust increases its thickness; the increased thickness decreases its interior diameter; the reduced ID squeezes the hose; and the squeezed hose passes high-pressure brake fluid from pressing the pedal but not as readily low-pressure brake fluid from the caliper’s return action.

Replacement hoses not available.

Rebuilt schoolbus brake hoses

Central States Thermo King to the rescue, again — remanufactured from scratch. $35 each. Hoses back to Neighbor Dan. Reinstallation promised for this weekend … and then he still has to check out the geyser from the reservoir.

Right, that’s another story.

<scrunches forehead really hard, squeezes eyes closed, clenches fists> I believe … I believe … I believe I will get to drive the bus again someday!

Hydraboost

Friday, November 13th, 2009

Things have been quiet here for a while, but that’s not because nothing’s been happening — I’m just behind on writing about it. This one dates back to July. (Sheesh!)

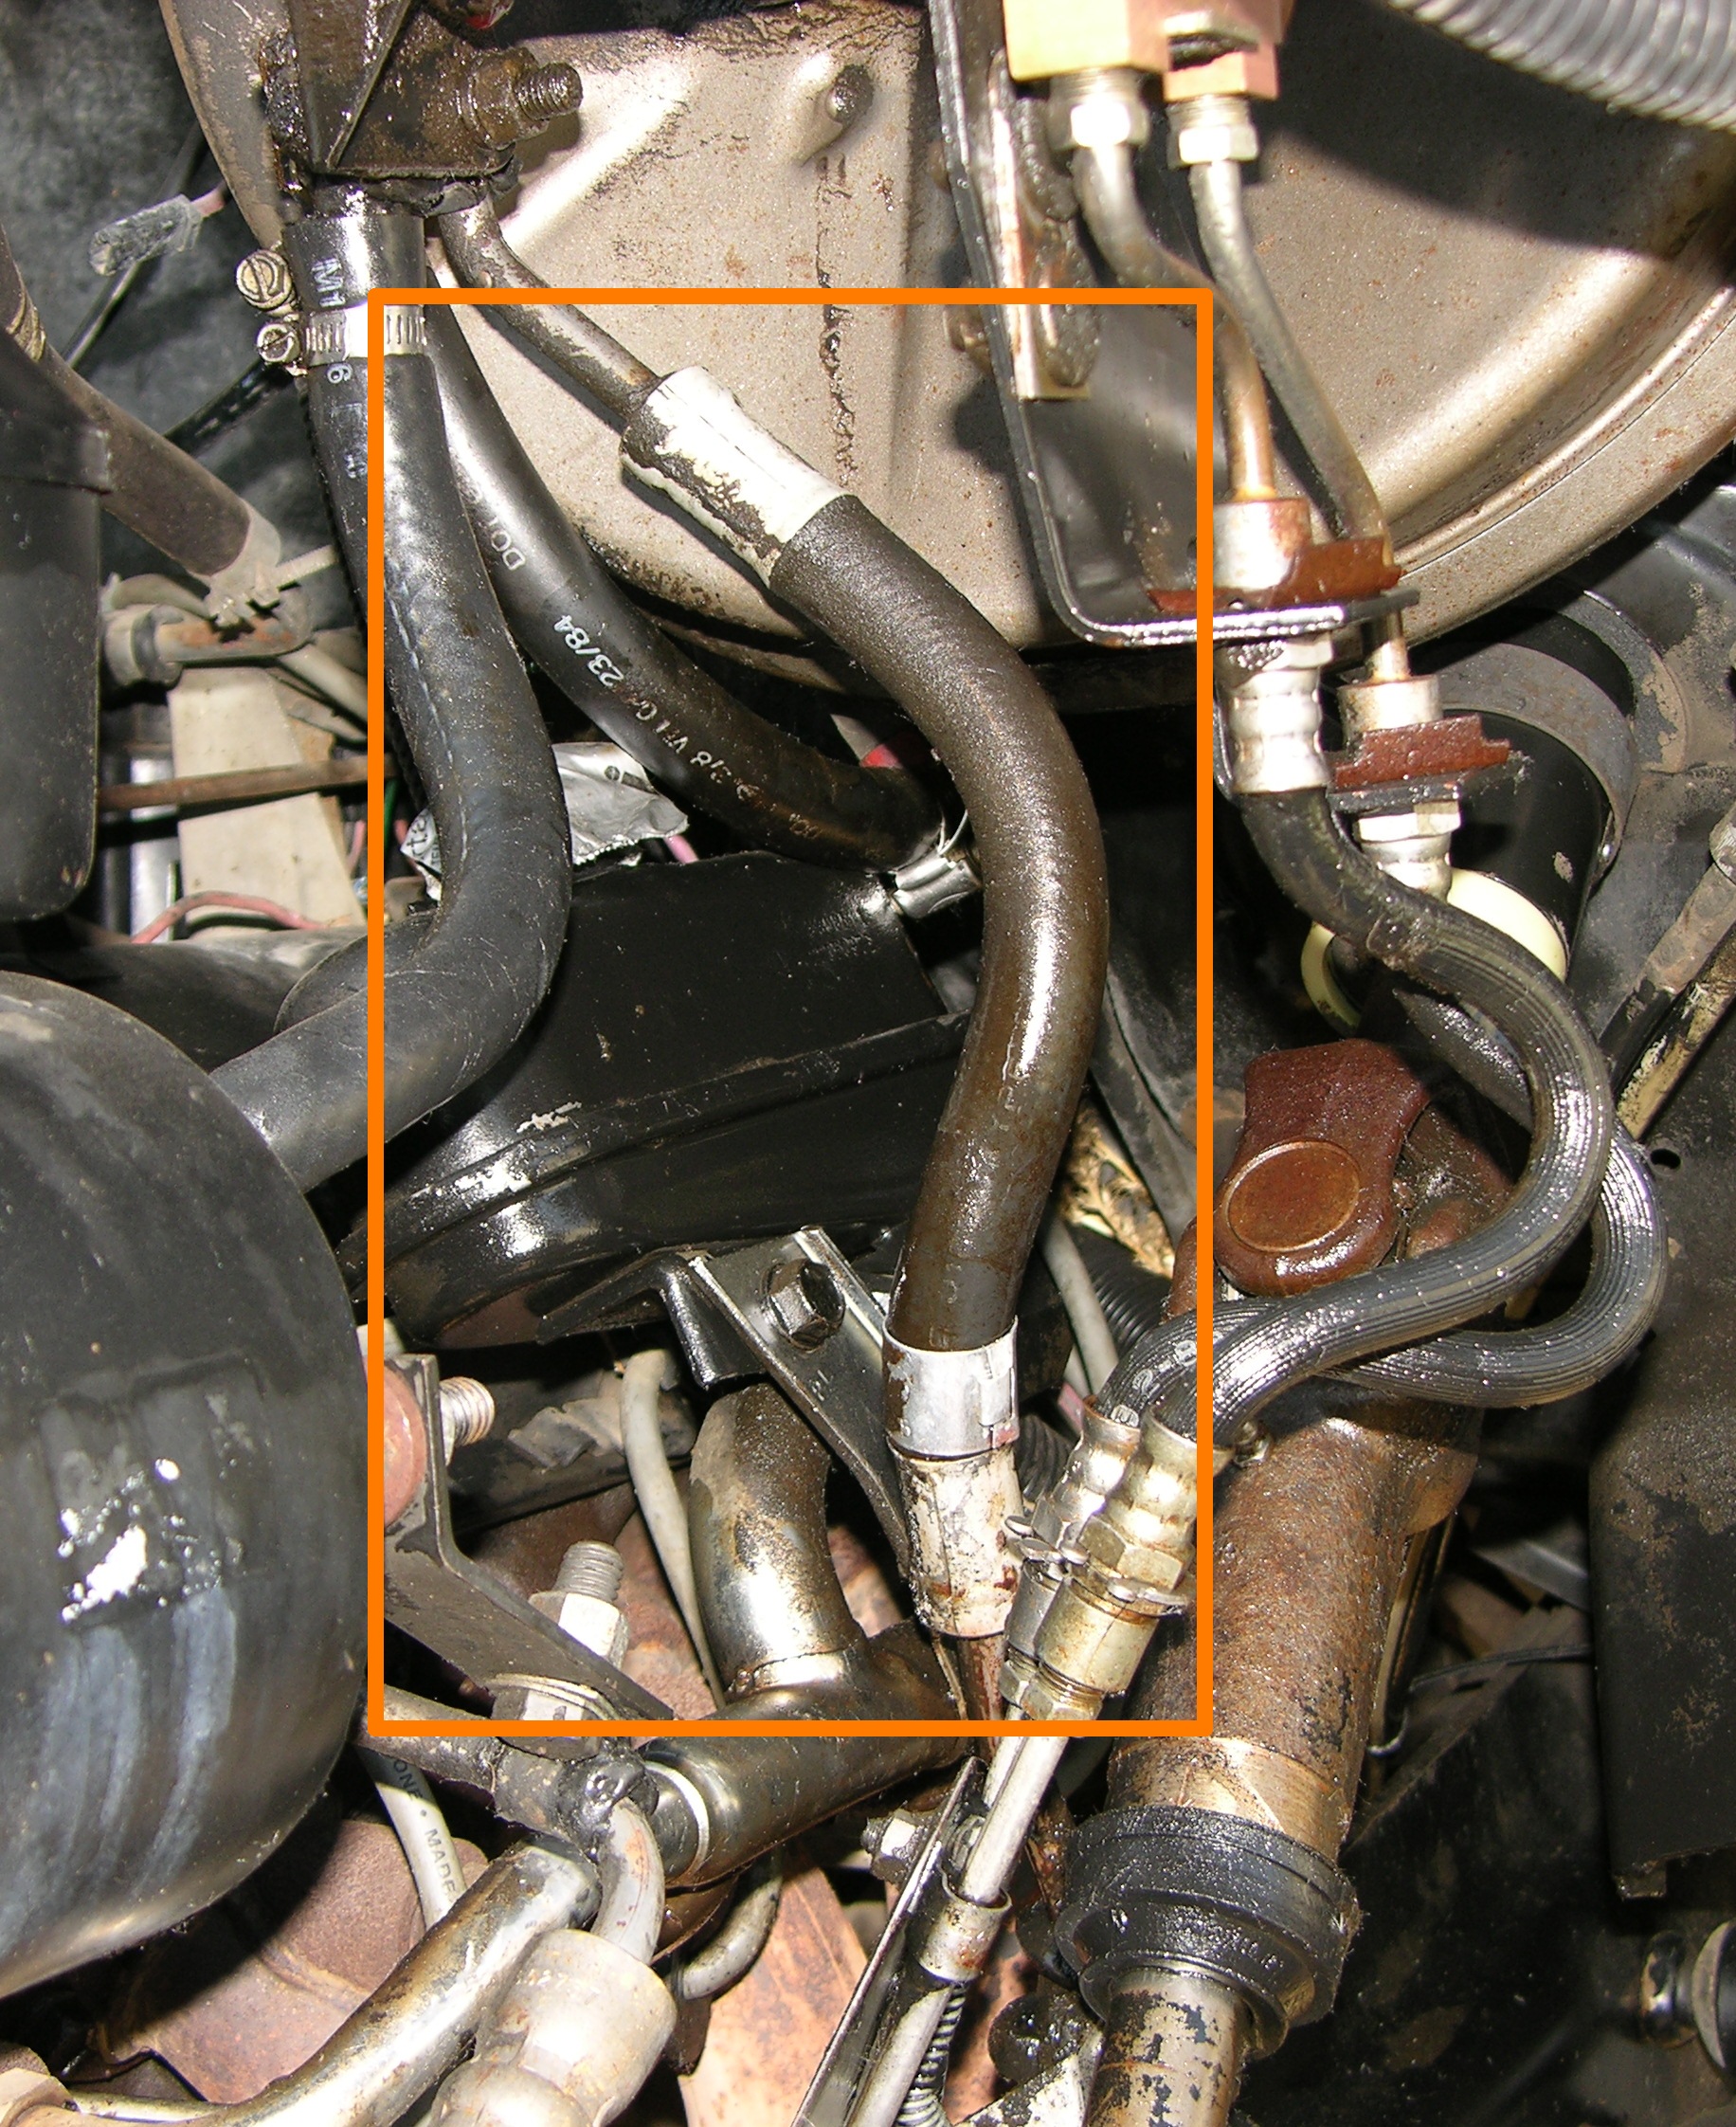
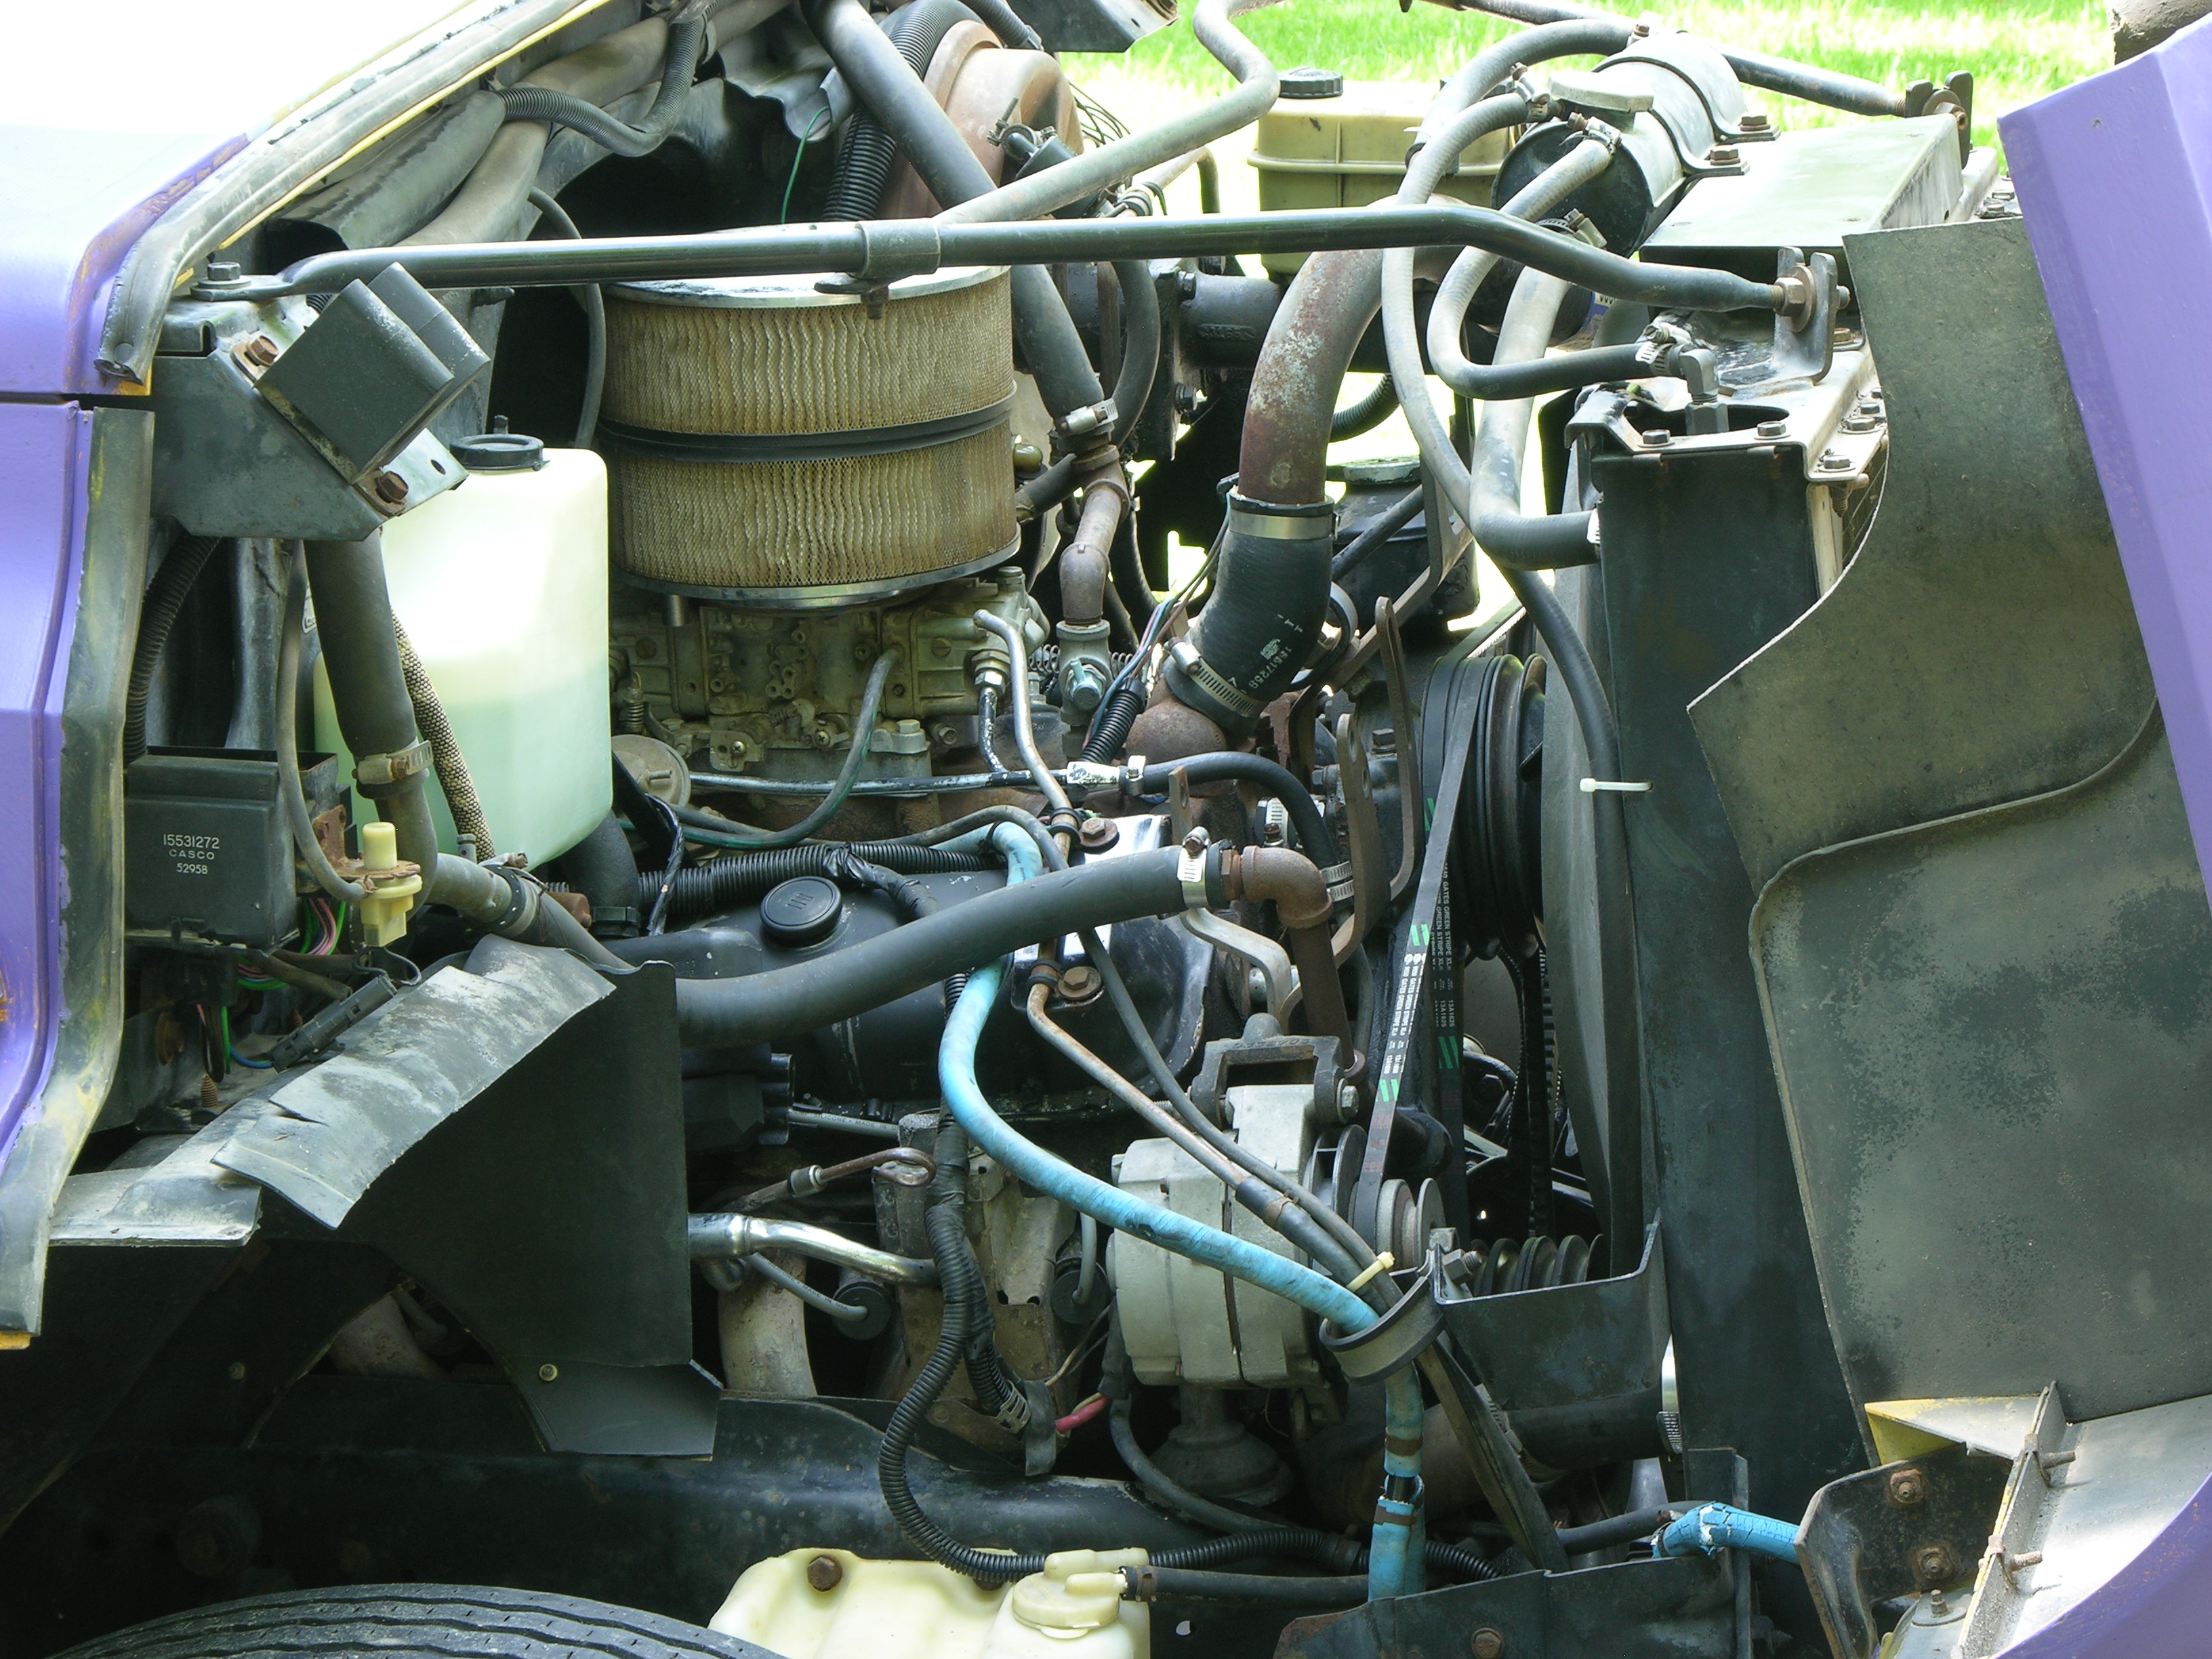
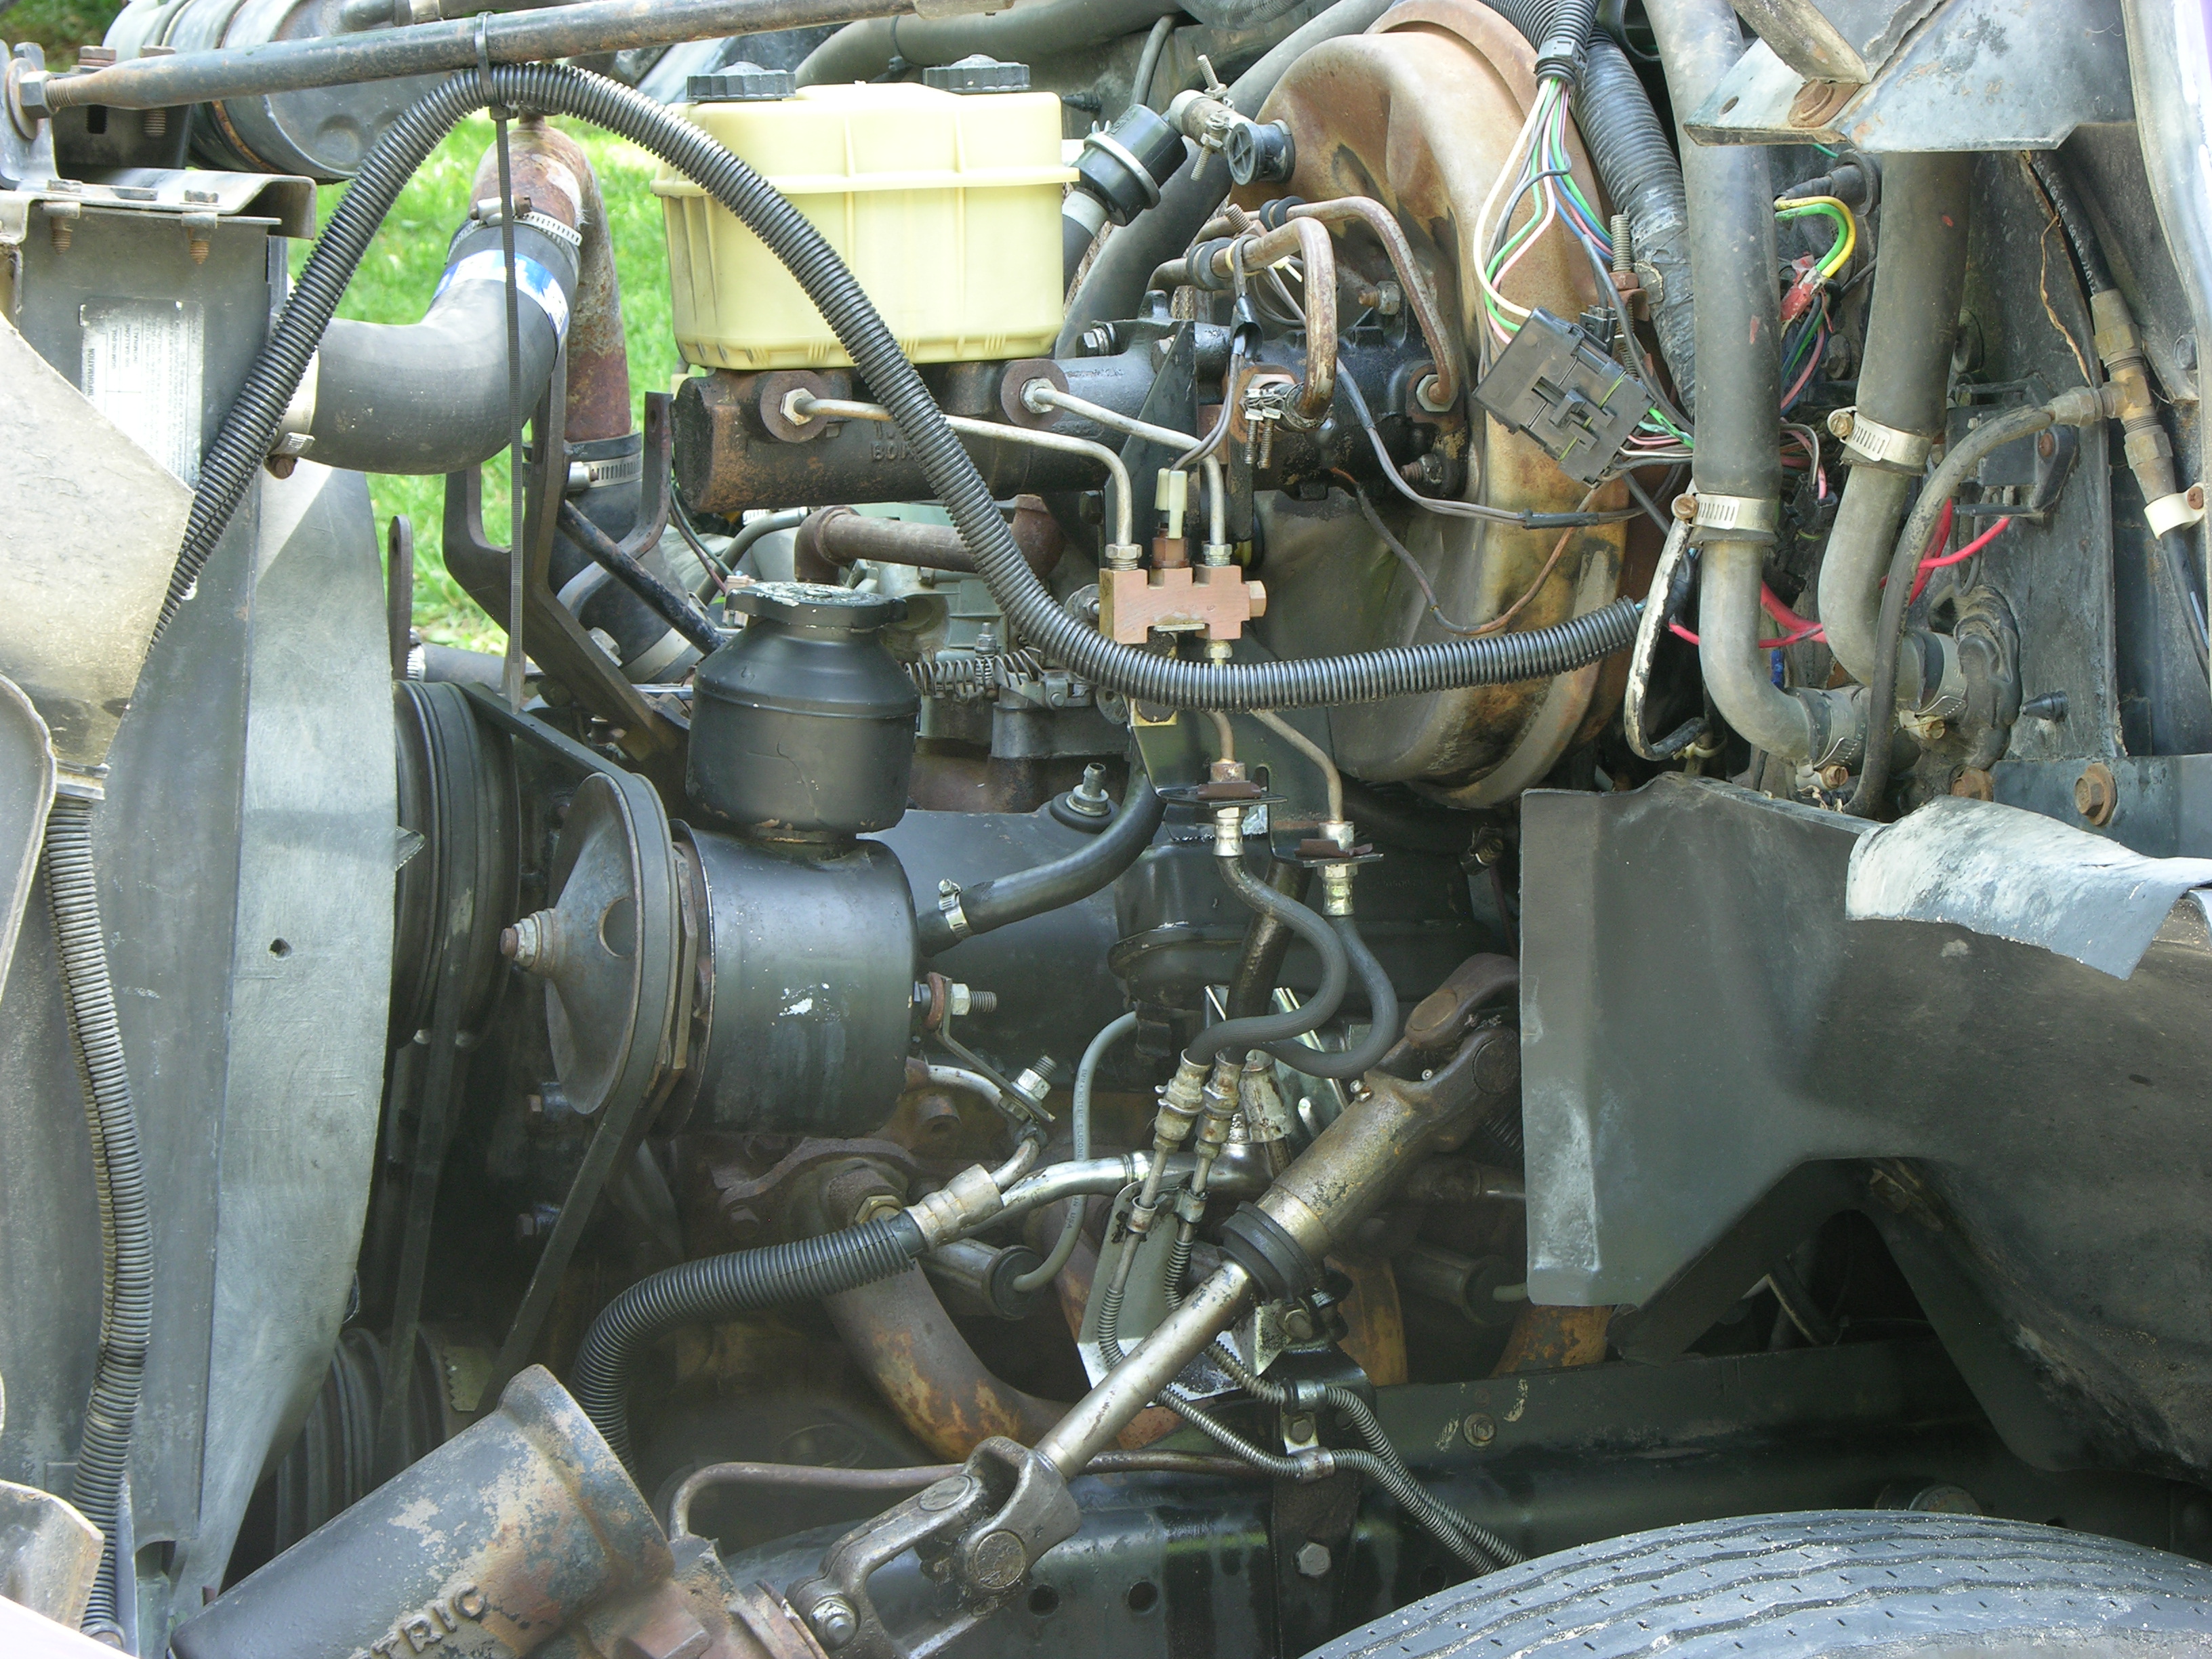
I had noticed that the power steering fluid was low and was disappearing after I refilled, and I’d had the engine compartment cleaned so I could see where the fluid was coming out. On a Saturday afternoon after the cleaning, Jonathan opened the hood and found that the cleaning wasn’t necessary to locate the leak — a hose was shooting a sheet of fluid out of a crack in its side when I pressed the brakes. When I pressed the brakes? Ah, hydraboost.

Leaking hydraboost hose on '86 Chevy schoolbus

The hose is on the driver’s side of the engine compartment and joins a couple of pieces of steel line that run up to the brake master cylinder and down to the power steering gearbox. It’s part of the hydraboost system — the power brakes are powered by the power steering pump rather than by vacuum pressure, as on many passenger vehicles.

Chasing a New Line

Well, drat, I took careful notes of all of my phone calls trying to find a replacement or rebuilt line and now can’t find them. Working from memory:

I started with Bumper to Bumper in Newton, who were recommended to me as being a good source for parts for big ugly things. They had nothing, but referred me to a hose company in Wichita. They weren’t actually in the business of making this type of hoses, but referred me to someone else, who referred me to someone else, whom I visited after work.

Meanwhile I called O’Reilly Auto Parts in Newton, who had nothing but suggested I call the Chevy dealership. This was the most promising lead so far — I got a part number, the information that it was a discontinued 20-year-old part, and the locations and phone numbers of the three dealerships in the US that showed the line in their inventory locator. I also got the price — when new, $230. Okay, WOW.

California was supposed to have two but told me they hadn’t uploaded inventory to the locator service for at least two years and didn’t have any. Another place (Oregon???) also didn’t have any. Alaska has four of them, new old stock (so they’re probably brittle by now), for the original price. Plus shipping. Uh, no.

After work I raced across Wichita to the company in the southwest industrial district who rebuilds hoses and tubing, arriving just barely before they closed. They looked at the compression fittings where the hose joined to the tubing and the amount of rust pitting on the steel line and told me that they likely couldn’t put on new fittings that wouldn’t leak.

But I should try “CSTK,” who brazes new fittings onto tubing. On the north edge of town — literally about as far away as you can get in the Wichita metro area. And only a few minutes from closing.

At least it wass on my way home, so if I didn’t make it I wouldn’t have gone out of my way.

I made it.

Central States Thermo King

CSTK turned out to be Central States Thermo King, who normally work on cooling systems (reefer trucks) and manufacture hoses that have to bear much higher pressure and contain much smaller molecules than those of my power steering fluid. They took my line and said they’d have it ready the next day.

I went back, picked it up, and paid them $37.14 for their work. I felt like I should have tipped them half the $200 I saved, but I’ll opt for trying to send a little more business their way instead.

Spiffy brazing job on rebuilt hydraboost hose

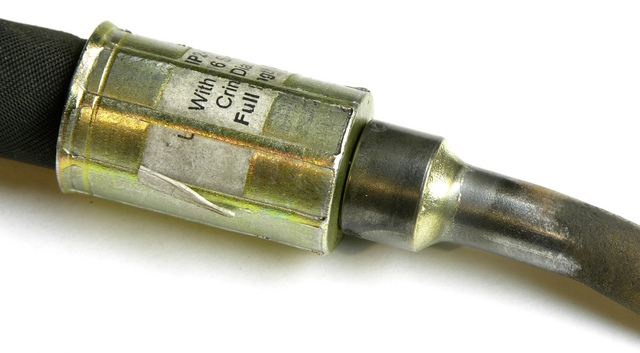
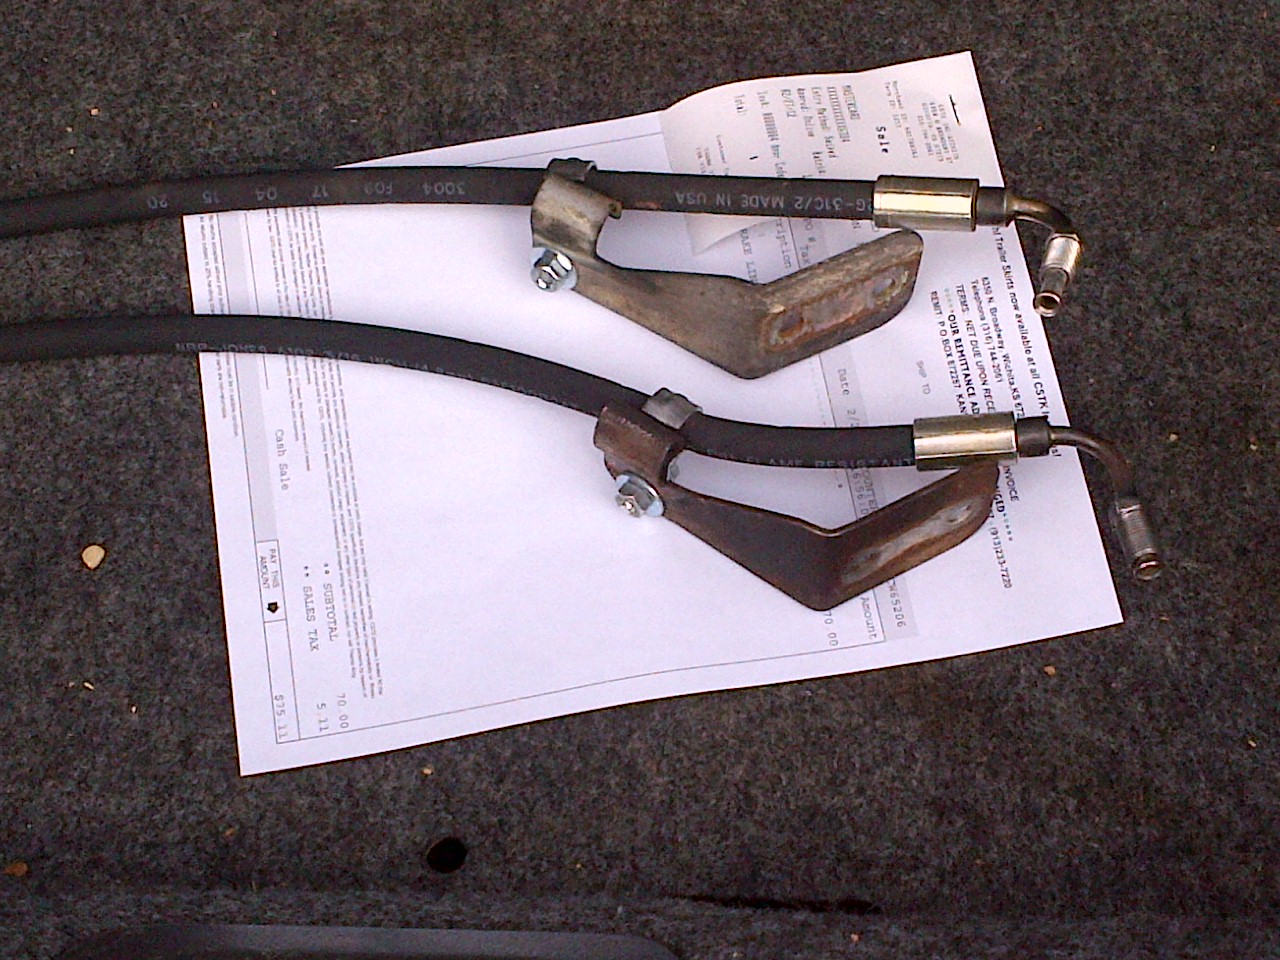
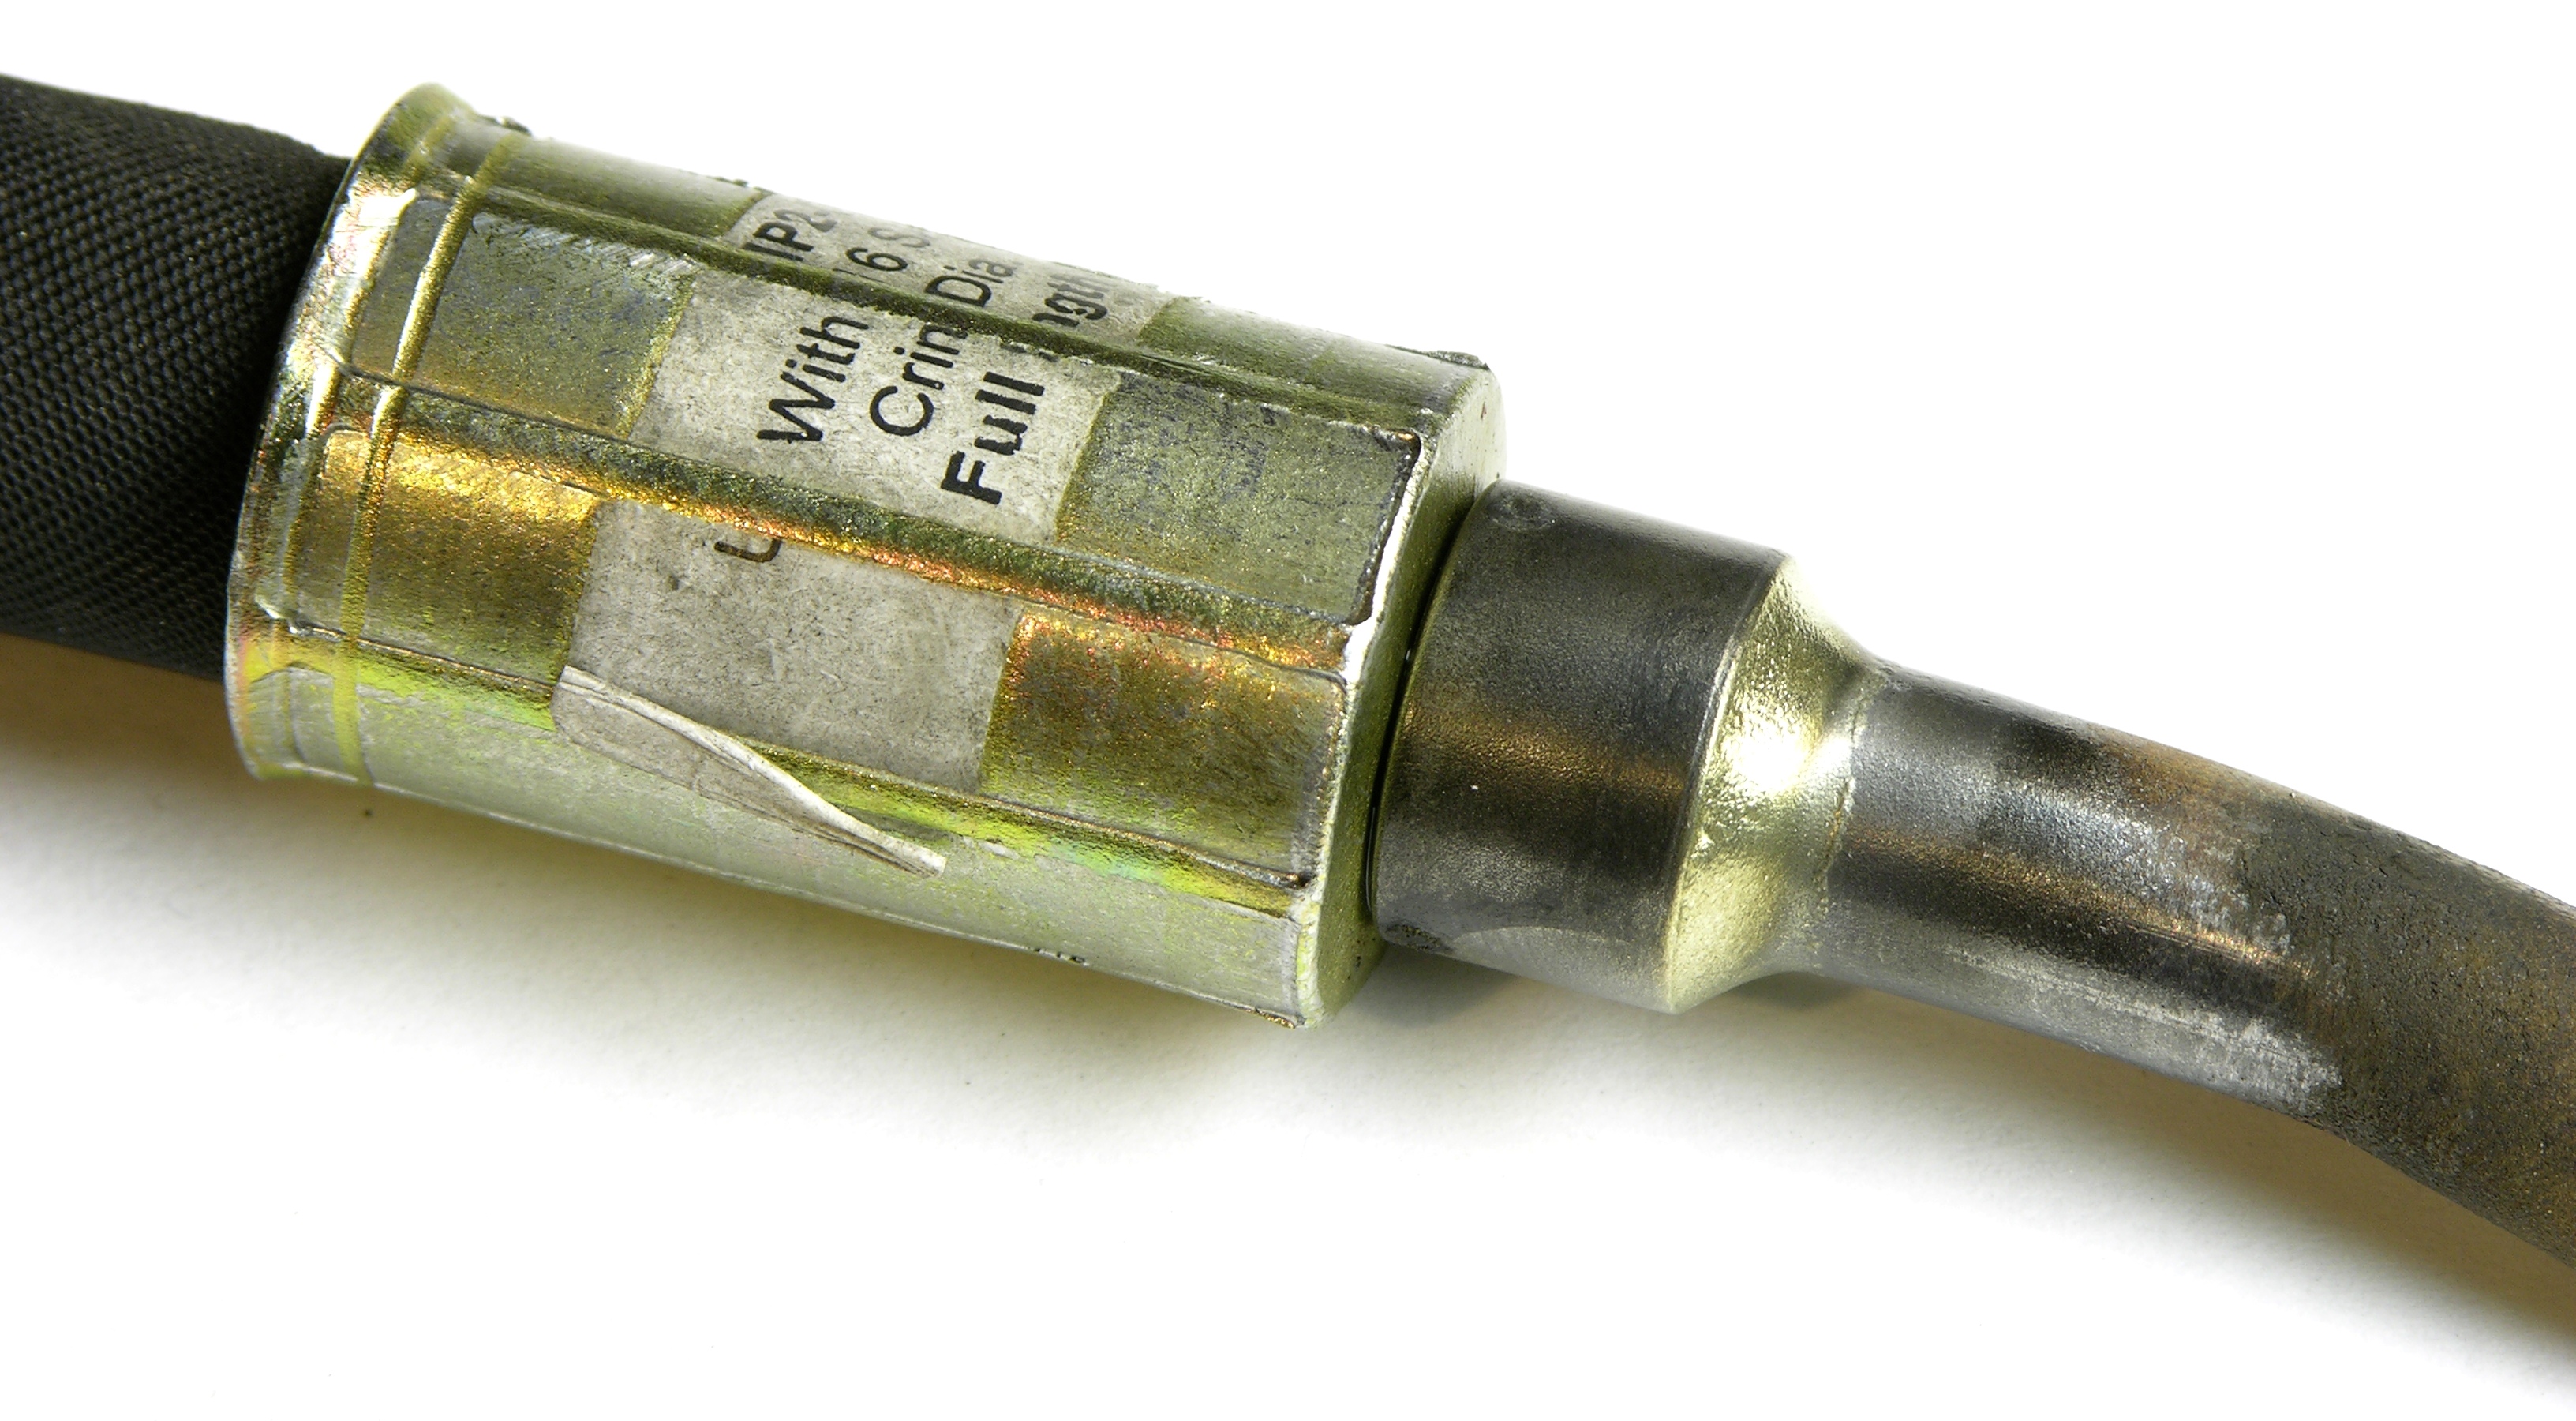
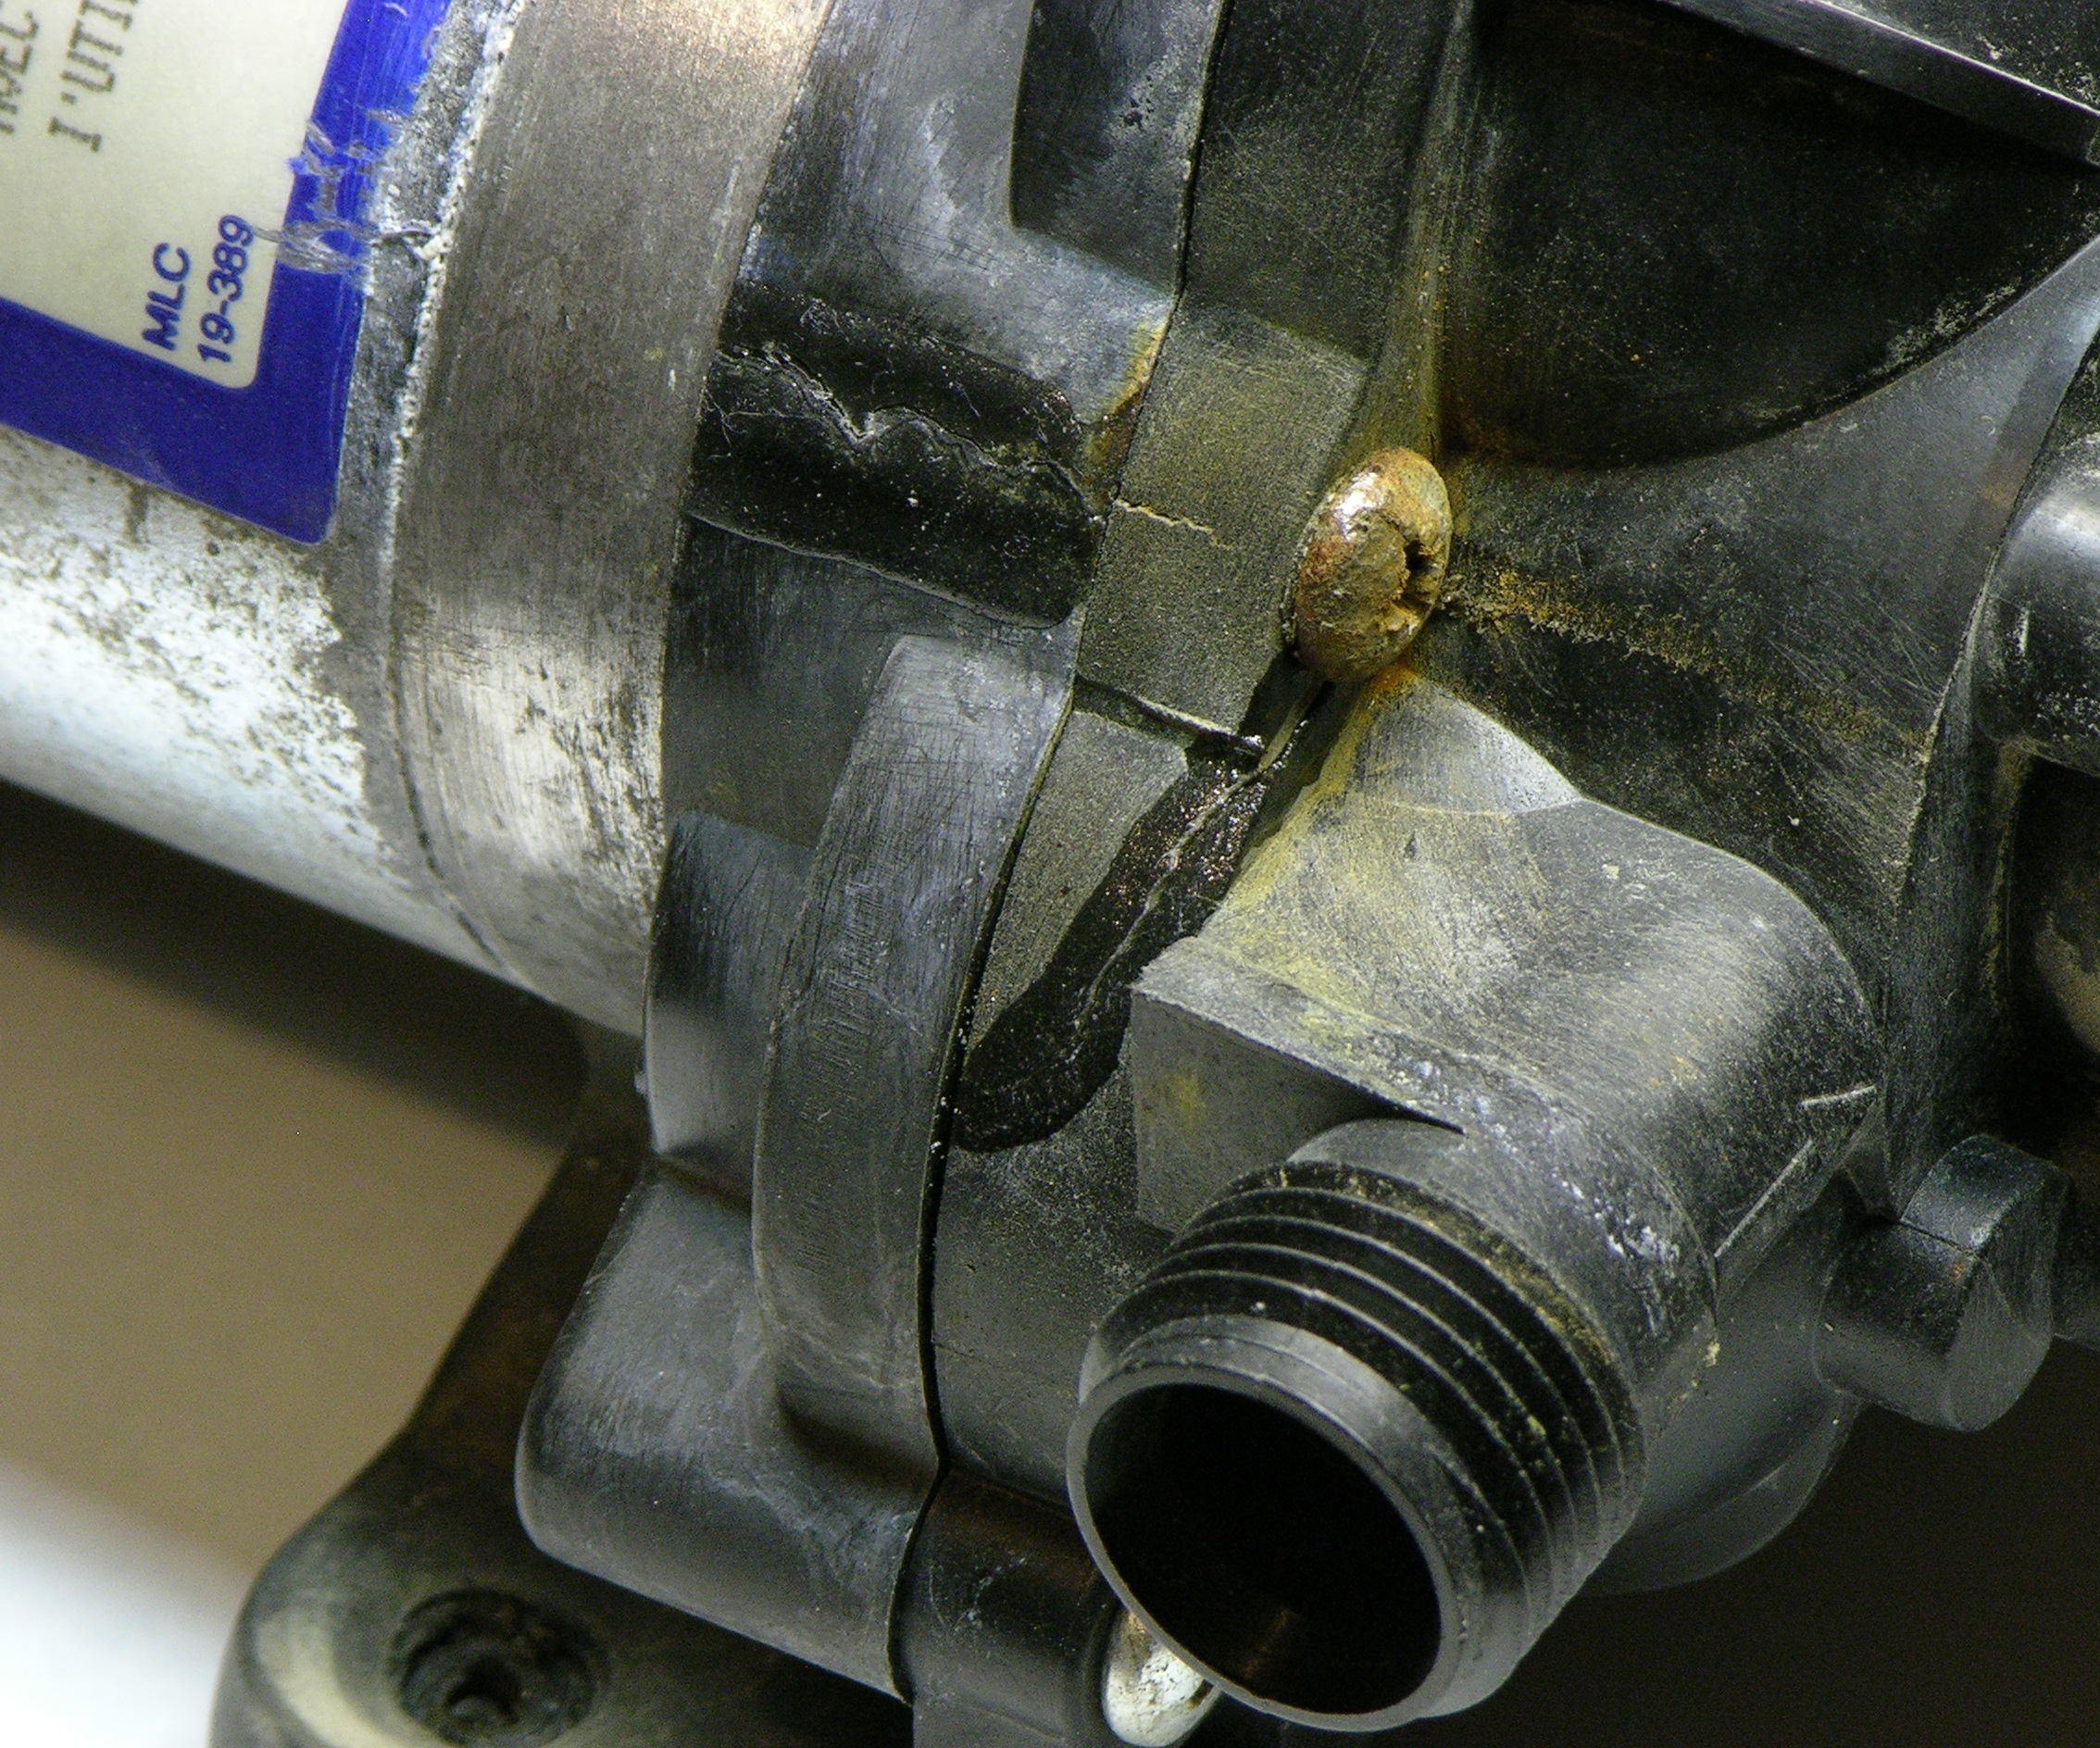
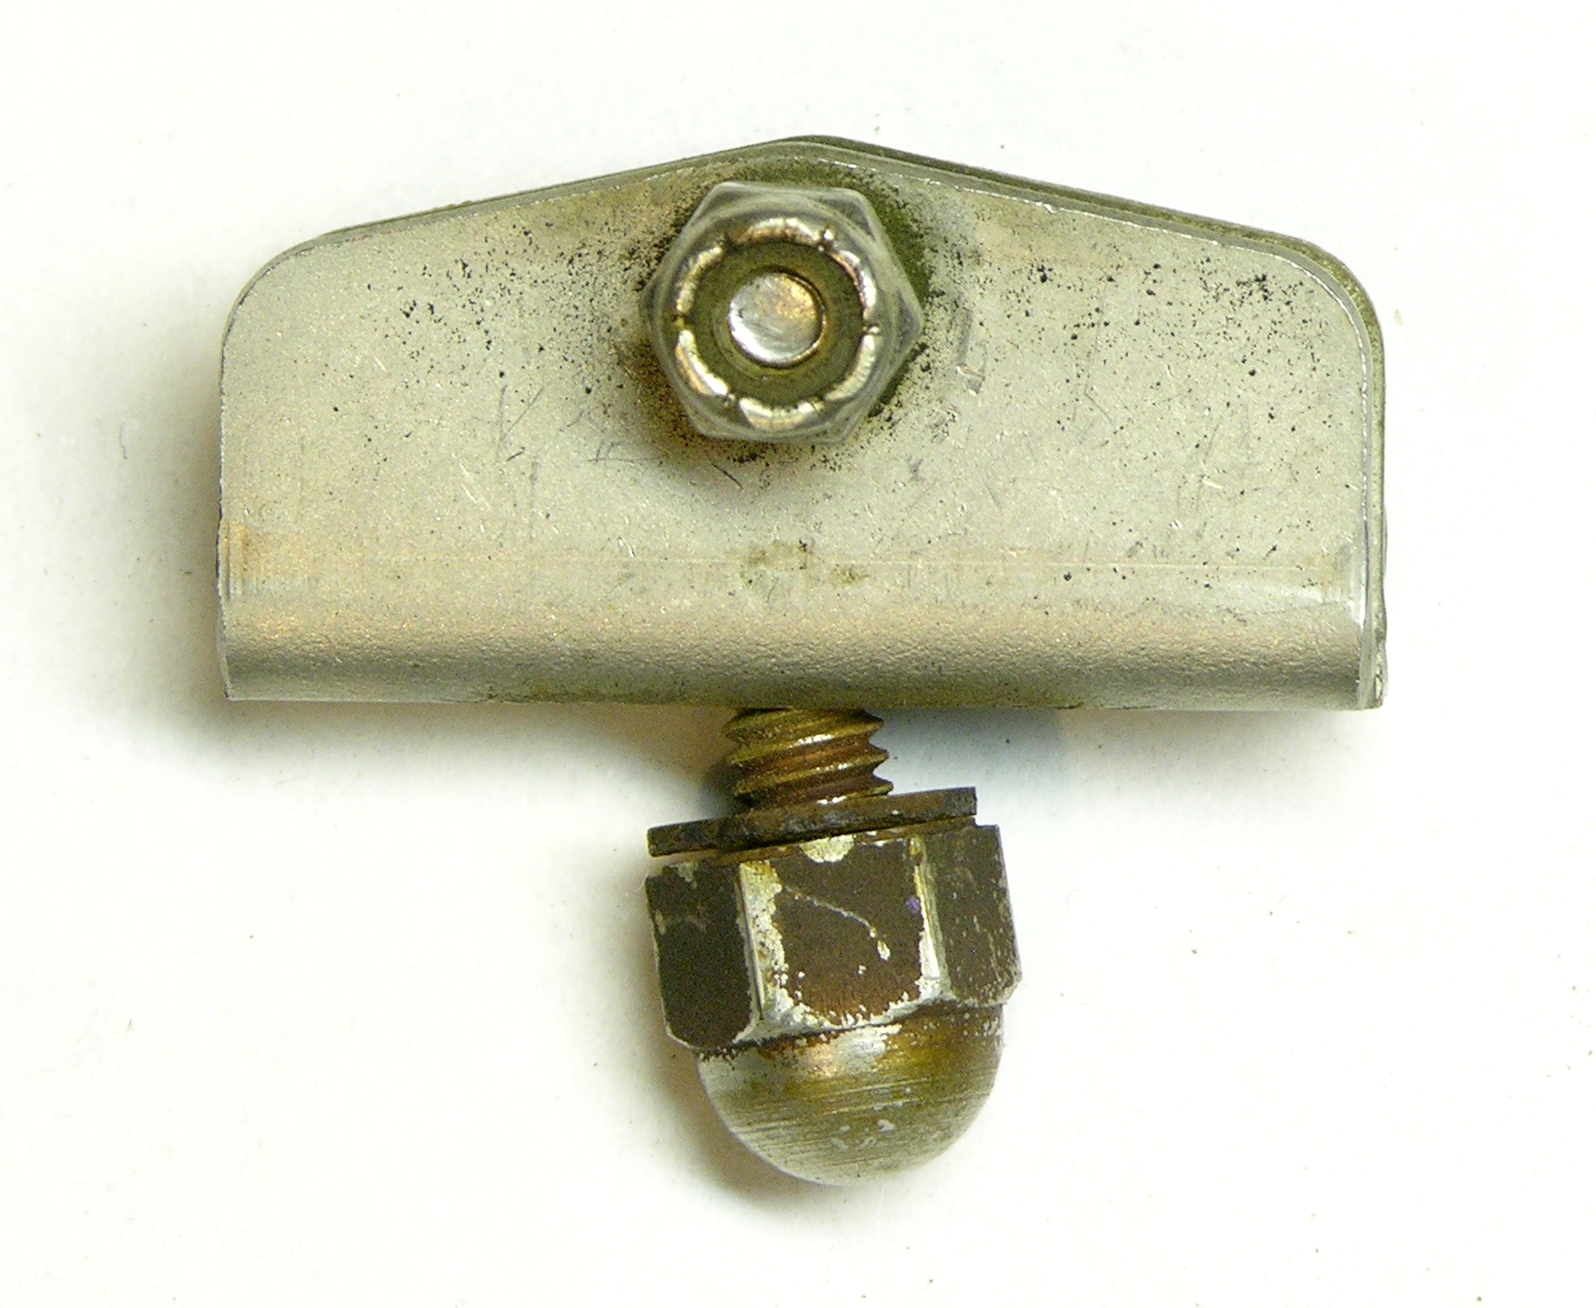
Look at this immaculate work. They cut off the old fitting and brazed on the butt end of this new crimp fitting.

Newly fabricated hydraboost hose section

I think the pressure rating on their hose should be … adequate … for my power steering / brakes system.

Rebuilt hydraboost hose

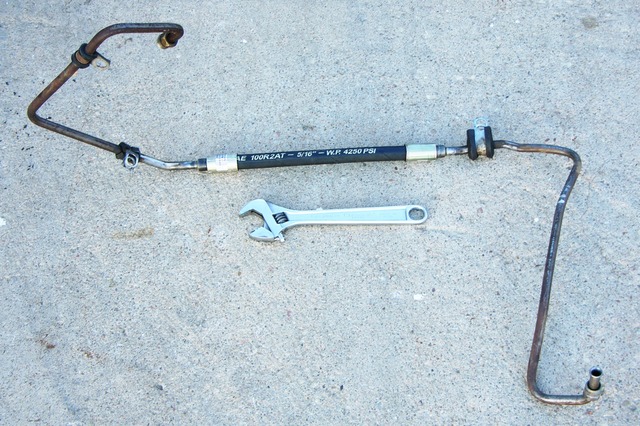
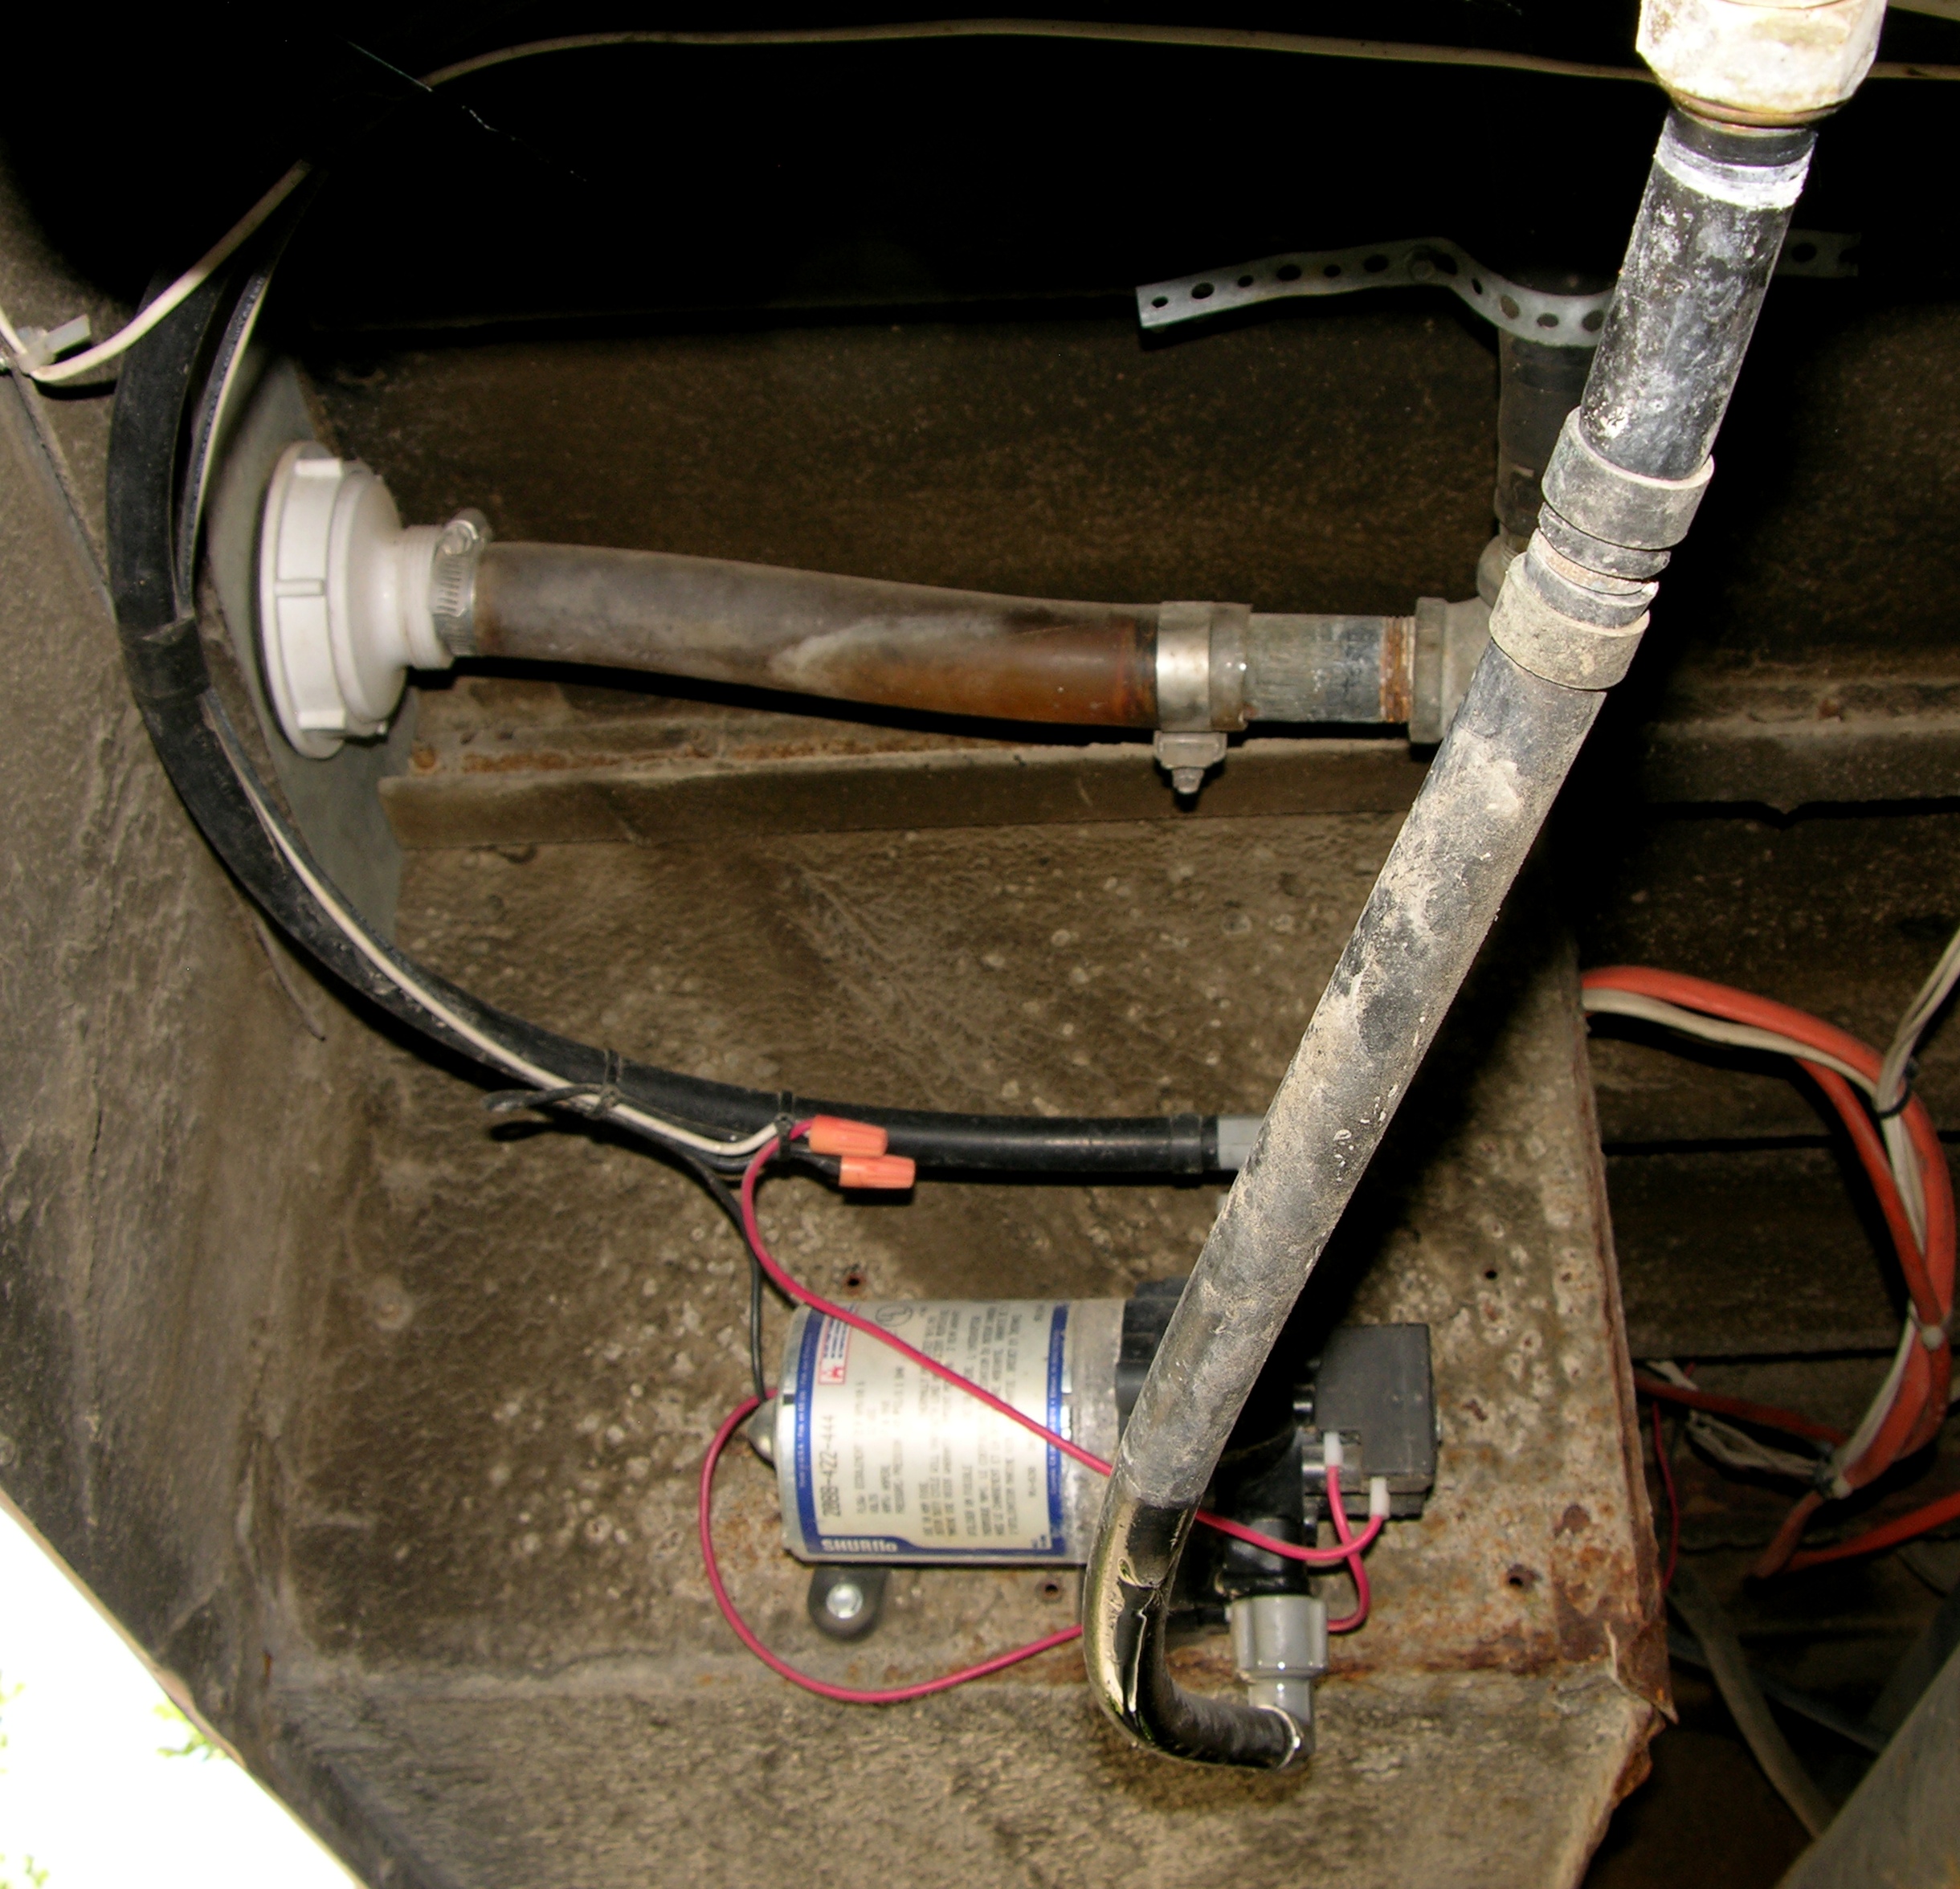
I fished the whole line back through and around all the obstacles, reattached it and all the clamps that hold it in place, and refilled the power steering reservoir.

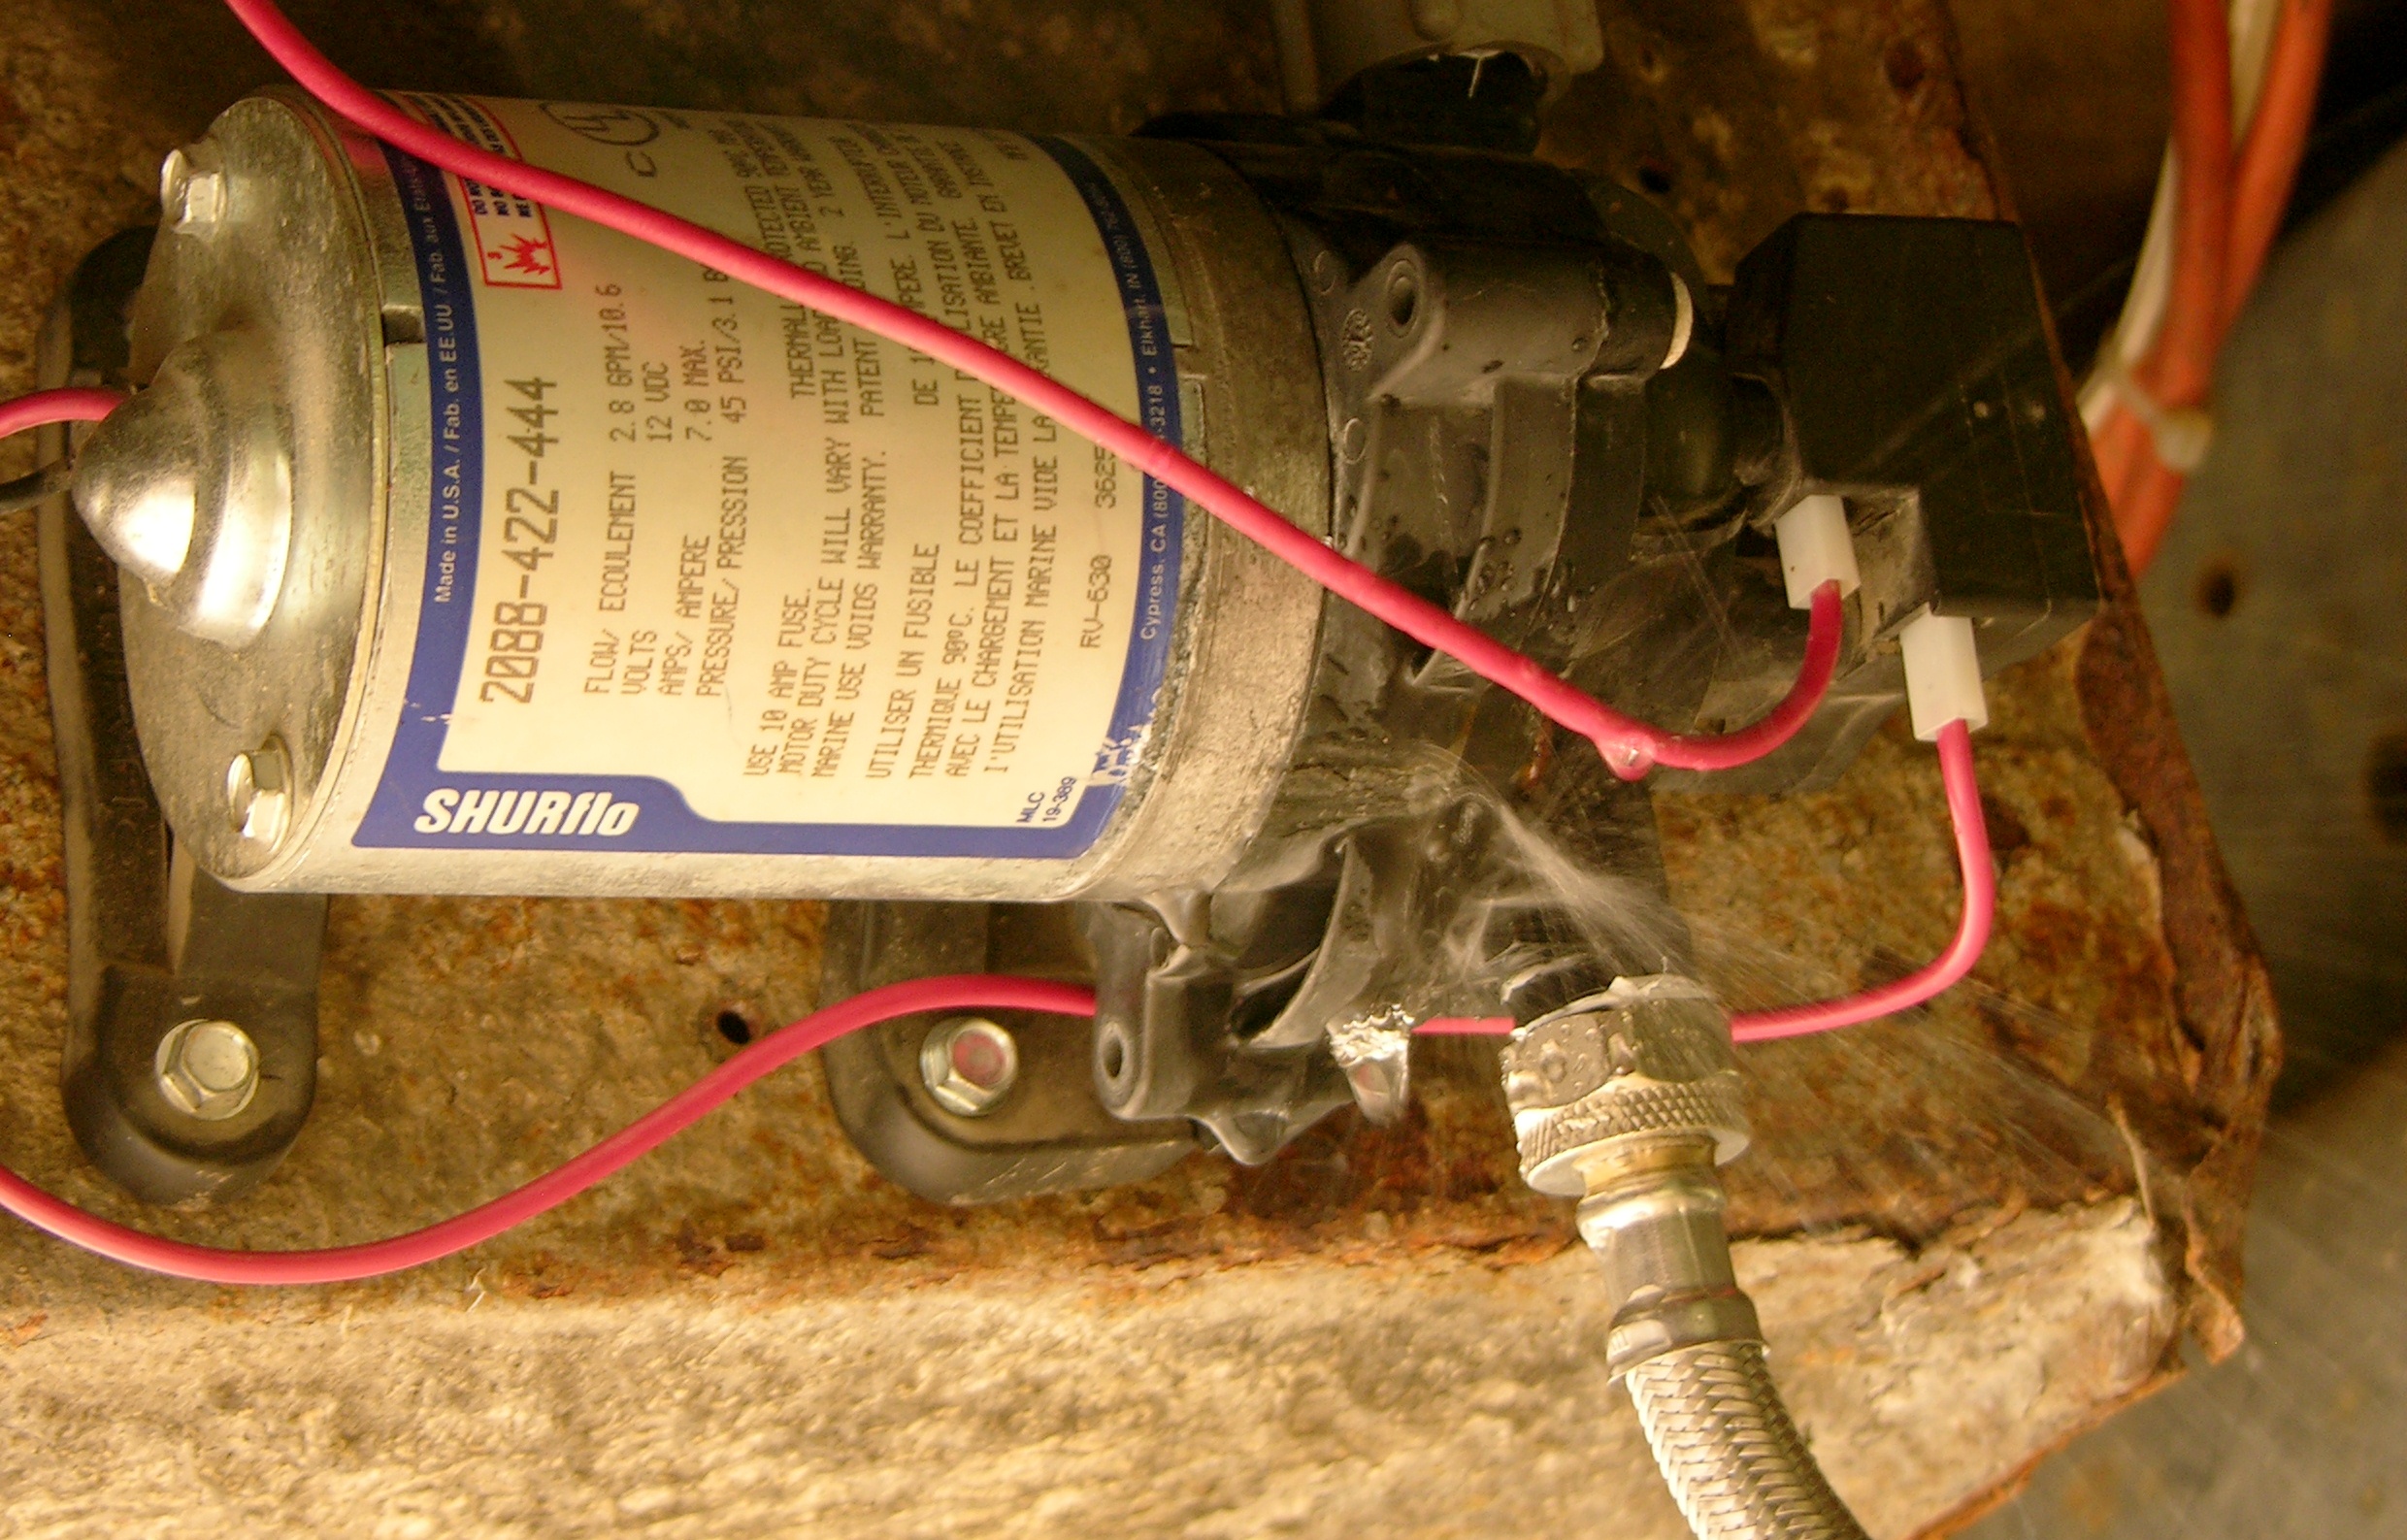
No more leak, but the power steering is still growling (even now, after driving it occasionally for several months and running the steering back and forth from end to end a number of times). I first attributed this to air in the system that needed to work out — and it may be — but I also note that the power steering pump clearly has a bearing going out, and I need to replace it before I get too worried about getting all the air out of the system.

Ah, well. It’s progress.

Expenses

$37.14 rebuilt hose

Procuring a Replacement Rear Door

Tuesday, July 14th, 2009

In thinking about the usability, security, and safety of the bus, I’ve come to the conclusion that the rear “ramp” installed by a former owner needs to be undone.

Converted schoolbus, rear door

It currently latches from the outside, so it’s not usable as an emergency exit without moving the hasps to the inside. It’s very heavy and the handle is high up, so not everyone I know is capable of lowering it. With the hasps inside, in a fire one could unlatch it and push it open to let it fall to the ground; but in other use, it would require two people (inside and out) or a winch to open carefully. It just doesn’t work for me.

First Junkyard Trip

Last Monday on my way home from a holiday trip to Lawrence, I stopped at the junkyard between Newton and Walton to look around. I hadn’t planned the visit and had neither target dimensions nor a tape measure with me; but I quickly found a bus that suggested a return trip was worthwhile.

Rear end of Bluebird bus in junkyard

(more…)

Water Pump Repair Attempt #1: Epoxy

Tuesday, July 7th, 2009

A couple of weekends ago I filled up the bus’s (nominally) fresh water tank. (Never mind all the grossness; it’ll get cleaned before I drink from it, but I have to start somewhere.)

RV fresh water pump mounted to wall of battery compartment

It didn’t take long to notice the water leaking from the lower end of the pump and dripping back down the line from the tank. Hand-tightening the lower (supply) fitting increased the rate of leakage.

For perspective, the tank is out of view above the camera, the white plastic ring is the fill neck and the clear tube and galvanized pipe are the fill lines, the pump is bolted to the aft end of the battery compartment, and the black hose from the top of the pump curves off to the left and then up into the bus to the sink.

RV fresh water pump with cracked housing

I drained the tank, removed the pump, brought it home, and cleaned it,

Crack in RV fresh water pump housing

at which point the problem was much more obvious in good light.

RV fresh water pump, top part of case removed

Out of curiosity, I opened the pump to see where all and how badly it was cracked.

Broken RV fresh water pump housing

Ah, pretty badly, then, eh.

Broken RV fresh water pump housing

Since it looked fairly easy to clean the broken edges, I was further curious whether plastic-repair epoxy would do any good. I scrubbed the broken ends with a wire brush, then mixed up and applied the epoxy. I clamped it up to cure overnight.

Cracked RV fresh water pump housing

Meanwhile, the housing was also cracked in a couple of different places. I epoxied it, clamped it up, and let it set overnight as well.

Glued RV fresh water pump housing

Upon reassembly, the glued cracks did appear to hold together.

Still leaking

But still it leaks.

Looking at how it’s built and where the water is coming out, I think it’s leaking out that large crack that goes circumferentially past the screw. Maybe a thin coat of RTV on the inside of the housing would stop the leak?

This repair is mainly for entertainment, mind you. But if it gets me by until I get the shower built and require a higher-capacity pump, so much the better.

Automotive Window Motor for Power Bus Door?

Saturday, June 20th, 2009

Converted schoolbus, rear door

Currently if the bus is closed, I have to open the heavy rear door to get in.

Converted schoolbus, right front interior

I don’t have a good picture of just the door, but the rod going horizontally across from the handle in the center of the bus to the door (hidden behind the cabinet) mechanically holds the door closed (by design) when the handle is latched in the closed position. As long as the handle stays latched, you can’t open the main passenger door from the outside.

With my highly-skilled momentum technique, I can close the front door from the outside so I don’t have to walk around, open the rear door, walk through, close the front door, walk around, and reclose the rear door; but once done, I then have to do the hokey-pokey to get back in.

I’d really like to be able to lock the passenger door and have a way to get in from the outside. And unlike many other bus-RV converters, I really don’t want to replace the bus door with an RV door — I’m not out to hide the fact that the vehicle started life as a bus. Until I have good reason to feel otherwise, I’d like to keep the accordion-fold door.

I’d love to motorize the door and add electronic entry — although at least in the long term, I need to have a purely mechanical way to get in, as backup in case something goes wrong with the motor.

Automotive Power Window Motor

Automotive power window motor assembly

“Neighbor Dan” has a pile of removed auto parts in the corner of his shop, and a guy comes by occasionally to haul the pile to a scrapyard. Dan has offered me anything I want out of the pile, and he says he has three more of these power window motors that I haven’t found yet. I’ll keep digging.

I don’t know that this is the motor to use for my power door, but it bears consideration.

Automotive power window motor assembly, opened

It looks pretty obvious why it was replaced — the cable is all messed up and broken where it wraps around the spool.

Automotive power window motor

With the jammed-up cable spool taken care of, the output shaft spins at almost two rotations per second. That’s a little fast if I were going to attach it directly to the door-opening handle or use it to replace the handle altogether. If I were to do that, I might use pulse-width modulation (PWM) to slow it down.

The motor coil resistance is 1Ω or less, so the motor draws at least an amp and I’d need a pretty hefty FET to drive it. (A compensating factor is that the motor would normally have a pretty short duty cycle, so the FET wouldn’t have long to heat up.)

Alternatively, I could use the motor with the spool and cable (maybe one of the others isn’t as messed up) and use a larger pulley / spool on the handle end to “gear down” the rotational speed.

I’ve considered that I could remove the manual handle, do away with the connecting rod, and fabricate an entirely new means to close the door. But as it’s constructed now, the rod does double-duty closing the door and “locking” it shut once closed. If I did away with it, I’d have to recreate that functionality on my own.

I’m Open to Something Completely Different

If someone knows of a better way to lock and unlock a bus front door from the outside, or motorize an accordion-fold door, I’m all ears.

Converting a Standard Windshield Wiper Blade to Fit the Bus

Saturday, June 20th, 2009

The windshield wiper blades on the bus are in very bad shape and hardly move around the water on the windshield at all, as I experienced this morning on the way to the dump.

Standard automotive and schoolbus windshield wiper blades

The bus blades use a different means of attaching to the wiper arms than do standard automotive blades. The bus wiper arms each have a hole in the end and a large, ridged washer welded to the blade side of the arm.

Bus windshield wiper blade attachment mechanism

The blade attachment mechanism has a captive bolt that goes through the hole in the wiper arm and an acorn nut to hold it in place. The bolt both holds the blade on the arm and — through friction with the ridged washer — sets the angle between the arm and the blade (which need not be colinear).

I think if I removed the welded-on washer, the wiper arm might fit the clip on a standard blade, without this mechanism. That would eliminate the ability to set the angle of the blade, though; and I do have the blade at a slightly different angle than the arm. I may consider knocking off the washer in the future, rather than continue to modify standard wiper blades.

Standard windshield wiper blade, attachment clip removed

(My local) Autozone doesn’t have wiper blades to fit the bus attachment type, so I modified a Rain-X blade. Mr. Negative at Autozone suggested duct tape and said no matter what I did it would look stupid. I believe the psychological term for his behavior is “projection.”

The first step was removing the stock clip that snap-fits onto the center post.

Dremel cut-off wheel and windshield wiper blade

Then I cut and removed the post.

New windshield wiper blade retrofitted with bus wiper arm attachment mechanism

The post’s holes were just the right size for the bus clip’s blade-to-clip bolt. I tightened the nylon-insert lock nut enough to squeeze the new blade’s walls down almost to the width of the bus clip, to reduce lateral and angular play.

New windshield wiper blade retrofitted with bus wiper arm attachment mechanism

The modified blade fits and works perfectly. Stupid indeed.

Engine Cleaning

Saturday, June 20th, 2009

Purple schoolbus pulled into shop for engine cleaning

After unloading the last removable items from the interior, I dropped the bus off at Hinz Motors to have the engine compartment pressure-washed. It’s easy to see that the brakes and power steering each have small leaks; but with so much gunk on everything, it wasn’t easy to see exactly where.

Greg only charged me $21.46. I think he should have asked more and I tried to tell him that, but it’s hard to argue with the guy holding the cash register. So to speak.

Bus engine compartment, passenger side, freshly washed

I think they did a bang-up job. I had no idea there were colors under the hood! Blue hoses, red cables, orange stars, green clovers …

Bus engine compartment, driver side, freshly washed

The leaking parts are nice and squeaky clean. Once everything’s completely dry, I’ll take it for a spin and see where the fluids show up.

$21.46 engine cleaning

Retrieval Attempt #2: Success!

Sunday, June 7th, 2009

Purple schoolbus, front left profile

It’s home!

“Neighbor Dan” and I left at 5:30 this morning to go up to Manhattan, rig the split shifter, and bring home the bus. Dan pulled the split shifter off the differential, decided the shifter motor was just old or gummed up, and got the shifter engaged into high with some electricity and some thumping. The drive back was pretty uneventful — in particular, the shifter did not drop back out of gear.

Dan thinks the split shifter motor may just need lubrication or new brushes. He described how easy it is to remove from the differential; so I’ll start by taking it off, drilling out the three motor-mount screws off of which I broke the heads, and seeing what I can do with the motor. I don’t want to do a short-term fix like lubricating it with a lightweight oil that will just burn off, so I don’t know yet whether this will be a rebuild or a replace.

Turn Signals and Schoolbus Flashers

Schoolbus signal lights

While Dan was working under the bus, I was looking for a bulb I could use to replace the burned-out rear right-turn signal light. Thought I might be able to pull one from the schoolbus flashers (which I don’t need), but it turns out they’re sealed-beam units.

Ended up borrowing one from the back-up lights, since I wasn’t planning to do a lot of backing on the highway.

Fuel Economy

The fuel gauge started on empty and I put in a little over 40 gallons in Manhattan, so I know the tank is at least a 41-gallon.

I refilled in Newton, adding about 22.7 gallons after about 108 miles, so I got about 4.75 mpg, a little less than I was hoping for. Dan thinks a tune-up may get me a little more.

Parked By the Shed

Purple schoolbus by shed with grain truck

My brother is indulging me and letting me park the bus behind his shed by his stick-hauling grain truck, for now, anyway. He’s already warned me not to get too comfortable with that — but I’m sure once he sees how charming the bus is, his heart will warm to the idea of keeping it nearby.

Today’s Expenses

For five and a half hours of his time, plus 220 miles in his pickup, Dan only asked for $125. I gave him $149 — everything I had on me at the time. A bargain.

$149 Dan’s travel and repair fee
$102 40.332 gallons gas at start of trip
$56.75 22.708 gallons gas at end of trip
$307.75 total for second (and final!) retrieval attempt

Retrieval Attempt #1: Split-Shifter

Tuesday, June 2nd, 2009

When I won the schoolbus auction Thursday, I was in Kansas City at a conference. Because the auction house is open Saturday mornings, I was able to divert through Manhattan on my way home, pay for the bus, and pick up the title and key.

Monday Retrieval Plans

I scheduled Monday off work and found that Lawrence’s daughter Mary could drive me to Manhattan to pick up the bus. Monday morning I went to my insurance company and got a liability policy. The $125 annual premium seemed low, but they explained they don’t expect the bus/RV to be driven every day so they have limited exposure.

Next I went to the courthouse to register the bus. I had already confirmed that I could register it as an RV, but there’s a matter of getting the correct weight on the title. The previous owner had registered it as a 3500-lb vehicle, and that’s obviously absurdly low. The vehicle department clerk (Ron Tozier’s wife Sandy) looked up other vehicles with similar VINs and found people registering them in the 7200 – 9000-lb range. (I love the helpful attitude in a small town.) She said she’d be happy to average them and call that the weight.

I wasn’t quite comfortable making up a weight like that, though; and I know I’ll be making a trip over the truck scale at the dump when I dispose of the ratty bus furniture anyway. So I got a 30-day tag and I’ll go back after I know the actual weight.

It Doesn’t Drive

(more…)