Archive for the ‘LogoChip’ Category

Multiplexing Ultrasonic Sensors

Monday, April 3rd, 2006

Last week in class, we talked about the potential need to have multiple Devantech SRF-05 ultrasonic sensors connected to one LogoChip. Different LogoChip output pins could connect to the different sensors’ trigger inputs, and then the sensors’ echo signals could all feed into one LogoChip input (because only one would be triggered at a time). We were trying to draw how to connect them together without burning them up, and I knew there was a right way to do it but couldn’t think of diodes.

Here it is:

Schematic to Multiplex Ultrasonic Sensors to One Digital Input

The echo signals are TTL, active high. That means that when the signal comes back, the sensor’s output will change from 0V to 5V. Put another way, 0V is normal; 5V means an echo was detected.

The diodes are one-way “valves” that allow electricity to flow from a sensor to the LogoChip when the sensor’s output is high (echo detected), but not from one sensor to another, under any circumstances. This protects the sensors from shorting each other out. When all of the sensors’ outputs are low, no electricity flows through the diodes to the LogoChip, so the pulldown resistor connects the LogoChip’s pin to ground (weakly) for a default input of low.

You could use some of Tom’s multiplexing techniques to connect even more ultrasonic sensors, but at $25 each, I expect cost will be the issue before running out of LogoChip pins.

Ultrasonic Rangefinder, Part II: Receiver

Sunday, March 26th, 2006

Last night, I prototyped the transmitter circuit; today, I worked on the receiver. Coe’s design uses a two-stage op-amp circuit, with AC coupling on the input from the transducer to the first stage, to amplify the received signal before sending it to a comparator. I wanted to do the same, but I prefer to run from a single supply voltage, so I used an LM324 and added voltage dividers to bias the signal up to 2.5V.

First, I powered up the circuit from last night and measured the receiver’s signal on my scope. With the transmitter and receiver about 2” apart, the receiver signal was about 2V peak-to-peak, attenuating to about .5V p-p at 2’. If it continues to attenuate by a factor of 10 every 2’, then to measure distance out to 10’ (round trip of 20’), the received signal would be 2 * 10-10, or .2nV. Let’s hope that’s not the case!

The Circuit

Each stage of the amplifier circuit is taken directly from the LM324 datasheet, “AC Coupled Inverting Amplifier” (although the two stages are DC coupled). The receiver’s signal is AC-coupled to the first amplifier’s inverting input, with a 2.5V bias to the non-inverting input.

Ultrasonic Receiver Amplification Schematic

I’m not sure why C1 is needed on the bias voltage divider, but the output waveform was considerably cleaner with it than without, so I left it in. I also don’t know what RB does, and Forrest Mims’ Engineer’s Mini Notebook on op-amp circuits didn’t show it but the datasheet did, so I left it in as well.

Values

The bandwidth-gain product for the LM324 is 1MHz, so a 24kHz input means the maximum possible gain is about 41.7. The gain is set by the quotient of the feedback and input resistors, and it worked very naturally to select RF = 1MΩ and RIN = 24kΩ.

According to Mims, CIN should have a value of 1 / (2π flow RIN), where flow is the lowest frequency to pass the filter. This gives CIN = 1 / (2π 24kHz 24kΩ) ≅ 280pF–except the first time around, I mistakenly calculated using RF (1MΩ) instead of RIN (24kΩ), and got 6.6pF. I had a 10pF on hand, so I substituted it; but it was still far too low a value, as will be seen shortly.

I breadboarded the circuit on my workbench and measured about .04V peak-to-peak directly from the receiver element, with both transducers pointed at the ceiling. (That was about an 8’ round trip, so my dire prediction of .2nV was fortunately not the case.) Next, I measured only about .08V p-p at the output of the first amplifier stage, so obviously something was wrong. It was at this point that I added C1, which brought the amplifier output to about .1V and cleaned it up dramatically–but with a gain of 40, it should have been more like 1.6V.

I was suspicious about the value of the AC coupling capacitor, CIN, and began substituting different values for it, with the following results:

Condition Signal Amplitude
direct transducer output .04V
CIN = 10pF, C1 absent .08V
CIN = 10pF, C1 = 10uF .1V
CIN = 100pF .5V
CIN = 1nF .6V
CIN = 10nF .6V

It looked like I must have miscalculated by an order of magnitude (at this point, I hadn’t yet caught my frequency error in the calculation), and 100pF was probably close to the best valued, but still a little too far down the knee of the filter’s response curve. .6V output was still a little low for a gain of 40, but within a range I was willing to accept, given that I was estimating the values by counting hashmarks touched by a dirty, wiggling waveform on my scope. I put the 1nF back in and called it good.

Second Stage

After honing the values on the first stage of amplification, the second stage was easy–just more of the same. I used all the same values, but omitted the AC coupling capacitor, since I’m happy to DC-amplify around the 2.5V bias. The second stage gives me a trapezoidal waveform (clipping both the top and bottom of the transducer’s sine wave) running rail-to-rail of the LM324′s advertised output capacity–from 0V to about 4V. Tomorrow I need to run that through a comparator to clean it up just a little more, and then steal John’s capture/compare LogoChip code to start timing the echoes.

DIY Ultrasonic Rangefinder

Saturday, March 25th, 2006

Ultrasonic rangefinders detect objects and measure distance the same way as a bat: Emit a high-pitched “ping” and measure how long it takes the echo to return. The speed of sound in air is nearly constant (ignoring slight variations due to air pressure and humidity), so the time from ping to echo translates directly into the distance to the object.

I’m interested in ultrasonic rangefinders for both hobby robotics and our TechArt final project. They’re available commercially, but $25 each adds up pretty fast if you need multiples to establish a view all around a bot or across the wide front of an art installation. All Electronics has transducer elements for $1 each in quantities of 10 or more, so I ordered a batch of them in hopes of building a rangefinder myself. At $2 each (two transducers, for send and receive), I can add a fair bit of supporting circuitry before hitting the $25 mark.

The Plan

I’m basing my circuit on a design by Gerald Coe at http://www.robot-electronics.co.uk/htm/srf1.shtml, and adapting it for different design goals. His circuit uses a dedicated PIC to provide the oscillator, a MAX232 to generate 16V to drive the transmitter, and 40kHz transducers. For now, I want to run my rangefinder from an existing LogoChip that’s also doing other work, avoid the complexities the MAX232 adds, and use transducers with a different nominal frequency. Later, I might build separate modules intended to stand alone and run with very low power.

Initial Testing

According to a comment on the All Electronics page for the transducers I ordered, they run at 24kHz. The first order of business was confirming that operating frequency.

I hooked my function generator to my frequency counter and scope and dialed in 24kHz, to make sure I was in the neighborhood before connecting the transducer. I then connected one transducer to the function generator to serve as the transmitter (with the frequency counter still attached), and the other transducer to the scope to serve as the receiver.

When I pointed the transmitter at the receiver, a signal showed up on the scope; when I pointed it away, the signal abated. I could bounce it off my hand and receive it, but not off the ceiling. (I’m guessing the elements weren’t aimed well enough and/or the amplitude wasn’t high enough.) And changing the oscillator frequency confirmed that 24kHz is indeed optimal.

So the project is at least possible. That’s a good start!

Connecting the LogoChip

I really didn’t feel like disassembling my balance-bot project, so I’m sure glad I bought several PICs! I built up a breadboard with another LogoChip on it and verified operation. Then I took my motor-control PWM code and cleaned it up to generate a single frequency signal.

Testing with my frequency counter and scope hooked up, it looks like I need timer 2 with a prescalar of 1 and a period of 82 to get as close as possible to 24kHz. Hm, 82 * 24k ≅ 2M, which tells me that I really don’t understand what timer 2 is using for an input clock. Wait–yes, I got it. The PIC has an internal 4x increase in oscillator speed, so the 2Mhz timer oscillator leads to the 10Mhz clocking.

Driving the Transmitter

I first tried powering the transmitter element with an NPN driver, for simplicity and to allow experimentation with the drive voltage:

Ultrasonic Transducer Driver using NPN Transistor

I connected the receiver element to my scope to detect the signal, and was surprised to detect nothing. I looked back at Coe’s schematic and noticed that he drives his transmitter in a push-pull arrangement using the MAX232, so I scrounged around for something with totem-pole outputs that I could use to test. The quickest thing I could come up with was a 7404:

Ultrasonic Transducer Driver using LS7404

And this time, I did show a received signal on the scope, albeit a slightly weak one; so I guess the push-pull drive is necessary.

I’m not satisfied being restricted to a 5V drive, because Coe specifically mentions using 16V to get adequate detection at greater range. However, I’m not sure I have anything on hand that will do exactly the right job and which I’m happy using. None of the options quite work out:

  • The 74xx chips with “high-power output” and 754xx peripheral drivers run open-collector, and I don’t see a good way to use that to provide push-pull.
  • The 754410 H-bridge driver adds about $2 to the cost–not bad, but I’d rather avoid it if I could.
  • The MAX232 adds about $1 plus numerous supporting components–and Coe mentioned that it generates enough noise that he shut it down after each ping to keep it from interfering with the echo detection circuitry.

I’ll probably prototype with the 754410 since I have some on hand, and keep looking for other options.

LogoChip and PWM: Bidirectional Motor Speed Control

Tuesday, March 21st, 2006

Early last week, I was working on expanding my PWM motor speed control to be able to reverse directions. I had the PWM output from my LogoChip’s PWM subsystem, and I wanted to add another line to indicate whether to spin the motor forward or backward.

Because I’m using the 754410 motor driver chip, I need to apply the PWM signal to the pin corresponding to the direction I want the motor to turn, and keep the other 754410 input pin grounded. That means I needed to translate from (speed, direction) to (move forward, move backward). I have lots of digital logic chips lying around, so I knew I could put something together.

Ideal Schematic

Ideally, if I had all the gates I wanted on a single chip, it’s this simple:

Ideal Motor Direction Control Schematic

(Pardon the truncated labels on the right side–EAGLE did that for me in the PNG export.)

I’m using a direction of 1 to mean forward and 0 reverse. So here’s what the schematic means:

  • If the PWM speed signal is on and Direction is 1 (forward), activate the Forward output.
  • If the PWM speed signal is on and Direction is 0 (reverse), activate the Reverse output.

I could have done this with a 74*08 quad AND gate and a 74*04 hex inverter, but that’s two chips. It offends my sensibilities to use two chips when one would suffice, plus I don’t have a lot of room to spare on my LogoChip breadboard. So I looked for something better.

74LS138

I was looking for a chip with a data input and address input(s) to select which output line the data was routed to, and the closest I could find was the 74*138. The ’138 is 3-to-8 decoder/demultiplexer, meant to decode three lines of an address bus into eight enable inputs for memory or other chips: You supply a three-bit address to its inputs, and it activates the corresponding one of its eight outputs.

This wasn’t exactly what I needed, but there’s a trick I figured I could use. I applied the Direction signal to an address input, to select which output would receive the PWM signal; then I applied the PWM signal to one of the enable inputs. In theory, that means that both outputs would be inactive any time the PWM speed signal was off, and the appropriate output would be active when the PWM speed signal was on.

Motor Direction Control with 74LS138

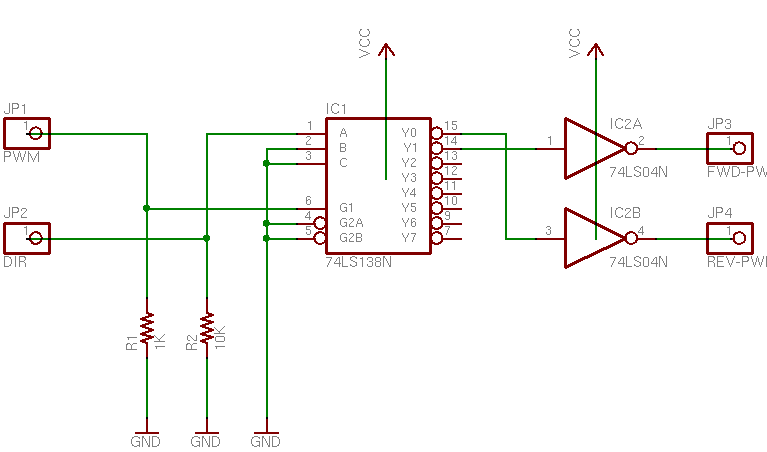
Unfortunately, EAGLE’s circuit symbol for the ’138 is a block diagram that doesn’t illustrate the internal logic, but here’s what’s going on. Direction is applied to address line A, which will select output Y1 (Forward) when Direction is 1 (forward) and output Y0 (Reverse) when direction is 0 (reverse). And the PWM speed signal is applied to active-high enable line G0, to activate the appropriate output whenever it’s high. The other enable lines are active-low, so they’re tied to ground to be active all the time.

But you’ve probably noticed that it’s still a two-chip design–there are two inverters off to the right. Unfortunately for this project, the ’138′s outputs are active-low. Most memory chips have active-low enable inputs (it makes it easier to gang together open-collector selection circuitry), so naturally the ’138 provides an active-low output. In order to get the active-high signals that I wanted to feed into the 754410 motor driver chip, I had to invert the ’138′s outputs, and that meant adding another chip. I did build and test this circuit as a proof of concept, but I still wasn’t satisfied, and kept looking.

As a bit of an aside–I could have used active-low signalling to drive the 754410. It’s an H-bridge driver chip, so it powers the motor whenever it has different inputs. When the inputs are the same–low or high–the motor doesn’t run. However, I’m guessing there’s slightly more power consumption when both inputs/outputs are high, and I wanted it to draw as little power as possible in the quiescent state, so I was determined to come up with a circuit that would provide active-high signalling.

One other note–I tied both inputs to ground with pull-down resistors. As long as the LogoChip is providing outputs, these are irrelevant–but when the LogoChip first powers up, its ports are configured as inputs and don’t provide a valid TTL signal to the ’138. The motor was freaking out (that’s the technical term) when I’d reset the LogoChip, so I added the pull-downs for power-up sanity.

74LS153

The 74LS153 is my final, one-chip solution. It’s a dual 4-line to 1-line data selector/multiplexer, meant to do exactly, uh, the opposite of what I need: It picks which of four inputs to send to the output. But that’s okay–there are two selector/multiplexers in one package. That means I can use one multiplexer to select whether the PWM or nothing goes to the Forward output, and the other to select whether nothing or the PWM goes to the Reverse output. Looks a little somethin’ like this:

Motor Direction Control with 74LS153

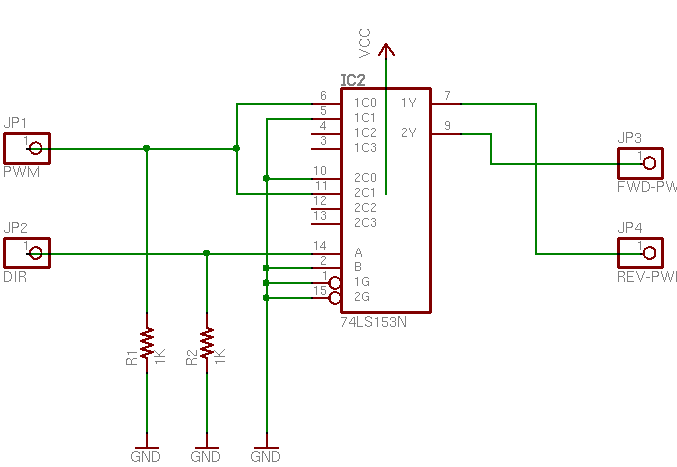
Again, EAGLE renders the ’153 as a block without exposing its inner workings, so explanation is in order. Inputs A and B are the address lines (think A0 and A1) to select which data input will be delivered to the output. Note that A and B select for both multiplexers at the same time, so I don’t have to wire to separate address lines for the two multiplexers. Input B (address line 1) is tied to ground because I always want it 0–I’m only working with the first two possible inputs. And the active-low enable inputs are tied to ground, because I always want the chip enabled.

The first selector has the PWM signal at its 0 input (1C0), ground at its 1 input (1C1), and its output (1Y) feeding the Reverse driver. So when Direction is 0 (reverse), the first selector will pick input 0 (PWM) and feed it to the Reverse input of the motor driver. When Direction is 1 (forward), the first selector will pick input 1 (ground, or nothing) and feed it to the Reverse input of the motor driver.

Likewise, the second selector has ground at its 0 input (2C0), the PWM speed signal at its 1 input (2C1), and its output (2Y) feeding the Forward driver. When Direction is 1 (forward), the second selector routes input 1 (PWM) to the Forward motor drive pin. When Direction is 0 (reverse), the second selector routes input 0 (ground) to the Forward motor drive pin.

Because human minds are forward-centric (there’s a very interesting section of linguistics that studies which word out of pairs of opposites has connotations of dominance: forward/reverse, up/down, hot/cold, etc.), it would seem to make more sense to use the first selector for the forward drive and the second selector for reverse. But I wanted Direction == 0 to activate the first selector and Direction == 1 to activate the second, and because I made Direction == 1 for forward, it worked out like this.

I added pull-down resistors again–different values this time, based on the datasheet and application notes. And the circuit works, in a single chip! Yeah, the ’153 is overkill for this application–but I can’t find a simpler single chip that’ll do the job. I could do it with a PAL and have room left over for other tasks; but in the absence of a need for other logic in this project, that’s even more overkill.

Finis.

LogoChip: PWM Motor Control

Thursday, March 9th, 2006

Built-In PWM

A while back, John sent me some code that he and Tom had been using to test the pulse-width modulation (PWM) capabilities of the hardware underlying the LogoChip. I read through the PIC18F2320 datasheet over the weekend and learned how it does PWM; and between John and Tom’s sample code and the information in the datasheet, tonight I got a motor running at variable speed under software control.

To use the PIC’s PWM, you configure the Timer 2 counter for the modulation frequency (period, actually), then set the output port into PWM mode and configure the duty cycle. Sounds simple; it’s really just a matter of finding all the control registers and the proper bits. Because the PWM is implemented in the chip’s hardware, it keeps running at the last-set duty cycle (== motor speed) even if you’re doing something else or your program stops running, so you can set and forget.

I’d like to measure the PWM output frequency and confirm what the Timer 2 counter and prescalar are doing, but my frequency counter is giving me weird results and I have no idea how far out of calibration my scope is, so that’ll have to wait for another day. When I hook a speaker to the output, it sounds well below 440Hz, but the frequency counter is trying to tell me it’s 2+kHz. Feh.

Huh, when I calculate the frequency (if I’m doing it right), I come up with ~2.4kHz. My speaker is a piezo and it sounded funny, so maybe that’s outside its range and the frequency counter was right on?

The Code

After I got over the excitement of just getting it to work at all, I wanted it to do more than let me manually set a speed for my motor, so there are a couple of extra procedures at the bottom (pwm-speedup and pwm-slowdown) to ramp the speed from slow to fast and back down to slow. They add to the code length, but they’re not critical for implementing PWM.

Here’s the program:

Here’s the code:

;   Keith Neufeld
;   08-Mar-2006
;
;   LogoChip program to demo motor speed control with PIC PWM output.
;   Uses PWM channel 1 on port C2.  Duty cycle values determined with
;   NPN transistor driver with 9V motor supply.

constants [
    [CCP1CON $fbd]                      ;   capture/compare/PWM 1 control reg
    [T2CON $fca]                        ;   timer 2 control register
        [TMR2ON 2]                              ;   timer 2 enable bit
        [T2CKPS1 1]                             ;   timer 2 prescale bit 1
    [CCPR1L $fbe]                       ;   C/C/P 1 register low byte
    [PR2 $fcb]                          ;   timer 2 period register

    [pwm-port-ddr portc-ddr]            ;   PWM 1 outputs on port C2
    [pwm-bit 2]

    [period 255]                        ;   default timer period to use
    ;[low-duty 110]                     ;   lowest duty cycle for my motor to
    [low-duty 10]                       ;   start from a stop
    [high-duty 255]                     ;   highest possible cycle
]

;   Initialize PWM by configuring timer 2 for PWM period and enabling PWM mode.
to pwm-init
    clearbit pwm-bit pwm-port-ddr       ;   set PWM port to output

    ;write T2CON 6                      ;   set timer 2 on, prescalar 16
    setbit T2CKPS1 T2CON                ;   set timer 2 prescalar to 16
    write PR2 period                    ;   set timer period highest possible
    setbit TMR2ON T2CON                 ;   turn on timer 2

    write CCP1CON 12                    ;   set PWM mode
    ;write CCPR1L 128                   ;   set 50% duty cycle
end

;   Set PWM period and duty cycle.
to pwm-set :period :duty
    write PR2 :period                   ;   set timer period
    write CCPR1L :duty                  ;   set PWM duty cycle
end

;   Disable PWM by shutting off timer 2.
to pwm-off
    pwm-set 0 0                         ;   disable PWM by setting duty cyc to 0
    clearbit TMR2ON T2CON               ;   and turn off timer 2
end

;   Enable PWM and ramp up to highest speed at :increment / 255ths
;   per 1/10 second.
global [duty]
to pwm-speedup :increment
    setduty low-duty
    pwm-set period duty
    repeat ((high-duty - low-duty) / :increment) [
        wait 1
        setduty duty + :increment
        pwm-set period duty
    ]
    setduty high-duty
end

;   Enable PWM and ramp down from highest speed at :increment / 255ths
;   per 1/10 second.
to pwm-slowdown :increment
    setduty high-duty
    pwm-set period duty
    repeat ((high-duty - low-duty) / :increment) [
        wait 1
        setduty duty - :increment
        pwm-set period duty
    ]
    setduty low-duty
end

LogoChip: Small Motor Control

Wednesday, March 8th, 2006

LogoChip Motor Control

Yesterday after class, Steve Atwood and John were talking about controlling a small motor from one of the LogoChip’s output ports. Steve had wired the motor from the LogoChip to ground, and when he activated the output port, the motor would barely spin.

The problem is that the chip on which the LogoChip is based can’t source a lot of current, so it can’t provide enough power to run the motor (even a small one). There are a couple of other ways to wire the motor that work better (which I’ll show below), but first, let me try to explain why it doesn’t work when it’s wired the simple way.

Source and Sink

Imagine a T-fitting attached to a faucet, with the bottom draining into the sink and the side leg connected to a hose. (This is almost exactly like the faucet fitting on a roll-up dishwasher, except the dishwasher has two hoses and we have only one.)

The T-fitting has a valve in it that you can turn, which connects the hose to either the faucet or the sink. So if you turn the valve to the faucet position, you can supply (“source”) water to the hose; if you turn the valve to the other position, you can put water in the other end of the hose and have it drain out into the sink.

One last complication: You only open the faucet enough to supply a trickle of water, not a torrent. But the bathtub is nearby, and you can open its faucet all the way to get as much water as you want.

If you wanted to use the water to spin a water wheel, what would you do? Your first instinct would be to set the valve so that the faucet supplies water to the hose, and hold the hose over your water wheel. That would work–sort of. Because the faucet will only supply a trickle of water, you only get a trickle into your wheel, and it doesn’t turn very fast.

Although it’s counterintuitive, you can actually spin the wheel faster by running a hose from the bathtub faucet (open wide) to your water wheel, then holding that over a funnel into the hose to your sink, with the valve (remember the valve?) set to drain water from the hose into the sink. The bathtub supplies all the water you want, the wheel spins, and the valve drains water down the sink as fast as the bathtub supplies it.

That’s a reasonable parallel for how the circuitry works on the output pins of our LogoChips. They’re not able to source a large amount of current (a trickle of water from the faucet), but they can sink quite a bit (sending the bathtub’s water down the drain).

Active High

Last night, I tested controlling a small motor in three different ways from my LogoChip. First, I hooked it directly to the LogoChip pin and to ground, so that when the pin was on, the motor ran. This type of arrangement is called “active high,” because when you want the motor to be active, you make the voltage on the chip’s pin high.

Motor Driven from PIC Port, Active High

To turn on the motor, I set the port’s value to 1 (setbit). This made the port output +5V, causing power to flow from the pin through the motor to ground. (Engineers, pardon me for using positive current flow, but there’s no point in getting into that much detail in this class.) The motor spun, but weakly.

Active Low

Next, I tried a configuration called “active low,” in which you set the chip’s pin to a low voltage to make the motor active. To set this up, I wired the motor from the pin to the +5V power connection, instead of to ground.

Motor Driven from PIC Port, Active Low

Then to activate the motor, I set the port’s value to 0 (clearbit), so that the pin’s voltage dropped to 0 and power was coming from +5V through the motor to the pin. The motor spun much faster, demonstrating that the chip is able to sink more power than it can source.

Transistor Driver

Finally, I tested using a separate transistor to power the motor. I had a suspicion that even though the motor ran faster in an active-low configuration, I might be able to get yet more performance using a separate transistor.

Motor Driven from PIC Port, NPN Transistor Driver

In this circuit, the LogoChip port goes high (+5V) and sends a small current (5mA) through the base-collector (B-C) junction of the NPN transistor. The transistor has a beta (amplification factor) of about 200, so that permits an emitter-collector current (E-C) of about 1A–enough that I’m pretty sure the transistor is in saturation, even though I haven’t checked the datasheet.

In non-geeky-electronics terminology, the transistor is working like a relay. A small amount of power through the relay coil controls a large amount of power through the relay’s contacts. In the case of the transistor, one wire (the collector) is shared between the low-power coil circuit and the high-power contact circuit. All the stuff with the numbers is just calculating the right value(s) of resistor(s) to use based on your circuit and the characteristics of your transistor.

And it worked as expected. The motor spun noticeably faster with the transistor driver than it did even in the active high configuration.

Stuff for Steve

I dug a couple of salvaged transistors and resistors out of my parts bins, soldered longer leads onto them, and brought them to work today for Steve to try out. I’ll be interested to see how much difference it makes for his motor. And like Tom McGuire, I have plenty of stuff saved up, so the offer’s open to anyone in class if you need help with circuits or components.

LogoChip: Audio Playback Demo

Tuesday, February 28th, 2006

Over the weekend and last night, I’ve put together a demo of using sensors and triggers with the LogoChip. The demo uses one of the built-in A/D converters to monitor a CdS photocell, and then trigger audio playback on a Radio Shack 276-1323 recording module.

The code watches for the light level to dim and then triggers one of two recordings, the idea being that someone is probably standing over the box looking into it. It’s actually a bit complex, because I keep a running average of the recent brightness, to make it easier to tell whether a sudden drop is a significant event or just noise variation on the sensor. LogoChip Logo doesn’t have terribly good support for arrays, and it was fairly interesting writing ring-buffer code.

Adapting the Playback Modules

[INSERT PHOTO OF CIRCUIT IN BOX]

The little PCBs on the sides are the Radio Shack audio playback modules. Each has an offboard record button and an onboard playback button. I desoldered the 9V battery clip that came with the units and soldered on leads to take power from my PCB, to cut down the number of batteries I had to install. I just now realized I had mistakenly plugged the power into the regulated 5V instead of the unregulated 9V, so that may explain why the playback was relatively quiet. It also speaks well for a wide supply voltage range on the modules.

The playback buttons are NO with pullup resistors, and ground their line when closed. Because they’re rubber pushbuttons with graphite contacts the press directly onto the PCBs, there were no leads to solder my remote trigger wires onto, so I wrapped them around the lower leads (toward the middle of the PCB) of the pullup resistors, R3.

[INSERT CLOSEUP PICTURE OF MODULE PCB]

Then I plugged the remote triggers into ports C6 and C7 on the LogoChip. Since the playback buttons on the modules are active low, I had to reverse my software logic and set the ports high on initialization, then pull them low to activate.

;   Configure the audio trigger I/O port.
to init-squawk-port
        ;   Set left and right triggers off (active low, so set high)
        setbit squawk-left-bit squawk-port
        setbit squawk-right-bit squawk-port

        ;   Set left and right triggers as outputs
        clearbit squawk-left-bit squawk-ddr
        clearbit squawk-right-bit squawk-ddr
end

;   Trigger the external playback modules
;   Parameter: which module to trigger
to squawk :squawk-bit
        ;   Trigger it (active low, so set low)
        clearbit :squawk-bit squawk-port

        ;   Wait a smidge to be sure it registers
        wait 1

        ;   Clear the trigger (active low, so set high)
        setbit :squawk-bit squawk-port
end

The Software

[INSERT DETAILED DESCRIPTION OF RUNNING AVERAGE FUNCTION]

I learned several important lessons from this programming exercise:

  • The A/D converter needs longer than .1 seconds between readings–at that repeat rate, I was getting garbage every time. .2 seconds appears to have been working reliably.
  • The LogoChip Language Reference gives the positions of global variables m and n incorrectly, which led to a buffer overflow in my code. Global n is actually position 0 and m is 1, not 1 and 2 as stated.
  • LogoChip Logo does bizarre things to arithmetic expressions. I have no idea how it was evaluating

    setsum-bright sum-bright - global (array-base + array-index) + bright

    because I couldn’t figure out any sequence of evaluation that led to the results it was giving me. I solved it with parentheses:

    setsum-bright (sum-bright - global (array-base + array-index)) + bright

    but it’d be nice to understand what was happening.

The Code

Here are the programs:

  • squawk.txt – Test code to play back sound samples
  • light-level.txt – Test code to monitor and report light levels
  • light-demo.txt – Program to monitor light levels and trigger audio playback

Here’s the code:

;   Keith Neufeld
;   27-Feb-2006
;
;   LogoChip program to demo measuring ambient light level
;   with CdS photocell wired from LogoChip port A1 to +5V
;   and 1K resistor wired from A1 to GND.
;
;   When light level suddenly becomes dimmer, trigger audio playback
;   using Radio Shack 276-1323 20-second recording modules
;   with play buttons wired to LogoChip ports C6 and C7.
;   Play buttons are active low.

;   Port assignments for the photocell and audio units
constants [
        [cds-port porta] [cds-ddr porta-ddr] [cds-bit 1]
        [squawk-port portc] [squawk-ddr portc-ddr]
                [squawk-left-bit 6] [squawk-right-bit 7]
]

;   Array for averaging brightness
global [array0 array1 array2 array3 array4 array5 array6 array7 array-index]
constants [
        [array-base 2]
        [array-len 8]
]

;   Current brightness, sum of recent brightness, average recent brightness
global [bright sum-bright avg-bright]
;   Calculated brightness values that indicate dimming
global [threshold-shady threshold-dark]

;   At powerup, run the main program.
to powerup
        startup
end

;   At startup, clear the array storage space, initialize some
;   global variables, and configure the I/O ports.
to startup
        init-array
        init-vars
        init-squawk-port
        init-cds-port

        prs "starting
        watch-brightness
end

;   Loop forever, taking samples and watching for dimming.
global [already-shady already-dark]
to watch-brightness
        loop [
                ;   Calculate what fractions of previous brightness
                ;   constitute being dim
                calc-thresholds

                ;   Get current brightness
                read-bright

                ;   The following logic for different brightness conditions
                ;   is carefully arranged to make a successful test exclude
                ;   success on subsequent tests.  I would have preferred to
                ;   write this using
                ;
                ;   if  [ block 1 ]
                ;   elseif  [ block 2 ]
                ;   elseif  [ block 3 ]
                ;
                ;   but LogoChip Logo doesn't support that, and I got cranky
                ;   nesting the conditional blocks three deep using the syntax
                ;   that _is_ supported.
                ;
                ;   Caveat maintainer.

                ;   If we're getting brighter,
                if bright > avg-bright [
                        ;   Start paying attention to getting dimmer again
                        setalready-dark 0
                        setalready-shady 0
                ]

                ;   If we're significantly darker than before,
                if bright < threshold-dark [
                        ;   And we haven't already done something about it,
                        if not already-dark [
                                ;   Then cause an event
                                dim-a-lot-event

                                ;   And remember that we're already dark
                                ;   and don't need to trigger another event.
                                setalready-dark 1
                                setalready-shady 1
                        ]
                ]

                ;   If we're a little darker than before,
                if bright < threshold-shady [
                        ;   And we haven't already done something about it,
                        if not already-shady [
                                ;   Then cause an event
                                dim-a-little-event

                                ;   And remember that we're already shady
                                ;   and don't need to trigger another event.
                                setalready-shady 1
                        ]
                ]
        ]
end

;   Event routine for when slight dimming is detected
to dim-a-little-event
        prs "|dimming a little|

        ;   Play the message from the right speaker.
        squawk squawk-right-bit

        ;   Give it a couple of seconds to finish.
        wait 20
end

;   Event routine for when significant dimming is detected
to dim-a-lot-event
        prs "|dimming a lot|

        ;   Play the message from the left speaker.
        squawk squawk-left-bit

        ;   Give it a couple of seconds to finish.
        wait 20
end

;   Clear the array.
to init-array
        setarray-index 0
        repeat array-len [
                setglobal (array-base + array-index) 0
                setarray-index (array-index + 1) % array-len
        ]
end

;   Initialize global variables.
to init-vars
        setsum-bright 0

        setalready-shady 0
        setalready-dark 0
end

;   Configure the audio trigger I/O port.
to init-squawk-port
        ;   Set left and right triggers off (active low, so set high)
        setbit squawk-left-bit squawk-port
        setbit squawk-right-bit squawk-port

        ;   Set left and right triggers as outputs
        clearbit squawk-left-bit squawk-ddr
        clearbit squawk-right-bit squawk-ddr
end

;   Configure the photocell I/O port.
to init-cds-port
        ;   Set photocell port as input
        setbit cds-bit cds-ddr

        ;   Give time for the operator to get their hand out of the way
        ;   and find out how bright the room can be
        repeat 10 [
                ;   Read the current brightness and store rolling average
                read-bright
                ;prs "average
                ;print avg-bright
        ]
        ;prs "|final average|
        ;print avg-bright
end

;   Trigger the external playback modules
;   Parameter: which module to trigger
to squawk :squawk-bit
        ;   Trigger it (active low, so set low)
        clearbit :squawk-bit squawk-port

        ;   Wait a smidge to be sure it registers
        wait 1

        ;   Clear the trigger (active low, so set high)
        setbit :squawk-bit squawk-port
end

;   Read the brightness and work it into a rolling average.
;   Uses a ring buffer to compute the rolling average.  If you know what
;   that means, there's not much I can teach you about LogoChip Logo.
to read-bright
        ;   Read current brightness
        setbright read-ad cds-bit
        ;prs "|current brightness|
        ;print bright

        ;   Roll off oldest value from rolling average and add current
        ;   Parentheses around first two operands are necessary--
        ;   returns random result without
        setsum-bright (sum-bright - global (array-base + array-index)) + bright

        ;   Save current brightness and advance history pointer
        setglobal (array-base + array-index) bright
        setarray-index (array-index + 1) % array-len

        ;   Calculate recent average brightness, rounding the fraction
        setavg-bright (sum-bright + (array-len / 2)) / array-len

        ;   A/D converter seems to require .2 sec between readings
        wait 2
end

;   Calculate thresholds of dimming based on recent average brightness.
;   Multiply then divide because fractions become 0 in integer arithmetic.
to calc-thresholds
        setthreshold-shady (9 * avg-bright) / 10
        ;prs "|shady threshold|
        ;print threshold-shady
        setthreshold-dark (5 * avg-bright) / 10
end

LogoChip Desktop Serial Port Configuration

Tuesday, February 21st, 2006

After learning of the ! print portnames command from John, I finally got my PowerBook’s LogoChip Desktop Software talking over my USB serial to my LogoChip.

Turns out the Classic mode support and the Java serial communications driver installation error were red herrings. The problem was simply that LogoChip Desktop was defaulting to the first serial driver in the list–which was the IrDA driver. Since my desktop computer doesn’t have IrDA, it picked the USB driver–the only one in the list.

The solution was simply to update my config.txt to read:

com-port: /dev/tty.usbserial0

I had previously tried changing it to usbserial0, but it didn’t recognize that format. It was the ! print portnames command that led me to the device-file syntax.

And it works. Hooray!

Detailed instructions on the class wiki.

Project Idea: Dancing Water

Wednesday, February 8th, 2006

The Concept

At last, I have an idea for a Technology: Art and Sound by Design final project. I’ve been struggling to think of anything interesting to do. As a musician, I’m dissatisfied with the beeps and boops that we can make with little chips; as a technologist, I’m more interested in building robotics that aren’t very artistic. But this morning, something clicked: I’d like to make a dancing water display.

I’ve been enchanted with dancing water fountains ever since I visited Disneyworld about twelve years ago. They have an amazing display with “snakes” of water frolicking from pot to pot and even leaping across the sidewalk over the heads of the guests. I’ve also watched the choreographed fountains at Atlanta’s Centennial Park, and recently I ran across the overview of a tutorial project called the Geyserbot at Bruce Shapiro’s The Art of Motion Control.

What

I’m thinking of a small display most akin to the Geyserbot–probably even a bit smaller (’cause it looks like it’s standing in a wading pool). I’d like it to be relatively easy to move around in order to display, and self-contained in a case to hide all the guts from the viewer. If it were ever formally exhibited, I might include a placard with a photo and description of the internal mechanism.

Complexity could be added in stages. First, get a basic mechanism running, with say eight jets (= 8 bits of control). Even if it did nothing more than the Geyserbot demo video–sequence the water jet to move back and forth down the line of nozzles, or shoot off alternating nozzles–I think it’d still be pretty interesting. Advanced versions could have more jets (maybe switch to the 40-pin version of the LogoChip with more I/O ports) and more choreography. If the valves could be actuated rapidly enough, it might even be possible to shoot simple pictures into the air–a heart shaped out of rising water droplets, for example.

I think I’d start with eight jets in a row pointing straight up, but it wouldn’t be hard to move them into a circle, tilt them inward so the jets met in the center, etc. With more jets, you could have sixteen in a circle with half pointing up and half pointing in. Lots of possibilities!

I haven’t decided whether I’d like it to be synchronized to music a la the Wizards of Winter Christmas display (which is a real display using a very high-end light sequencer, BTW), or silent except for the sounds of water splashing. Sequencing to music is obviously more difficult–and I don’t know whether it would really add anything. I rather like quiet sounds of water.

How

Since a pump takes longer to start up and shut off than a valve takes to open and close (I assume), I envision having one pump overall, and an electrically-operated valve for each jet. I don’t want the water to spray particularly high into the air–I’m more interested in having fat streams of water than thin sprays–so I think I’d need relatively low water pressure. It may be difficult finding a pump as slow/small as what I need (a small fraction of a cfm, by my estimations), so I might have to inflate some kind of bladder and use a pressure switch to turn the pump on and off on demand. And I’d be very interested if anyone has suggestions on where to get a pump and affordable valves–add a comment to this post if you have ideas!

Control is easy–start with eight jets and wire them to a single output register on the LogoChip. Build MOSFET drivers with back-EMF diodes for the valves, and I’m good to go. Eventually it’d be nice to have a sequencer program like Tom McGuire showed us on his drum machines, but I’d probably start out programming the jets by hand.

I’d like to build it into a case, and I haven’t thought much about what would be most appealing. I know I’d like to have the nozzles barely protruding from a pool of water, both from an aesthetic standpoint (hide the technology and focus on the art) and from a practical one (I think the pool will help dissipate splashing as all the water falls back down).

I’m not sure about the enclosure, though–what kind of material would be appropriate. I don’t want anything high-tech or flashy like aluminum to distract attention from the water show. The weathered metals we saw yesterday in the art workshop were gorgeous, but I don’t know whether they’re right for this project (and whether I could make them happen in time). I’m most comfortable working with wood, and a cherry enclosure (my old favorite) might not be too bad.

Comments welcome!

Got Beep

Monday, February 6th, 2006

Read the Manual, Stupid

Last week when I was trying to get the piezo buzzer to work with the LogoChip, I was in such a hurry to get to the sound that I skipped this part of the instructions:

Upon powering up, all of the user accessible pins on the LogoChip are configured as “inputs”. . . . Therefore, for the exercises in this document, we would like to always have all of the portb pins configured as outputs. . . . This can be done by creating the following special powerup procedure.

to powerup
write portb-ddr 0 ; turns all of portb into outputs
end

Last night when I soldered pins onto the piezo buzzer from the pager, plugged it into the LogoChip, and still couldn’t get sound out of it, I knew something was up. Finally it dawned on me that I didn’t know which way the ports were configured at boot, and looked at the getting started guide closely enough to find the section I quoted above. With the ports configured as outputs, it beeps just fine. Duh.

Beep Volume

I’m surprised at how quiet the beep is running on 5V, compared to how obnoxiously noisy the beep is in a pager on 1.5V. I changed back to the beeper from the microwave and it’s a little louder, but not much. Is the 1.5V in the pager really getting stepped up somehow? Tiny transformer, or voltage multiplier? Maybe I just need a driver transistor; I guess some experimentation is in order.

Beep Code

Making a beep was cute and simple, but booooring, so I made a little warbly sound.

to powerup
        write portb-ddr 0            ;   set port B to output at power-up
end

to startup
        warble 3                     ;   "warble" three times when the Go button is pressed
end

to click-on
        setbit 0 portb
end

to click-off
        clearbit 0 portb
end

to delay :n
        repeat :n [no-op]            ;   waste time by doing nothing, several times
end

to note :period :duration            ;   play a note of a given pitch for a given duration
        repeat :duration [           ;   repeat as long as requested
                click-on             ;   make a sound
                delay :period        ;   wait a little bit
                click-off            ;   make another sound
                delay :period        ;   wait another little bit
        ]
end

to warble :times        ;   make a warbly noise several times
        repeat :times [
                note 2 200           ;   make a low-pitched sound
                note 1 200           ;   make a higher-pitched sound
        ]
end

Of course, downloading a routine named powerup doesn’t automatically invoke that routine (unless you reboot the chip), so I invoked it manually from the console. Having done that, the routine makes a nice little warbly noise any time you type warble # at the console, or press the “Go” button on the circuit board.

Another thought: Since note‘s duration code loops around calls to the click-on, click-off routine, which calls delay to set pitch, the duration is actually impacted proportionally to the pitch of the note. It’d be interesting to rewrite the duration code to take input in ms (or seconds) and check timer to see when we’ve played the tone for long enough.

Pitches and Timing

If the code makes sense to you, then you’ll notice that I’m calling the delay routine with the second-shortest and shortest possible delays–twice and once through the loop. With delays of 2 and 1, the second pitch should be an octave higher than the first (twice the frequency)–but in practice, the one sound is only about a minor third higher than the other. That means that the overhead of calling the delay procedure is much higher than the delay of running once through a timing loop around a no-op.

Here’s the math: a minor third corresponds to a frequency difference of the fourth root of 2 (in equal-tempered tuning), whereas an octave is a factor of two. So if there were no overhead for calling the procedure, then the respective frequencies and periods would be simple doubles of each other:

f2 = 2f1
p1 = 2p2

But in practice

f2 = 4√2 f1
p1 = 4√2 p2

Let’s define tcall as the duration of the function call overhead (which should be constant) and tnoop as the duration of one trip through the loop in the delay procedure, including both loop overhead and the no-op operation (which we’re told is 13ms). (This ignores the fact that loop overhead will be slightly different when repeating and when exiting, but I suspect that the difference is small enough to be irrelevant. If anyone wants to check, I can measure frequencies for more delay values and give you equations in three variables . . .)

p1 = tcall + 2tnoop
p2 = tcall + 1tnoop

Then substituting back into the period relationship

p1 = 4√2 p2

tcall + 2tnoop = 4√2 (tcall + tnoop) = 4√2 tcall + 4√2 tnoop

2tnoop4√2 tnoop = 4√2 tcall – tcall

(2 – 4√2) tnoop = (4√2 – 1) tcall

tcall / tnoop = (2 – 4√2) / (4√2 – 1) ≅ 4.3

So if I did all that right (and I confess I ‘m pretty rusty), the overhead of calling delay is a little more than four times the delay of one trip through the no-op loop. Hmph.

Regardless of the relative values, the actual frequencies aren’t particularly high–higher than 440Hz, but well within the limits of my hearing. (I should test them tonight with my frequency counter.) That’s a bit disappointing for a 5Mhz-clocked chip running flat-out in a busy wait.

I thought about clocking the chip up to 40MHz per the instructions in the getting started guide (8x the clock speed = 3 octaves higher = outside the limits of my hearing), but I didn’t order the crystal and I didn’t have two 10Mhz crystals in my parts bin. Shucks.

I just talked to John, and he said that he and Tom McGuire were able to produce higher sounds using the chip’s built-in PWM. Not bad for a hack, but I wanted to use both channels of PWM for motor control. Think I need me a crystal.