Archive for the ‘Hacks’ Category

Homebrew SMT Probe Tweezers

Saturday, February 23rd, 2008

Closeup of SMT probe tweezers in use

Some surface-mount resistors have their values printed on them, but all 1206 and smaller SMT capacitors that I’ve seen are completely blank. The only way to determine their value — after salvaging, that is — is to measure them.

My multimeter has a capacitor tester, but its connections are slots in the body of the meter rather than the regular probes, so it doesn’t work at all for SMT capacitors. (In fact, most salvaged capacitors’ leads are much to short to make contact with the meter’s sockets.) Lately I’ve been plugging a couple of long wires with tinned ends into the meter so I can use the other ends to check the values of SMT capacitors on my workbench.

This is a pain.

Ever since I started salvaging SMT components, I thought it’d be great to have a pair of tweezers wired as meter probes — grab the component, pick it up to put away, and check its value all at the same time. There actually are such things available, but the ones I’ve found start at $35 with a custom connector for that manufacturer’s meter. Not much to my liking.

I figured on building my own, maybe by finding a pair of plastic tweezers and gluing some kind of metal foil to the gripping surface. But what kind of metal? I was thinking about this on the drive to work Monday. Copper oxides rapidly and wouldn’t make good contact in the long term; so does solder. Silver would probably be okay. Gold would be perfect, but I have no idea where to get . . . wait a minute. Sure I do.

Circuit board about to be sacrificed

Monday night I sifted through my junk boxes and found a sacrificial circuit board with a nice, wide, gold-plated .156″-spacing card-edge connector on it. I desoldered everything from it the hard way — with a soldering iron — because this time it was about preserving the board rather than removing components as fast as possible.

Circuit board cut into strips

Tuesday I took the stripped board to the lab at school and used the PCB shear to cut it into strips, many of which are almost straight. That night I cut a pointed shape onto the end of two strips on my scrollsaw, doing a terrible job. I did slightly better on the next ones.

I used the bench disc sander to smooth them out and narrow the points to the width of the gold strips, then bevel the edges near the tips so the edges are sharp like a knife instead of thick like a PCB edge — it makes it easier to pick up very not tall SMT components. I also sanded the tip’s angle back from 90° to about 60°, since I’ll be holding these at an angle from my hand down to the workbench.

Two halves of SMT probe tweezers, wired

This afternoon I wet-sanded them very smooth, both faces and edges, then soldered a couple of jumper wires so I could use the existing traces to get from tip to handle, and soldered on two lead wires.

Completed SMT probe tweezers

I taped the points together in alignment, clamped the handle end in a vise with a maple chunk in between, drilled holes through the works, and bolted it together. I had to cut one trace to keep it from contacting the bolts — it wouldn’t have shorted the two leads together, but I still didn’t want the bolts “live” on either side of the connection.

At the far end, I soldered to a salvaged plug (something from a CRT monitor yoke PCB, I think) to fit into the capacitor test slots on my meter.

SMT probe tweezers in use

It works very nicely. The tweezer adds about 50pF to my measurements when it’s wide open, 60pF when I hold it as closed as I can without shorting; so probably 50pF when I’m holding a capacitor in it. That’s only a .05% error on the .1μF SMT capacitors I have in abundance, and I bet my meter itself is two orders of magnitude less accurate than that, so it really doesn’t bother me.

I think I have the jack that mates with the plug, and I want to build an adaptor to banana plugs so I can use this to double-check SMT resistor values, too.

Now I’m out of excuses not to put away all the SMT chips sitting out on my workbench. :-)

Parallax Motion Sensor from Radio Shack

Saturday, January 5th, 2008

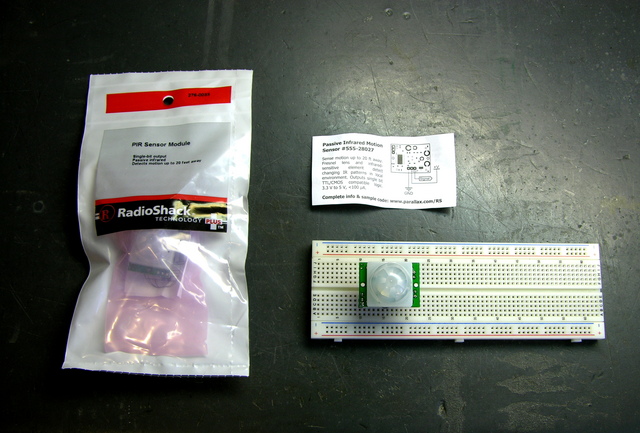
The back cover of Servo Magazine is always an ad from Parallax, and the December issue featured several sensors that will now be distributed through Radio Shack, including a motion sensor for $10.

John and I are getting ready for this spring’s Technology: Art and Sound by Design class; and although I think John will be doing most of the teaching this year, I’m always on the lookout for sensors that would be good for students’ interactive sculptures.

Jason at work suggested that the LED puck could have a motion-sensing mode, to serve as a sort of intrusion alarm.

When two separate events occur simultaneously pertaining to the same object of inquiry, we must always pay strict attention. Or, ah, three events.

Two Parallax / Radio Shack motion sensor kits

I picked up a couple of the sensors last week to try out. The clerk said when they got them, he had thought they’d never sell any. Why am I always the guy buying the weird stuff?

How Motion Sensors Work

The heart of common motion detectors is a pyroelectric sensor, which is essentially a FET with a window in the case opening onto an infrared-sensitive gate. Changes in the level of IR light with a wavelength corresponding to body heat cause changes in the drain-source resistance, which the circuit monitors.

Parallax pyroelectric sensor

The real trick is that the sensor is then placed behind a multifaceted lens that (loosely speaking) “chops up” the view of the world into smaller cones of heightened visibility and intervening areas of lessened visibility. Think of a stage polka-dotted with multiple spotlights, only actually seeing that way rather than merely illuminating that way.

A body moving from an area of reduced visibility into an area of increased visibility causes a rapid change in the amount of IR (body heat) shining on the sensor, hence a rapid change in its drain-source resistance. The motion detector circuit watches for these rapid changes, and when detected, triggers the alarm. This is why Robert Redford has to move slowly while retrieving the MacGuffin from Cosmo’s office in Sneakers.

A brief note about the multifaceted lens: It is usually a Fresnel lens, but being a Fresnel lens is a red herring. That simply makes the lens thin and easy to mold out of plastic; it is really the multifaceted nature of the lens that’s important. Closer examination of a motion sensor lens easily reveals that it comprises multiple adjacent Fresnel lenses.

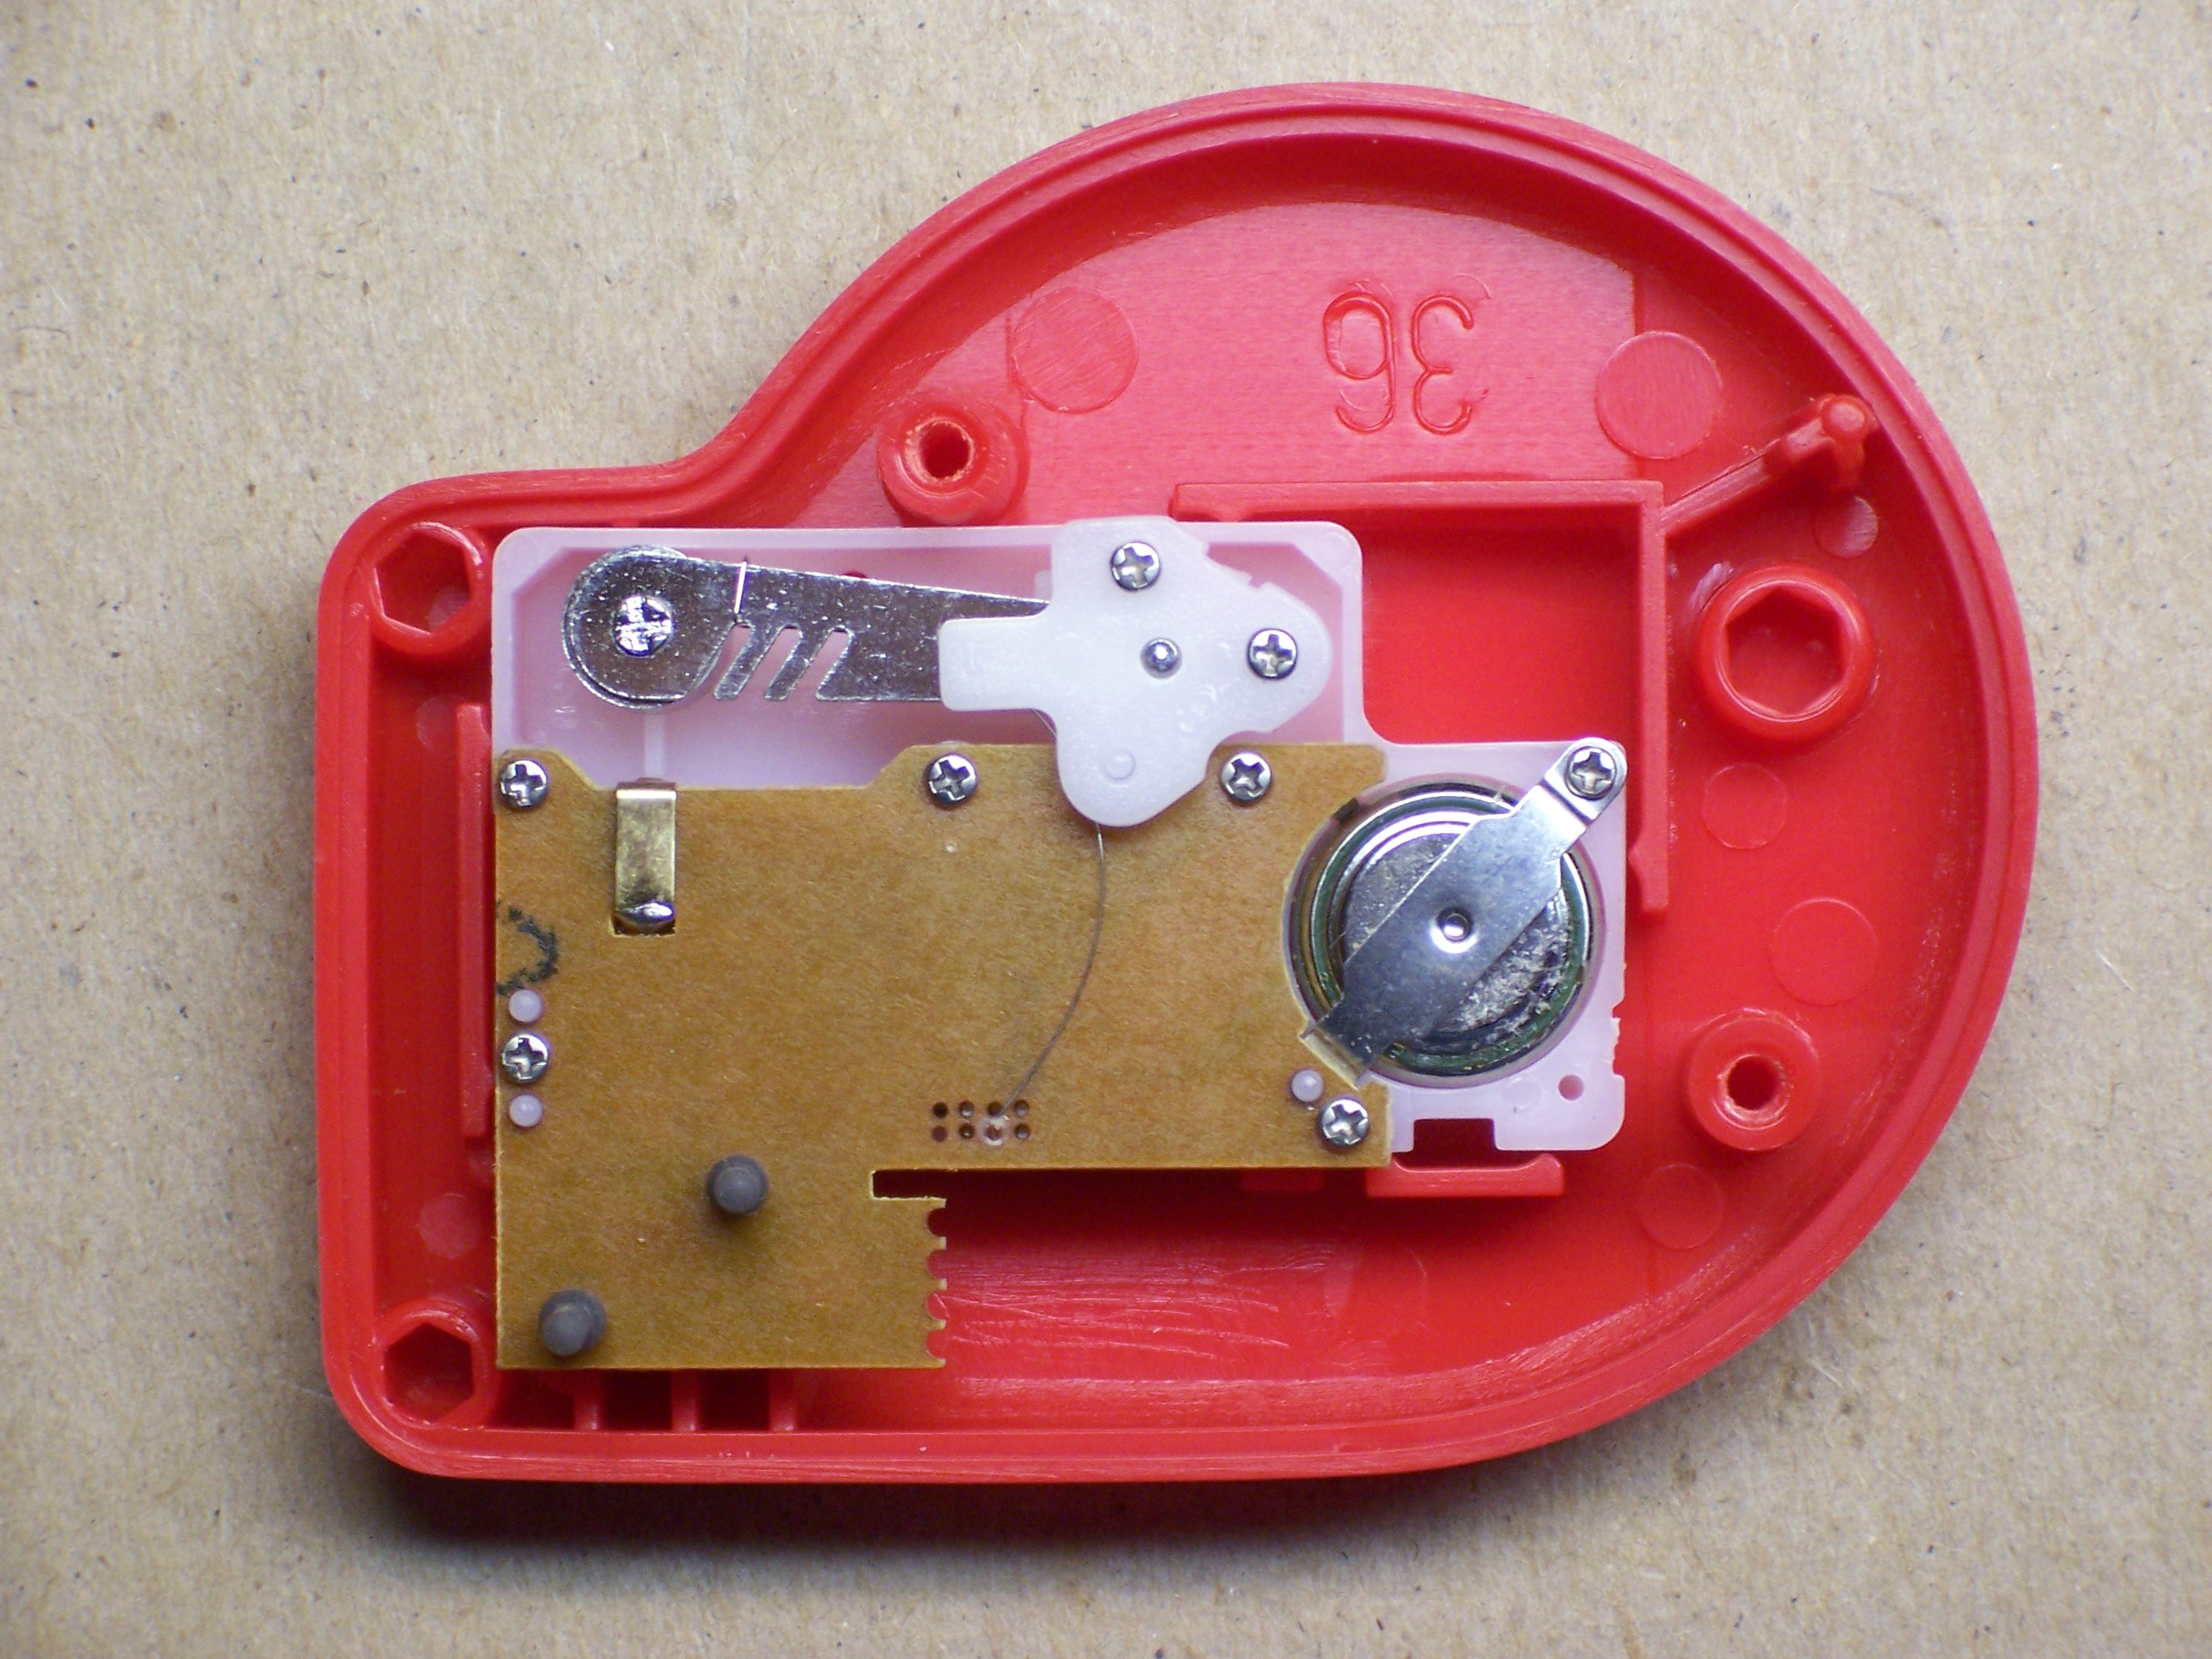
The Fresnel dome of this sensor, by the way, is too large to fit into the LED puck (as, most likely, is the PCB). However, it’s not out of the question to purchase a separate PIR element and mill a multifaceted lens pattern into the puck enclosure above it. It would be an interesting challenge, perhaps for a later version.
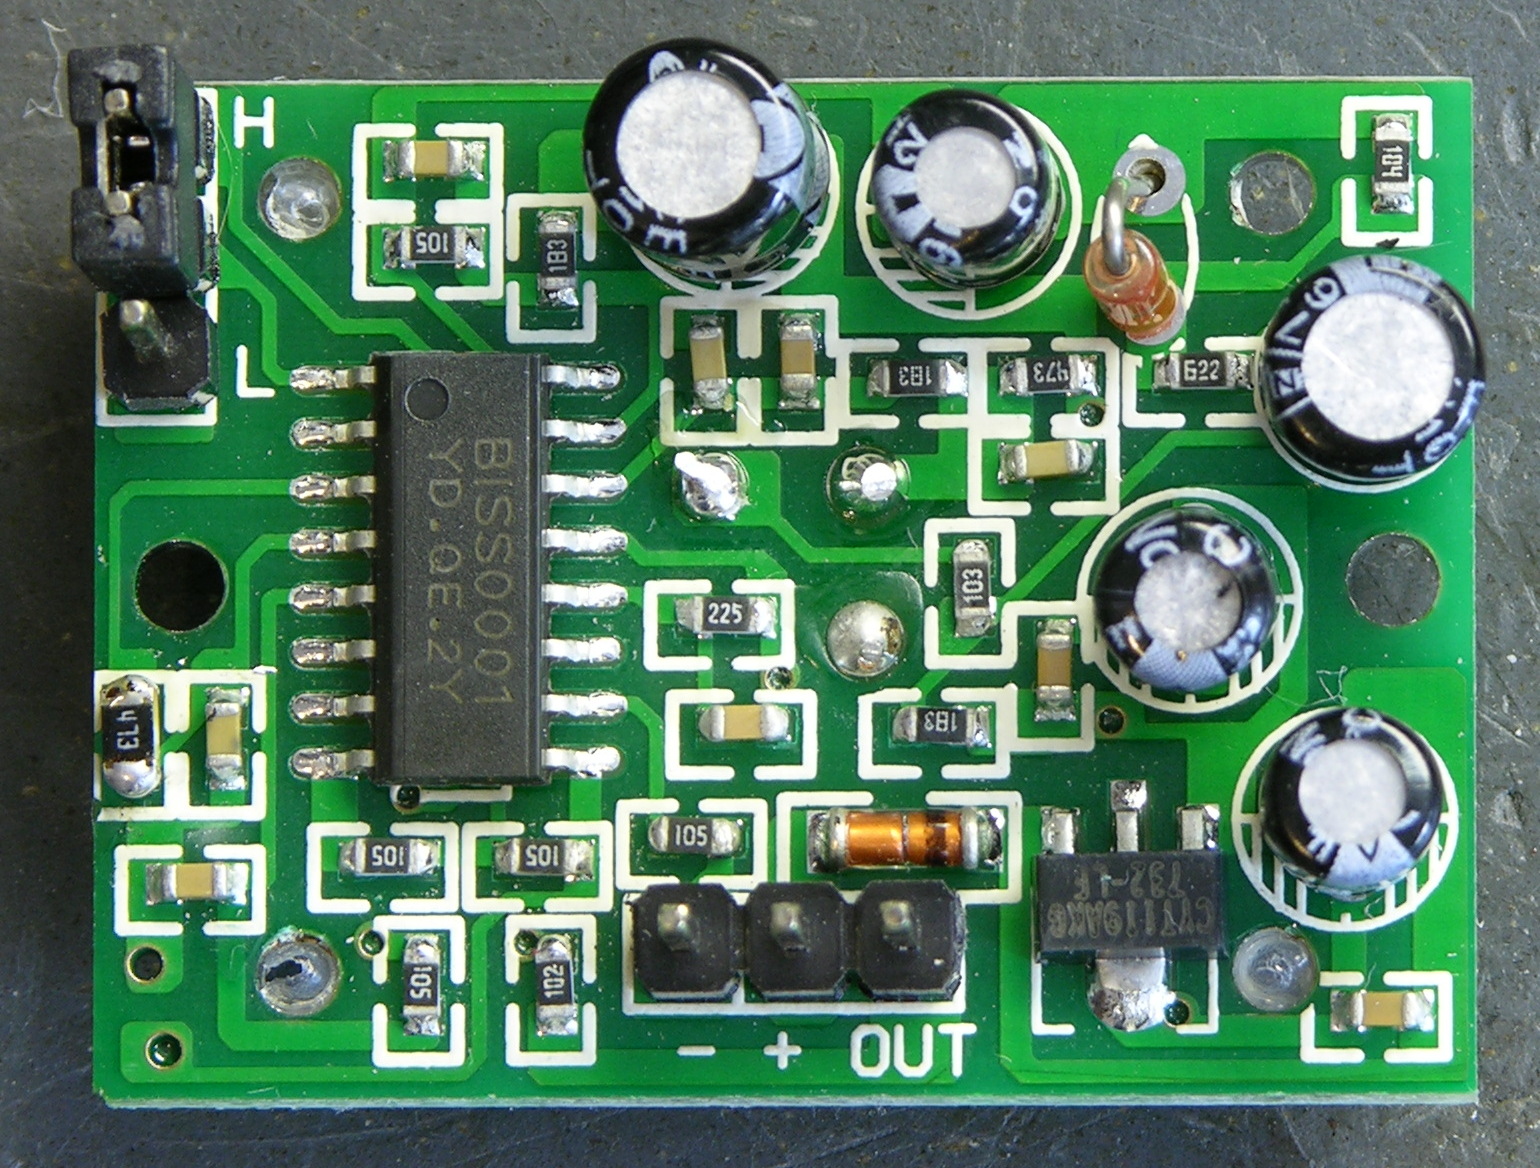
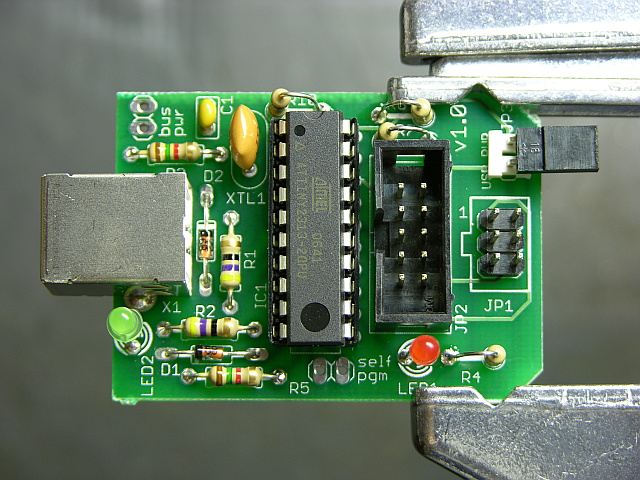
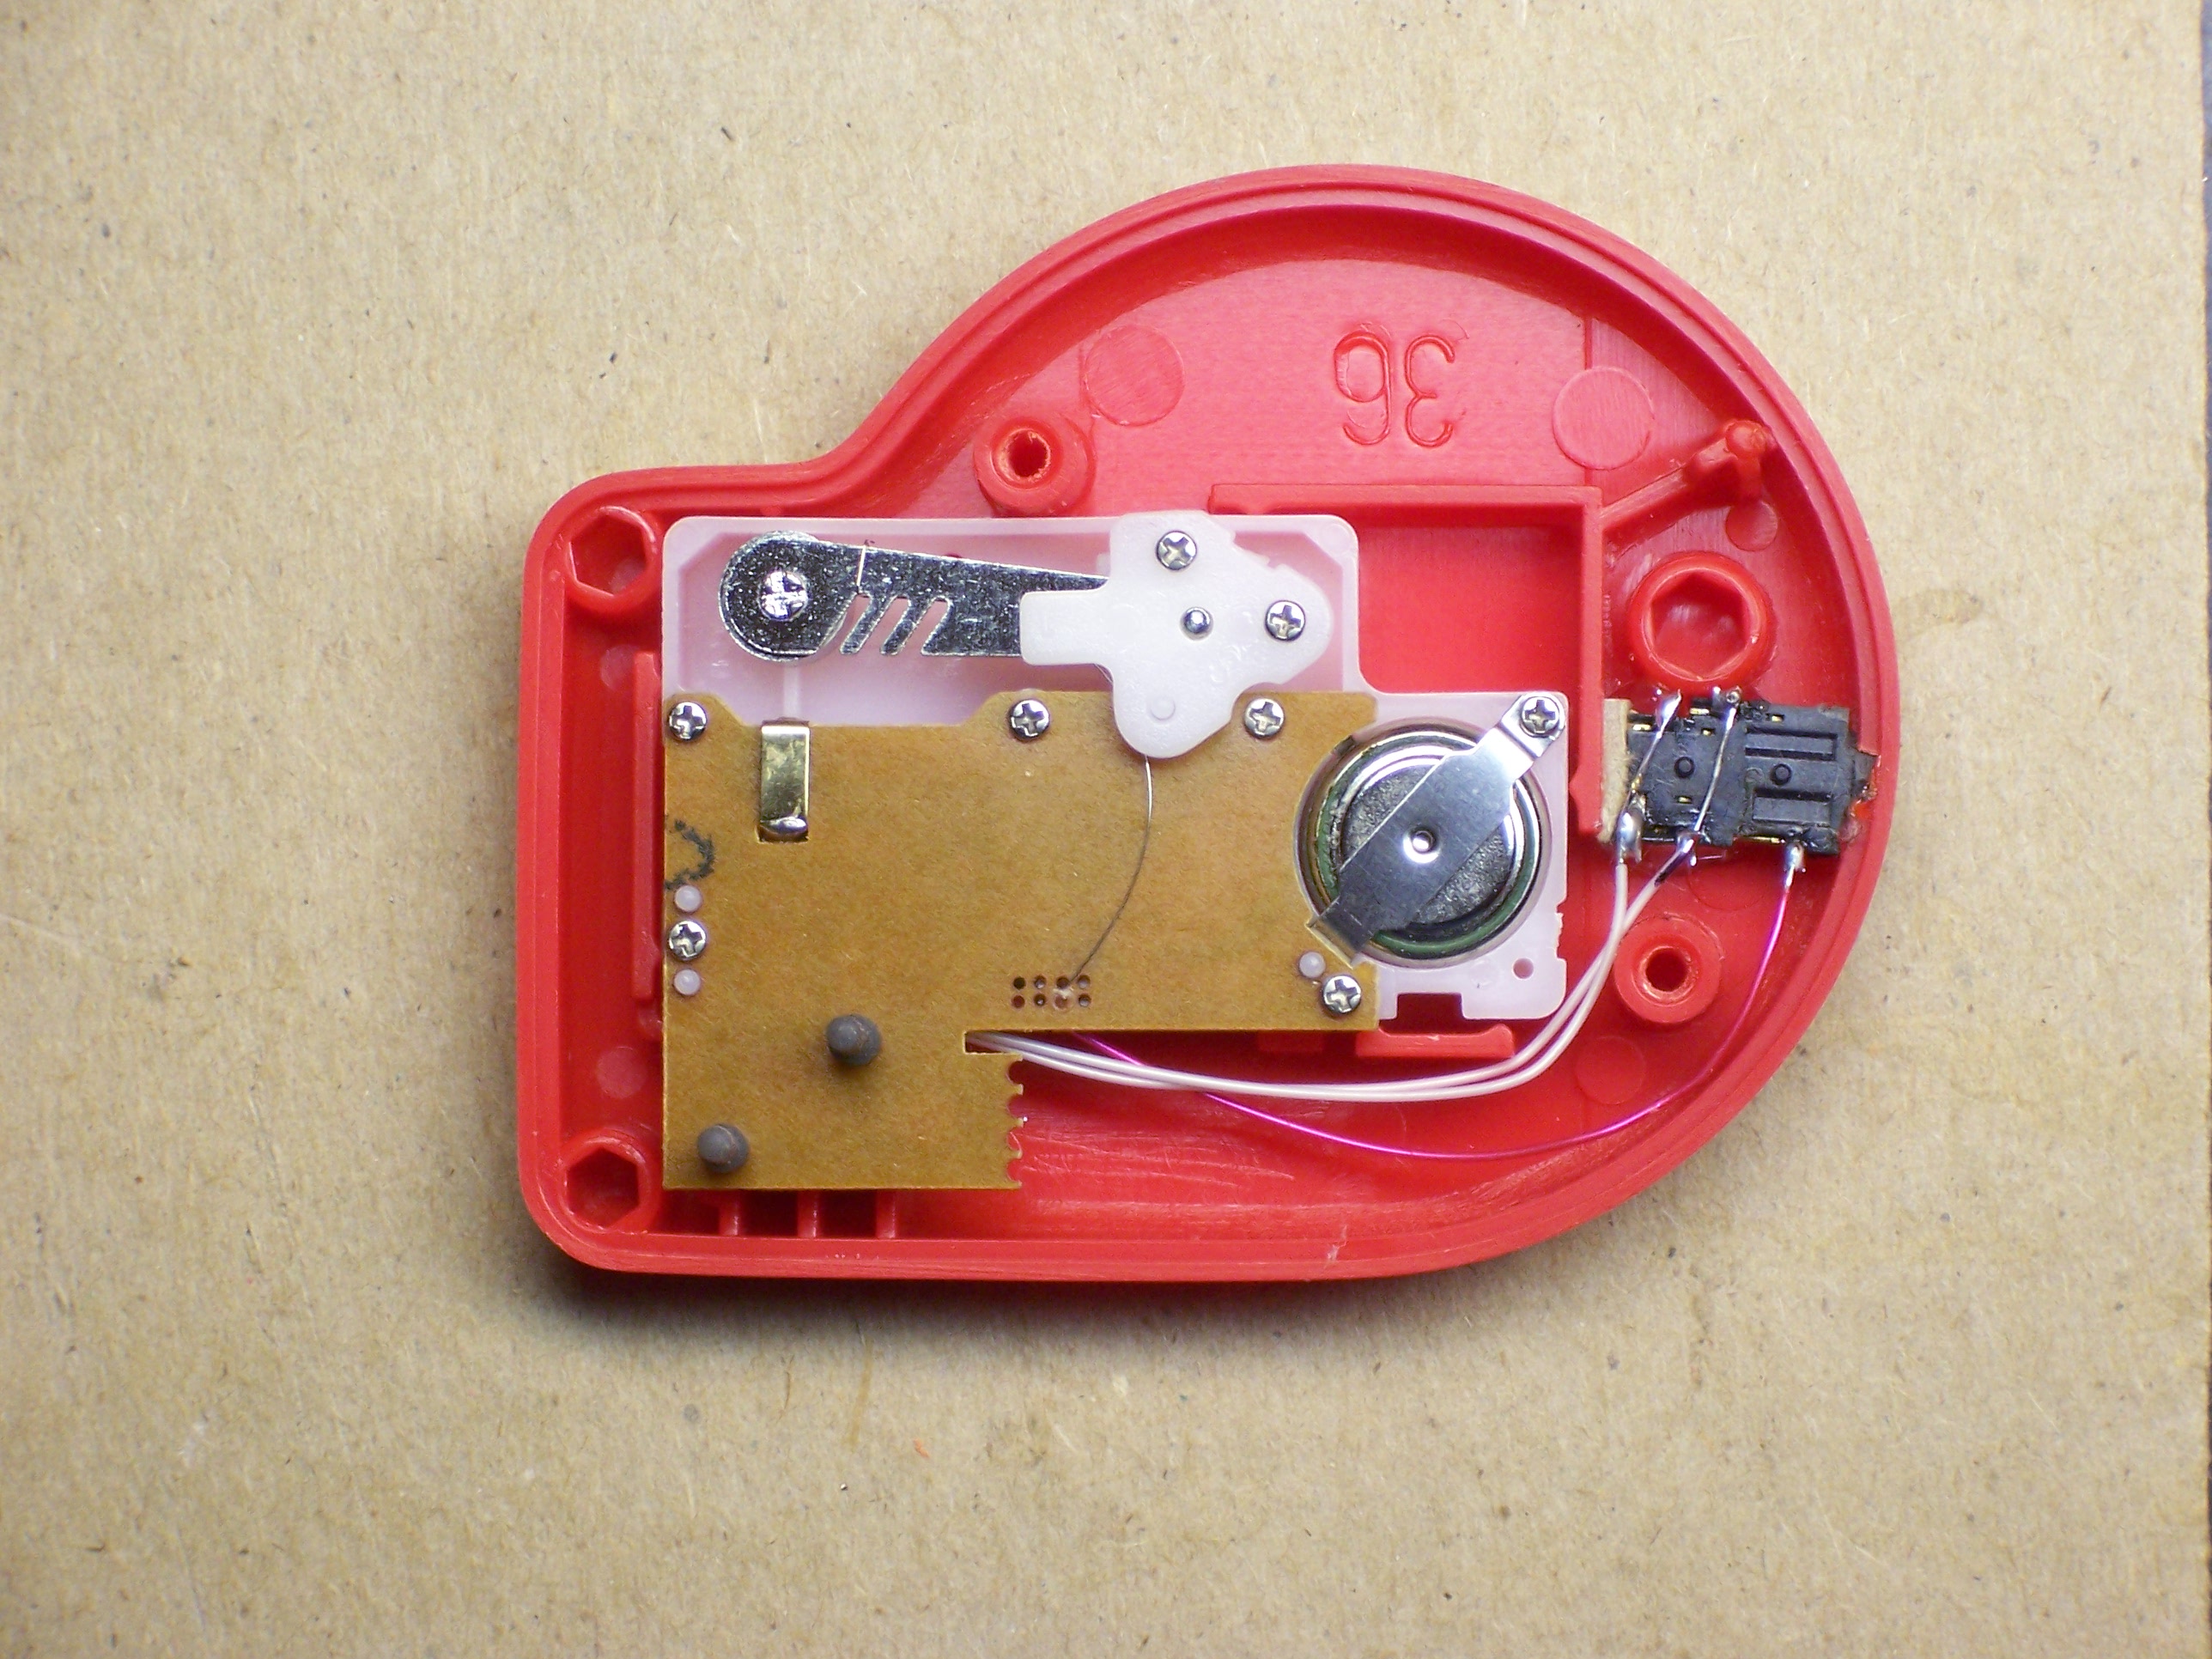
The Parallax Sensor

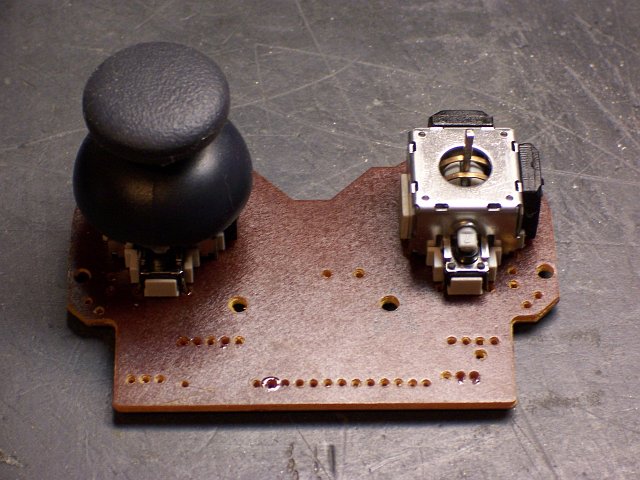
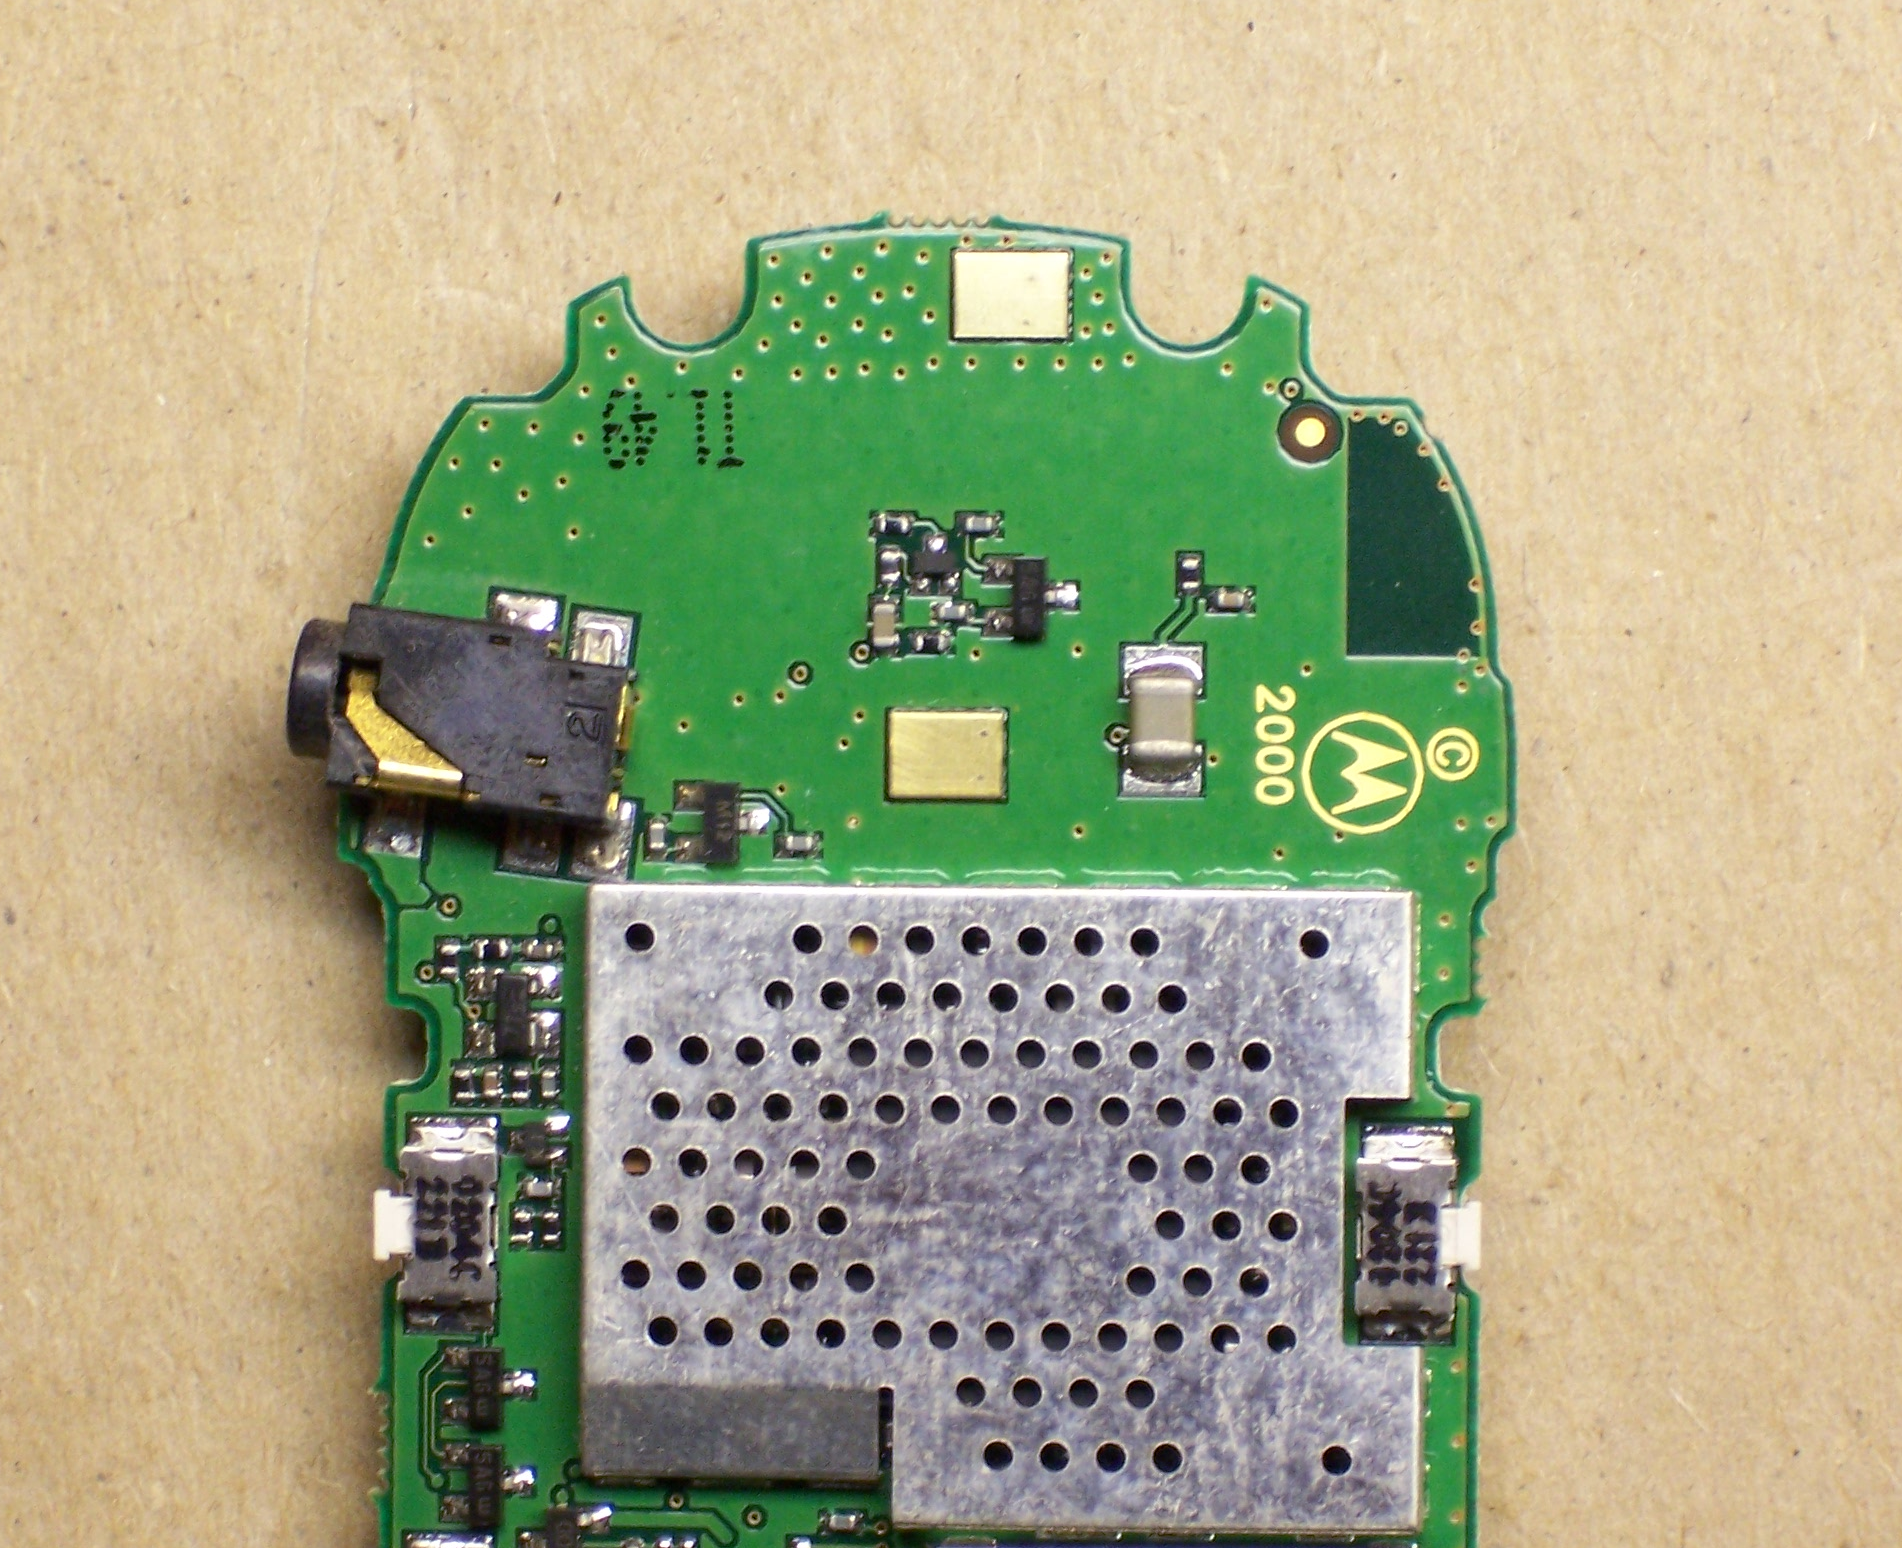
The sensor comes with an absolutely minimal connection diagram, and refers to the Parallax web site for full documentation. The module has a three-pin connector (bottom) for ground/V+/output, and a two-position jumper (upper left) for retriggering mode.

Parallax motion sensor, component side

The power/output header is annoyingly the same height as the other components on the back side of the board, so the sensor cannot be plugged directly into a breadboard for prototyping; it requires an extension. Parallax recommends a servo extension cable; I soldered a three-pin header to a three-pin header socket to make a rigid extension for breadboarding.

The module’s output is active-high. The Parallax documentation indicates that the jumper selects retriggering mode. With the jumper in the L position, the module triggers the output upon detecting motion and then goes low again. With the jumper in the H position, the module is supposed to keep the output high as long as motion continues, but mine does not.

The datasheet indicates that the module needs a “warmup” period of about a minute, during which time it’s adapting to ambient conditions and may trigger randomly. My experience was similar, so anyone using this module needs to be prepared to accept random triggering for a while after startup.

The package and datasheet indicate a detection range of about 20′. I didn’t have room to test this, but I’m willing to believe it until I learn otherwise. Apart from the minor annoyances above, the sensor really is very easy to use, particularly for our class. It seems quite responsive to motion, and certainly responsive enough to pick up gallery visitors not specifically trying to sneak up on it. Output is a very clean 5V, so it’ll be easy for students to interface to the Arduino.

Sensitivity is fixed. It’d be nice to have a trim pot to adjust sensitivity/range, particularly for use in interactive sculpture projects. A Halloween prop-maker going by the name “Scary Terry” has written a nice review of the motion sensor, and includes pictures of mounting it inside PVC pipe to control its angle of sensitivity. I guess with care, the sensor could be angled toward the ground in such a way that it would be triggered only when feet entered a designated area.

Hacking the Sensor

I suspect that most students using this sensor either would trigger a long sequence of actions when motion is first detected, or would like to get a continuous (retriggered) signal the entire time motion is detected. I’m somewhat interested, though, in a much finer-grained notion of “the entire time motion is detected” than that.

By my rough count, the sensor triggers for about two and a half seconds each time it detects motion. It then locks out briefly (didn’t time it — say another couple of seconds?) during which time it’s insensitive before it can detect motion again.

I’d like to be able to get a series of much shorter spikes and much shorter recovery time. I don’t know exactly why; it just seems useful to me.

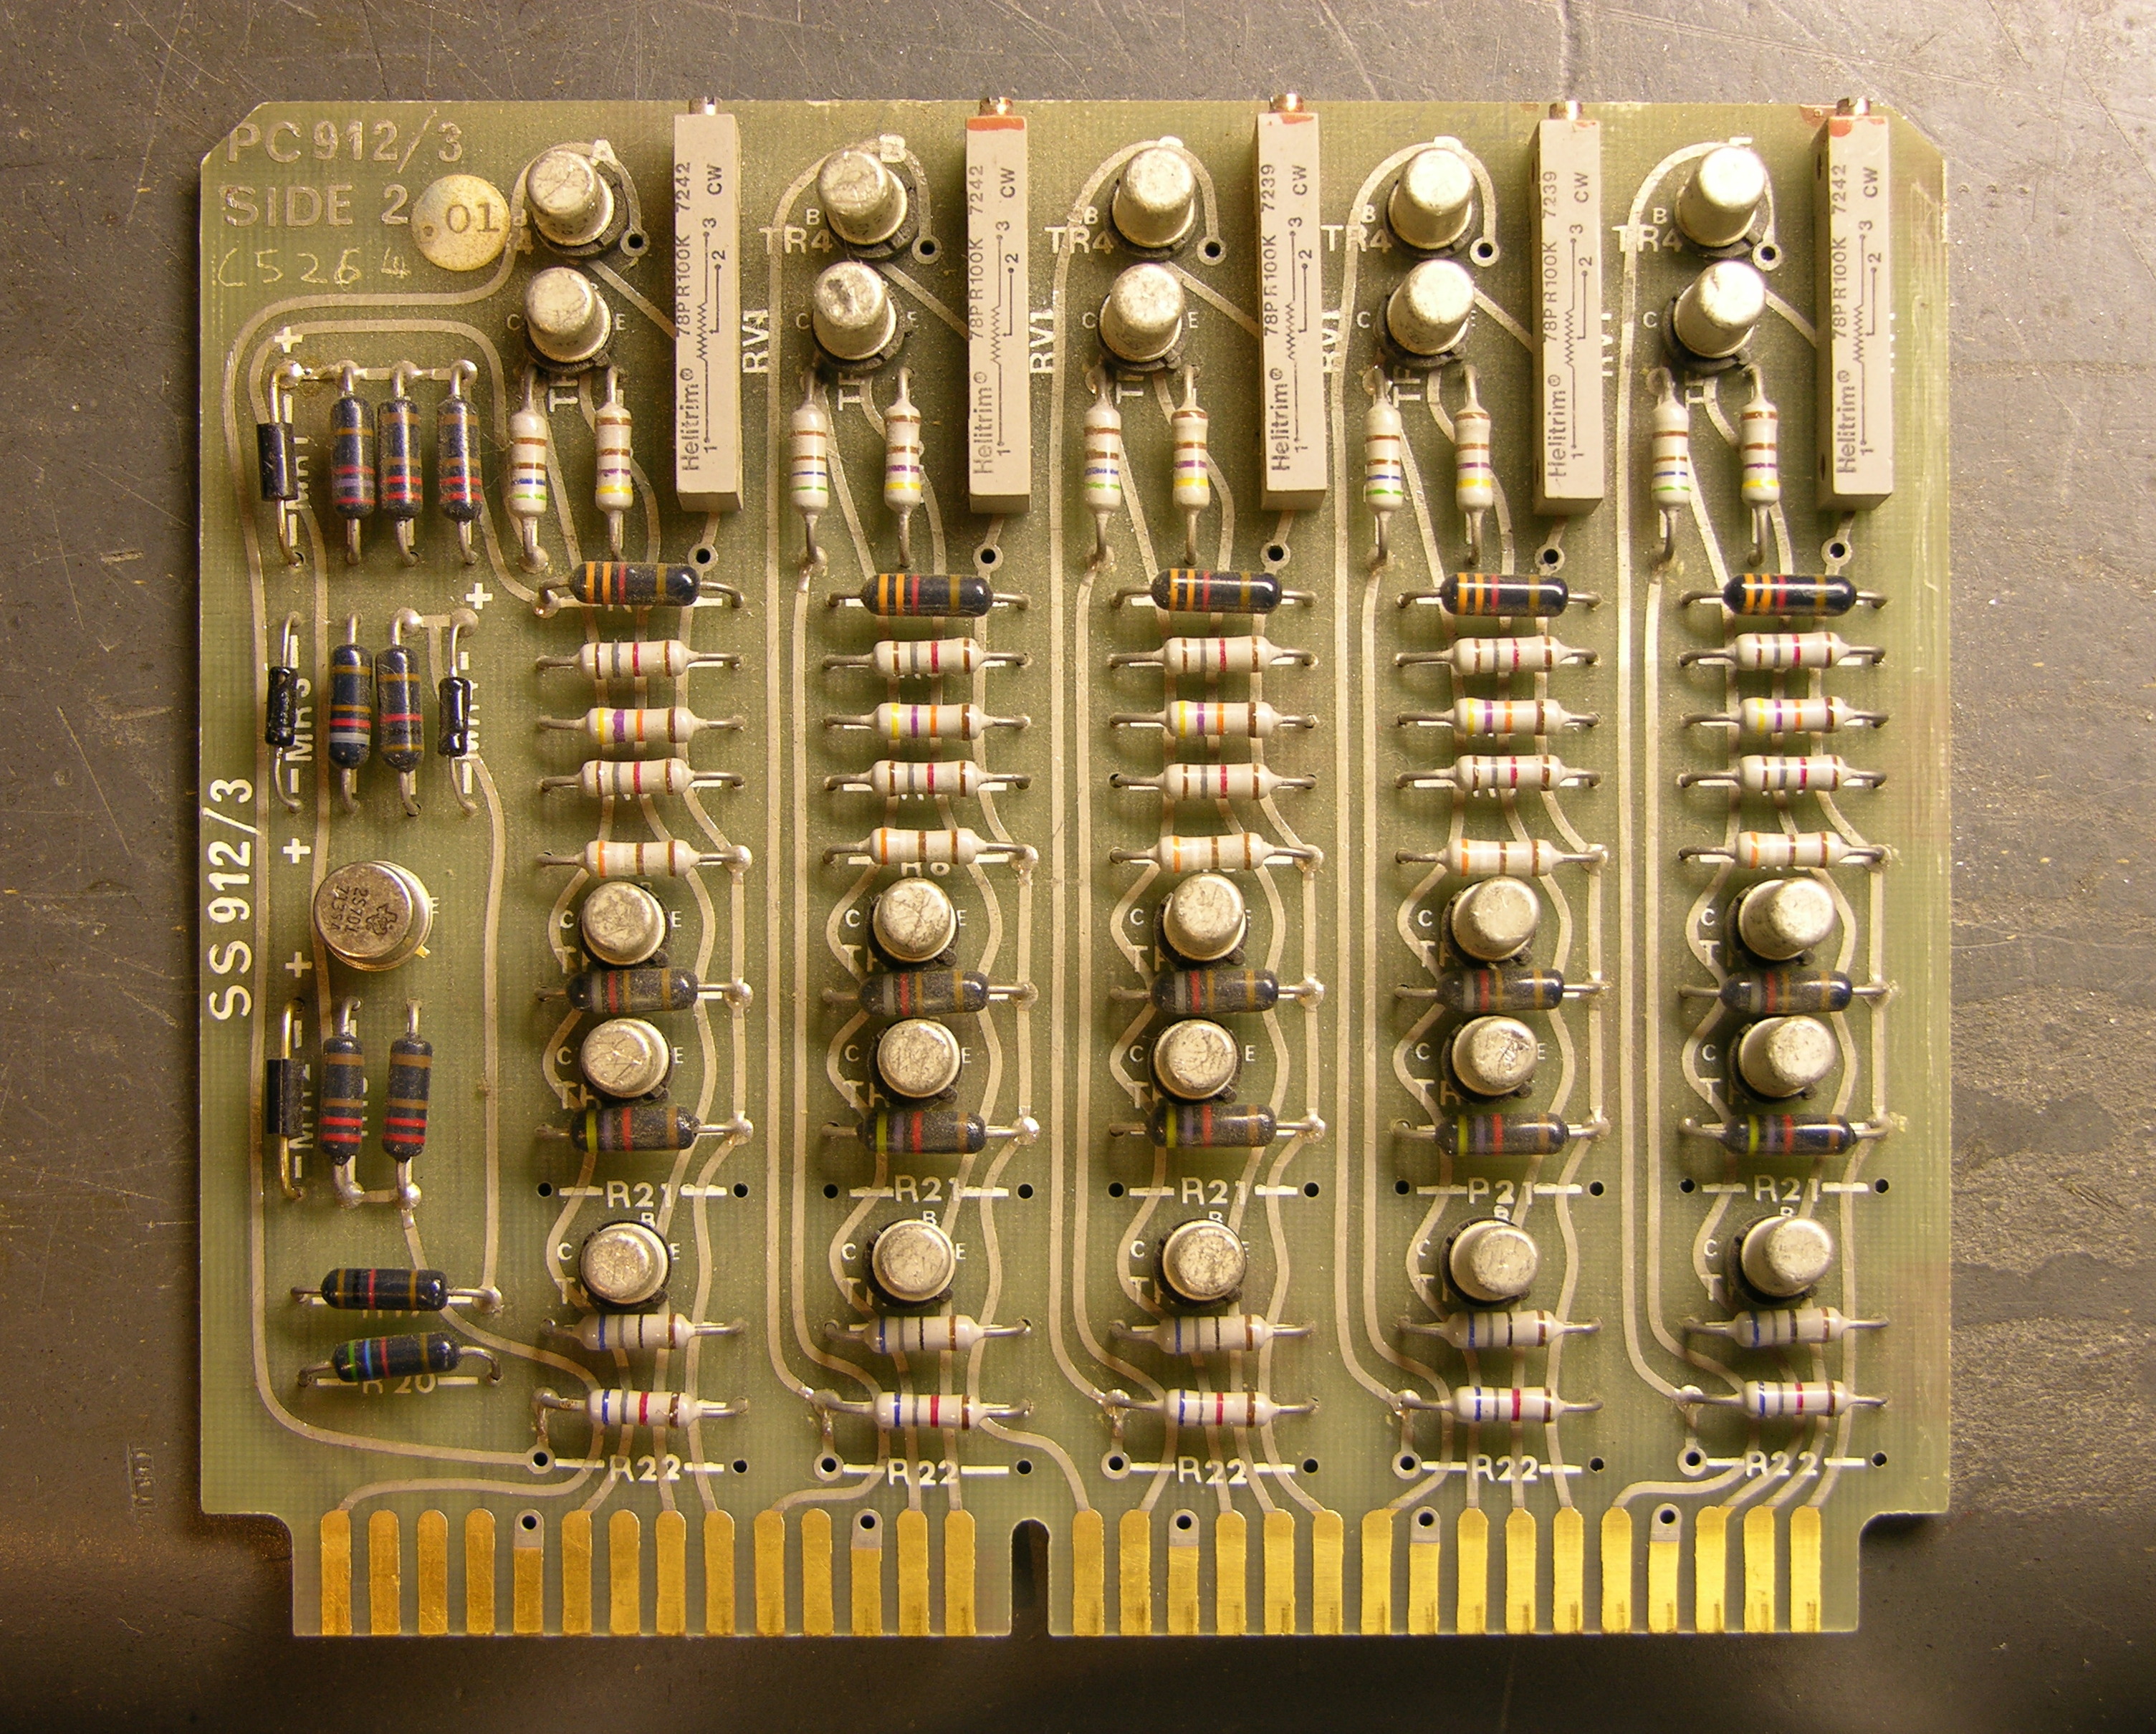
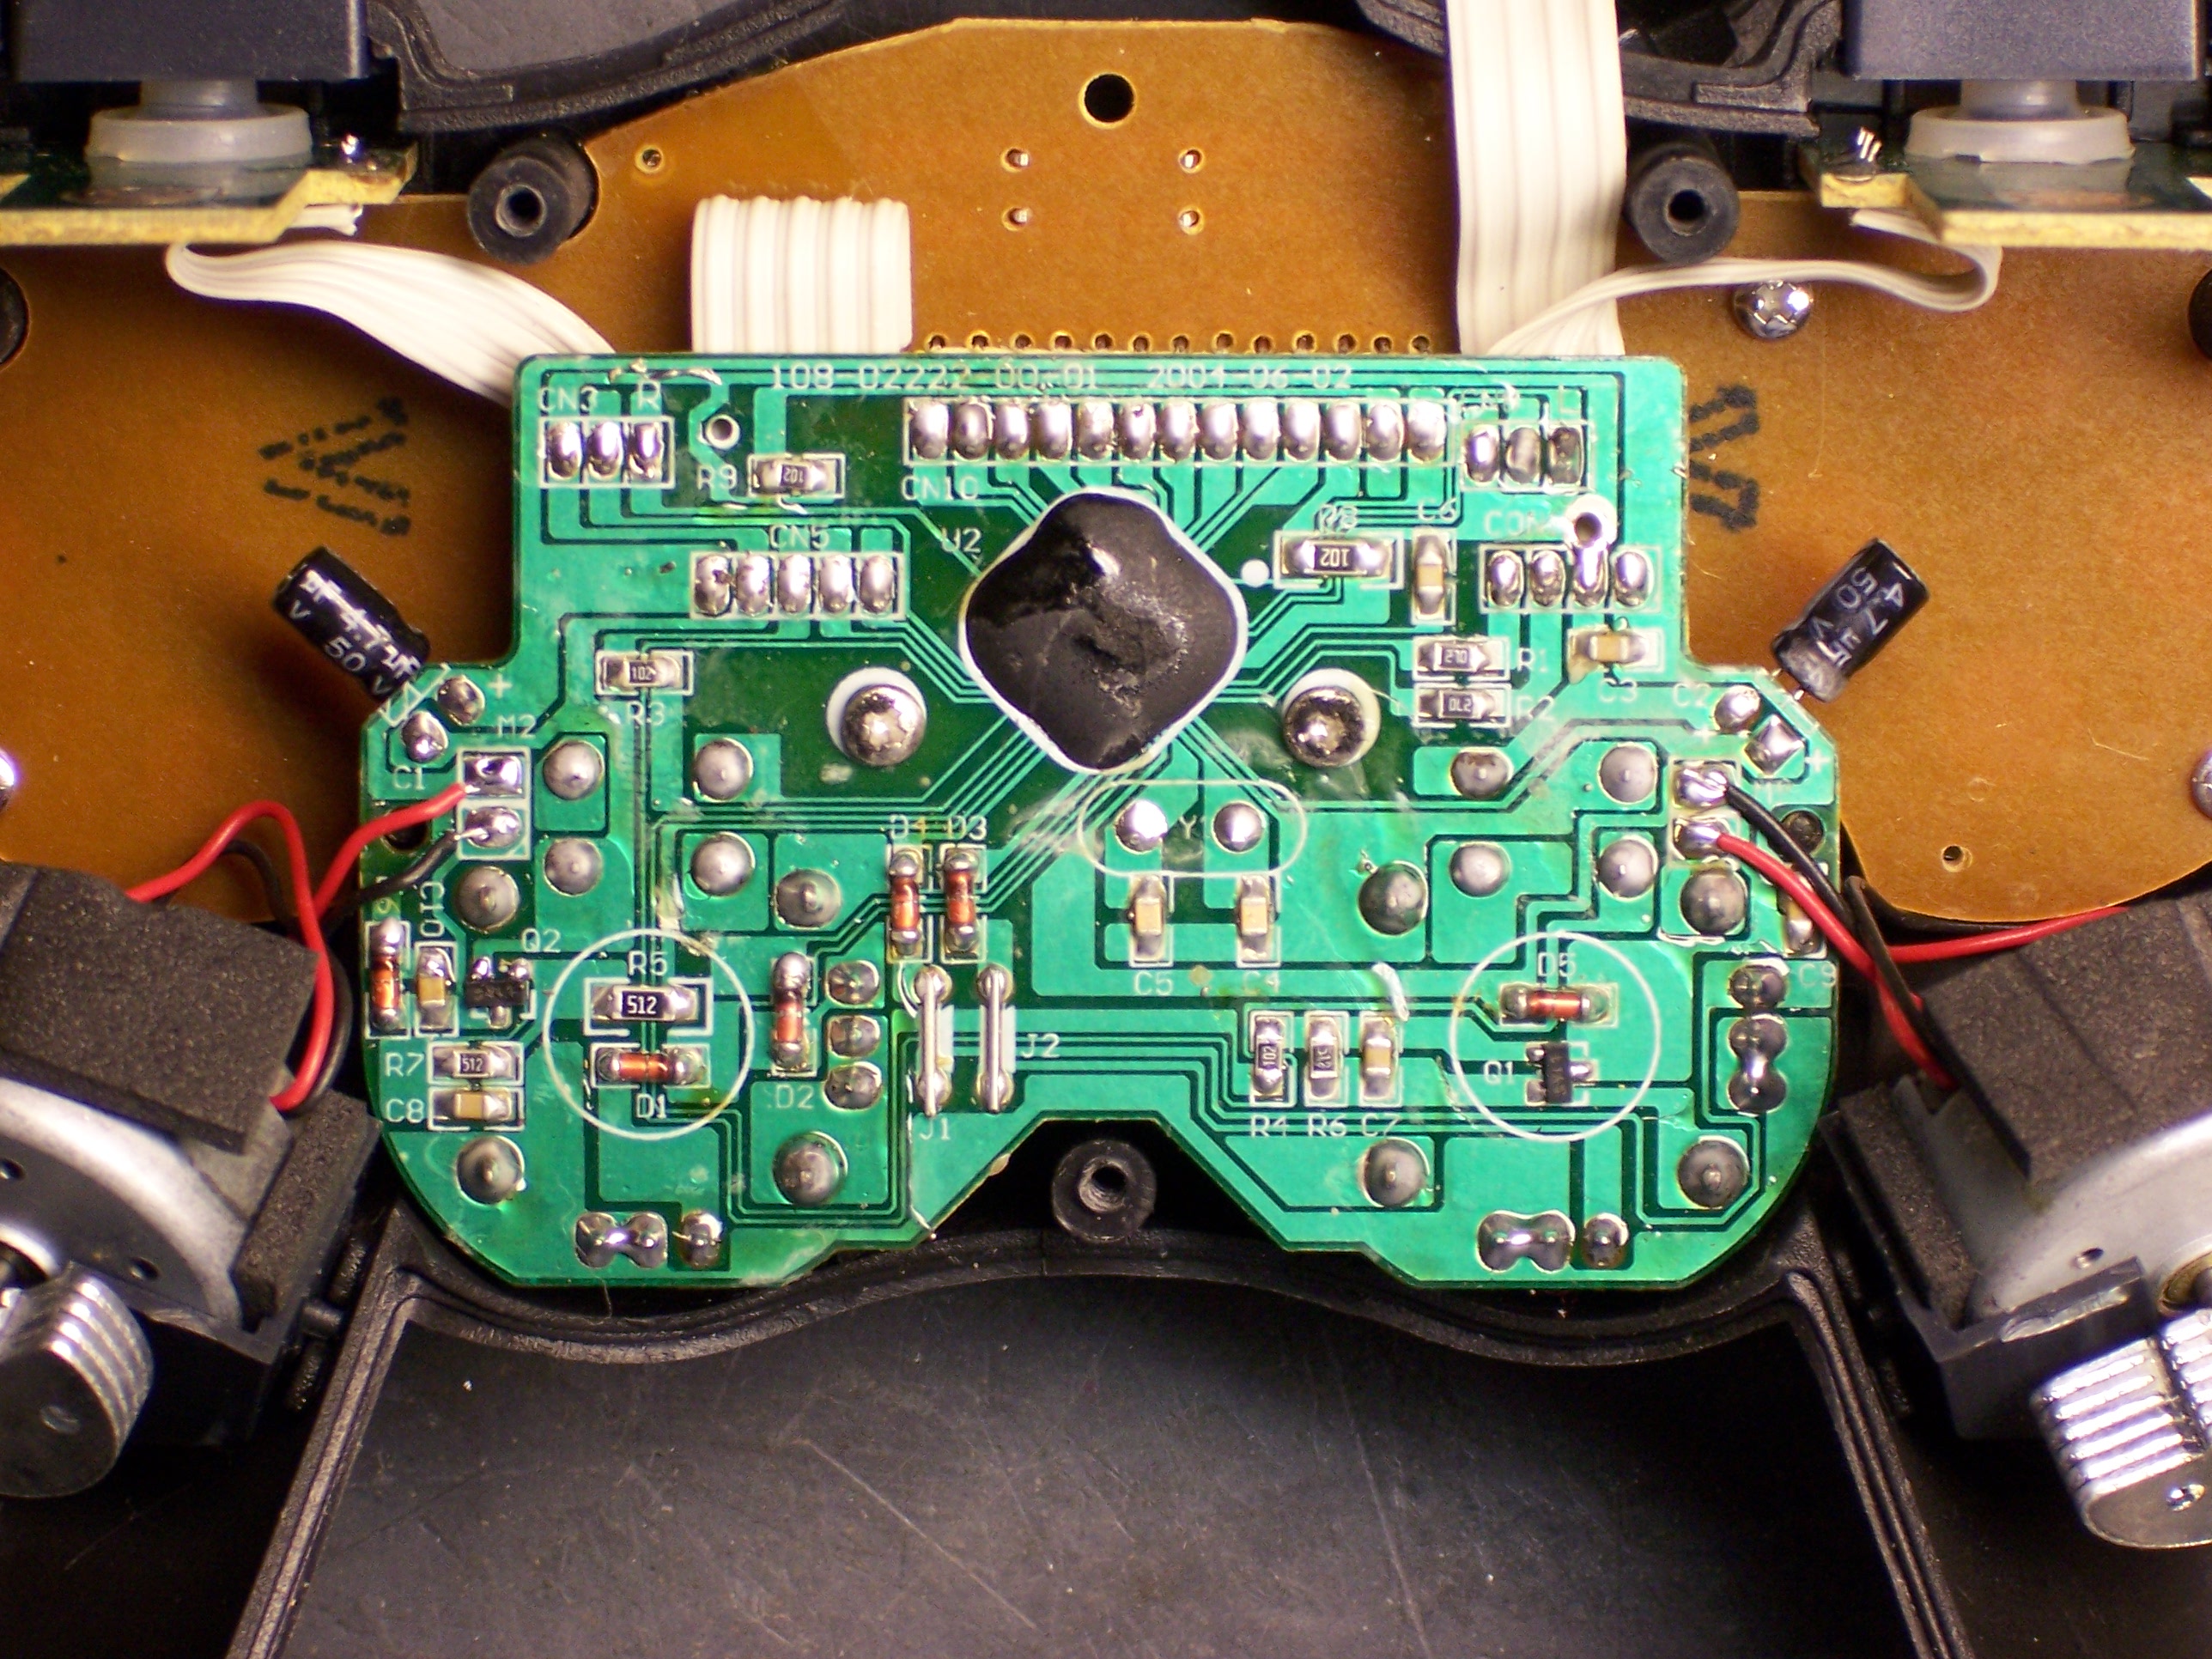
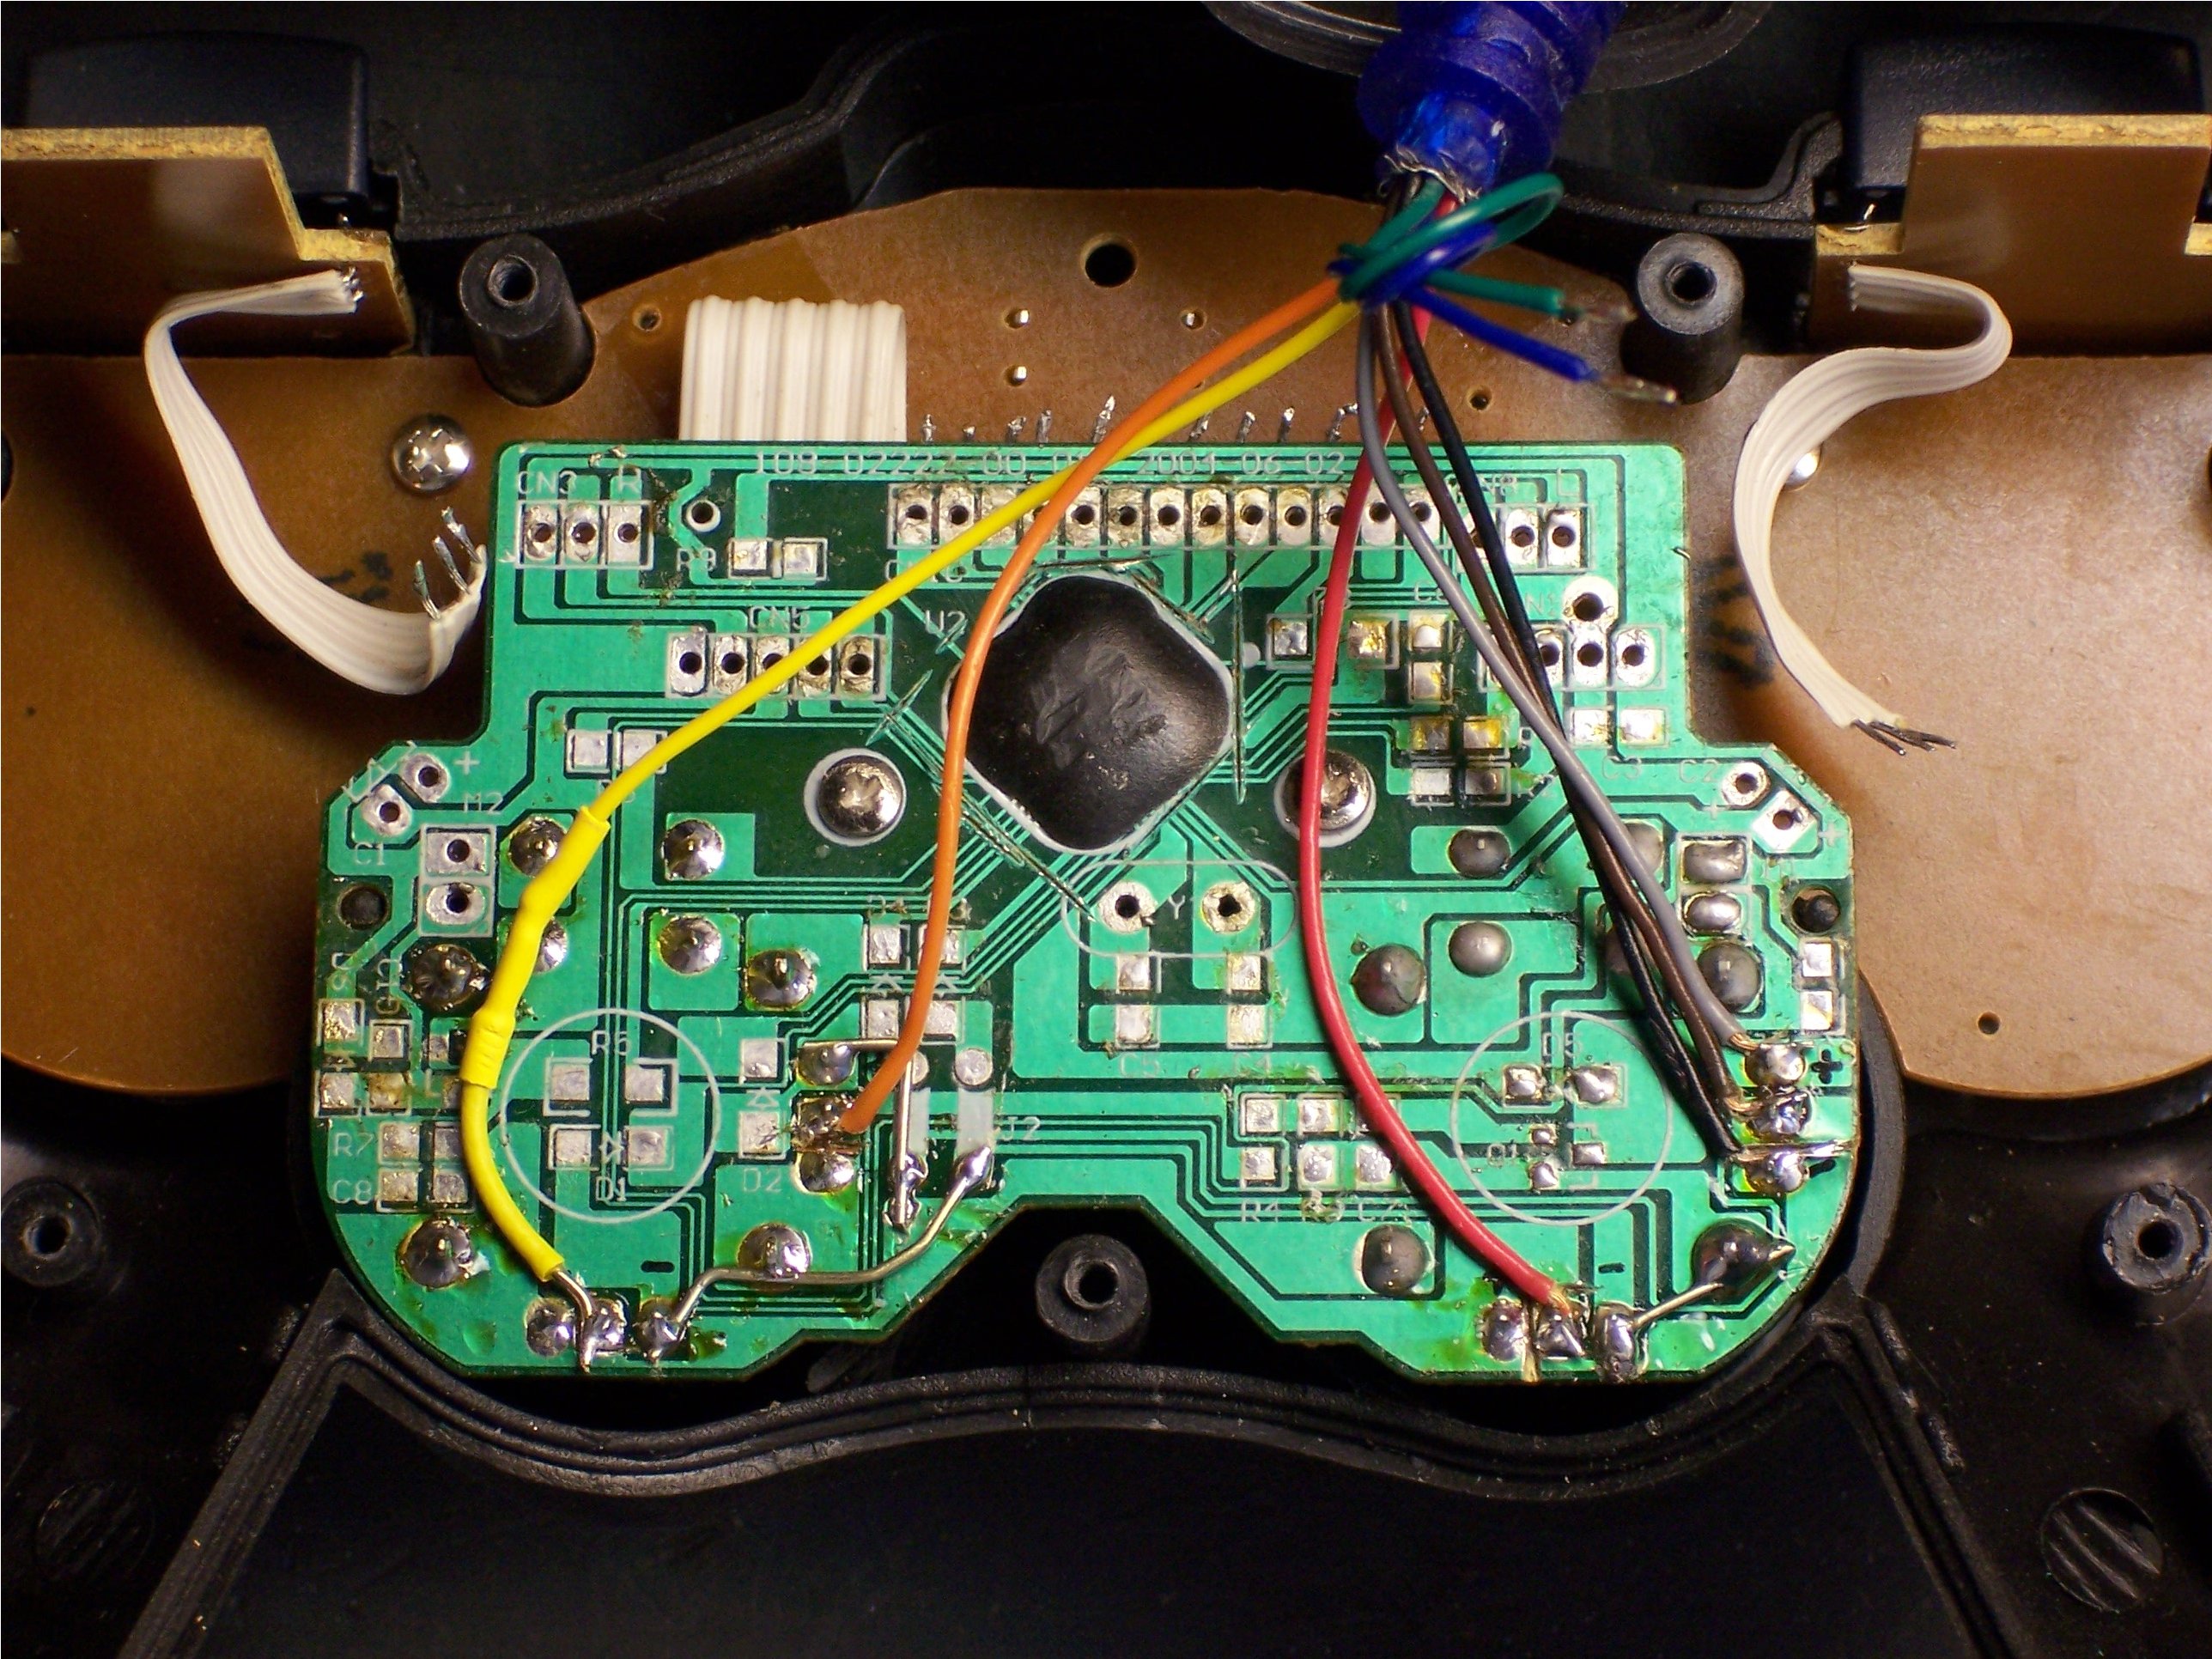
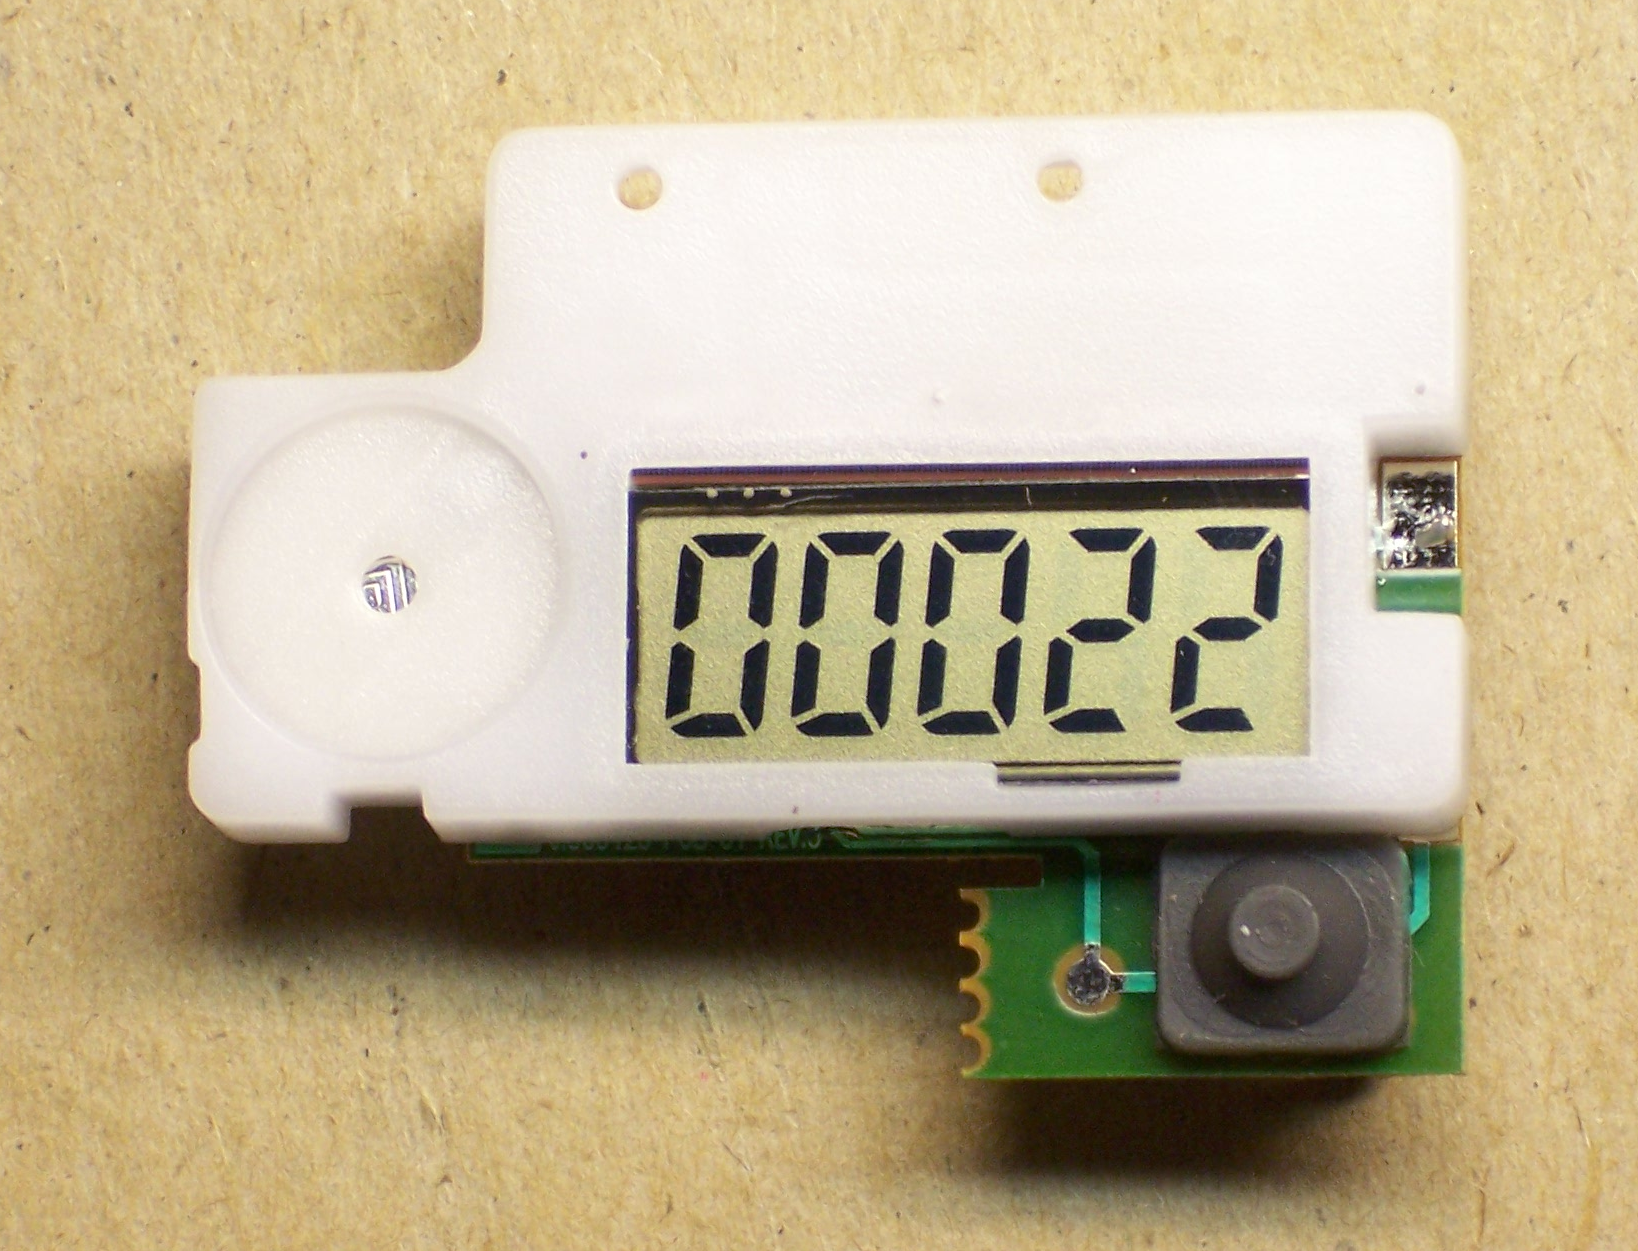
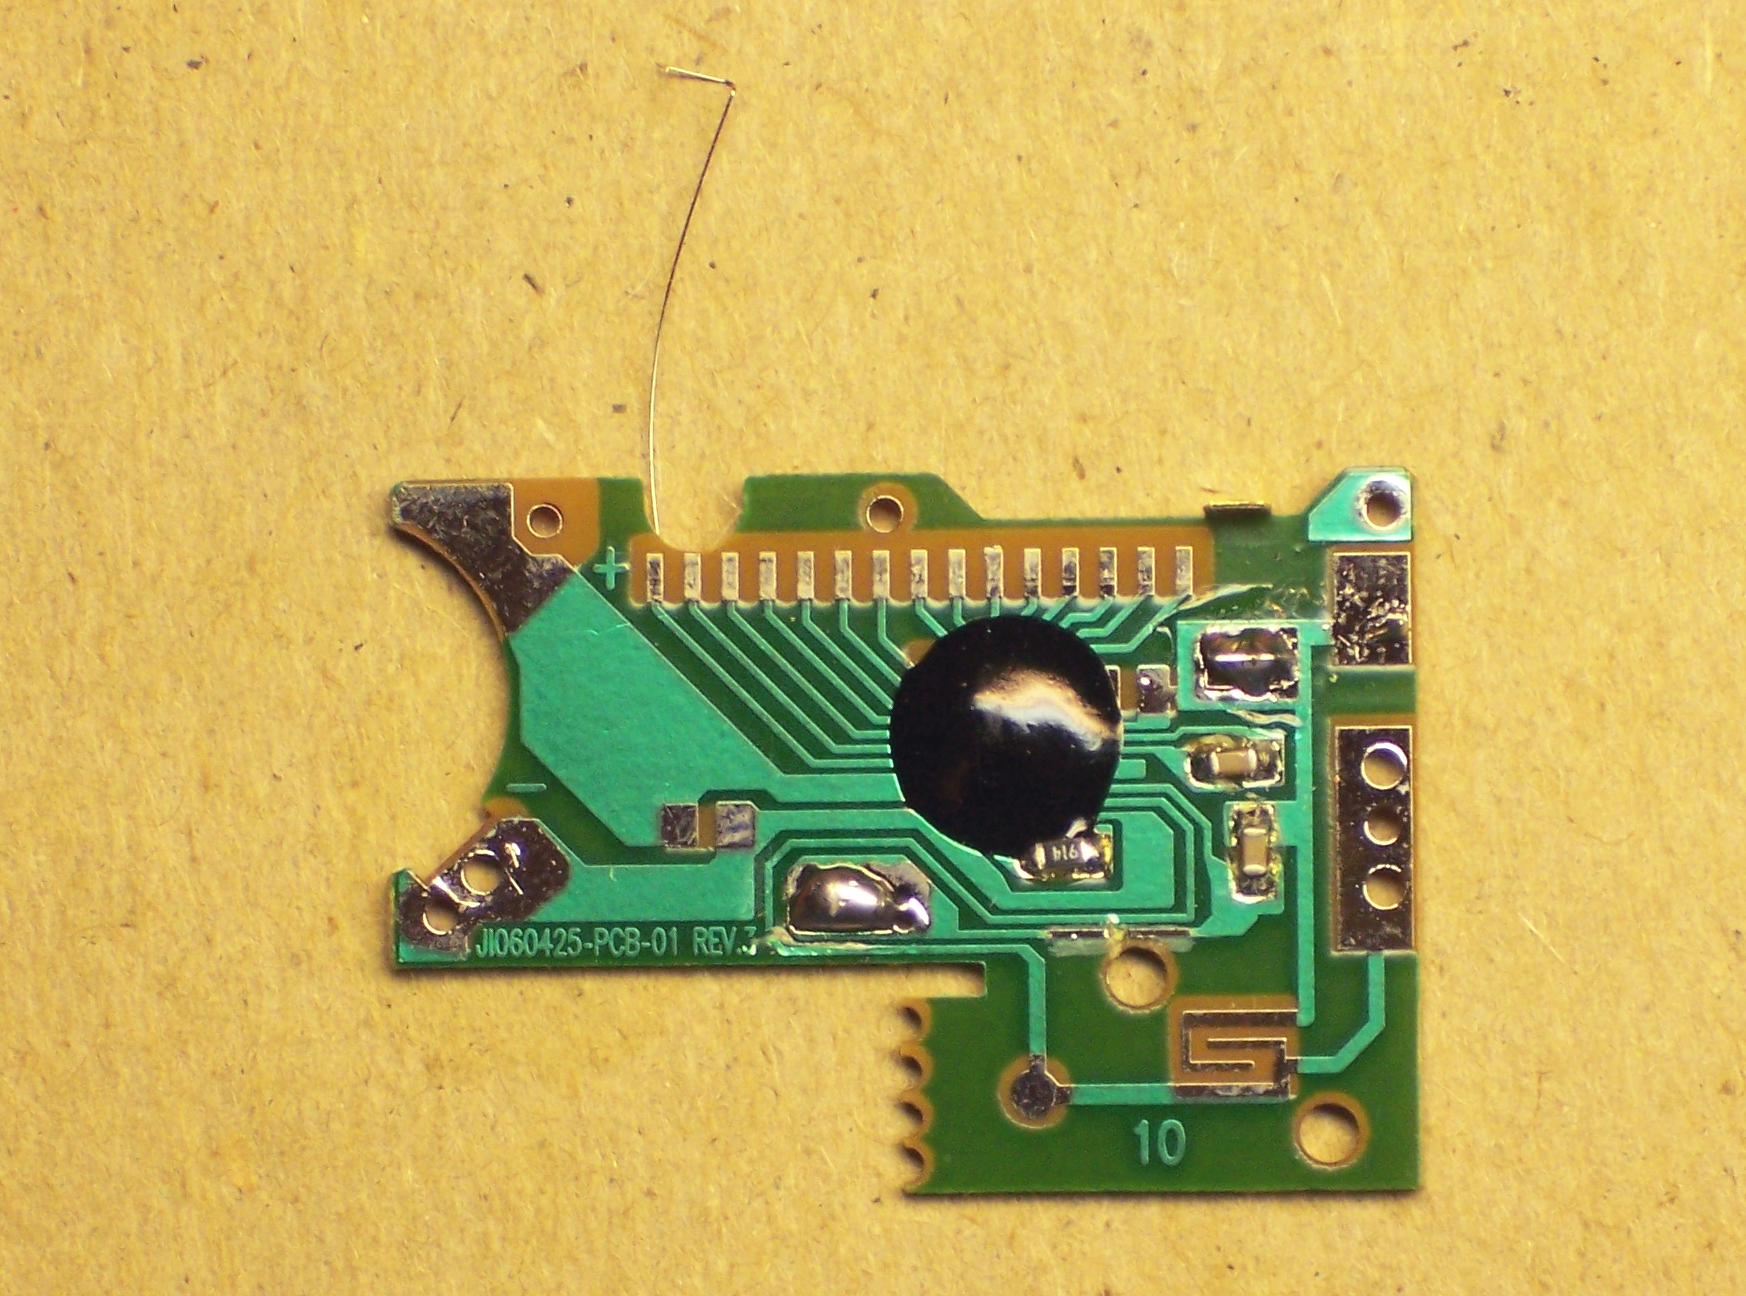
Let’s go back to that component view:

Parallax motion sensor, component side

The IC doing all the work is a BISS0001. The only datasheet I can find for it is in Chinese, yay, don’t read that, sorry. The chip has a bunch of comparators, some logic, a logic section labelled in Chinese, and two timers labelled in Chinese. It looks like it’s probably made specifically for motion-sensing applications.

Fortunately the pinouts and component values are labelled in English, so I was able to make enough sense of the datasheet to understand how to set the timing constants. From the sample application circuit, pin 2 is obviously the master output; and on the pinouts, pin 2 is labelled VO.

On the timing diagrams, VO goes high for a period labelled TX and low for a period labelled Ti. Just above that, we have the equation TX ≈ 49152R1C1 leaping out at me from a wad of impenetrable Chinese. On the functional diagram, R1 and C1 stack from pin 3 to 4 to ground.

Parallax motion sensor, pulse timing components

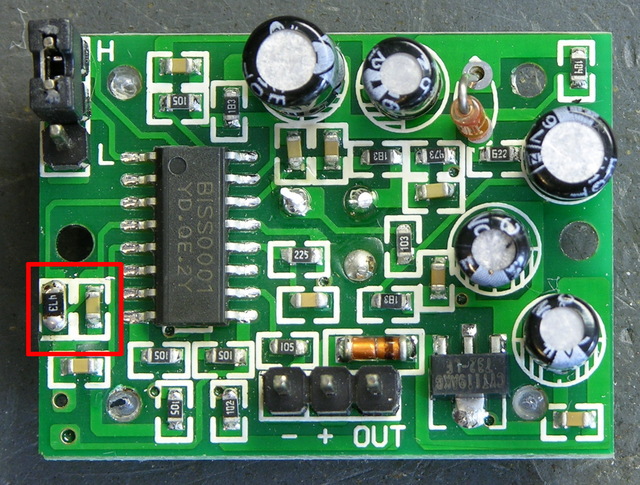
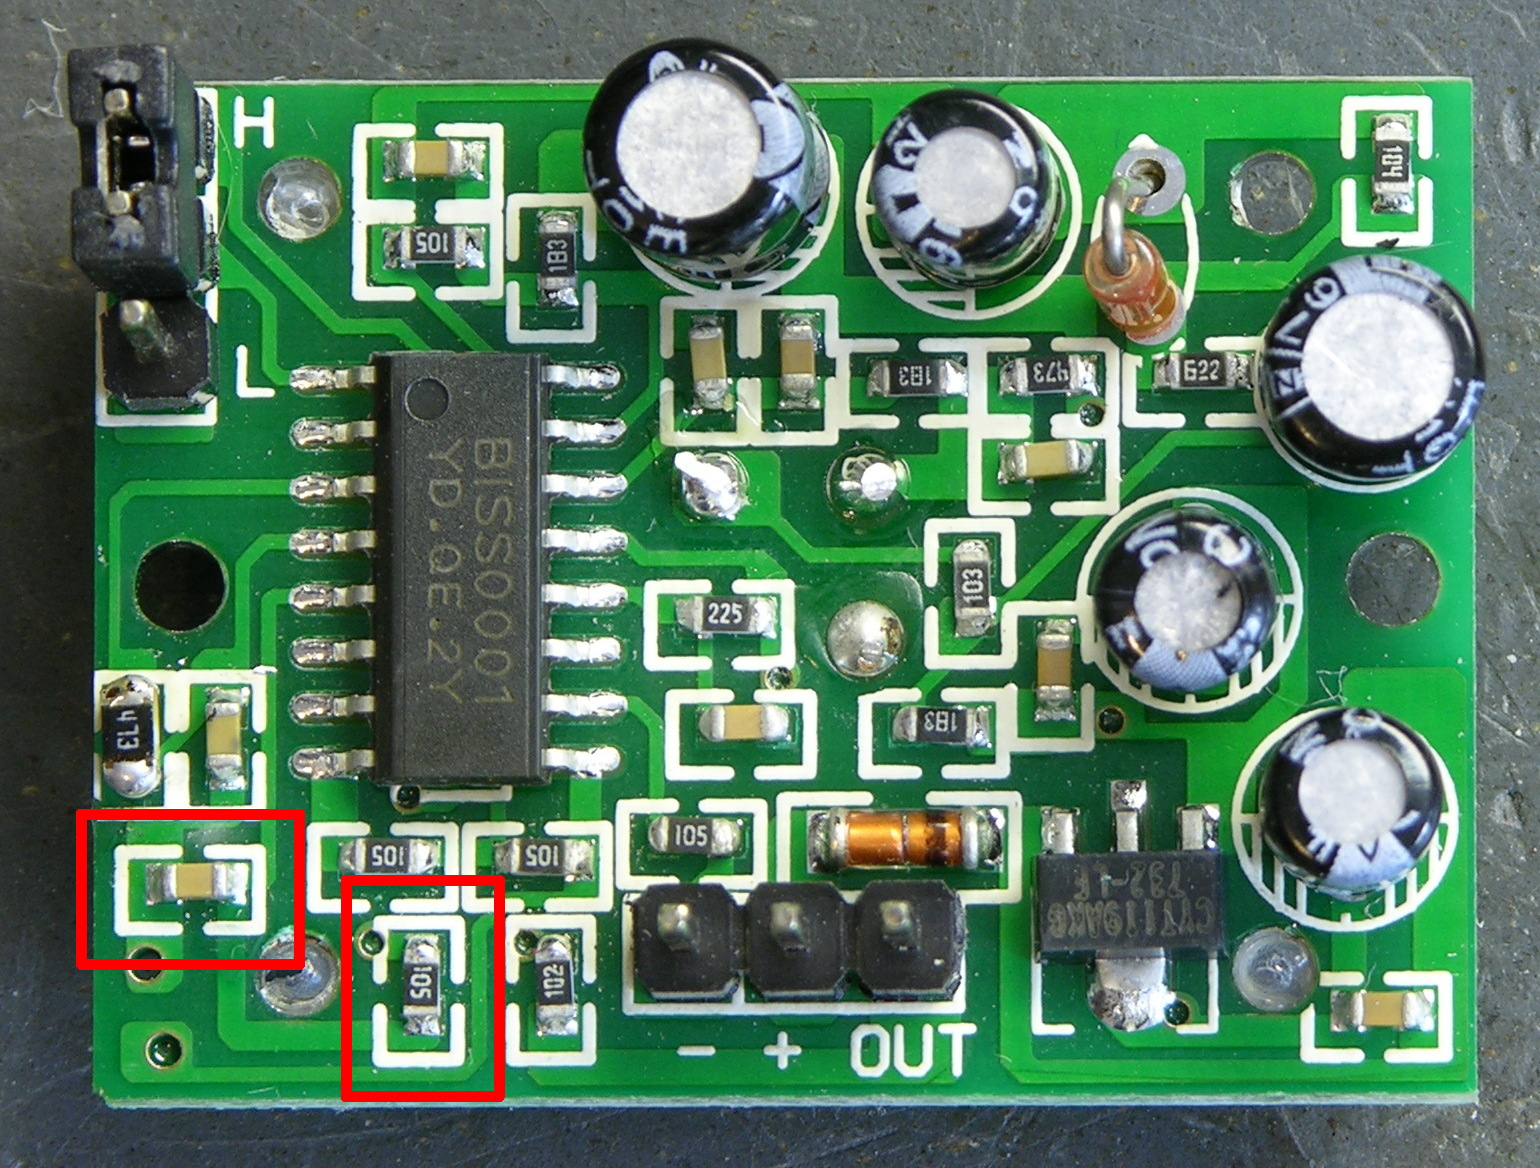
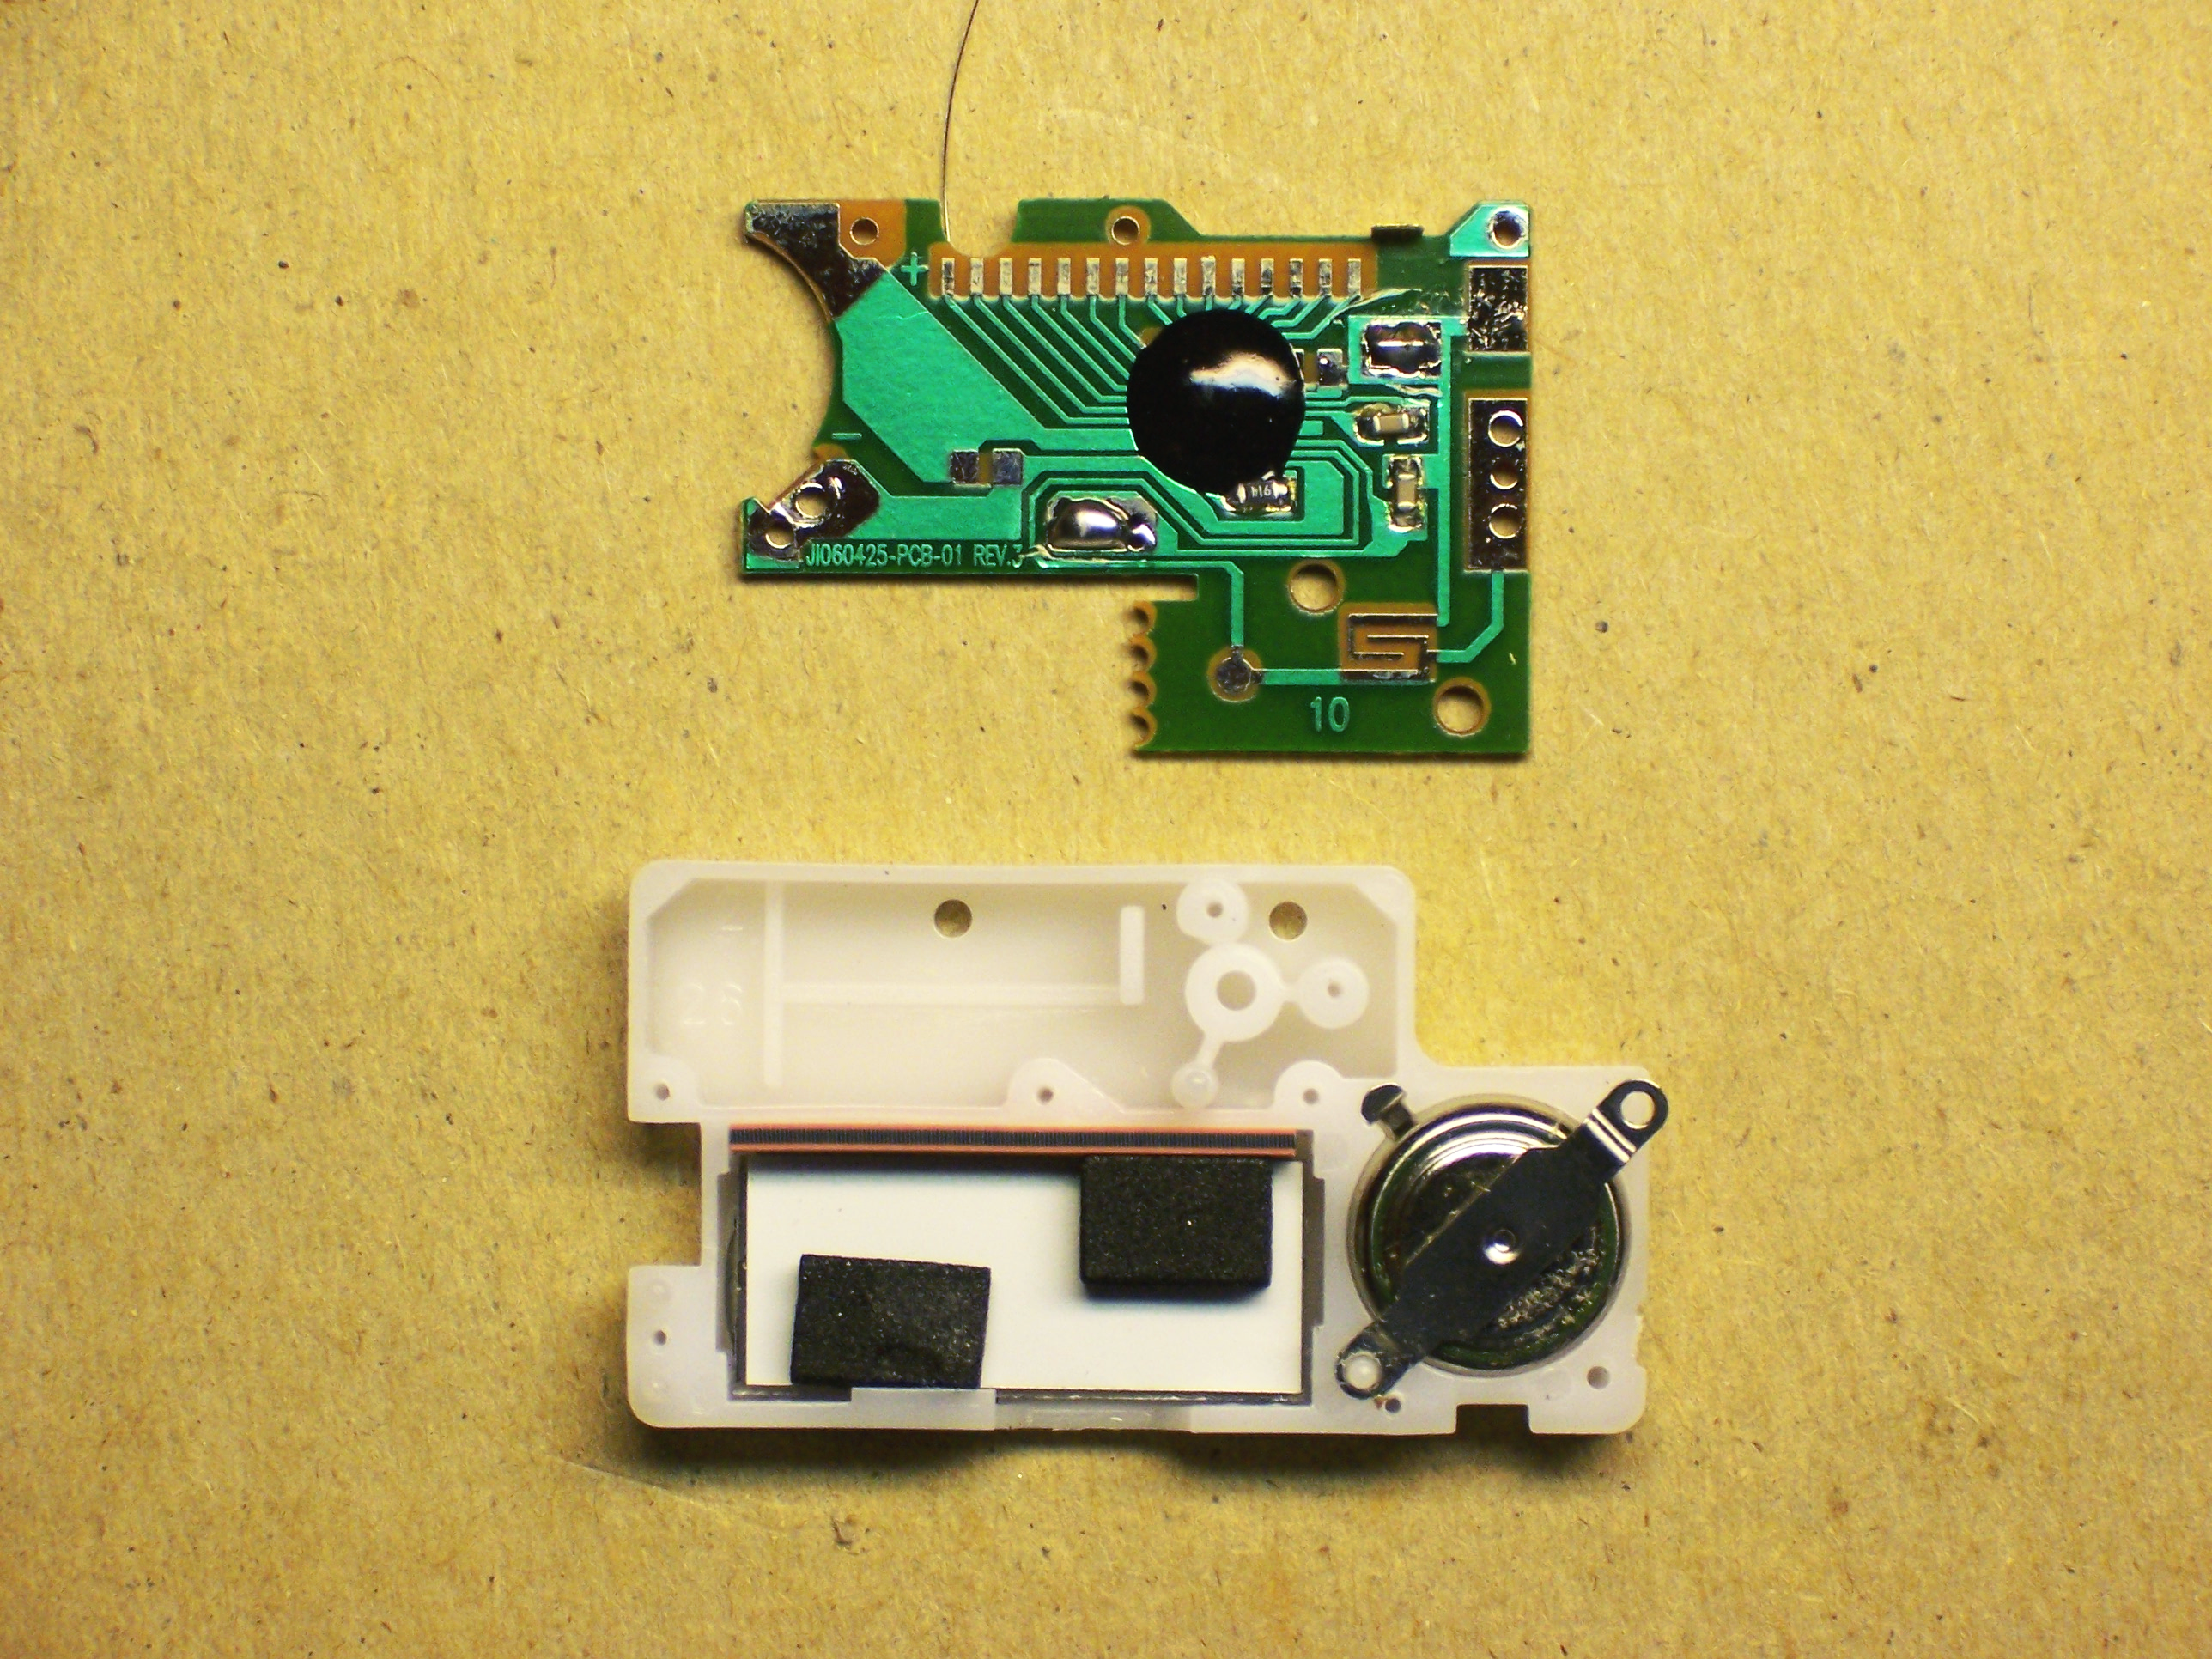
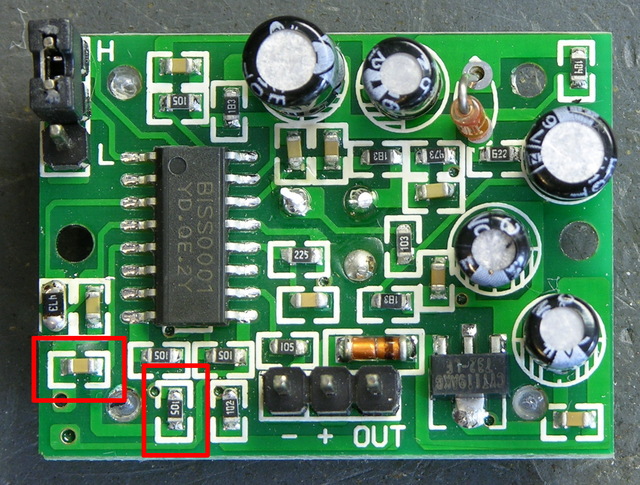
Okay! On the PCB, pin 3 goes to a resistor that said “204.” (Ignore the 473 in the picture.) The resistor and the IC’s pin 4 go to a capacitor, which goes to ground. We’re in business!

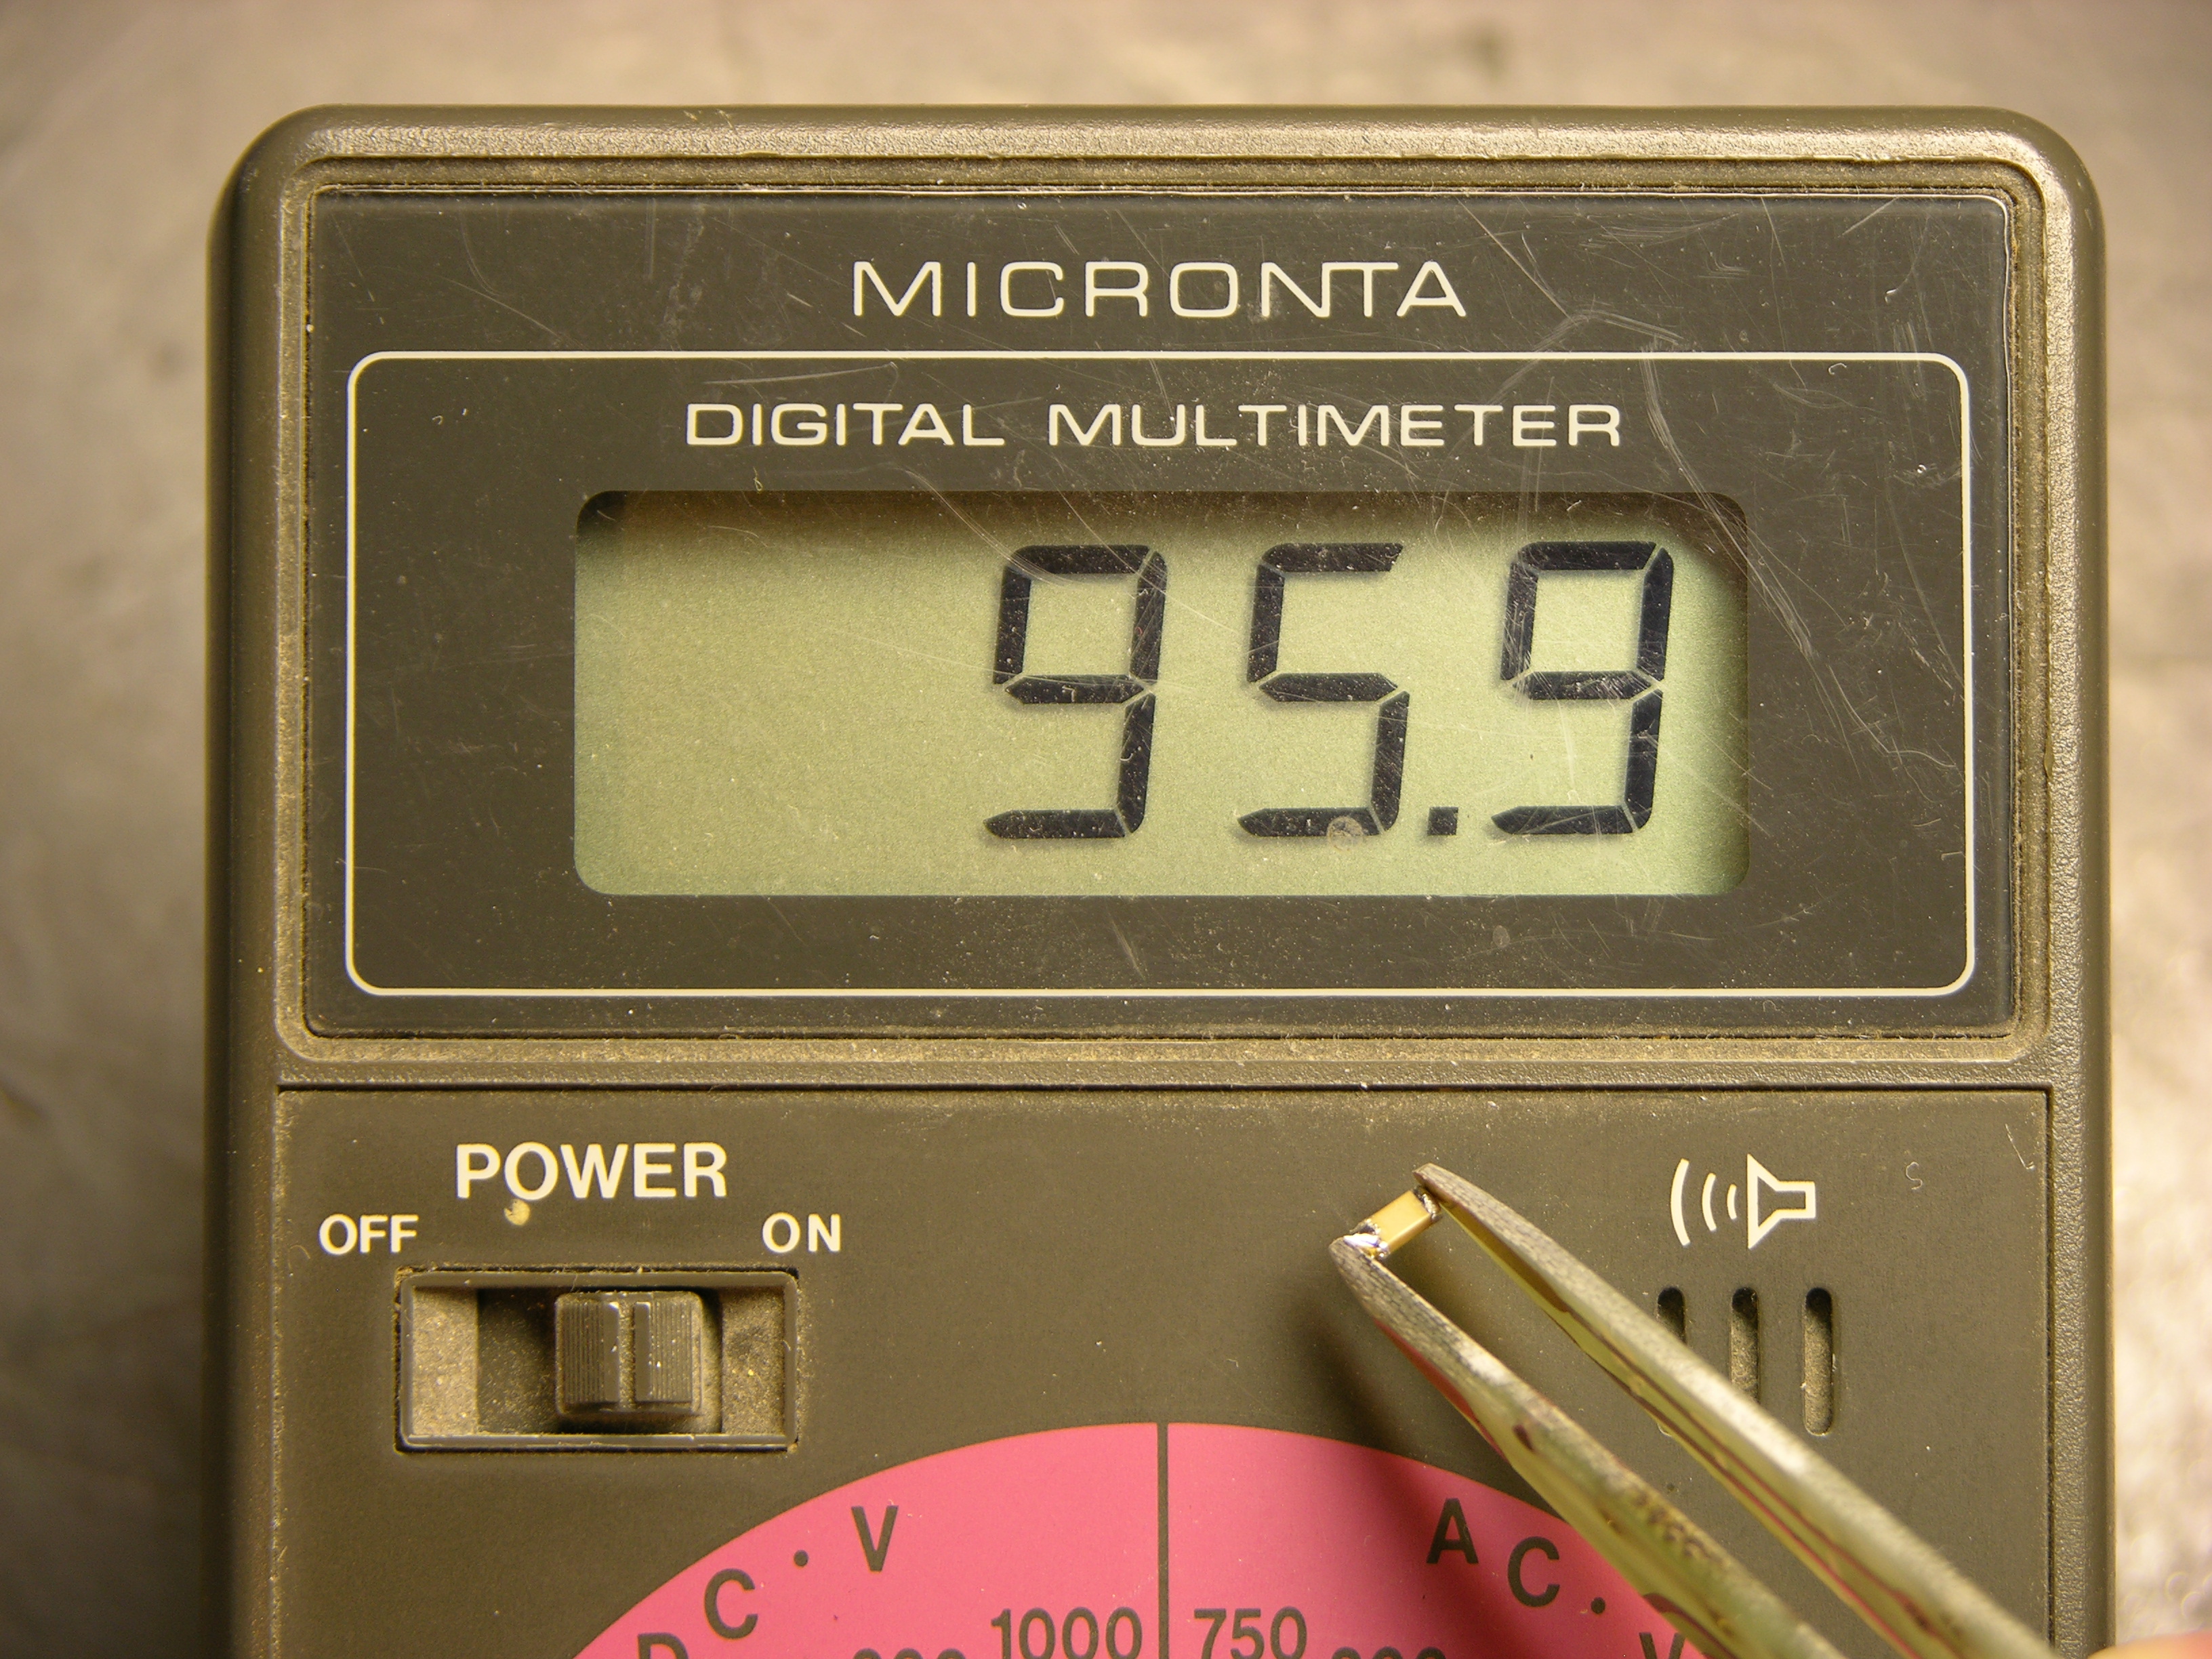
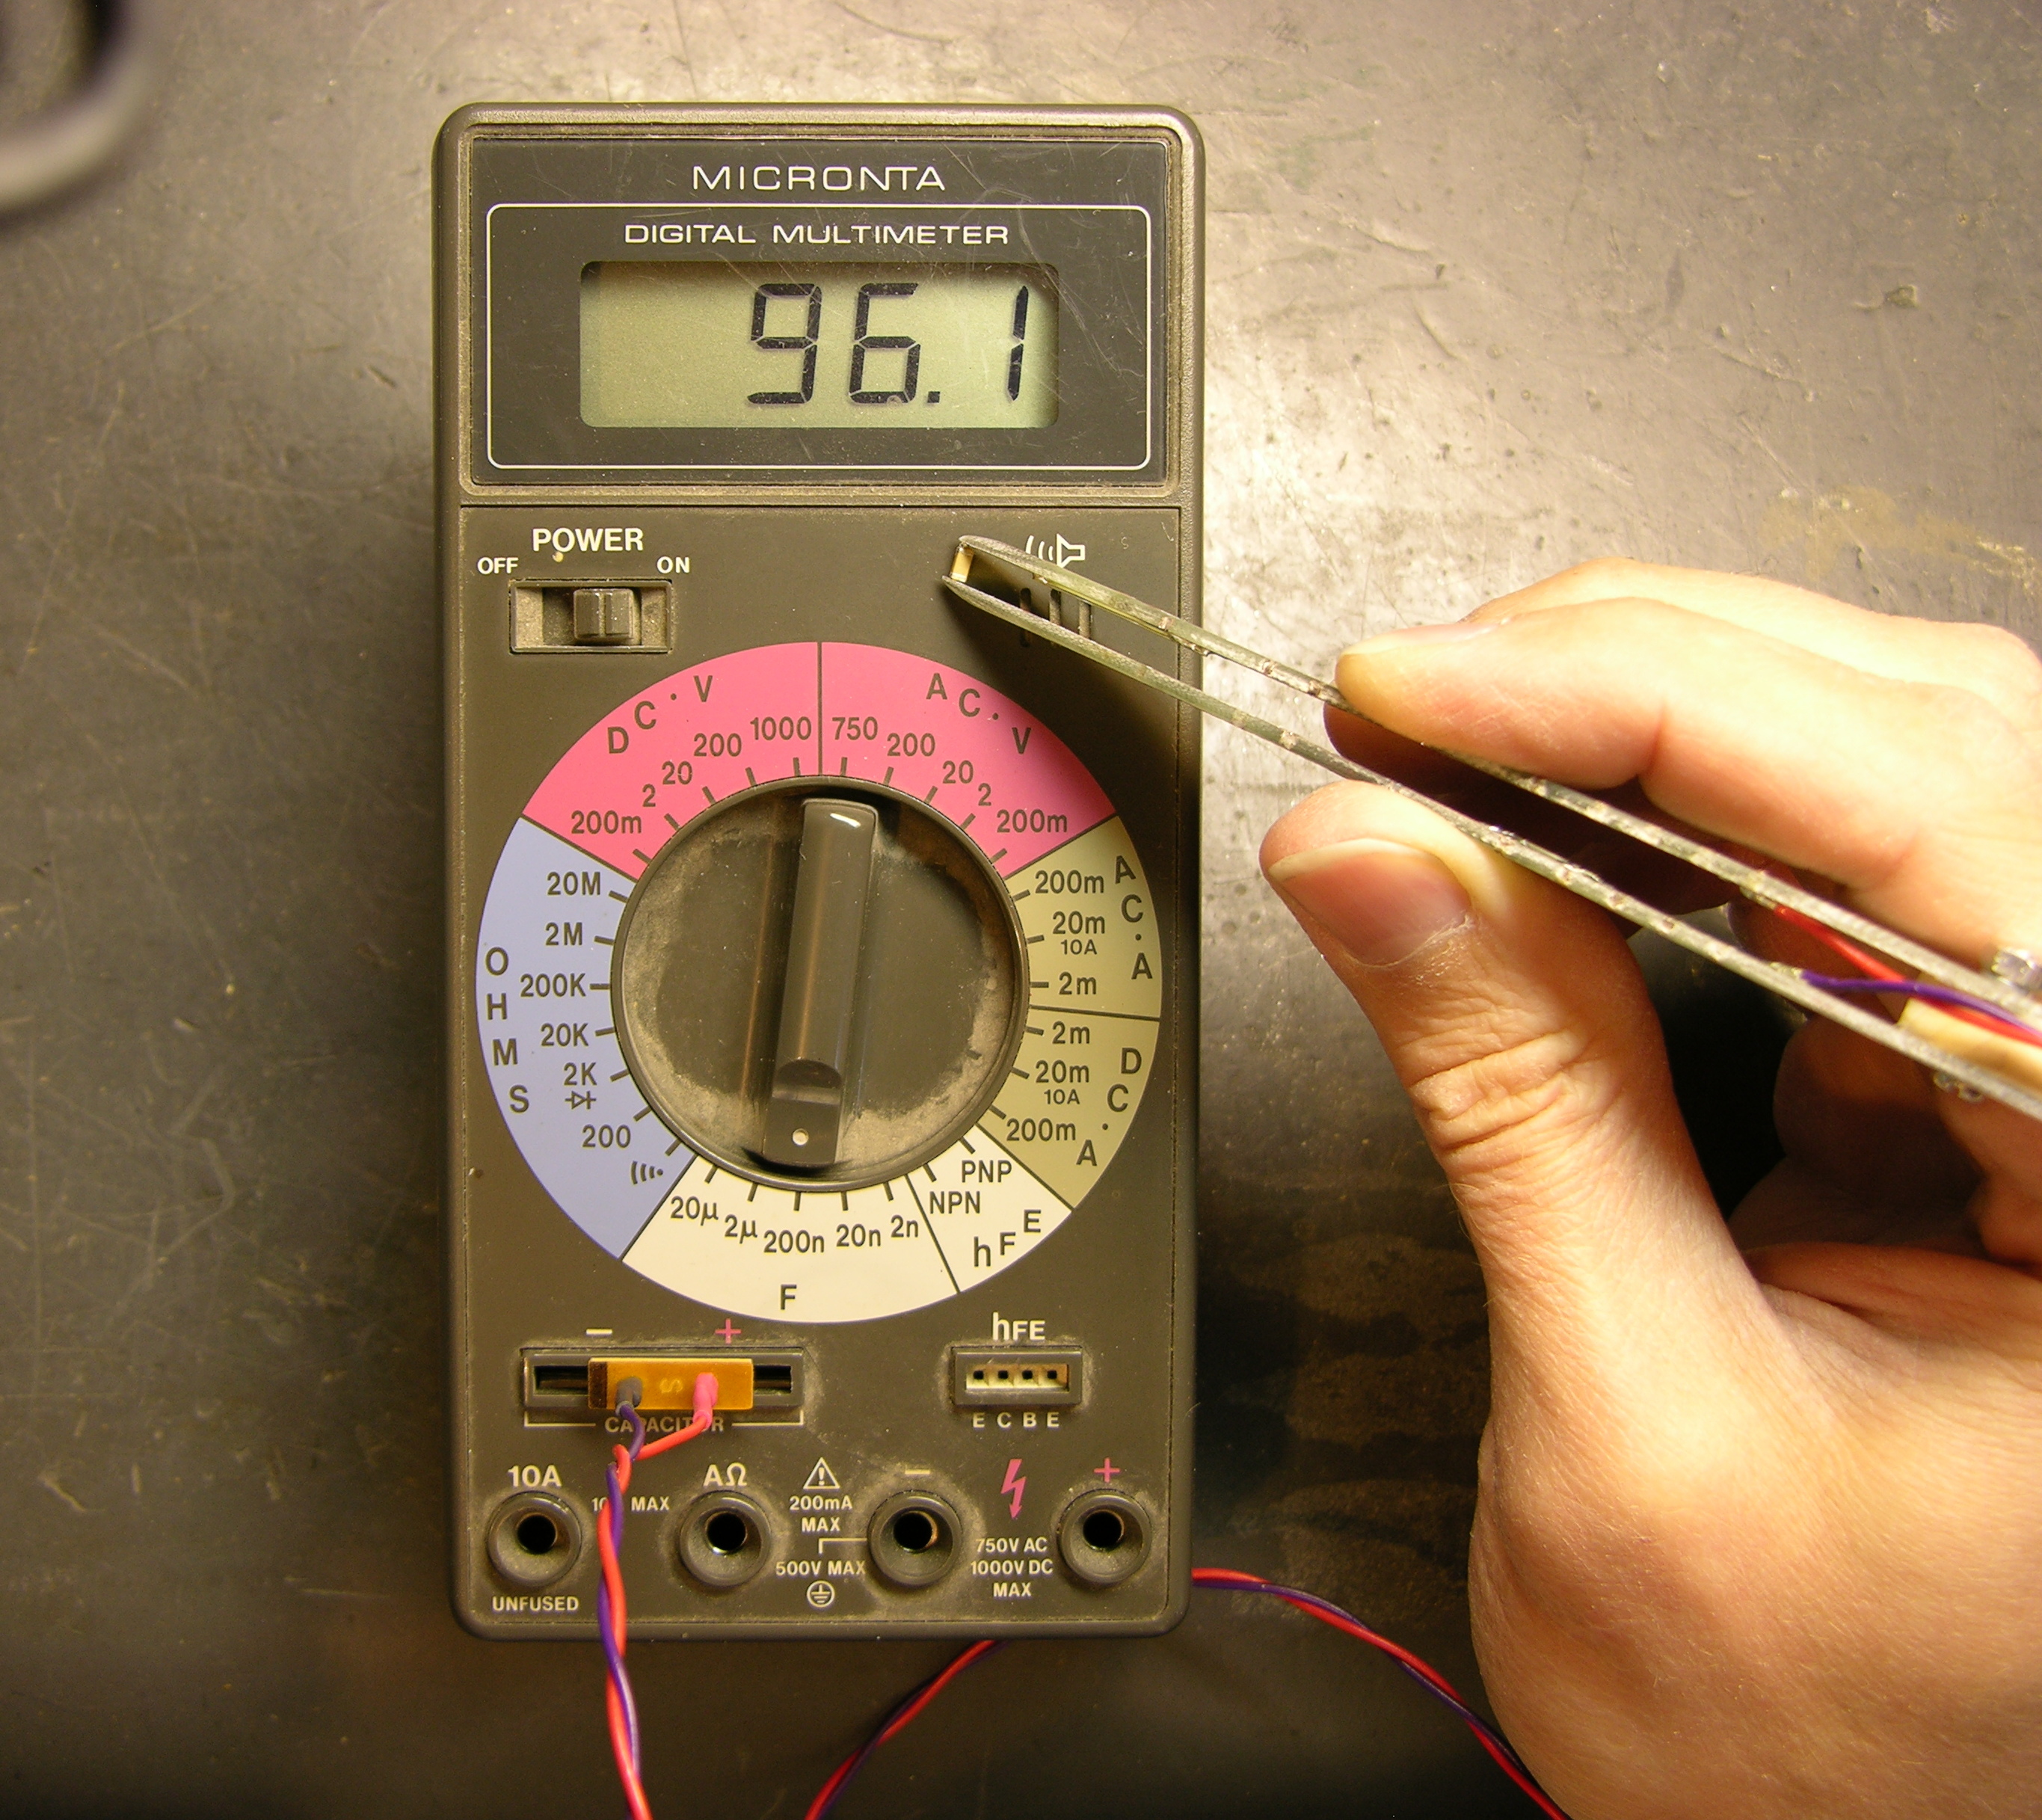
The resistor is labelled as a 200KΩ, and my meter confirms that. The capacitor is unlabelled; in-circuit, my meter tests it at about 470pF. Doing the math:

49152 R1 C1 = 49152 * 200KΩ * 470pF ≈ 4.6 seconds

Hm, that’s a little off from the 2.6 seconds I was counting, but same order of magnitude. For a capacitor value that small, I’m willing to believe that I’m getting extra capacitance from my meter probes and from measuring it in-circuit. I think we’re in the ballpark.

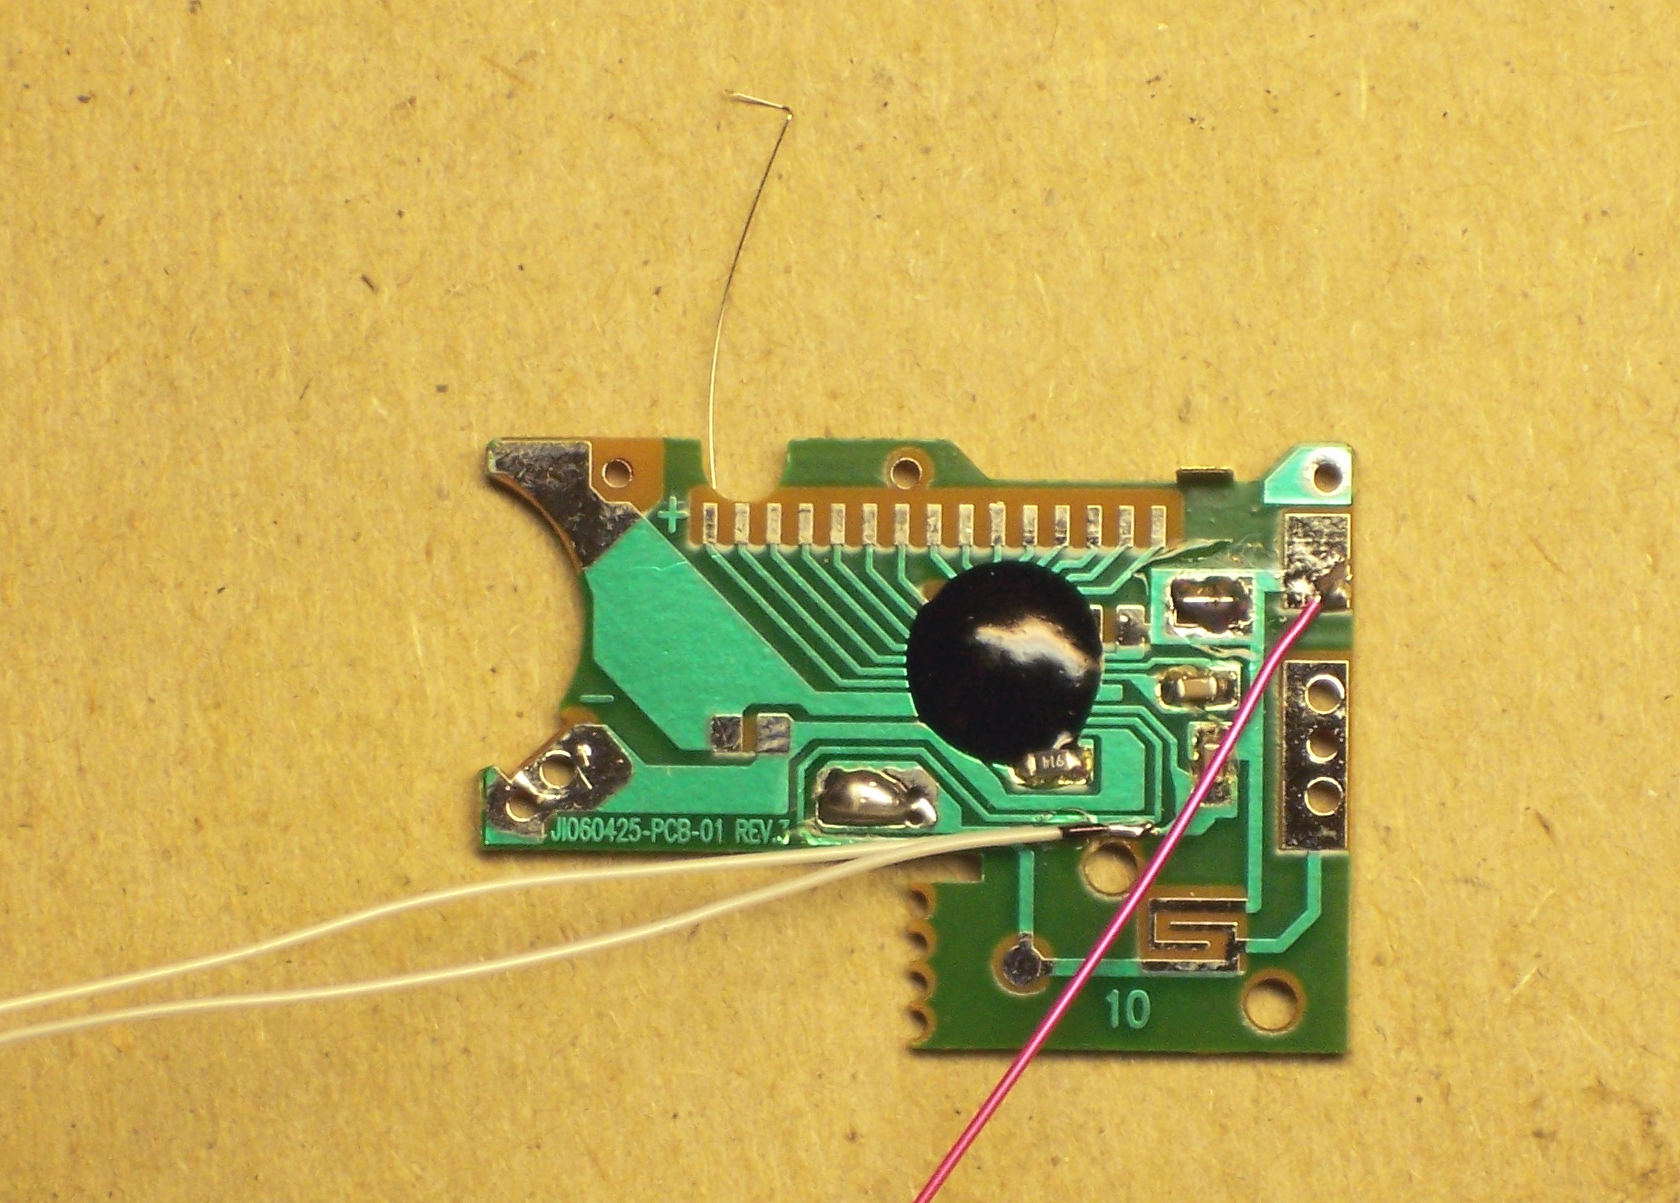
The easiest way to shorten the on-period (TX) seems to me to be replacing the resistor. To take the period down an order of magnitude, I should use about a 20KΩ resistor. After looking at the SMT resistors on a dead PC motherboard, I found a 473 (47KΩ) and figured it was enough smaller to make my point.

I desoldered it by wrapping a piece of heavier wire around it and heating the wire, like Josh suggested, and it worked great. Then out of laziness and because the new resistor was larger than the existing resistor and might not fit the pads well, I just soldered it on top of the resistor that was already there, in parallel. Makes it a 38KΩ resistor instead of a 47KΩ, so we’re even going in the right direction.

I powered up the motion sensor again, waited a minute for it to settle down, and started timing its response. On-time after sensing motion (TX) is now in the half-second range. The absolute numbers still don’t match what the equation says I should get, but the relative values are right on — a resistor with 1/5 the value reduced TX to 1/5 of its former value.

Parallax motion sensor, lockout timing components

Pretty slick! Now I can pick whatever TX I want, be it short or long. I haven’t tried it yet, but the lockout time between motion detection (Ti) is set by R2 and C2 on pins 5 and 6, and they’re easily accessible as well, so I should be able to change that too.

And About that Datasheet . . .

Don’t get me wrong about the Chinese datasheet. Sure I would have been disappointed if I couldn’t read it, but I was actually really pleased that sections of it were in English. I’m aware that people throughout the rest of the world have to learn English in order to do a lot of technical things, and do so with ease and proficiency much greater than that of the few Americans who bother to learn languages other than English.

Bunnie Huang has an interesting blog post that touches in passing on certain types of devices using chips of Chinese manufacture that can’t be found, or can scarcely be found, by searching Google in English:

Just try searching for USB mass storage controller ASICs, or digital picture frame SoCs on Google in English, and then go and open up one of these devices and compare your findings. I bet you’ll find that the chips most frequently used in these popular devices are best searched for in Chinese.

It’s a competitive world out there, and those of us in the west have had it awfully easy for an awfully long time. I know as a mere hobbyist, the technology I use is far behind the leading edge, and I’m not yet impacted in nearly the way of engineers developing new products for market. But the world is changing, no doubt about it, and I hope it’s a while yet before it impacts my ability to tinker.

Arduino USB Auto-Reset Hack

Monday, December 31st, 2007

Older Arduino boards like mine have two annoyances associated with uploading software to them. First, you have to press the reset button (physically) to trigger the bootloader to expect new software from the host computer. Second, the Arduino waits allegedly 6-8 seconds (actually about 10 on mine) on every boot before starting your program, in case you might want to be uploading new software to it.

Small annoyances, to be sure, but they add up quickly when you’re trying to tweak a timing constant in a program and uploading software repeatedly. Thus in designing the latest Arduino, the Diecimila, the team addressed these two issues.

On the Diecimila board, they added a capacitor between the USB-serial chip’s DTR line (active-low) and the microcontroller’s reset line, so that the host computer can trigger DTR and pull down the reset for a moment, relieving you of pressing the button. In the new version (10) of the IDE, they added code to support that new functionality. And in the bootloader burned into the ATmega168 microcontroller, they shortened the boot wait time to a second or less.

All of that comes prepackaged for Diecimila owners; but owners of older Arduinos are resourceful and found how to adapt their own boards as well. The NG can be hacked by soldering a capacitor across two adjacent pads that appear to have been put there for that purpose. The Arduino serial can be hacked by stringing a capacitor between the serial connector and the reset line.

Arduino USB hacked for auto-reset, top side

But I have an Arduino USB, the first version to support USB and not yet a “next generation,” and I haven’t been able to find instructions on modifying it. It doesn’t have the pads already broken out like the NG; in fact, it doesn’t even have the same package USB-serial chip. So I muddled through, found the right pins, and did it myself. Works (mostly) great!

Finding the Right Pins

The page for the NG hack simply shows you physically where to put the capacitor on the NG board and doesn’t describe what it’s connecting electrically, which didn’t help me, as I needed to figure out where to put it on the physically different USB board. Fortunately, the page for the Arduino serial hack gives the critical information:

The retrofitting process consists on soldering a 0.1uF disc capacitor between the DTR pin [of the serial port or USB-serial chip] and the Reset signal [of the microcontroller].

Good enough!

I got the datasheet for the FTDI FT232BL USB-serial chip, and for a moment got my hopes up higher than I should have. The DTR line is in the row toward the top of the Arduino board, and it looked as though it might already be broken out into the unpopulated, .1″-spacing X3 header. Nope, nope, it’s about the only line on that side that’s not already broken out. I was going to have to solder directly to the chip.

Given that it’s a 7mm-square LQFP with .8mm (.03″) lead spacing, I should perhaps have set it out with a thimbleful of Special Sheep Liniment to entice the Nac Mac Feegle to solder for me. But I have no dearth of hubris, and soldered it myself. Twice, in fact, the second time after cutting the other end of the wire too short to reach the capacitor.

top-side zoom

One side of the capacitor connects to the DTR line of the USB-serial chip, the fourth pin from the left on the upper edge. The other side connects to the reset line, which appears to be available only on the microprocessor, the ISP header, and the reset button. I chose the reset button on the underside of the board.

I could have used a capacitor with long leads, sleeved them, and connected them directly to the pins at both ends as in the serial board hack; but I thought it looked better to use wire-wrap wire.

bottom side

I laced the (insulated) wire-wrap wire through open vias in the board to keep things tidy and the capacitor snugged down. A few dots of glue would have done the same had I wanted to keep all the wires top-side, but this felt a little more artful to me. Plus it seemed easier to solder to the underside of the reset switch rather than the top, so I was feeding a wire to the back side of the board anyway.

IDE and Auto-Reset

I upgraded the integrated development environment to version 10, which adds the DTR-triggering, and tried it out. The host computer does indeed now reset the Arduino, and I can upload software to it without pressing the button! Hooray!

But there’s still about a 10-second delay after a boot, reset, or upload before the software starts running. Boooo!

Bootloader and USBtinyISP

One of the hacking guides suggested that the Arduino bootloader would need to be upgraded in order to reduce the reset delay, which makes sense. The IDE includes the ability to burn a new bootloader, for which the bootloader web page gives instructions. Burning the bootloader, unfortunately, can’t be done through the Arduino’s serial interface; it requires a separate AVR programmer.

Thus it was time to assemble my USBtinyISP kit from LadyAda.

USBtinyISP PCB

I bought it a while back in order to be prepared for programming ATmegas outside of the Arduino board. It’s an Atmel ATtiny chip interfacing directly between a USB connector and two cables for in-system programming. The board is nicely made, the instructions are clear enough for absolute beginners, and it was a joy to solder.

USBtinyISP

Fully assembled, it lives in a shell that makes me think of old serial line drivers; but the shell is somewhat customized to fit the USBtinyISP board (and vice-versa).

I read recently and have since forgotten the name of the little “columns” built into plastic enclosures (like toys) to hold PCBs in place; but no matter, since my point is that this case doesn’t have them. The USB end of the board had a lot of room to move and was a bit wibbly-wobbly, but I took the foam that the chip shipped in and packed it between the USB connector and the top of the case, which secured the whole thing nicely.


The term is mounting bosses, seen at Near Future Laboratory.


That done, I unplugged the Arduino’s USB connector, plugged the USBtinyISP into the Arduino’s ISP header and into my iBook’s USB, and burned a new bootloader. I went to the Arduino IDE’s Tools / Board menu and selected Arduino NG or older w/ ATmeta8, then Tools / Burn Bootloader / w/ USBtinyISP. The USBtinyISP’s programming light went on and IDE told me it was burning and would take a minute. Twiddle twiddle.

Finished. Disconnected the USBtinyISP and reconnected the Arduino. It didn’t seem to have my program on it any more, which I guess makes sense that doing low-level AVR programming would wipe the whole memory. I uploaded my code again; and when the upload finished, it took about 10 seconds to start the code. Hrm. Pressed reset, and it took about 10 seconds. HRM.

Arduino Bootloaders and ATmega8

My Arduino is so old that it has the ATmega8 instead of the ATmega168. I don’t know whether that’s true of all Arduino USB boards, but it’s certainly true of mine.

It would appear that the ATmega8 bootloader image has not been updated for the auto-reset. Poo.

The bootloader source code is available online, but the ATmega8 code looks unusable. By that I mean that large sections of code are commented out, including the part that makes timeout after n seconds. (Yes, I’m saying it appears that it would wait forever for a software upload before starting your program.)

It looks to me like it’s been half-***ed patched with updates that have been made to the ATmega168 bootloader, but that parts that would have taken any effort to fix have been commented out rather than updated. Yes, I’m bitter.


See the comment from David Mellis, a developer of the Arduino, below. The timeout value is still present; I just didn’t look carefully enough. The ATmega8 bootloader code probably is what’s in the IDE, and it should be possible to recompile it with a shorter timeout. I’ll provide a further update once I get that worked out.


Interestingly, the ATmega168 bootloader code includes conditional compilation for many different ATmega chips, including the ATmega8. It seems likely that I could build it for the ATmega8 and get it to work. However, the bootloader web page says that the ATmega8 bootloader is only 1k rather than the newer bootloader’s 2k, an important savings given the ATmega8′s mere 8k of FLASH.

Fix the abandoned ATmega8 bootloader code myself? Sacrifice an extra 1k of program space by using the newer bootloader? Sigh.

Another option would be to buy Lady Ada’s preprogrammed ATmeta168 microcontroller. Of course I’d check first, but I think the ATmega8 and ATmega168 are pin-compatible. If that’s the case, I could pop in a 168 (preprogrammed from her, or straight from the factory and program it myself with the USBtinyISP) and be done with this. But it really grates on me to replace hardware when a software fix is perfectly viable.

And of course I could just try lying to my IDE about what chip I have and burning the ATmega168 bootloader into my ATmega8. But looking at the source code, there are enough differences between the ATmega168 and ATmega8 sections that I’m leery of doing this. I wouldn’t mind if it simply didn’t work, but I don’t know enough to be sure it wouldn’t damage the chip somehow. I’d rather live with the delay (for now) than destroy the only chip I have (for now).

To Sum Up

The capacitor-reset hack was easily adapted to the Arduino USB, if you don’t mind a little fine-pitch soldering. Yay! That plus an upgrade to v10 of the Arduino IDE allow the host computer to reset the Arduino when uploading new software, relieving you of pressing the reset button each time. Yay! But I don’t yet have a solution to reduce the reset delay on a board using the ATmega8 microcontroller. Boo!

Rewiring a Game Controller’s Joysticks

Monday, August 13th, 2007

When the CNC machine is finished, it will of course be controlled by a computer. But during development, it’ll be handy to test it with other controls, like joysticks. I had in mind to use analog joysticks, so I could control motor speed as well as direction.

Unfortunately, I couldn’t find the analog joystick element that I bought from All Electronics. (That this happened something like nineteen years ago may have a little to do with why I can’t find it right now.) Fortunately, a poll of my friends for an analog joystick I could borrow yielded this game controller that Jeremy had already brought me in a batch of electronics junk:

USB game controller

In his own words:

Didn’t like it because it was crappy. The retractable cord (while an OK idea) was too short and stiff. Its real downfall was that the buttons were sticky. They wouldn’t pop back up immediately when pressed so rapid tapping was impossible. More frustrating than useful.

So, perfect for me to butcher for my own purposes.

Inside the Game Controller

My first thought was to extract the analog joystick elements, so I opened the case and dug in.

Game controller with case open

Here you can see all the guts that make it work. The upper half of the picture is the bottom side of the case, with the retractable USB cable recessed under the PCB, and wipers on the PCB to make contact as it spins.

In the handles near the bottom of the picture are small motors with eccentric weights for “force feedback,” and directly above them at the center of the picture are the pushbuttons on the forward edge. The tan PCB has contacts for the pushbuttons, LEDs, and pseudo-joysticks on the top face; and the green PCB is the brains of the outfit.

Game controller, main board

The main board holds the analog joysticks (the solder pads surrounding the silk-screened circles in the lower left and right) and the USB interface (in the black blob).

Game controller, joystick mounting

Flipping the main board makes it easy to see how joysticks work. Each is a clever cage with a gimbal mechanism for the stick, connecting to two potentiometers (visible above and to the right of the right stick). These joysticks also have pushbutton action (like clicking the scrolly-wheel on a mouse), so there’s a stick coming out the lower side to a switch housing.

I had actually completely desoldered one of the joysticks when I stopped to think about how I was going to mount them — loose, to a board, what? How about . . . in a game controller case. Duh.

Rewiring

So I soldered the joystick back in and started to look at the circuit. The USB interface was useless to me since I wanted direct access to the analog controls, but I could still use the board as a carrier for the components.

The controller had the potentiometers wired as variable resistors (the wiper tied to one leg, probably for the blob to measure resistance with an RC timer), but I wanted potentiometers so I could measure voltage with an A/D converter on my microcontroller. So the first order of business was cutting traces.

I used a knife to cut through the traces tying the potentiometer wipers to the legs, and the continuity meter to makes sure I’d cut thoroughly enough. Then I identified which direction I wanted to be 0V and which 5V (moving the joystick to the upper right should deliver 5V on each axis), labelled potentiometer terminals with + and -, and started jumpering together pads that hadn’t previously been connected, to distribute power and ground to all the potentiometers.

And that’s how far I got in May, when I last worked on it. I picked it up again this weekend and finished the job.

Game controller, rewired for direct access to analog joysticks

I severed all the connections around the processor blob, since I didn’t need it and didn’t want it getting confused by the new arrangements. And I soldered on wires from a supple new cable Joel gave me (salvaged from who-knows-what). I provide 5V and ground on the grey and black wires, connected joysticks on brown-red-orange-yellow, and have blue and green left over for pushbuttons when I figure out which ones I want to use.

On the loose end, I soldered a header pin to each wire, to fit nicely into prototyping sockets, and heatshrunk each solder joint. I also heatshrunk logical pairs of wires together, to make it easy to remember which wires go together to a potentiometer. You can see that end in my previous post on the Arduino.

I made one mistake, which I had to go back in and correct: I wasn’t thinking straight about which potentiometer was the X axis and which was the Y. The one across the bottom, of course, is the X axis, and the one on the side the Y — but that’s not how I wired it. I swapped the brown and red and orange and yellow wires from what’s shown in the shot above.

And it works great! I have it reassembled and the right joystick controlling the prototype Z axis of my milling machine . . . which I’ll talk about next.

Rice Krispies Five-Digit Counter

Thursday, April 19th, 2007

Look what my wife found in a Rice Krispies box!

Mickey Mouse step counter from Rice Krispies box

It’s a five-digit counter module! Oh, it’s supposed to count your steps while you walk around at Disneyland, but why shouldn’t it be able to count other things???

Okay, let’s do it.

Digging In

Here’s the back side of the case.

Counter case, back side

OH NOES!!! Triangle-drive screws! Whatever shall we do???

Security bit set

:-)

Counter, interior view from above

Here’s the inside. The metal arm at the upper left has a small weight, nearly balanced by the hairspring. It bobs up and down when you walk, making contact on the downstrokes with the metal tab at the corner of the PC board.

Counter, interior view

The Guts

After removal of the two screws holding down the weight, the active electronics pop out–still running.

Counter module, extracted

Disassembling the screws from the back of the PCB enables it to be separated from the screen.

Counter PCB and screen assembly

Note the anisotropic strip on the LCD. It looks like a strip of rubber, but conducts electricity only in the direction of its width (which is oriented vertically here). It interconnects the display contacts on the PCB with the contacts on the LCD, just by virtue of being squeezed between them.

Counter module, back side of screen

Mickey, Meet Jack

It’d be nice to be able to continue using this as a pedometer, but connect something else to count. And it’d be nice if connecting something else disabled the internal counter so you didn’t get extra counts from bouncy bouncy, right?

So we need a closed-circuit jack. It feeds a default signal to the destination, and disconnects the default when you plug something in. Think of plugging headphones into a receiver and it shutting off the speakers . . . or plugging a headset into a cell phone and it disabling the built-in earpiece and mike.

Main board from Motorola cell phone

[A few frustrating minutes with a good soldering iron and a bad piece of solder wick later . . .]

Closed-circuit jack from Motorola cell phone

The jack. Or in French, Le Jacques.

According to my continuity meter, the connections closest to each other on each side are normally closed (NC), and open to break the connection when a plug is inserted. The ones nearest the plug end make connection with the plug, and the ones furthest from the plug end get disconnected.

This jack is made for a stereo plug (common plus two wires), but we only need mono (common plus one wire). Which of the contacts touches the tip, and which the sleeve? I don’t know! We’ll connect both!

Counter case with jack fitted in place

Hold. Mark. Drill tiny. Enlarge. Enlarge. Enlarge. Step-drill. Step-enlarge. Step-enlarge. Voila! Or in French, voila!

Counter case with jack fitted in place, end view

Mickey, Meet Wire

Hum tiddle-um, time to do some wiring. Need to break the connection on one side of the weight-switch and reroute it through the default (NC) pins on the jack. The big metal strip that the weight hits is pretty directly connected to what turns out to be the + power lead, so it’s easier to interject into the hairspring’s connection (the big solder blob in the lower middle).

Counter PCB with trace cut and cleaned

Scrape, scrape, scrape, scrape, scrape. Clean the green varnish off the trace. Then cut the trace (just above the mounting hole).

Counter PCB with fly wires attached

And solder on some fly wires to go to the jack. I knew that my leftover wire wrap would come in handy someday. One piece to each side of the cut trace, and one piece to the + power supply (to take the place of the weight switch).

Counter module, rewired

After some notching of the LCD case (more than was intended, thanks to lack of planning), the module can be closed back up. I highly recommend putting the battery connector in the wrong place, so there can be more takey-aparty and putty-back-togethery. Then wire to the jack, connecting to both sides as mentioned earlier. (See the bare wires running across the left end?)

Or in French, Voilalala!

Counter, reassembled with new jack

One completed, rewired, general-purpose, five-digit decimal counter.