Repairing Roomba Original, Part 2: Power Board
Quick Links
Background
Part 1: Disassembly
Part 2: Power Board
Part 3: Brush Deck
Power Board
My Roomba wouldn’t power on, as a result of installing a battery that was wired backwards. The original event produced a strong smell of ozone, so I suspected open circuit board traces and possibly burned components. I started by examining the power distribution board, which holds the power switch and charging jack, and routes power to and from the battery and to the main board.
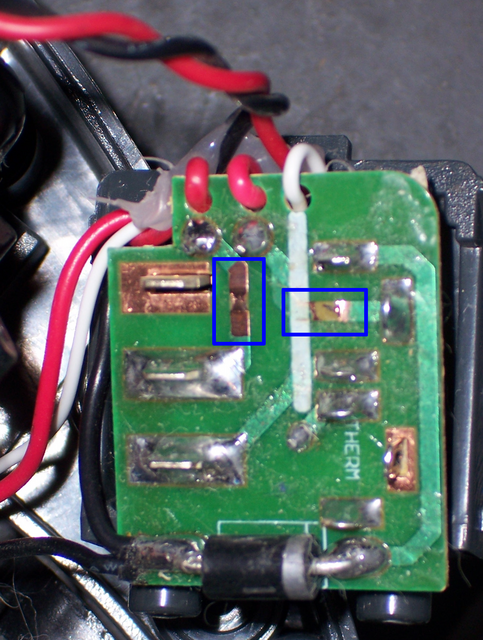
My board was damaged in two places — a trace completely burned away, highlighted in the blue rectangle on the right; and a trace partially burned away, in the blue rectangle on the left. I drew out the traces and made a schematic of this small board to determine the impact of this open trace. As it turns out, it routes power between the battery (right red wire) and the charger (solder pads on the right side of the board) and the power switch to the main board (solder pads on the left side; left red wire). No connection to the battery pretty much means Roomba don’t go.
Interestingly enough, that hefty diode protects the Roomba from reverse polarity on the charger, but not reverse polarity on the battery. I guess you wouldn’t want a homebrew charger blowing up the battery . . . dunno, I’m still trying to figure out the entire logic there.
Before proceeding, I unplugged the power connector from the main board, snapped in the battery and did a sanity check with the voltmeter to make sure I really understood which lead was which. I then removed the battery and fixed the open trace the easy way — I soldered a piece of wire across the two terminals it was connecting. It was easier to tie around each lug than to hold a short wire across the gap in the trace while trying to solder down each end.
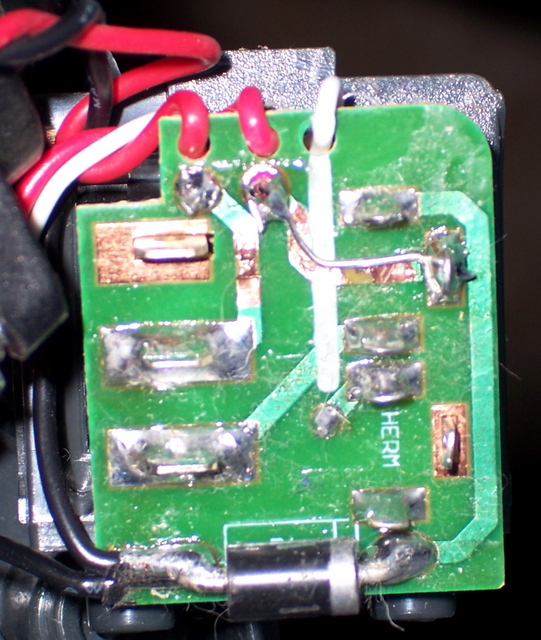
The tail end of the wire on the upper connection isn’t as close to the neighboring trace (in three dimension) as the picture makes it look. And I decided not to bother soldering across the partial trace on the left — it looked like there was enough copper there to hold out.
Testing the Power Board Repair
To test my work, I put the battery back in (with the power connector still unplugged from the main board) and measured 14+V from the right end of the repaired trace to ground. When the charger is disconnected, the jack closes the right terminal to the lower terminal, so I also measured 14+V from the lower terminal of the jack to ground, and from the lower terminal of the power switch to ground. Finally, I turned the switch on and measured 14+V from the main board’s supply wire to ground.
The power distribution board was now fixed, but it was possible there were still other things wrong in Roomba. However, I couldn’t see any signs of scorching or heat damage on the parts of the main board surrounding the power connection. Furthermore, if there were more components damaged by the battery having been connected with reverse polarity, it seemed unlikely to me that they’d be further damaged by reconnecting the battery with correct polarity.

So I plugged the power connector back into the main board, snapped in the battery, and turned on the power — and it worked! Wheels started spinning and brushes whirred. Everything obviously wrong with Roomba was now fixed. I took him into the kitchen and tried to run a cleaning cycle, which ended very quickly when the battery (never fully charged, and sitting on the shelf for two months) ran down.
Checking the Charger
I wasn’t done yet, though. Because the charger had been involved in the original incident, there was a fair chance it was damaged also. In fact, when I had hooked everything up, heard a pop, and smelled ozone, I thought it had come from the charger.
The charger is made in two pieces — a wall wart that feels heavy (linear), and a floor wart that feels light (switching or regulating). That actually made it easier to test. First, I plugged in the wall wart, which says it outputs 24VDC, and measured 28V. That’s acceptably above nominal for an unloaded wall wart, so it was probably okay.
Because I didn’t know what the floor wart did, nor could I find an indication of what it outputs, I didn’t feel I could just plug it in and check it with a voltmeter. So I opened it and did a quick visual inspection for damaged components or traces.
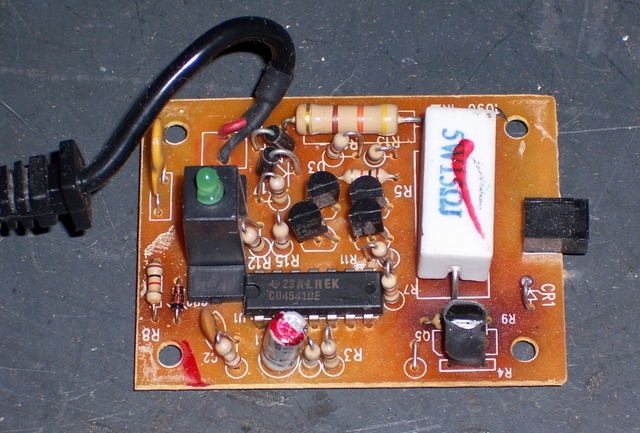
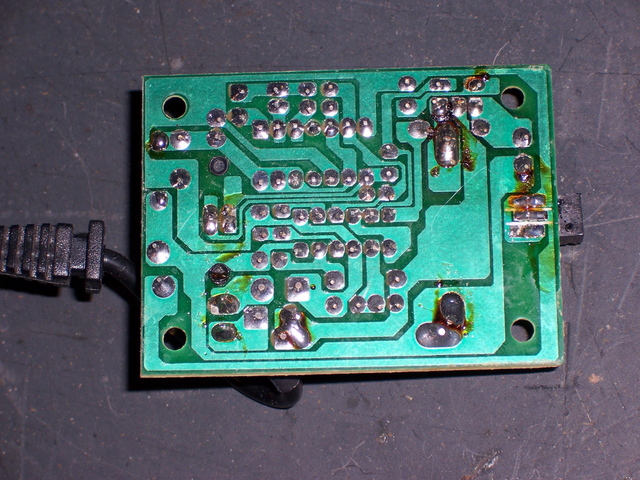
The R4 / Q5 combo has obviously been pretty warm; but it looks to be a temperature regulating feature, so getting warm is probably its job. Everything else on the component side looks pretty clean. The solder side has some brown, but it all turned out to be leftover flux, so no harm there.
Still slightly suspicious but willing to believe, I reassembled the charger and plugged it into the wall wart. I measured 25.1V on the upper charger plug (the one that actually delivers power to Roomba) and decided it was probably okay. I plugged it into Roomba, the light came on, and I left it to charge overnight. The charger must work, as I’ve cleaned two rooms today and the battery indicator was still green; whereas before the battery replacement, I could barely clean a single room.
Cheap Charger
By the way, if you compare the picture of the power distribution board to the component-side view of the charger, you may notice something interesting. The battery pack is wired with a thermal sensor to shut down charging when the battery gets too warm; it’s connected to the white wire. The white wire goes to the lower charger plug on the power distribution board — and has no connection inside the charger!
iRobot offers a rapid charger that will recharge the battery in only a few hours, compared with overnight on this charger. That’s the difference — the rapid charger monitors the battery temperature to charge at the fastest possible rate without overheating the battery and damaging its chemistry, whereas the “cheap charger” charges at a constant rate so slow that it’s known to be safe.
All Better?
The electrical problems on the Roomba were now all repaired and it was scooting merrily around my kitchen floor; however, it still wasn’t picking up anything! Huh; did I mess up the mechanics when I put it back together?
Sections
Background
Part 1: Disassembly
Part 2: Power Board
Part 3: Brush Deck