Archive for the ‘Miscellaneous’ Category

Gas Detector No Longer Needed

Wednesday, November 21st, 2007

Today my boss mentioned a gas leak scare at his home (the service company found a slightly loose exterior fitting that happened to be near a vent in the side of the house), and I took the opportunity to ask whether he was still interested in a gas detector for the trailer at the farm.

Nay. They have a new trailer, and the old one leaks water (as well, presumably, as gas), and they don’t use the old one any more.

So I probably won’t go any further with my flammable gas detector project. But it was still enjoyable figuring out as much as I did.

60,000 mcd Sure Sounds Bright

Sunday, November 18th, 2007

I’m still interested in building a sunrise alarm clock, to gradually lighten the bedroom up to full daylight brightness when it’s time for me to wake up. I’d enjoy making it with LEDs, and a blog reader suggested I check out some yellow LEDs from this eBay seller.

They had fifty 10mm 60,000 mcd yellow LEDs for $6.98 plus $8.98 shipping and $2.00 insurance, so $17.96 for the lot or 36¢ each. Seemed very reasonable, and I was the only bidder on that batch, so I won the auction.

The LEDs arrived, and they’re the first 10mm LEDs I’ve bought, and they’re huge. But I put them in my LED tester, and they don’t seem that bright, even at 50 mA. So tonight I put them in a breadboard with 100Ω resistors and cranked up my variable bench power supply. They still don’t seem that bright.

10mm and 5mm LEDs on breadboard

Here’s the layout, so you can see I’m not lying and using different resistor values for different LEDs. The LEDs on the left are the 60,000 mcd yellows, and the ones on the right are the 5mm 10,000 mcd blues I’m using in the LED clock.

10mm yellow and 5mm blue LEDs on breadboard, lit

The yellows are a little more directional than the blues, which was making comparison difficult, so I scuff-sanded all of them to get a frosted, diffuse effect and level the playing field. The blues are pretty clearly brighter.

ceiling

Here’s the ceiling above the breadboard. The yellows are still more directional even after frosting — the whole ceiling is bathed in pleasing, blue light with only a small patch of slightly brighter yellow in the center.

I know that candelas are a measure of brightness within the coverage pattern of a directional light source, whereas lumens are a measure of total light output. Here’s my favorite mcd and viewing angle to lumen calculator, which makes it easy to convert. The seller’s information for the yellows says they have a 10° viewing angle, and I should have thought more carefully about its impact before buying.

At 3 lumen each, and with a 60W incandescent outputting about 800 lumen, I’m probably not going to be able to use these to simulate full daylight. I’ve been starting to consider using dimmable fluorescents instead, in spite of the hassle of having to build an enclosure to protect the bulbs.

I wonder what application only needs a 10° viewing angle.

Lesson: Always check viewing angle and lumen output of LEDs before buying.

I Love These Cables!

Sunday, November 18th, 2007

This is the back side of an aging SGI cluster that we host in our data center at work for the high-performance computing group.

SGI cluster cabinet

For a sense of scale, this is a 23″ rack, and that’s a grey CAT5 patch cord stretched down the left portion. The white cables are close to an inch thick.

Huge SGI cluster cables

The fat cables with the beautiful, tough braided jackets seem almost synthetic-organic to me. They always make me think of Bishop after he’s been torn in half by the alien.

Tool Holder

Monday, October 29th, 2007

Back in September, I was working on something and got tired of fishing the right pliers out of the pile on my workbench — flat nose for straightening bent component leads, needlenose for shaping leads, wire strippers, cutters, etc. So I made a dirt simple tool holder.

Simple tool holder for needlenose pliers

It’s just a 2×4 block with 1/2″ holes drilled in at regular intervals (Forstner bit makes nice flat bottoms), spaced for the at-rest width of my pliers handles and as close together as is easy to reach in and pluck out the one I want.

It’s cleared up a significant mess on my bench, and it’s so fast and easy to access that I tend to put tools back between each use rather than each session. It’s ugly as can be, but I wanted to know how well it would work before making a pretty one. Problem is, now that enough time has passed for me to know it works well, I’ve lost some of my motivation to make it pretty. :-)

Cherry and Maple Rolling Pin

Monday, October 29th, 2007

No LEDs. Nothing to do with electronics at all. Just wood.

This is for Lawrence’s wife. I made a cherry rolling pin for Cort a couple of years ago; and when I described it to Gail, she was very interested. She said she preferred hers with a maple stripe in it, and I finished it yesterday.

If you think cherry wood should be redder because that’s what you’ve seen in furniture stores . . . let me tell you that what you’ve seen bears as much resemblance to real cherry wood as a maraschino does to a real cherry: They’re both full of dye and completely unnatural. With exposure to light, this cherry will darken to a lovely, deeper brown shade within a few weeks, further highlighting the difference between the cherry and the maple. No bright red about it.

Glue-Up

I started a while back by gluing up the block. I have a large supply of short, narrow cherry and maple pieces from a long-lost high school classmate (who turns out to be Ron-the-TV-guy’s brother-in-law; lots of connections in a small town) who worked at a cabinet shop and got all the rails and stiles when they closed, then got tired of storing them and cheerfully sold them to me for a song.

The cherry and maple were both flat-sawn, so they showed broad grain patterns on their faces and tight (boring) grain on the edges. I didn’t like the way the maple edge grain looked sandwiched between the cherry; so I sliced the maple into thirds, rotated the slender sticks 90°, edge-glued them back together to put face grain on the outside, and planed it flat again. Then I glued up the block — from the end, you can still see three maple squares sandwiched between two solid cherry pieces. And (like many of my projects), it then sat a while.

Turning

This weekend I returned home from a conference, played a rock concert to benefit the high school robotics team, finished my obligations to the world, and finally had some time to myself. Electronics is great, but it’s awfully cerebral; and yesterday afternoon it was nice to give the mind a rest and do something visceral.

2

I’m not a particularly good wood turner, and my results are due entirely to patience rather than skill, but I enjoy the process. I finally got to use the new roughing gouge that I got last Christmas, and boy, was it a treat. The little picture doesn’t do it justice — the gouge is huge, with a 2″ scoop shown in the picture. It cleaned up the blank quickly and with minimal chatter, and I was actually able to use it for the whole turning. I should probably have used a sharper tool at the end, because I had some slightly torn grain on the figured portions of the cherry, but it sanded out nicely.

Finishing

After sanding down to 1600 grit, I cut the ends free, removed it from the lathe, and started coating it with food-safe oil. I kept coming back to it all evening to add more oil, and I think I’ve put on about as much as it’s going to take right now.

This morning, I got to re-experience one of the pleasures of woodworking with which non-woodworkers are probably unfamiliar: the wonderful smell of fresh-cut cherry still permeating my garage as I left for work. And yes, the smell of cut cherry is distinctly different than the smell of fresh-cut maple, oak, and walnut, and completely different than the smell of pitch from softwood (pine, fir).

Schedule permitting, I’ll be able to take it to Gail tomorrow night.

Inside a Diebold Transaction Number Generator

Sunday, September 23rd, 2007

I’ve been swamped at work lately and it’s been spilling over to home, so I haven’t done much with CNC (or other projects) for several weeks. But I bought this Diebold Transaction Number Generator on eBay for $10, out of sheer curiosity to see what was inside. I have no idea what it’s supposed to do, and can’t find any information about it online, but industrial security and crypto equipment fascinates me.

Diebold Transaction Number Generator, front view

My goal was not to reverse-engineer the whole thing, but to get a rough idea how it worked and look over the interesting bits. I think I’m not alone in that when I get a new electronic device, I like to look inside to see what they used to make it work.

Diebold Transaction Number Generator, rear

The back panel has video in, video out, and screw-clamp wire connectors:

(Nearly) all of my blog pictures are links to the full-resolution version, so you can click to zoom on this, but I’ll save you the trouble. Here are the labels over all the wire connectors:

D
A
4
G
N
D
S
T
4
D
A
3
G
N
D
S
T
3
D
A
2
G
N
D
S
T
2
D
A
1
G
N
D
S
T
1

E
N
G
N
D
A
L
M
S
C
4
S
C
3
S
C
2
S
C
1
G
N
D
T
2
F
T
2
A
C
⌈   ⌉

Okay, so I get what “AC” is, and “EN” might be enable, and “ALM” looks a lot like alarm, and there sure are a lot of ground lines, but the rest of the connections pretty much escape me. The DA-GND-ST triples make me think of some kind of balanced transmission, but wouldn’t a balanced transmission line have a shielded connector instead of a terminal strip?

And why video? Does this box generate transaction numbers and superimpose them on a video feed? I dunno. But it sure is pretty inside. Let’s have a look.

Diebold Transaction Number Generator, interior

I really dig the red circuit boards (red solder mask). Green solder mask predominates these days, and I’ve seen blue and other colors, but I’m pretty partial to red.

The small board in the upper left appears to be mainly the power supply. The medium board in the upper right interfaces to the video feed, and the large board in the middle has some interesting digital logic on it.

Power Supply Board

Diebold Transaction Number Generator, small, left board

Here’s the power supply board. The bridge rectifier, CR201, connects to the main AC terminals on the back panel and feeds the LM317 regulator U201. U201 uses R202 (150Ω) and R201 (1.3kΩ) to set its regulated voltage.

The LM317 maintains a nominal 1.25V voltage across its reference terminals, across which R1 thus sets the reference current I1. The reference current also flows through R2, determining the regulated voltage. From the LM317 datasheet,

VOUT = VREF (1 + R2 / R1) + I1 R2

where

I1 = VREF / R1 = 1.25V / 150Ω ≈ 8.33mA

So

VOUT = 1.25V (1 + 1.3kΩ / 150Ω) + 8.33mA 1.3kΩ

    ≈ 1.25V * 1.87 + 10.8V ≈ 13.1V

With a bridge rectifier and capacitor-input filter, output voltage is approximately equal to peak input voltage, which is VAC / √2, so the box is expecting an AC supply voltage of not less than 18.6V; compensating for diode voltage drops gives about 20VAC. Knowing that, I could (if I cared enough) now power it up.

Note the bridge rectifier made of discrete diodes CR202-207 connected to external pins T2, T2F, and ground. CR206 and 207 double in two bridge circuits with CR202-203 and CR204-205, making me suspect that T2 and T2F are not meant to be used simultaneously, but as alternates. On the other hand, T2 heads off to the OUT1 (common) pin of the MC14066 quad analog mux chip. Kind of looks like it’s being switched to one of two different destinations.

Video Board

That’s about as much effort as I care to put into the power board, so let’s move on to the video board.

Diebold Transaction Number Generator, right board

The four chips in the lower left are MC14538 oscillators, there’s another LM317 voltage regulator in the lower center, and the board has a mechanical relay up at the top. But the really interesting part is the two large chips in the lower right: MM58146 on-screen display drivers for television channel indicators. So this box is built to superimpose some kind of transaction numbers onto video. That’s interesting to know.

Logic Board

Diebold Transaction Number Generator, large, center board

On to the logic board in the center, which I’ve rotated here to make the part numbers easier to read. The four chips U5-8 near the empty sockets on the right are MC14495 hex to seven-segment decoders. Whaaaa? I assume the on-screen display driver chips do their own character generation, so why decode binary to seven-segment? Maybe the four empty sockets U1-4 are for DIP seven-segment displays, to show the transaction numbers internally during testing or troubleshooting.

The four large chips in the middle, U11-12 and U14-15, are even more interesting. They’re MC14034 universal bus registers, permitting bidirectional transfer of data between two parallel buses, serial-to-parallel, and parallel-to-serial conversion.

The datasheet tantalizingly offers, “Other useful applications for this device include pseudo–random code generation,” but says nothing further about it. My guess is you’d wire them to shift and output bits, possibly with external inverters to shuffle things around at different stages, to make a hardware implementation of a PRNG algorithm.

You might even be able to wire them up to make a digital version of something like the rotors from a German Enigma cipher machine — but without spending a lot of time tracing pins on the bottom side of the board, I don’t know whether that’s how they’re being used here, or merely for more mundane purposes. It’s not quite worth it to me to figure out exactly how the MC14034s are used, so I’m pretty well done with my exploration.

Conclusions

I didn’t figure out a whole lot about the device, but it’s pretty clear that it takes a video input and superimposes numbers onto it. (One thing I wondered initially was whether it might be using video as a source of random noise to generate transaction numbers.) And it has some interesting bits inside, with logic chips I might be able to reuse for something else. That’s enough to satisfy my curiosity for now.

Elastomeric Connectors

Tuesday, August 28th, 2007

A reader named Dave posted a very well-informed comment that what I’ve been referring to as an anisotropic strip (connecting an LCD to a PCB) is more specifically called an elastomeric connector. I thought it was interesting enough to be worth pulling up into a new post:

The anisotropic strip on the LCD is technically known as an elastromeric connector, but usually referred to as a zebra strip. If you examine it closely under a strong magnifying glass or a low power microscope, you’ll see alternating bands of conductive and insulating material, usually something like graphite loaded rubber for the conductive material and unloaded rubber for the insulating material. The graphite loaded rubber gives that portion of the strip a darker colour. Thus, you have alternating light and dark bands, similar to what a zebra looks like. :-)

Dave

Thanks for the detail!

Welcome, Make Readers!

Wednesday, August 22nd, 2007

Wednesday afternoon:

I never expected this kind of web traffic to my blog, and my current image hosting solution isn’t up to the job.

I’m mirroring right now; images should be back up within a couple of hours.

Wednesday evening:

Images for recent posts should be back up. The remaining images from 2007 are almost done mirroring to the new server, and earlier images will get mirrored if there’s still time while traffic load is still high.

Thursday morning:

Everything seems to be mirrored and working!

Rewiring a Game Controller’s Joysticks

Monday, August 13th, 2007

When the CNC machine is finished, it will of course be controlled by a computer. But during development, it’ll be handy to test it with other controls, like joysticks. I had in mind to use analog joysticks, so I could control motor speed as well as direction.

Unfortunately, I couldn’t find the analog joystick element that I bought from All Electronics. (That this happened something like nineteen years ago may have a little to do with why I can’t find it right now.) Fortunately, a poll of my friends for an analog joystick I could borrow yielded this game controller that Jeremy had already brought me in a batch of electronics junk:

USB game controller

In his own words:

Didn’t like it because it was crappy. The retractable cord (while an OK idea) was too short and stiff. Its real downfall was that the buttons were sticky. They wouldn’t pop back up immediately when pressed so rapid tapping was impossible. More frustrating than useful.

So, perfect for me to butcher for my own purposes.

Inside the Game Controller

My first thought was to extract the analog joystick elements, so I opened the case and dug in.

Game controller with case open

Here you can see all the guts that make it work. The upper half of the picture is the bottom side of the case, with the retractable USB cable recessed under the PCB, and wipers on the PCB to make contact as it spins.

In the handles near the bottom of the picture are small motors with eccentric weights for “force feedback,” and directly above them at the center of the picture are the pushbuttons on the forward edge. The tan PCB has contacts for the pushbuttons, LEDs, and pseudo-joysticks on the top face; and the green PCB is the brains of the outfit.

Game controller, main board

The main board holds the analog joysticks (the solder pads surrounding the silk-screened circles in the lower left and right) and the USB interface (in the black blob).

Game controller, joystick mounting

Flipping the main board makes it easy to see how joysticks work. Each is a clever cage with a gimbal mechanism for the stick, connecting to two potentiometers (visible above and to the right of the right stick). These joysticks also have pushbutton action (like clicking the scrolly-wheel on a mouse), so there’s a stick coming out the lower side to a switch housing.

I had actually completely desoldered one of the joysticks when I stopped to think about how I was going to mount them — loose, to a board, what? How about . . . in a game controller case. Duh.

Rewiring

So I soldered the joystick back in and started to look at the circuit. The USB interface was useless to me since I wanted direct access to the analog controls, but I could still use the board as a carrier for the components.

The controller had the potentiometers wired as variable resistors (the wiper tied to one leg, probably for the blob to measure resistance with an RC timer), but I wanted potentiometers so I could measure voltage with an A/D converter on my microcontroller. So the first order of business was cutting traces.

I used a knife to cut through the traces tying the potentiometer wipers to the legs, and the continuity meter to makes sure I’d cut thoroughly enough. Then I identified which direction I wanted to be 0V and which 5V (moving the joystick to the upper right should deliver 5V on each axis), labelled potentiometer terminals with + and -, and started jumpering together pads that hadn’t previously been connected, to distribute power and ground to all the potentiometers.

And that’s how far I got in May, when I last worked on it. I picked it up again this weekend and finished the job.

Game controller, rewired for direct access to analog joysticks

I severed all the connections around the processor blob, since I didn’t need it and didn’t want it getting confused by the new arrangements. And I soldered on wires from a supple new cable Joel gave me (salvaged from who-knows-what). I provide 5V and ground on the grey and black wires, connected joysticks on brown-red-orange-yellow, and have blue and green left over for pushbuttons when I figure out which ones I want to use.

On the loose end, I soldered a header pin to each wire, to fit nicely into prototyping sockets, and heatshrunk each solder joint. I also heatshrunk logical pairs of wires together, to make it easy to remember which wires go together to a potentiometer. You can see that end in my previous post on the Arduino.

I made one mistake, which I had to go back in and correct: I wasn’t thinking straight about which potentiometer was the X axis and which was the Y. The one across the bottom, of course, is the X axis, and the one on the side the Y — but that’s not how I wired it. I swapped the brown and red and orange and yellow wires from what’s shown in the shot above.

And it works great! I have it reassembled and the right joystick controlling the prototype Z axis of my milling machine . . . which I’ll talk about next.

Auto Power Sequencer for SAE A502 and A202 Amplifiers

Tuesday, August 7th, 2007

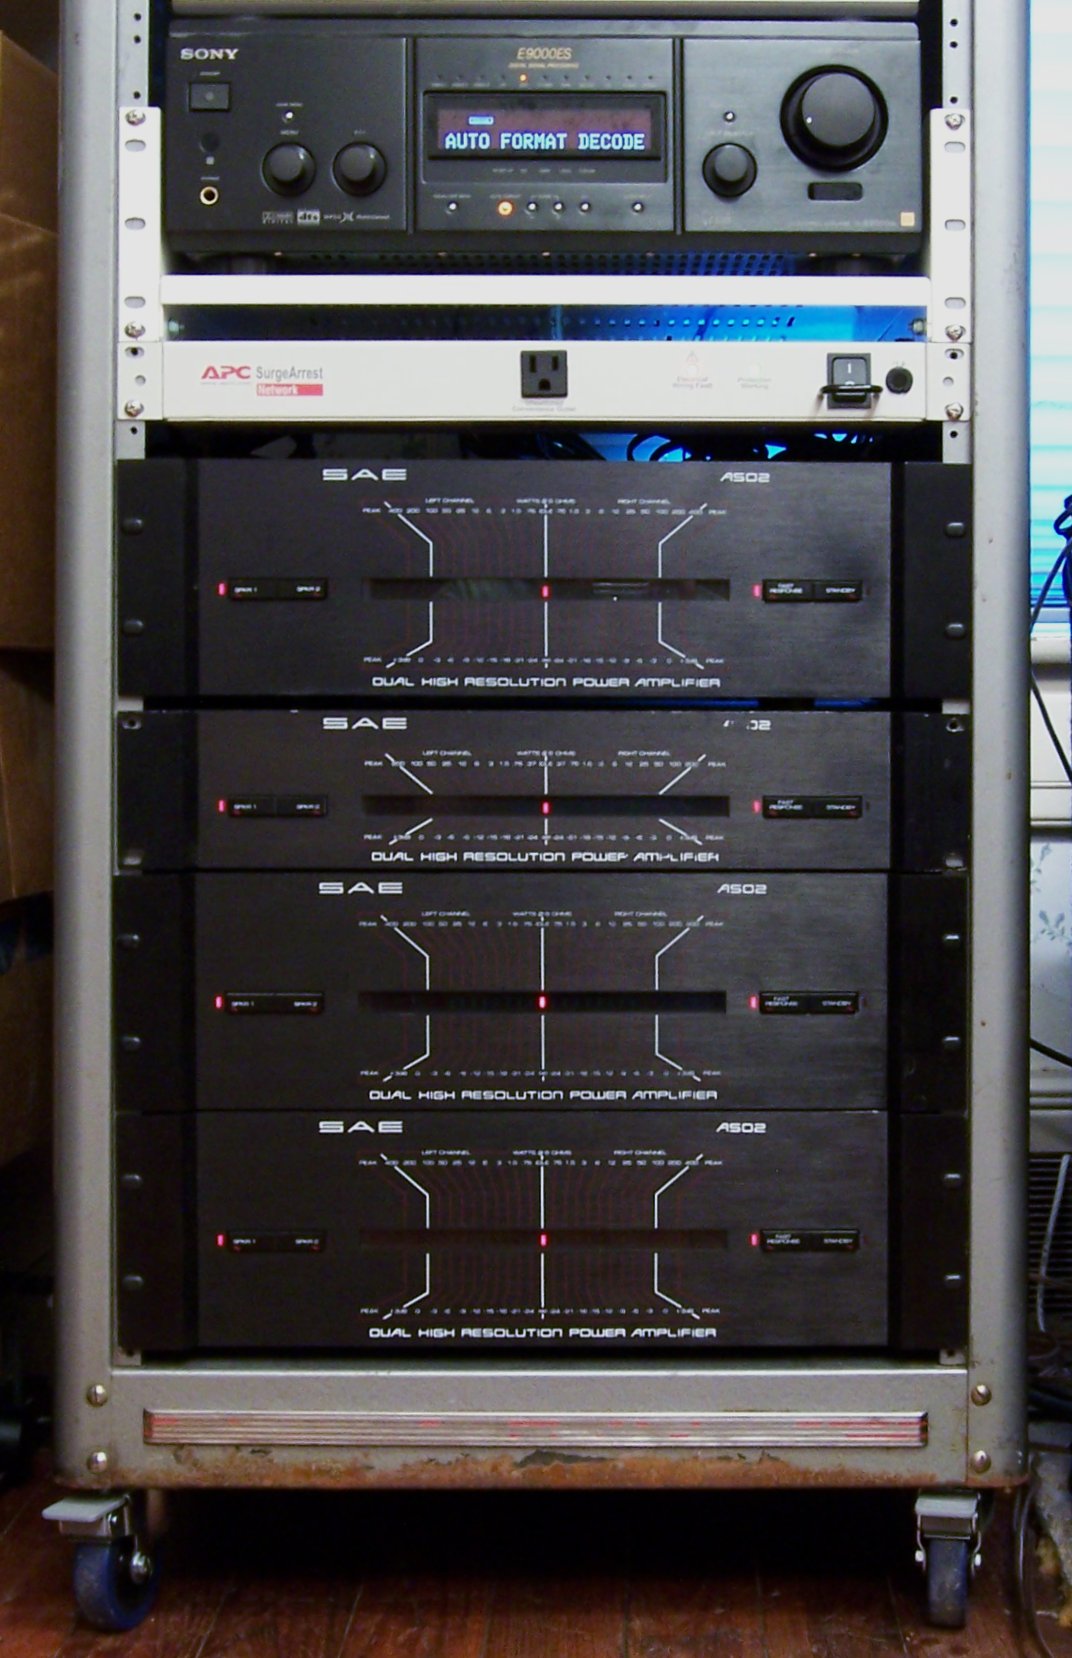
The project I’ve been working on lately is a power sequencer for my SAE A502 and A202 amplifiers. I bought my first A502 with summer job money when I was in college, and recently I’ve bought a few more on eBay. They’re big and beefy and I love ‘em.

My stereo rack, with Sony preamp and SAE amplifier stack

Their only drawback is that they have to be switched on and off manually — they’re not tied to my preamp. This is particularly annoying to my wife who hates all things electronic — she just wants to watch TV or a movie, and she has to fiddle with all these buttons to get the sound to come on.

Well, not any more.

Standby Circuit

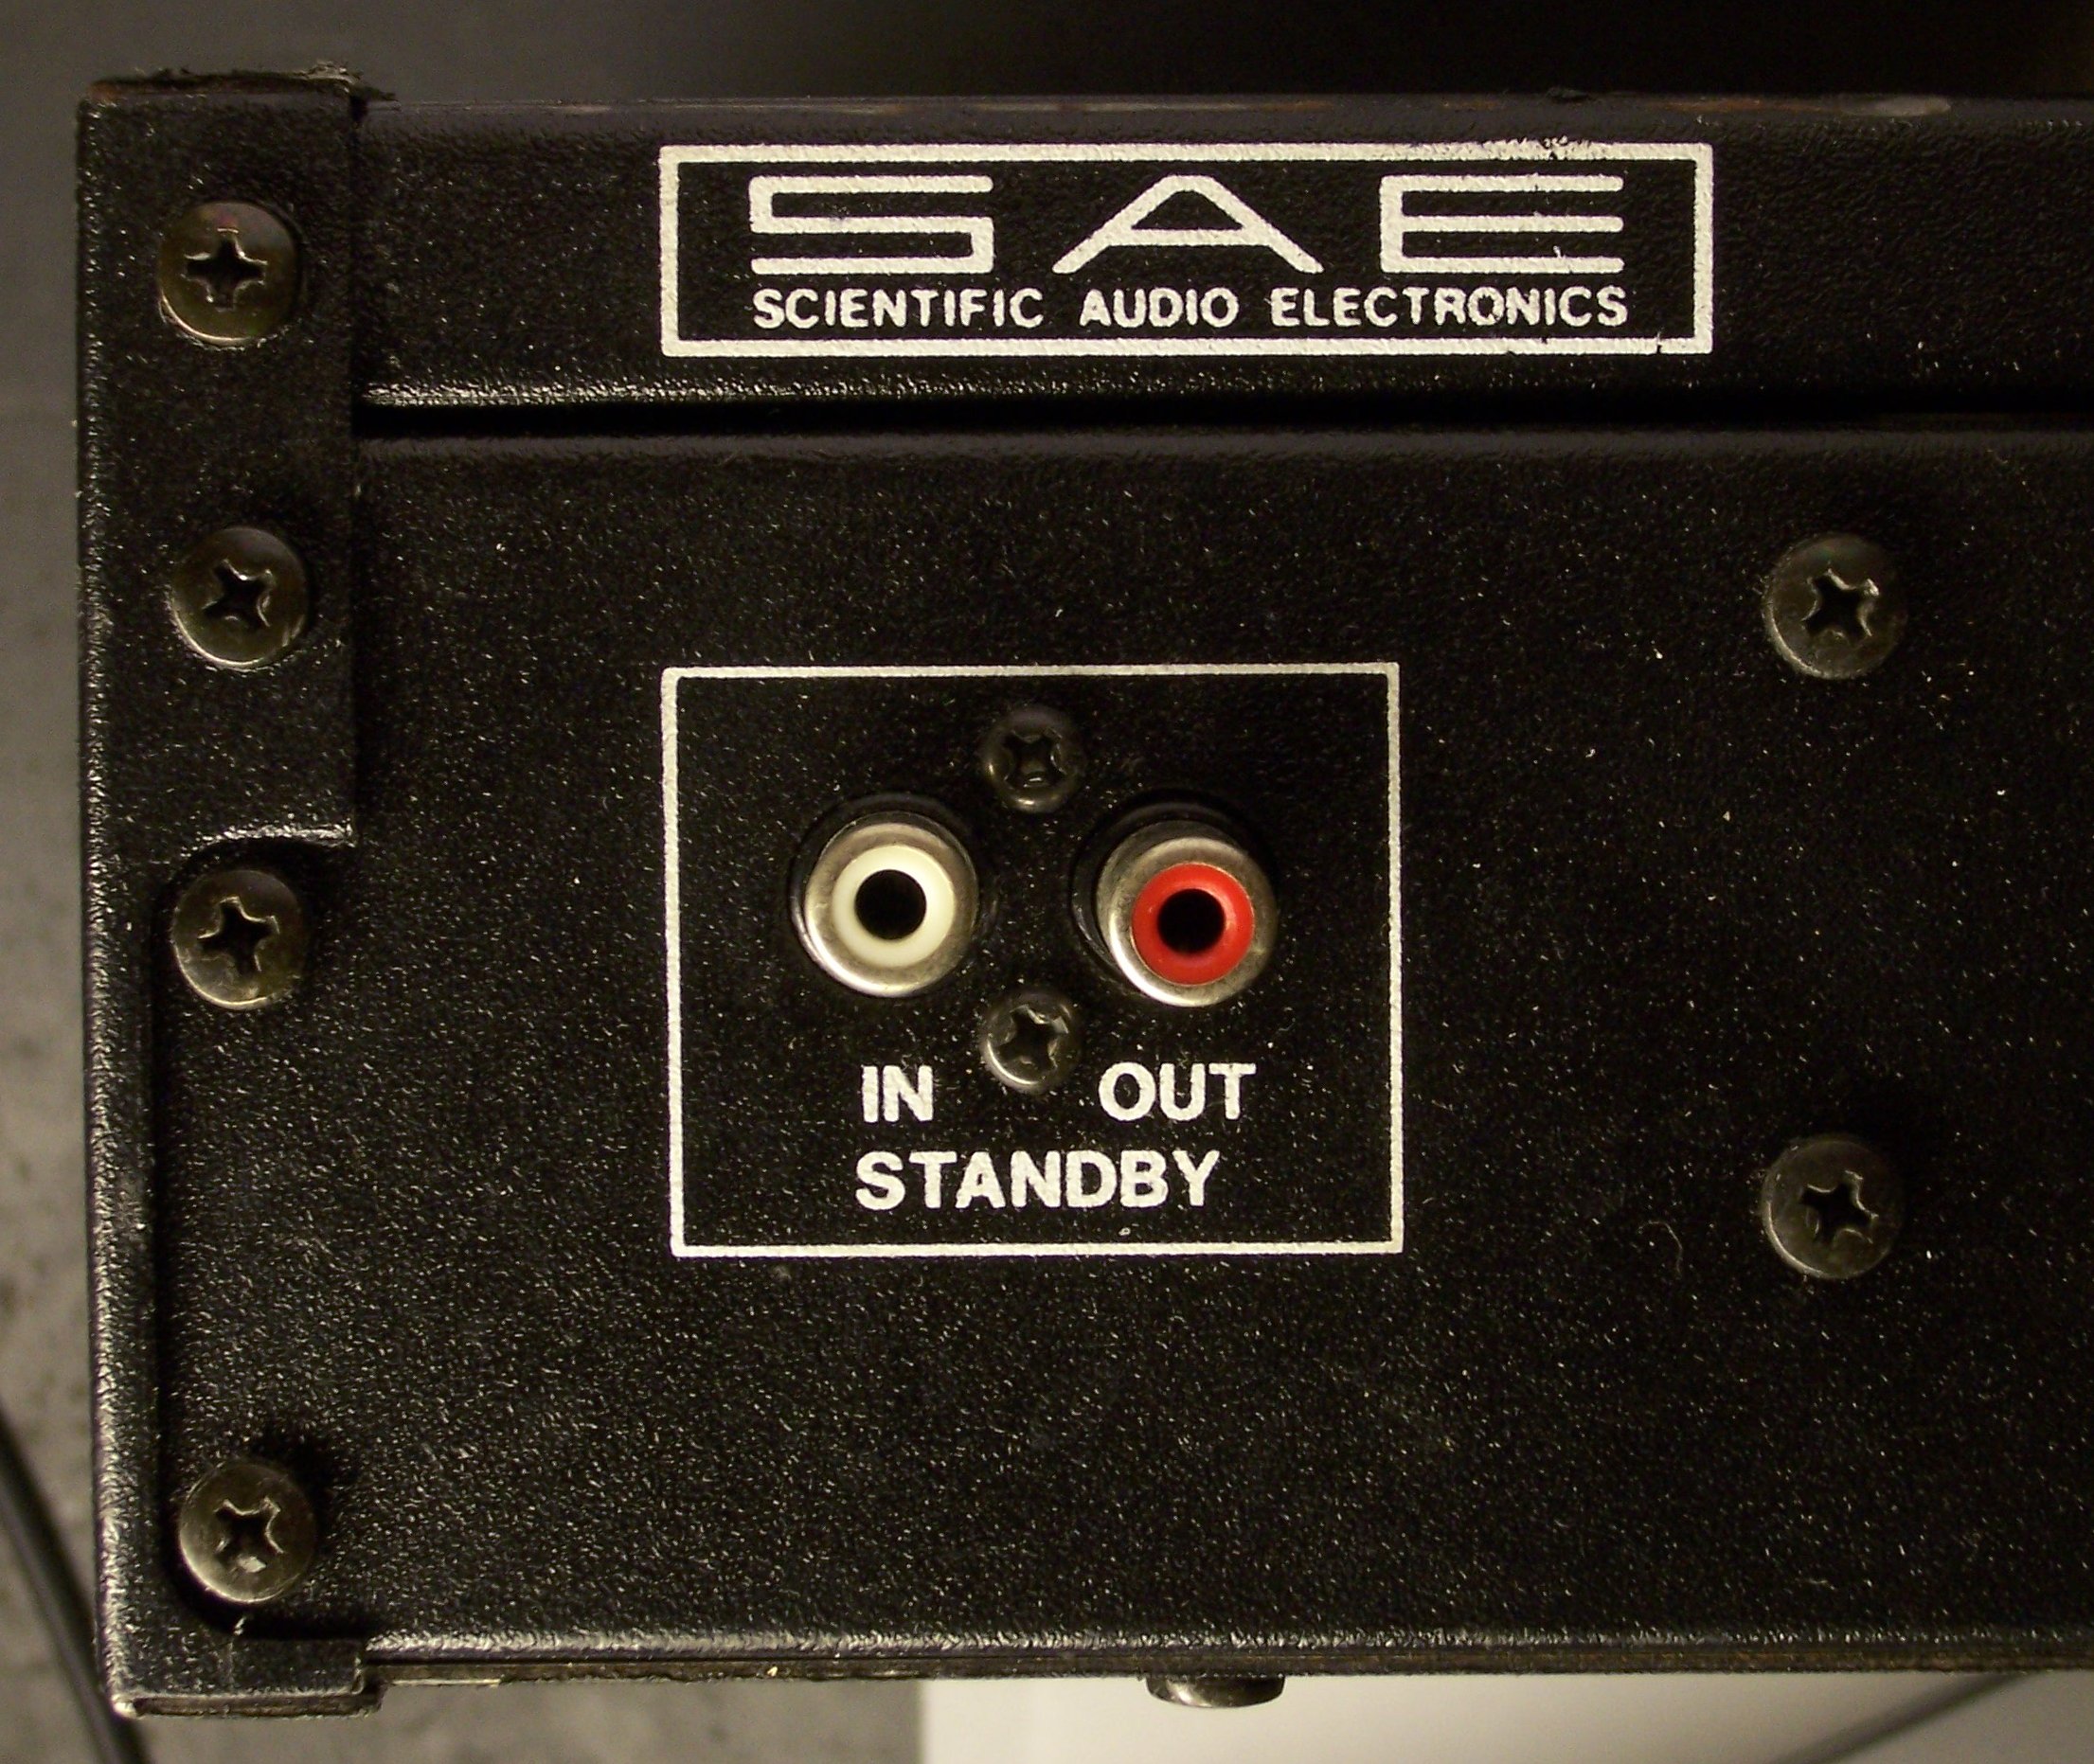
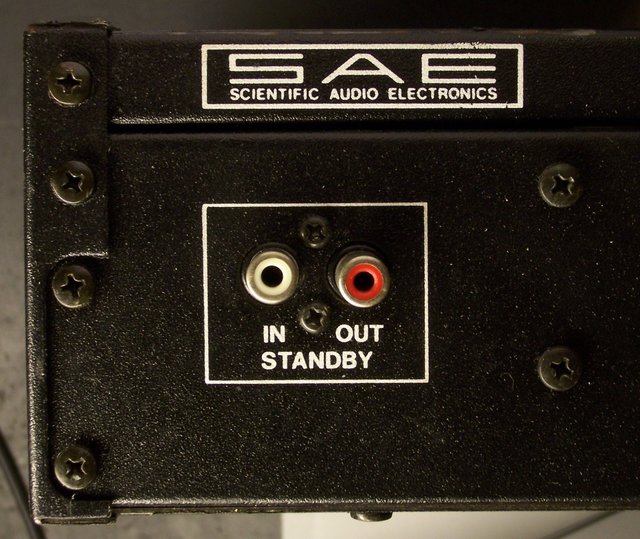
Many of the SAE amplifiers, particularly including the “02″ series, have standby inputs. The SAE preamplifier puts out a signal telling the amplifiers when to turn on and off, and the whole stack is controlled by the preamp.

SAE amplifier standby input

Which is great if you have an SAE preamp and you just want to listen to stereo audio — but SAE went out of business long before the advent of home theater surround sound, much less 5.1 surround. If you want surround, you’re not using an SAE preamp; and if you’re not using an SAE preamp, you’re turning your amplifiers on and off by hand.

I’ve long dreamed of building a box to do that for me, and now I’ve done it.

The first step was determining how the standby signalling is done. The owner’s manual isn’t much help; it doesn’t list the details of the protocol, but only describes (in rather roundabout language) that you need to manually turn the amp on and let the preamp turn it off.

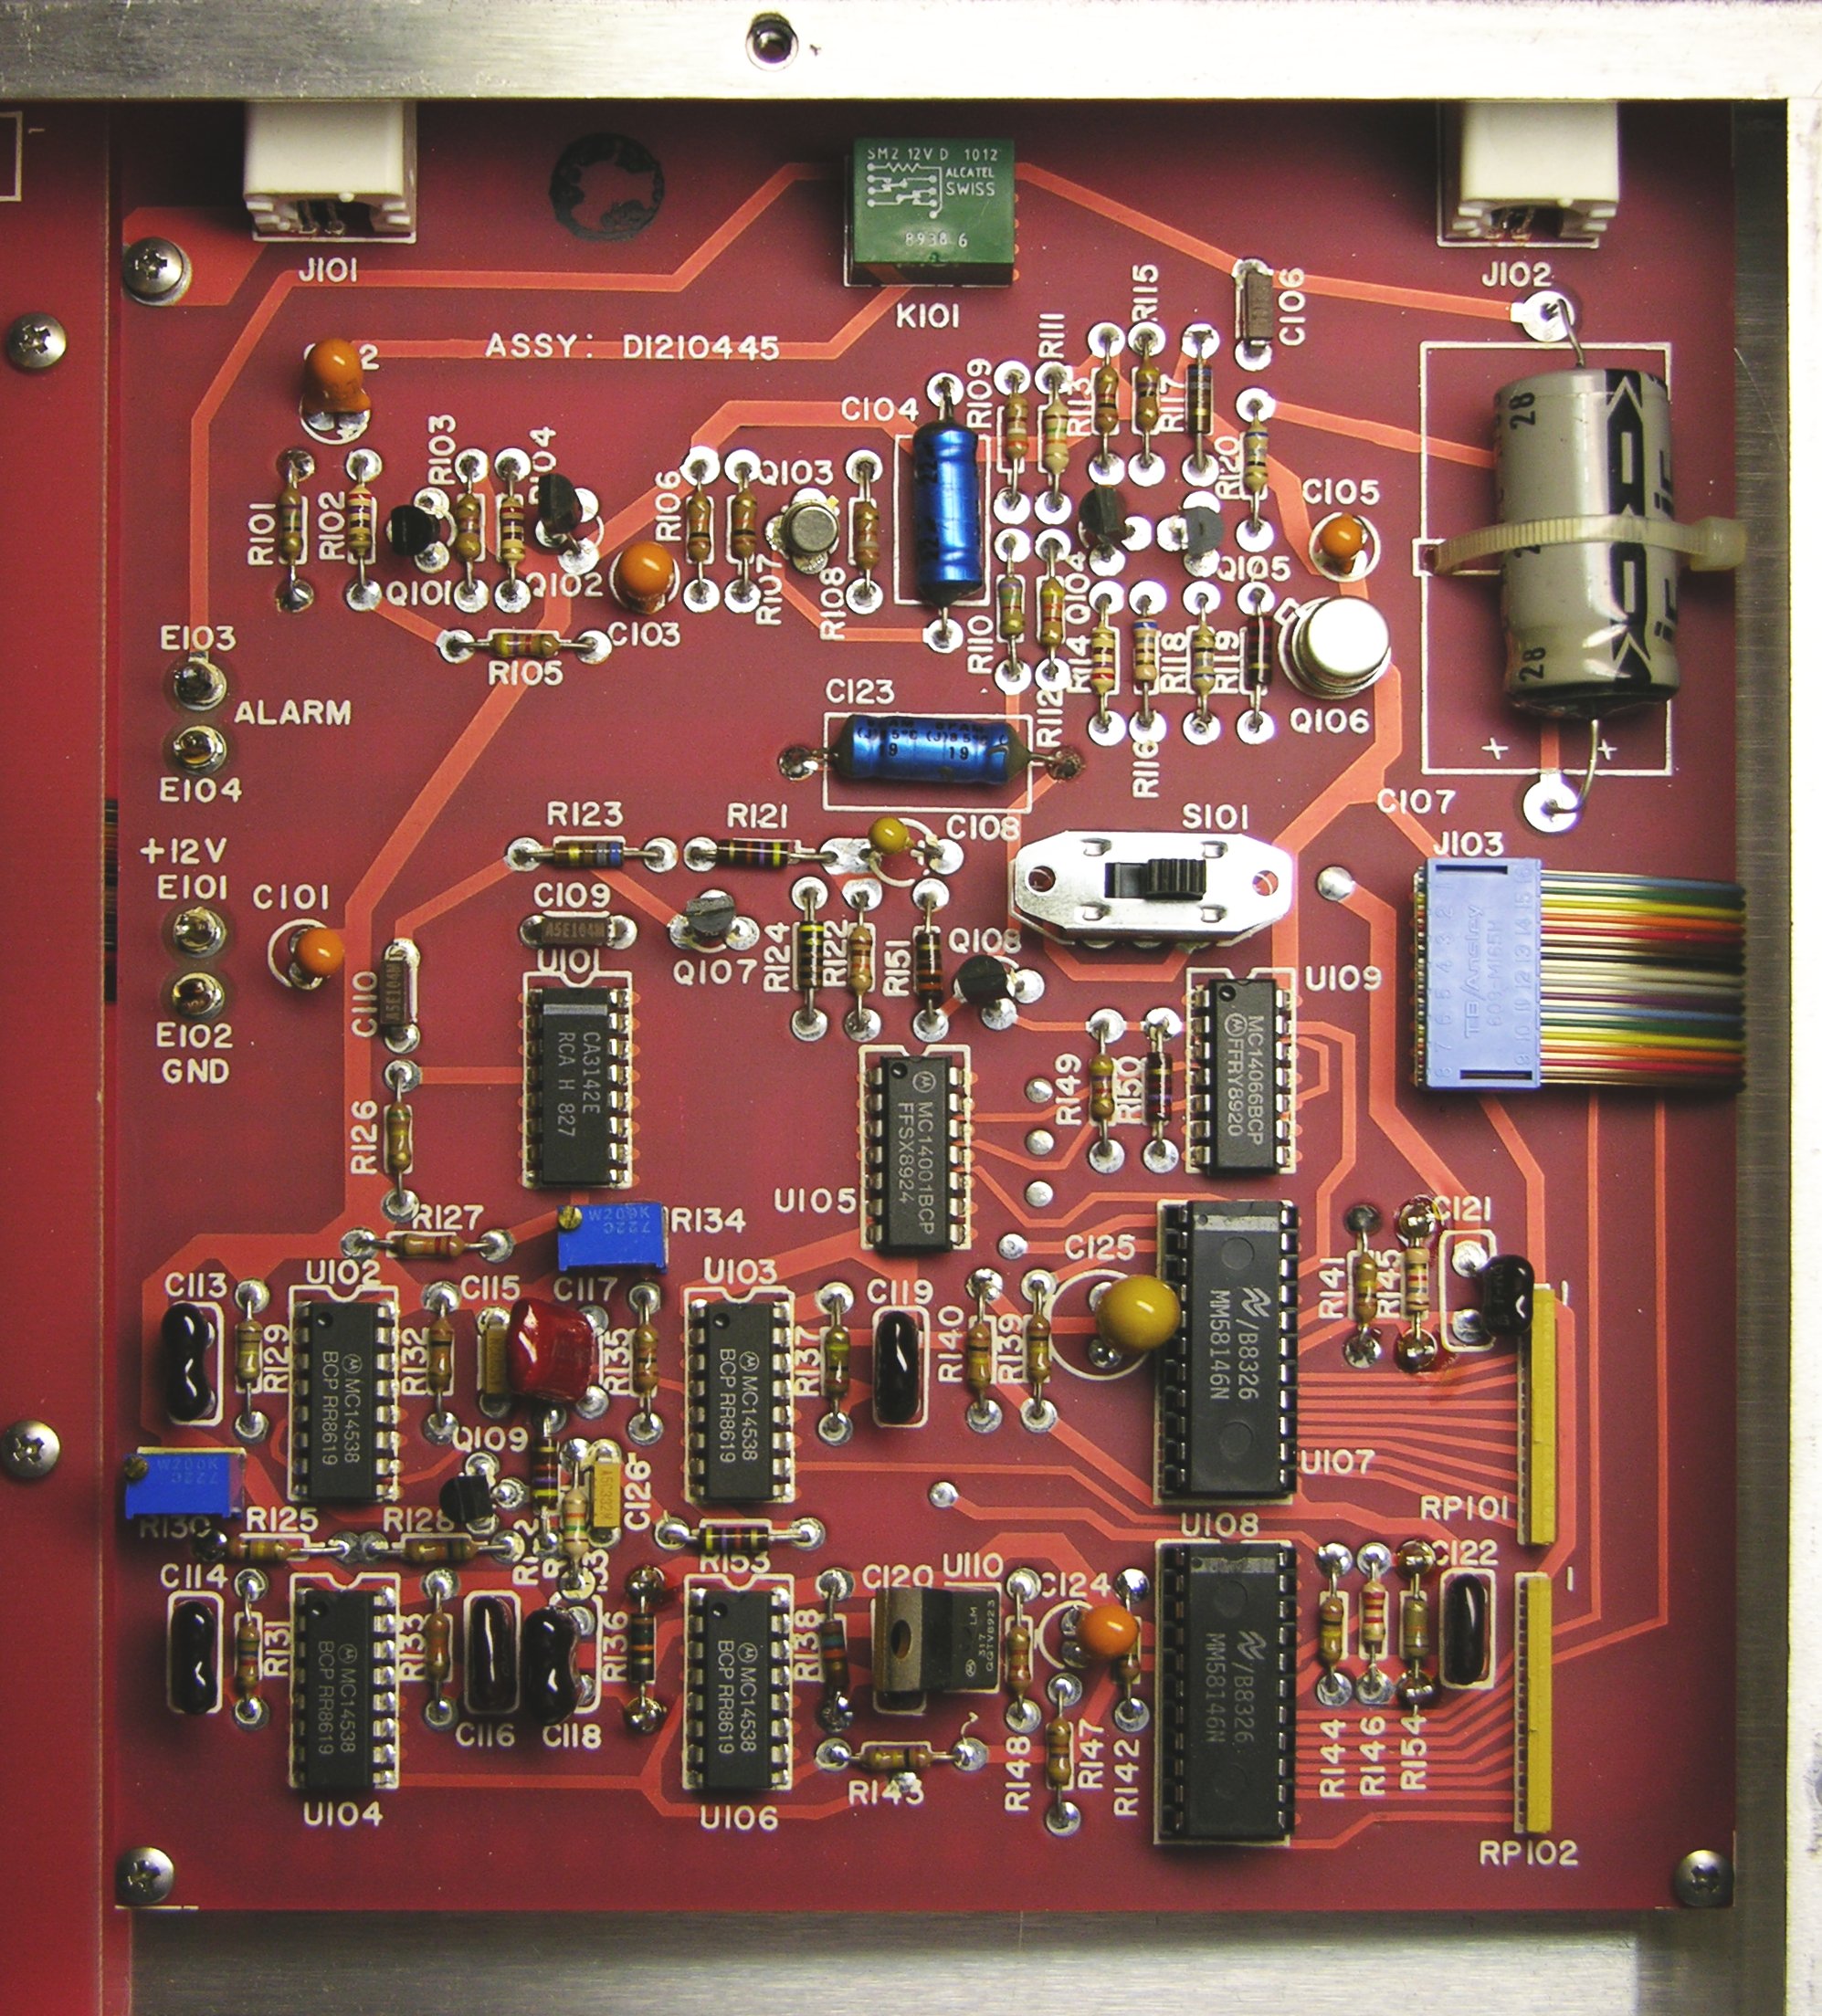
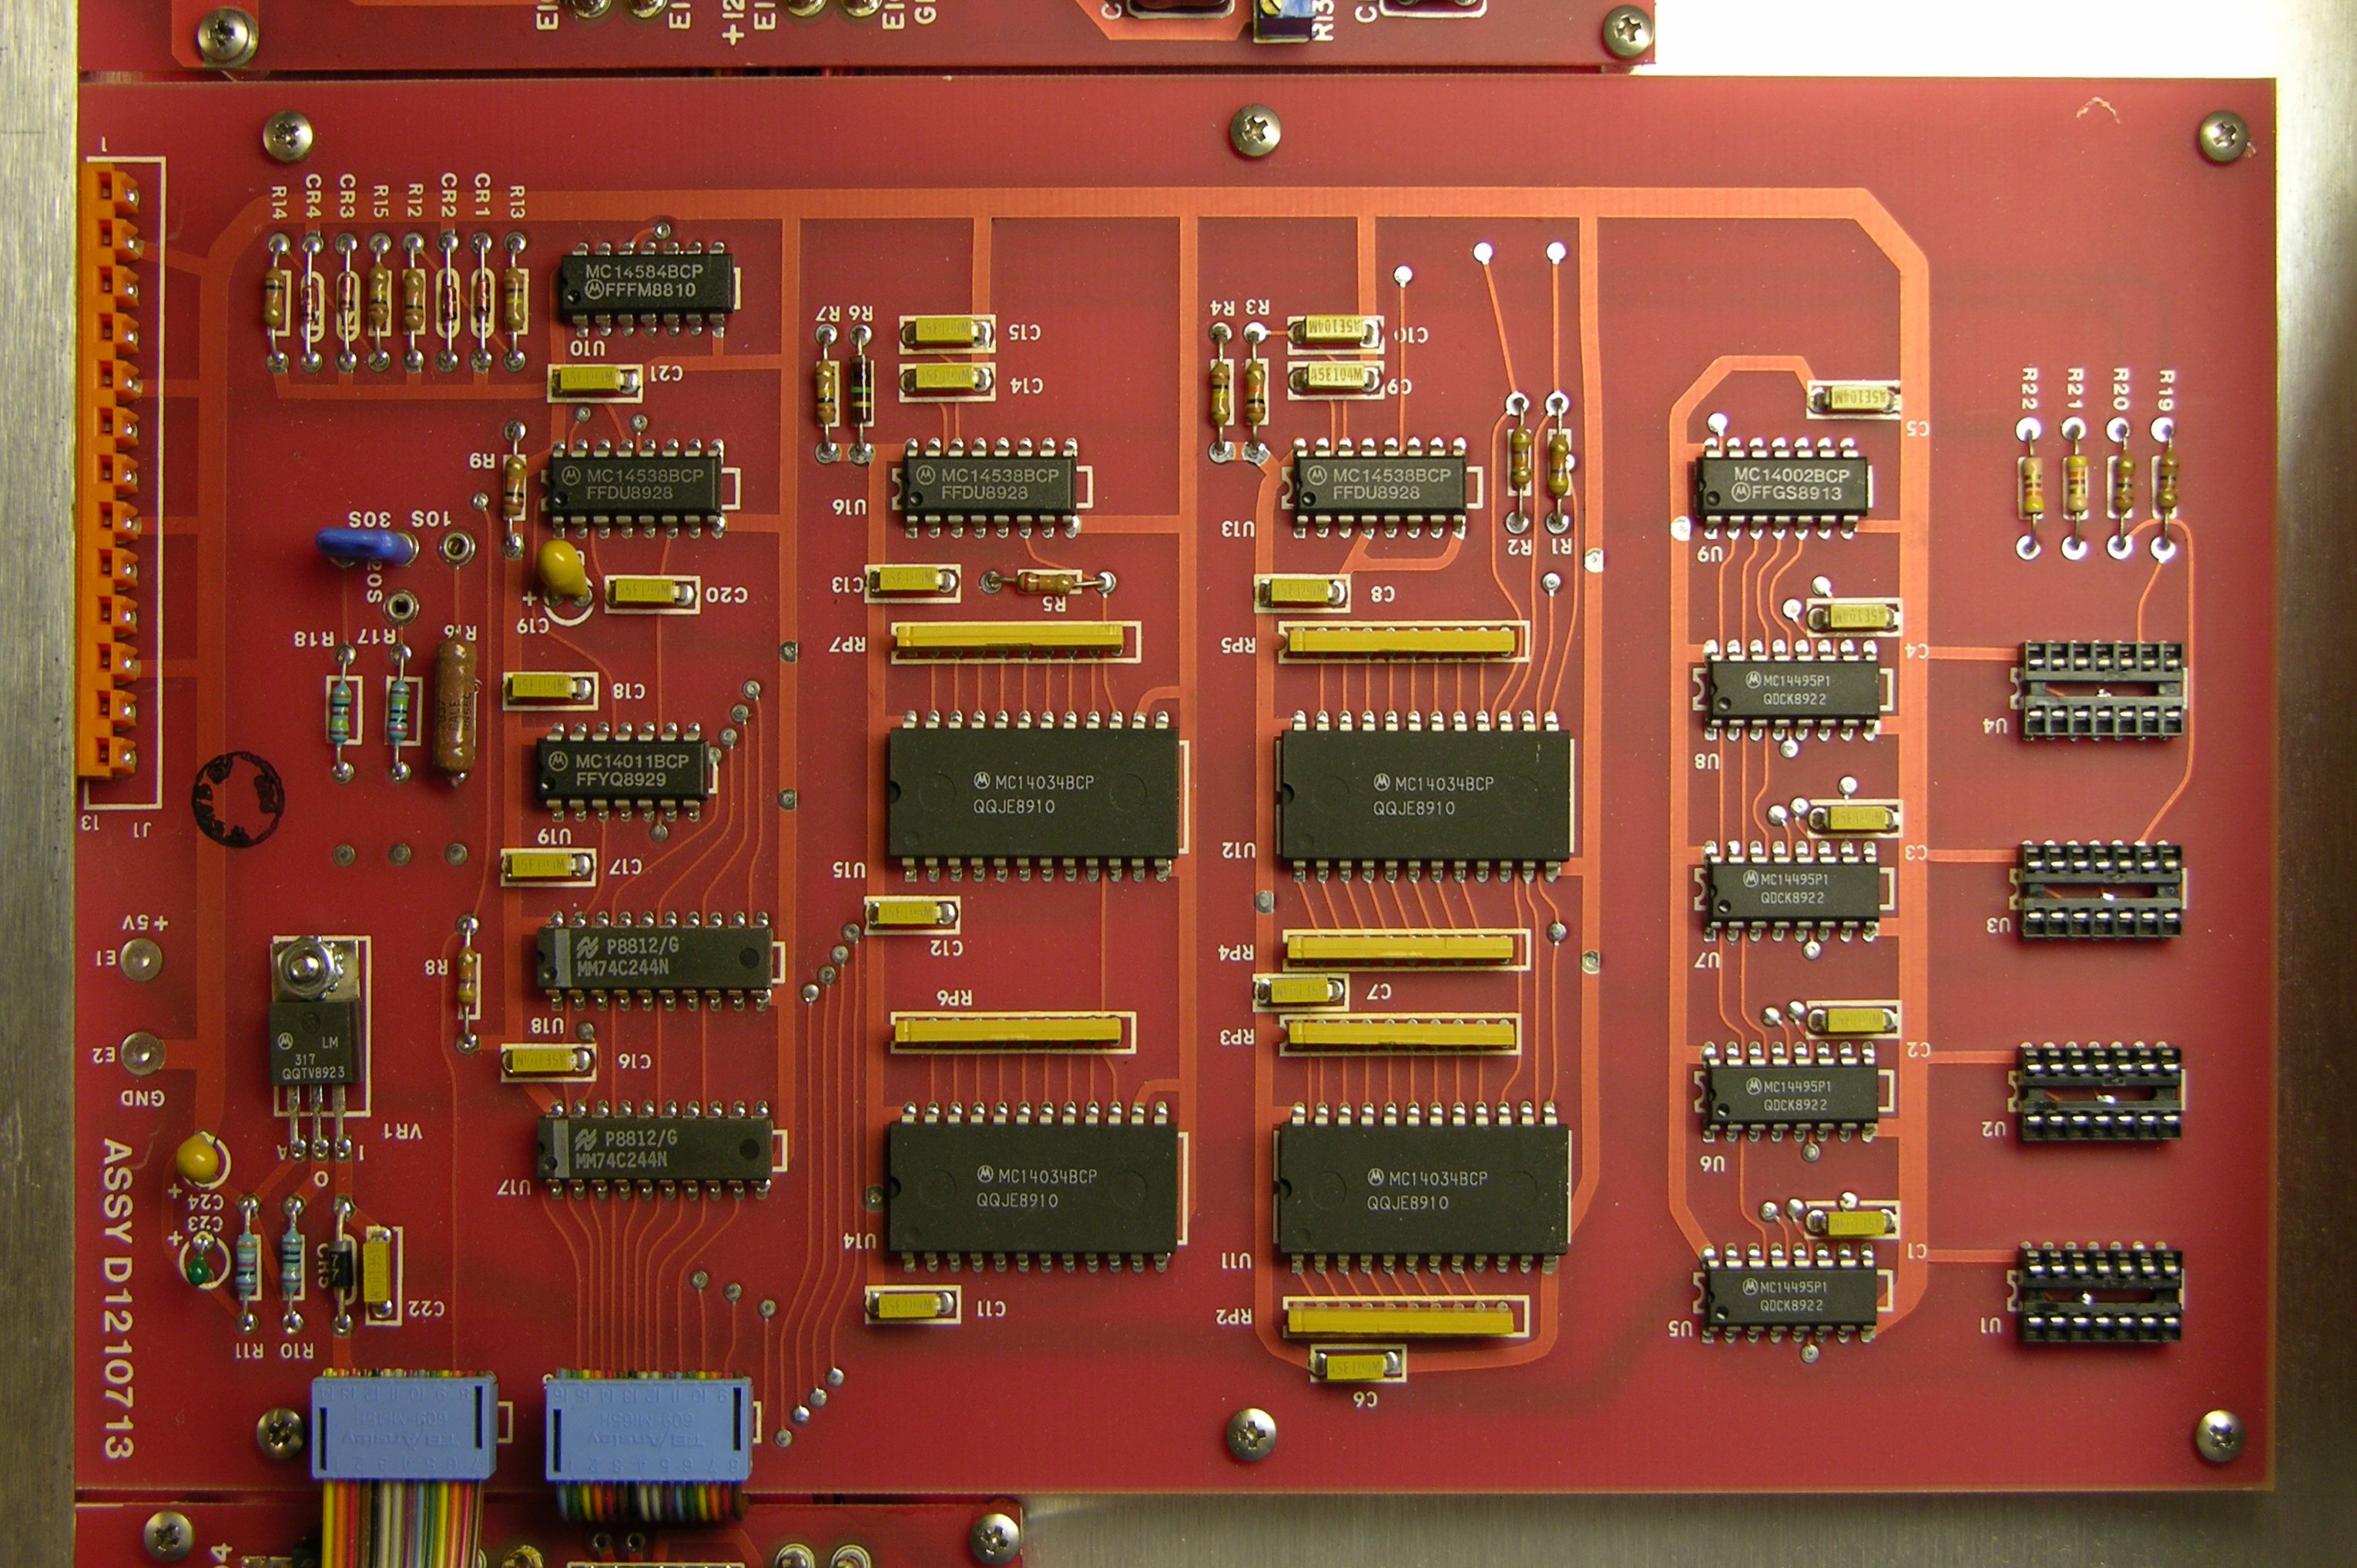
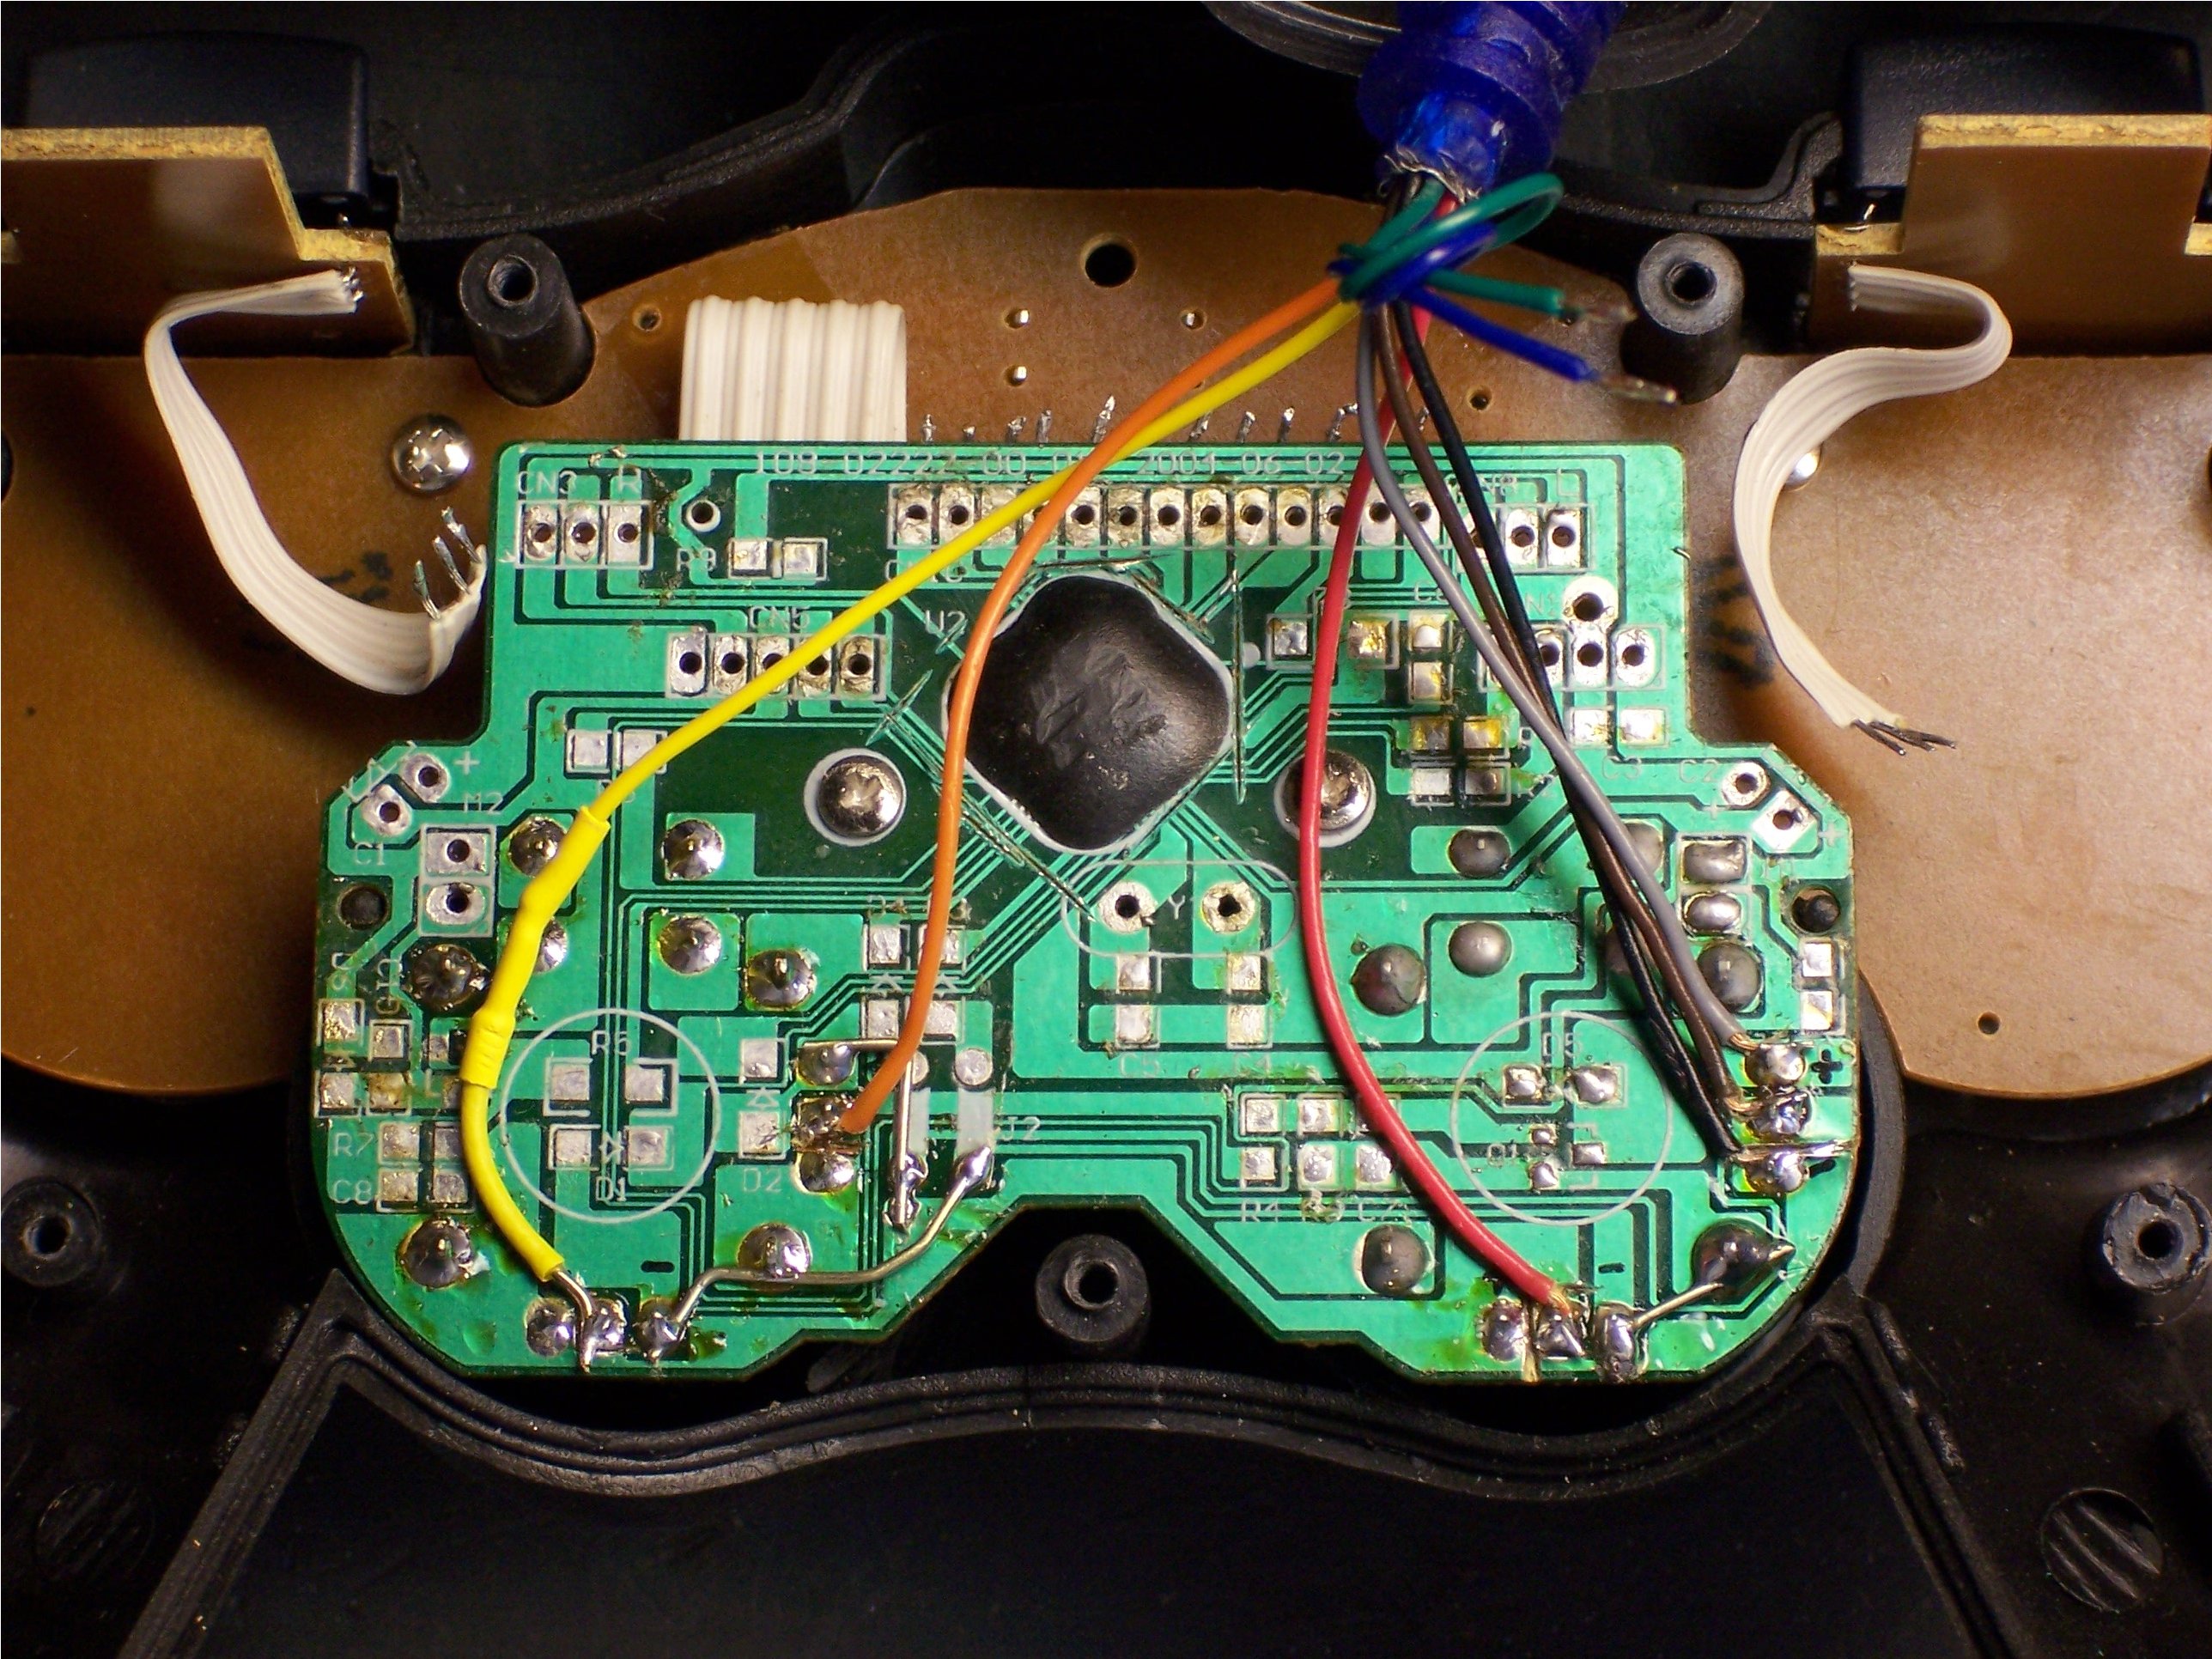
So I opened an amplifier and looked at its standby board. The circuitry is very simple, and I’ve since confirmed my schematic against the amplifier’s official schematic.

SAE amplifier standby circuit

The “input” and “output” jacks are identical and tied directly together, with the tips feeding the base of an NPN transistor. Put a small amount of current through the tip and the transistor will shunt the red wire’s voltage to ground.

Inside the amp, the red wire connects to the base of a Darlington pair that drives the main power relay. Steal its base current and the relay can’t switch the main power on; hence the standby is an override to keep the amp off, as the manual described.

Knowing that, it’s very simple to build a device to control the amplifiers.

Watching the Preamp

The question that remains is how to know when it’s time to turn on. In my case, since I have an A/V preamp, I thought the preamp put out a video signal any time it was on (even if it was just a bluescreen when no inputs are active). It turns out I was wrong, but this was still a productive train of thought.

I used an LM1881 video sync separator chip to watch a video connection. The chip ends up generating sync signals if none are present, so I couldn’t use its sync outputs to detect the presence of video; but it has a logic-level odd/even frame output that oscillates at 30Hz whenever an interlaced video signal is being received. Repeated rising (or falling) edges == video present.

LM1881 video detection circuit

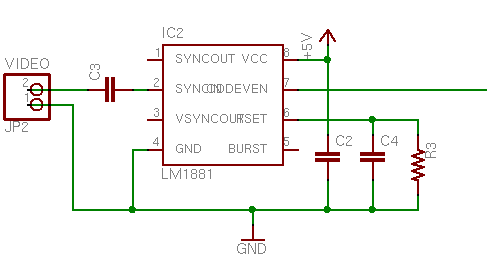
I had already built and tested the circuit before I discovered that my preamp most certainly does not output video when it’s on, unless it actually has a video input on as well. That was very disappointing, since I don’t want the system dependent on a third device that supplies video — it should work whether I’m watching a movie, listening to a CD, or listening to 8-track.

Skulking around for alternatives, the best I could come up with was the switched outlet on the back of my preamp. I bought a slim 5V wall wart to plug into the back of the preamp and added another detection circuit to rectify and regulate an arbitrary low-voltage input.

Switched power detection circuit

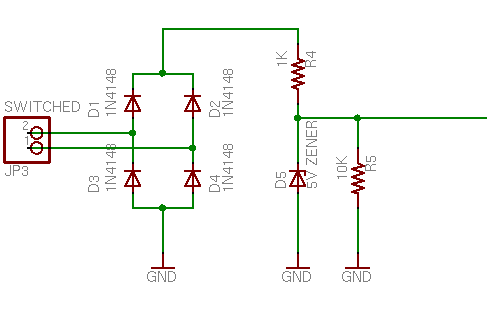
The preamp powers up, the switched recep comes on, 5V feeds into the bridge rectifier, and a logic high feeds out. The input would do just as well detecting a low-voltage AC wall wart . . . if I had remembered to put a capacitor between the diode bridge and R4. Duly noted for the next version.

Control Logic

Cort was saying that I should have built the whole circuit out of discrete TTL logic, and I could indeed have done so, for a little retro charm. However, I wanted additional control that would have raised my chip count too high, so I built the control with a PIC.

When the preamp comes on, the sequencer turns on all four amps, one at a time, to spread out the inrush current. (Could have used a clock and a shift register.) But all four amps are only needed when watching movies — listening to music requires only the front and sub channels, not the center and rear. I wanted manual override pushbuttons so I could turn off the unused amps. (Could have used S-R latches.)

Additionally, when Cort and I were discussing what should happen to manual selections when the preamp eventually turns off, he suggested having a fully manual mode that ignores the signal detector inputs and heeds only the front-panel pushbuttons. (Could have . . . naahhhhh.)

Ultimately, I ended up using every available I/O pin on my PIC18F232:

  • 1 capture/compare input pin to watch the video signal
  • 1 input pin to watch the switched power signal
  • 2 output pins to run the bicolor power/mode LED
  • 4 input pins to watch the front-panel pushbuttons
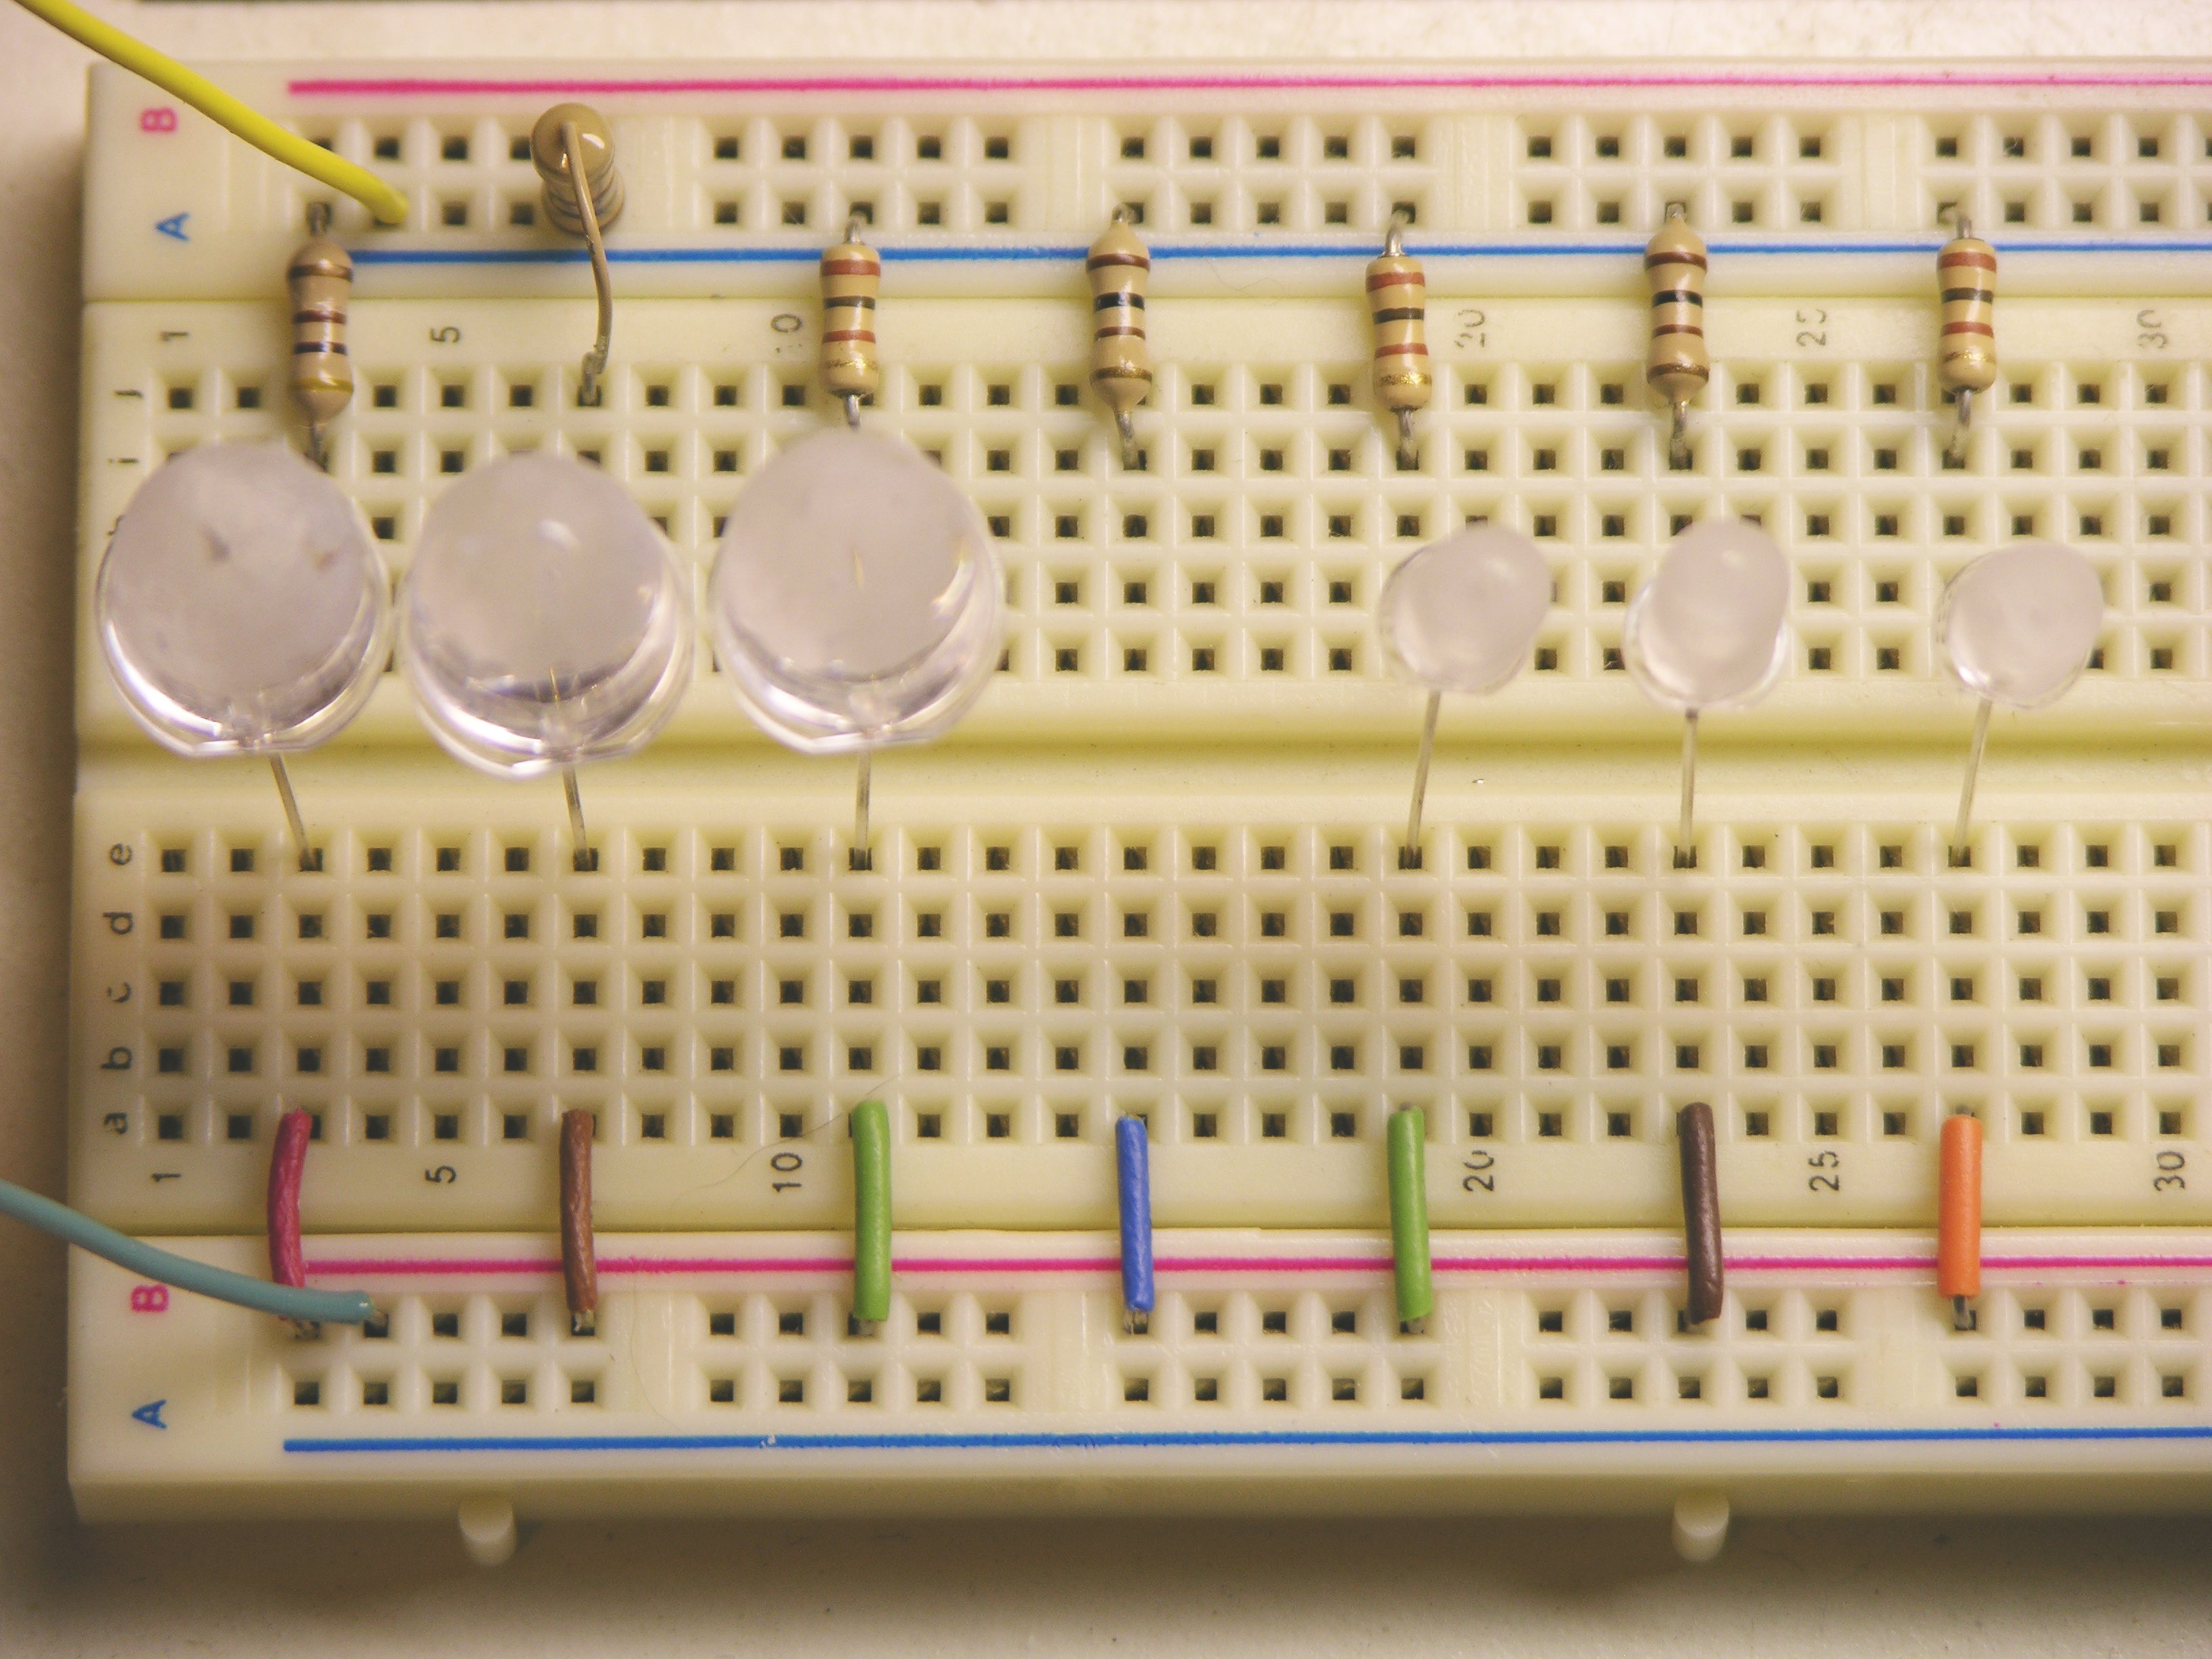
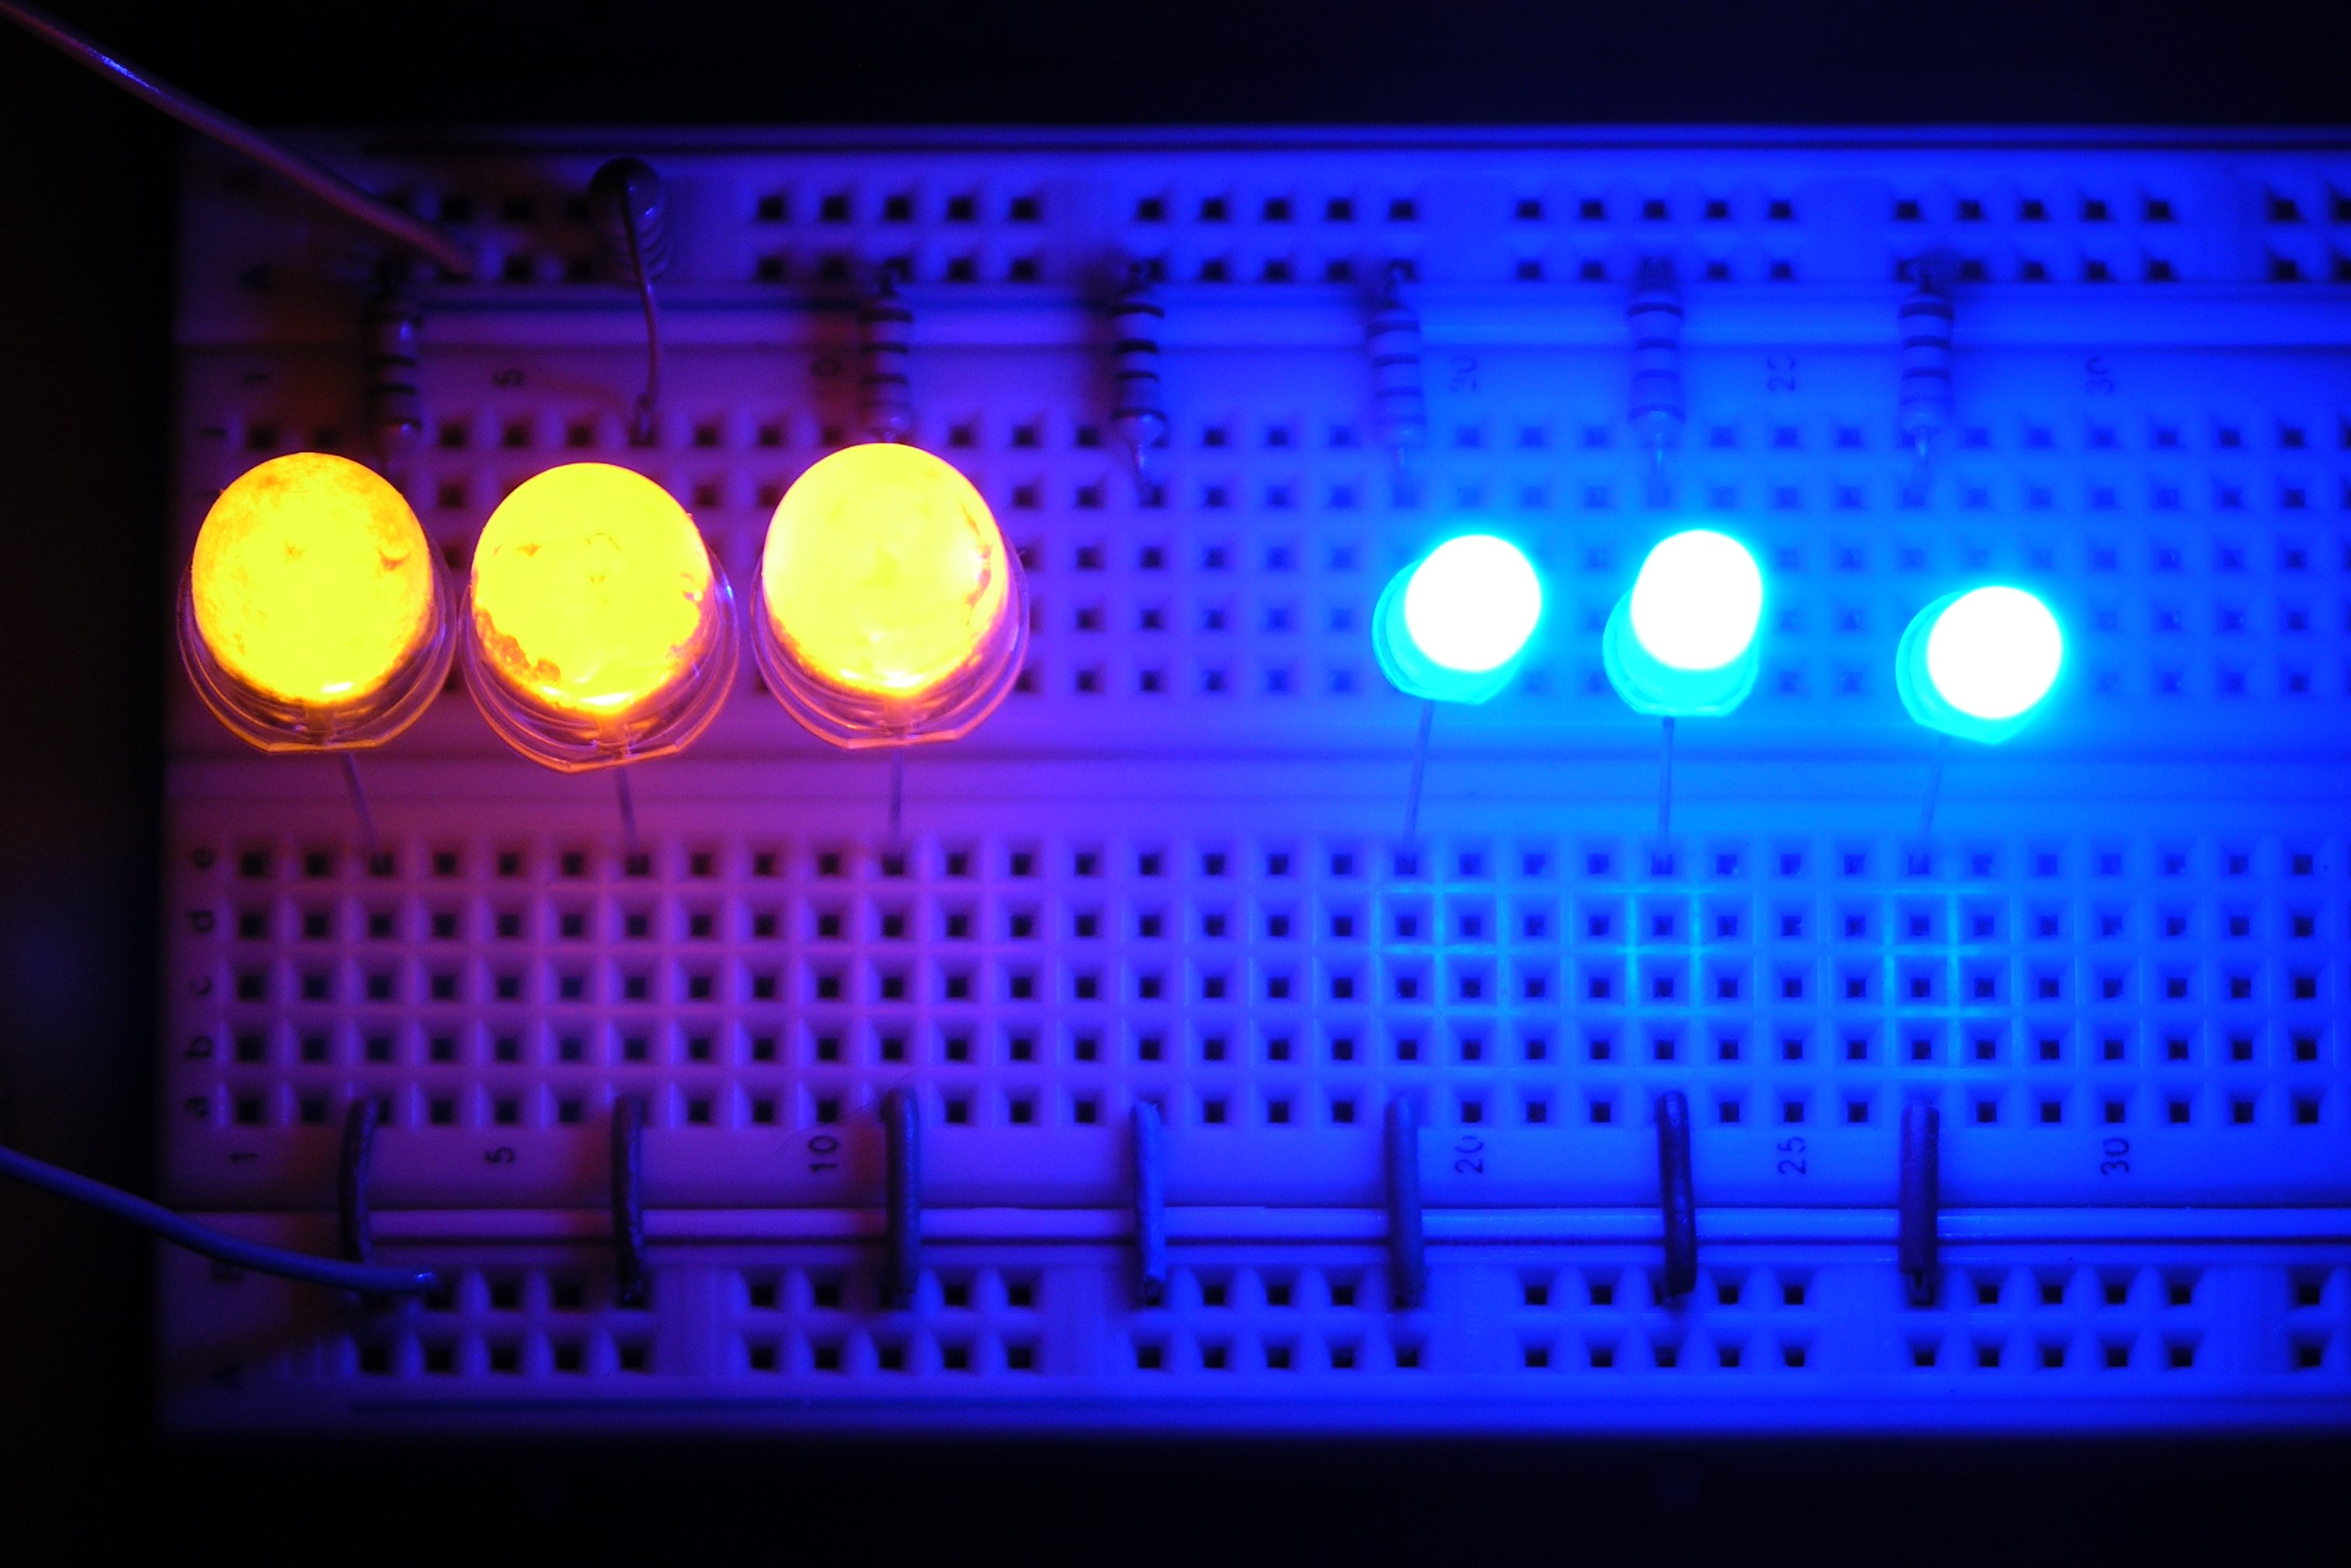
  • 4 I/O pins to run bicolor amplifier status LEDs using the tristate trick
  • 4 output pins to control the amplifier standby inputs

I wrote the code in LogoChip Logo, with subroutines to service the input modules and a state machine to control the different modes. All of the timing is done in software, including the delay between turning on consecutive amps, and a loss-of-video countdown timer to keep short glitches from bouncing the amps.

Sequencer in Action

The video detector wasn’t a waste; I plugged a spare output of my DVD player into it, so the amps come on when the DVD player is turned on or the preamp is turned on, whichever comes first.

Here’s a video of me turning on the DVD player and the sequencer (just above the amp stack) turning on the amps, then turning off the DVD player and the sequencer turns off the amps after a delay. If you have audio turned on, you can hear the amps’ relays clicking in sync with the sequencer LEDs, then later clicks as the delayed speaker relays engage.

This is really slow to load; I’m working on migrating this to YouTube.

These are too slow to load and are causing problems with my browser. You’re welcome to paste in the URL and try them if you like.

embed src=”http://www2.neufeld.newton.ks.us/images/electronics/2007/08/06/100_3046.mov” controller=”true” width=”480″ height=”656″ kioskmode=”false” autoplay=”false” pluginspage=”http://www.apple.com/quicktime/download/”>

There’s one little snag — the standby circuit on my top amplifier isn’t working, so I’m still turning it on and off manually. I just bought an SAE preamp on eBay and should receive it within a week or so, at which point I’ll hook it up and see whether it has magic juju that my sequencer doesn’t, or whether I need to troubleshoot my amp.

Here’s a nearly identical video of me turning on the preamp and the sequencer turning on the amps.

embed src=”http://www2.neufeld.newton.ks.us/images/electronics/2007/08/06/100_3047.mov” controller=”true” width=”480″ height=”656″ kioskmode=”false” autoplay=”false” pluginspage=”http://www.apple.com/quicktime/download/”>

Kits for Sale

Well, not yet, but I’m interested in pursuing it. There’s a pretty active community of SAE equipment owners, and I have to believe there’d be other folks in the same position, using SAE amps with non-SAE preamps. After I work through a few issues, I’d like to offer the power sequencer in both kit and appliance form and see if I can sell a few.

I want to split the main circuit board into a front-panel board and a control board, to make it easier for other folks to adapt the LED and button spacing to fit enclosures of their own choice. That also solves the problem with the RJ-45 jack, as it could then be on the component side of the control daughterboard. And I made some mistakes in the physical size and mounting of the board that I’d like to correct as well.

Once I touch up the circuit and board designs and clean up my code, I want to release the whole schmear under a Creative Commons license, probably Attribution Share Alike. Lady Ada’s Creative-Commons-licensed kits are pretty inspiring to me, and I’d like to think there’s a small but healthy market for kits and appliances that don’t rely on keeping the design closed and secret.

Wish me luck!