Archive for the ‘Circuits’ Category

Speaker Power Detector

Tuesday, October 2nd, 2007

A few weeks ago, a reader who goes by Mikey asked:

I’d like a device that connects inline to the speaker output(s) on my home stereo amplifier between the amp and the speakers that has led indicators that flash with the audio signal that passes through the speaker wire.

We have outdoor speakers on our “B” channel of the amp. On many occasions, we forget to turn them off, and I’d love some type of indicator that would be on/flashing when the speakers are in use. This would remind us to turn them off.

Any ideas how to build a device like this, or somewhere to go?

Prototype of speaker power detector

It seemed like an interesting request, potentially useful to other folks, and easy enough to build. I’ve had a little time to play this week and hacked together a prototype, which I’ve posted here along with schematic, parts list, and build instructions.

Auto Power Sequencer for SAE A502 and A202 Amplifiers

Tuesday, August 7th, 2007

The project I’ve been working on lately is a power sequencer for my SAE A502 and A202 amplifiers. I bought my first A502 with summer job money when I was in college, and recently I’ve bought a few more on eBay. They’re big and beefy and I love ‘em.

My stereo rack, with Sony preamp and SAE amplifier stack

Their only drawback is that they have to be switched on and off manually — they’re not tied to my preamp. This is particularly annoying to my wife who hates all things electronic — she just wants to watch TV or a movie, and she has to fiddle with all these buttons to get the sound to come on.

Well, not any more.

Standby Circuit

Many of the SAE amplifiers, particularly including the “02″ series, have standby inputs. The SAE preamplifier puts out a signal telling the amplifiers when to turn on and off, and the whole stack is controlled by the preamp.

SAE amplifier standby input

Which is great if you have an SAE preamp and you just want to listen to stereo audio — but SAE went out of business long before the advent of home theater surround sound, much less 5.1 surround. If you want surround, you’re not using an SAE preamp; and if you’re not using an SAE preamp, you’re turning your amplifiers on and off by hand.

I’ve long dreamed of building a box to do that for me, and now I’ve done it.

The first step was determining how the standby signalling is done. The owner’s manual isn’t much help; it doesn’t list the details of the protocol, but only describes (in rather roundabout language) that you need to manually turn the amp on and let the preamp turn it off.

So I opened an amplifier and looked at its standby board. The circuitry is very simple, and I’ve since confirmed my schematic against the amplifier’s official schematic.

SAE amplifier standby circuit

The “input” and “output” jacks are identical and tied directly together, with the tips feeding the base of an NPN transistor. Put a small amount of current through the tip and the transistor will shunt the red wire’s voltage to ground.

Inside the amp, the red wire connects to the base of a Darlington pair that drives the main power relay. Steal its base current and the relay can’t switch the main power on; hence the standby is an override to keep the amp off, as the manual described.

Knowing that, it’s very simple to build a device to control the amplifiers.

Watching the Preamp

The question that remains is how to know when it’s time to turn on. In my case, since I have an A/V preamp, I thought the preamp put out a video signal any time it was on (even if it was just a bluescreen when no inputs are active). It turns out I was wrong, but this was still a productive train of thought.

I used an LM1881 video sync separator chip to watch a video connection. The chip ends up generating sync signals if none are present, so I couldn’t use its sync outputs to detect the presence of video; but it has a logic-level odd/even frame output that oscillates at 30Hz whenever an interlaced video signal is being received. Repeated rising (or falling) edges == video present.

LM1881 video detection circuit

I had already built and tested the circuit before I discovered that my preamp most certainly does not output video when it’s on, unless it actually has a video input on as well. That was very disappointing, since I don’t want the system dependent on a third device that supplies video — it should work whether I’m watching a movie, listening to a CD, or listening to 8-track.

Skulking around for alternatives, the best I could come up with was the switched outlet on the back of my preamp. I bought a slim 5V wall wart to plug into the back of the preamp and added another detection circuit to rectify and regulate an arbitrary low-voltage input.

Switched power detection circuit

The preamp powers up, the switched recep comes on, 5V feeds into the bridge rectifier, and a logic high feeds out. The input would do just as well detecting a low-voltage AC wall wart . . . if I had remembered to put a capacitor between the diode bridge and R4. Duly noted for the next version.

Control Logic

Cort was saying that I should have built the whole circuit out of discrete TTL logic, and I could indeed have done so, for a little retro charm. However, I wanted additional control that would have raised my chip count too high, so I built the control with a PIC.

When the preamp comes on, the sequencer turns on all four amps, one at a time, to spread out the inrush current. (Could have used a clock and a shift register.) But all four amps are only needed when watching movies — listening to music requires only the front and sub channels, not the center and rear. I wanted manual override pushbuttons so I could turn off the unused amps. (Could have used S-R latches.)

Additionally, when Cort and I were discussing what should happen to manual selections when the preamp eventually turns off, he suggested having a fully manual mode that ignores the signal detector inputs and heeds only the front-panel pushbuttons. (Could have . . . naahhhhh.)

Ultimately, I ended up using every available I/O pin on my PIC18F232:

  • 1 capture/compare input pin to watch the video signal
  • 1 input pin to watch the switched power signal
  • 2 output pins to run the bicolor power/mode LED
  • 4 input pins to watch the front-panel pushbuttons
  • 4 I/O pins to run bicolor amplifier status LEDs using the tristate trick
  • 4 output pins to control the amplifier standby inputs

I wrote the code in LogoChip Logo, with subroutines to service the input modules and a state machine to control the different modes. All of the timing is done in software, including the delay between turning on consecutive amps, and a loss-of-video countdown timer to keep short glitches from bouncing the amps.

Sequencer in Action

The video detector wasn’t a waste; I plugged a spare output of my DVD player into it, so the amps come on when the DVD player is turned on or the preamp is turned on, whichever comes first.

Here’s a video of me turning on the DVD player and the sequencer (just above the amp stack) turning on the amps, then turning off the DVD player and the sequencer turns off the amps after a delay. If you have audio turned on, you can hear the amps’ relays clicking in sync with the sequencer LEDs, then later clicks as the delayed speaker relays engage.

This is really slow to load; I’m working on migrating this to YouTube.

These are too slow to load and are causing problems with my browser. You’re welcome to paste in the URL and try them if you like.

embed src=”http://www2.neufeld.newton.ks.us/images/electronics/2007/08/06/100_3046.mov” controller=”true” width=”480″ height=”656″ kioskmode=”false” autoplay=”false” pluginspage=”http://www.apple.com/quicktime/download/”>

There’s one little snag — the standby circuit on my top amplifier isn’t working, so I’m still turning it on and off manually. I just bought an SAE preamp on eBay and should receive it within a week or so, at which point I’ll hook it up and see whether it has magic juju that my sequencer doesn’t, or whether I need to troubleshoot my amp.

Here’s a nearly identical video of me turning on the preamp and the sequencer turning on the amps.

embed src=”http://www2.neufeld.newton.ks.us/images/electronics/2007/08/06/100_3047.mov” controller=”true” width=”480″ height=”656″ kioskmode=”false” autoplay=”false” pluginspage=”http://www.apple.com/quicktime/download/”>

Kits for Sale

Well, not yet, but I’m interested in pursuing it. There’s a pretty active community of SAE equipment owners, and I have to believe there’d be other folks in the same position, using SAE amps with non-SAE preamps. After I work through a few issues, I’d like to offer the power sequencer in both kit and appliance form and see if I can sell a few.

I want to split the main circuit board into a front-panel board and a control board, to make it easier for other folks to adapt the LED and button spacing to fit enclosures of their own choice. That also solves the problem with the RJ-45 jack, as it could then be on the component side of the control daughterboard. And I made some mistakes in the physical size and mounting of the board that I’d like to correct as well.

Once I touch up the circuit and board designs and clean up my code, I want to release the whole schmear under a Creative Commons license, probably Attribution Share Alike. Lady Ada’s Creative-Commons-licensed kits are pretty inspiring to me, and I’d like to think there’s a small but healthy market for kits and appliances that don’t rely on keeping the design closed and secret.

Wish me luck!

Follow-Up to Driving a Bicolor LED from a Single Output Pin

Sunday, July 1st, 2007

Within mere hours of posting yesterday’s entry about driving a bicolor LED from a single pin using the trick of turning the port into an input to make it tristate, “Mazzoo” posted an excellent comment, including this very insightful statement:

tristating or setting a controller pin as input, and leave it floating or (even worse) setting it to Vcc/2 is a reliable way to destroy the input gate.

That’s a very good point, and one that I hadn’t been thinking about (but hope I would have considered sooner or later).

Digital logic inputs depend on being high or low, and don’t deal well with inputs in the “dead band” in between. With many digital inputs, a voltage in the dead band puts the input transistors into their linear regions, which causes them to carry excessive current and overheat quickly. Deliberately putting digital inputs into the dead band for long periods of time would be a very bad idea.

Thus, to use this method for driving a bicolor LED, not only does the pin need to be changed to an input so it tristates, but it needs to be an A/D pin set to analog mode, so it doesn’t mind seeing a voltage in the dead band.

As I’ve described before, having a PIC pin set as an analog input changes the PORTX register from a read/write register to a write-only register, and you have to read the values from LATX, which messes up the LogoChip’s clearbit / setbit / testbit commands. But I’ll just have to work around that by using LATX instead of PORTX, because I can’t leave the pin floating in digital input mode.

Thanks, Mazzoo!

July 4:

It should also be safe to use tristating on a pin in digital input mode with a Schmitt trigger — pin A4 and all of port C. Unfortunately for me, the LogoChip’s design already uses most of port C, and I really wouldn’t have enough pins available to drive the four bicolor LEDs that I want to use in this project. So analog inputs it is.

Driving a Bicolor LED from a Single Output Pin

Saturday, June 30th, 2007

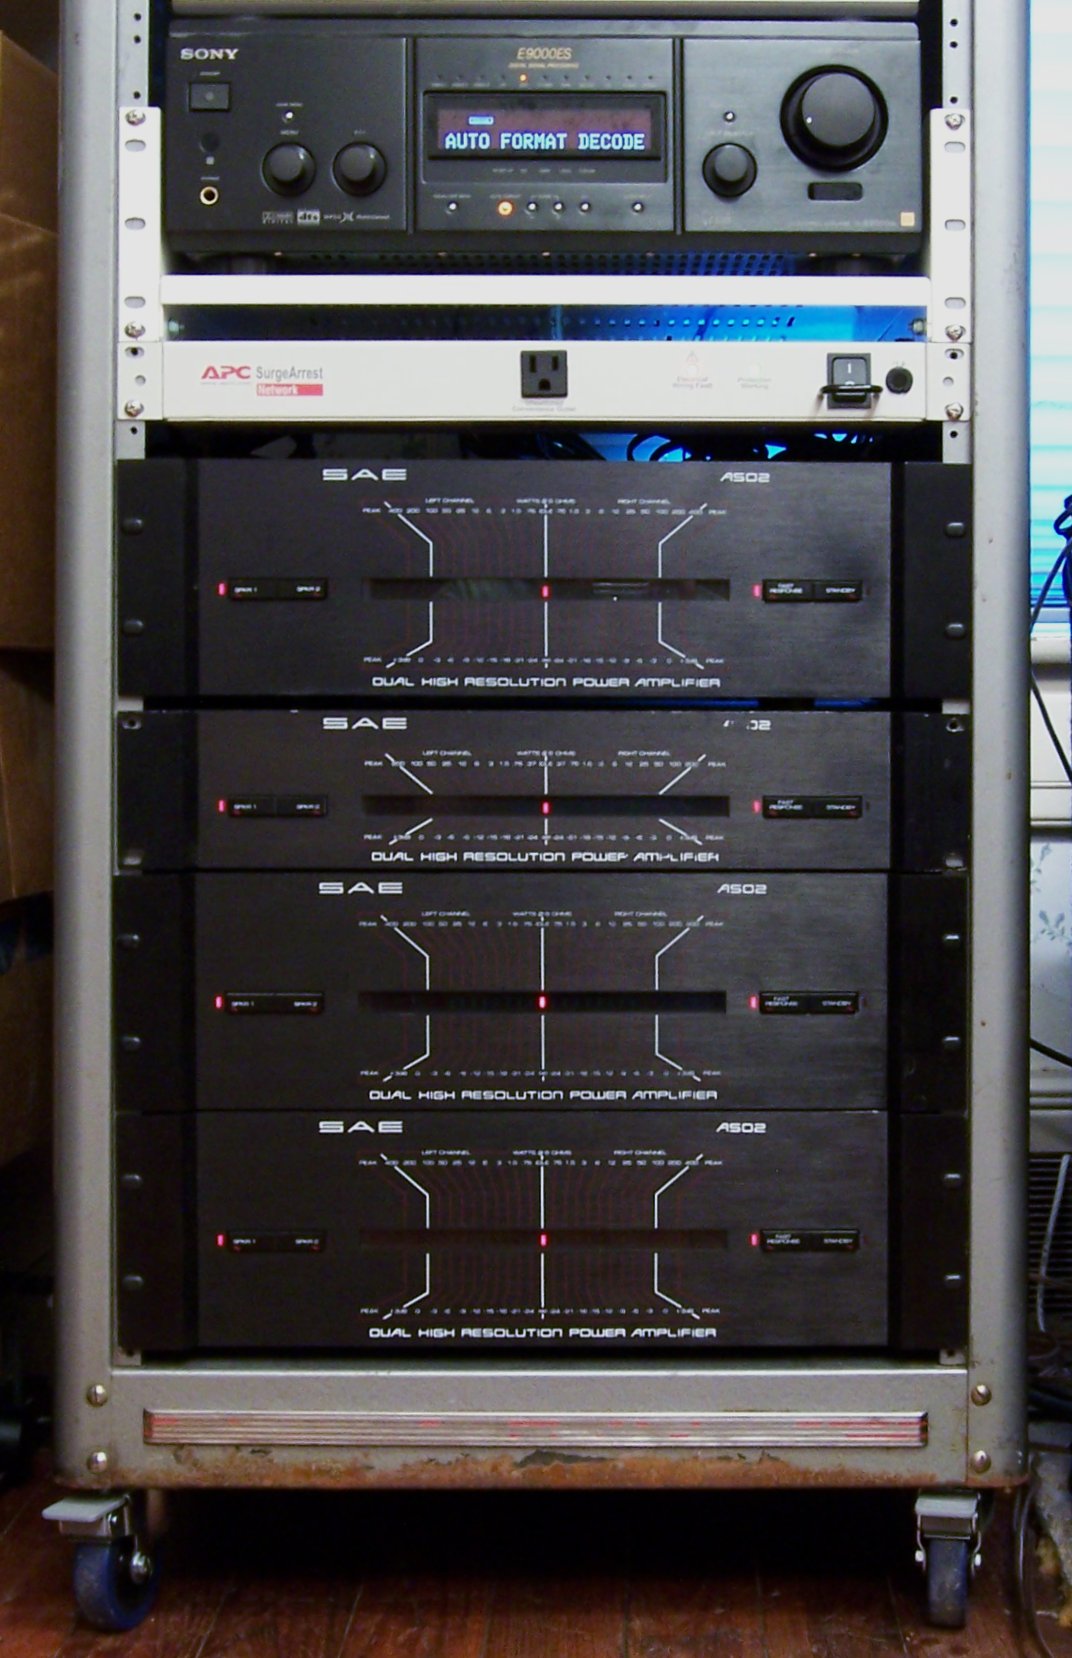
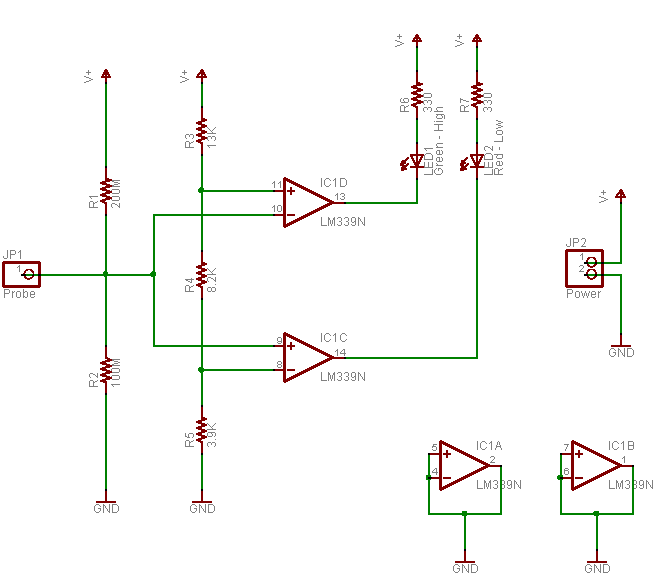
I’m working on a control system for my stereo, with more information on that project to be posted soon. I was running into a problem having enough pins on my PIC to connect all the inputs, pushbuttons, LEDs, and outputs.

Yesterday I was talking to Tom and describing how each bicolor output LED requires two microcontroller pins to control both colors. I’m sure this scheme has been used a million times before, and I may even have seen it before, but I was very pleased to realize in a flash of insight how to drive a bicolor LED from a single output pin.

Driving a bicolor LED from a single microcontroller pin

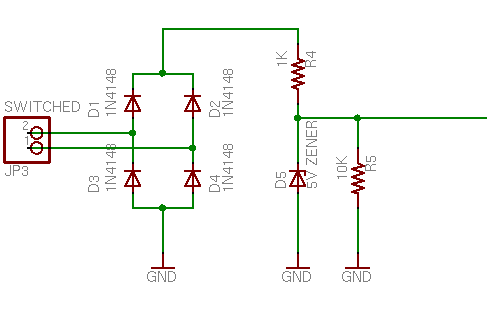
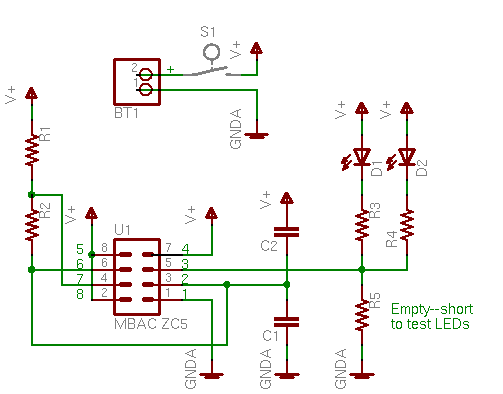
Instead of connecting the LED between the control pin and V+ or ground, connect it to a voltage divider between the two. Raise the control voltage to V+ and the green LED will conduct through R2. Lower the control voltage to 0V and the red LED will conduct through R1. Here’s the best part — change the control pin to an input and it’ll go into a tristate (high-impedance) mode, leaving the left end of the bicolor LED floating, with both elements off. Perfect! That saves my project!

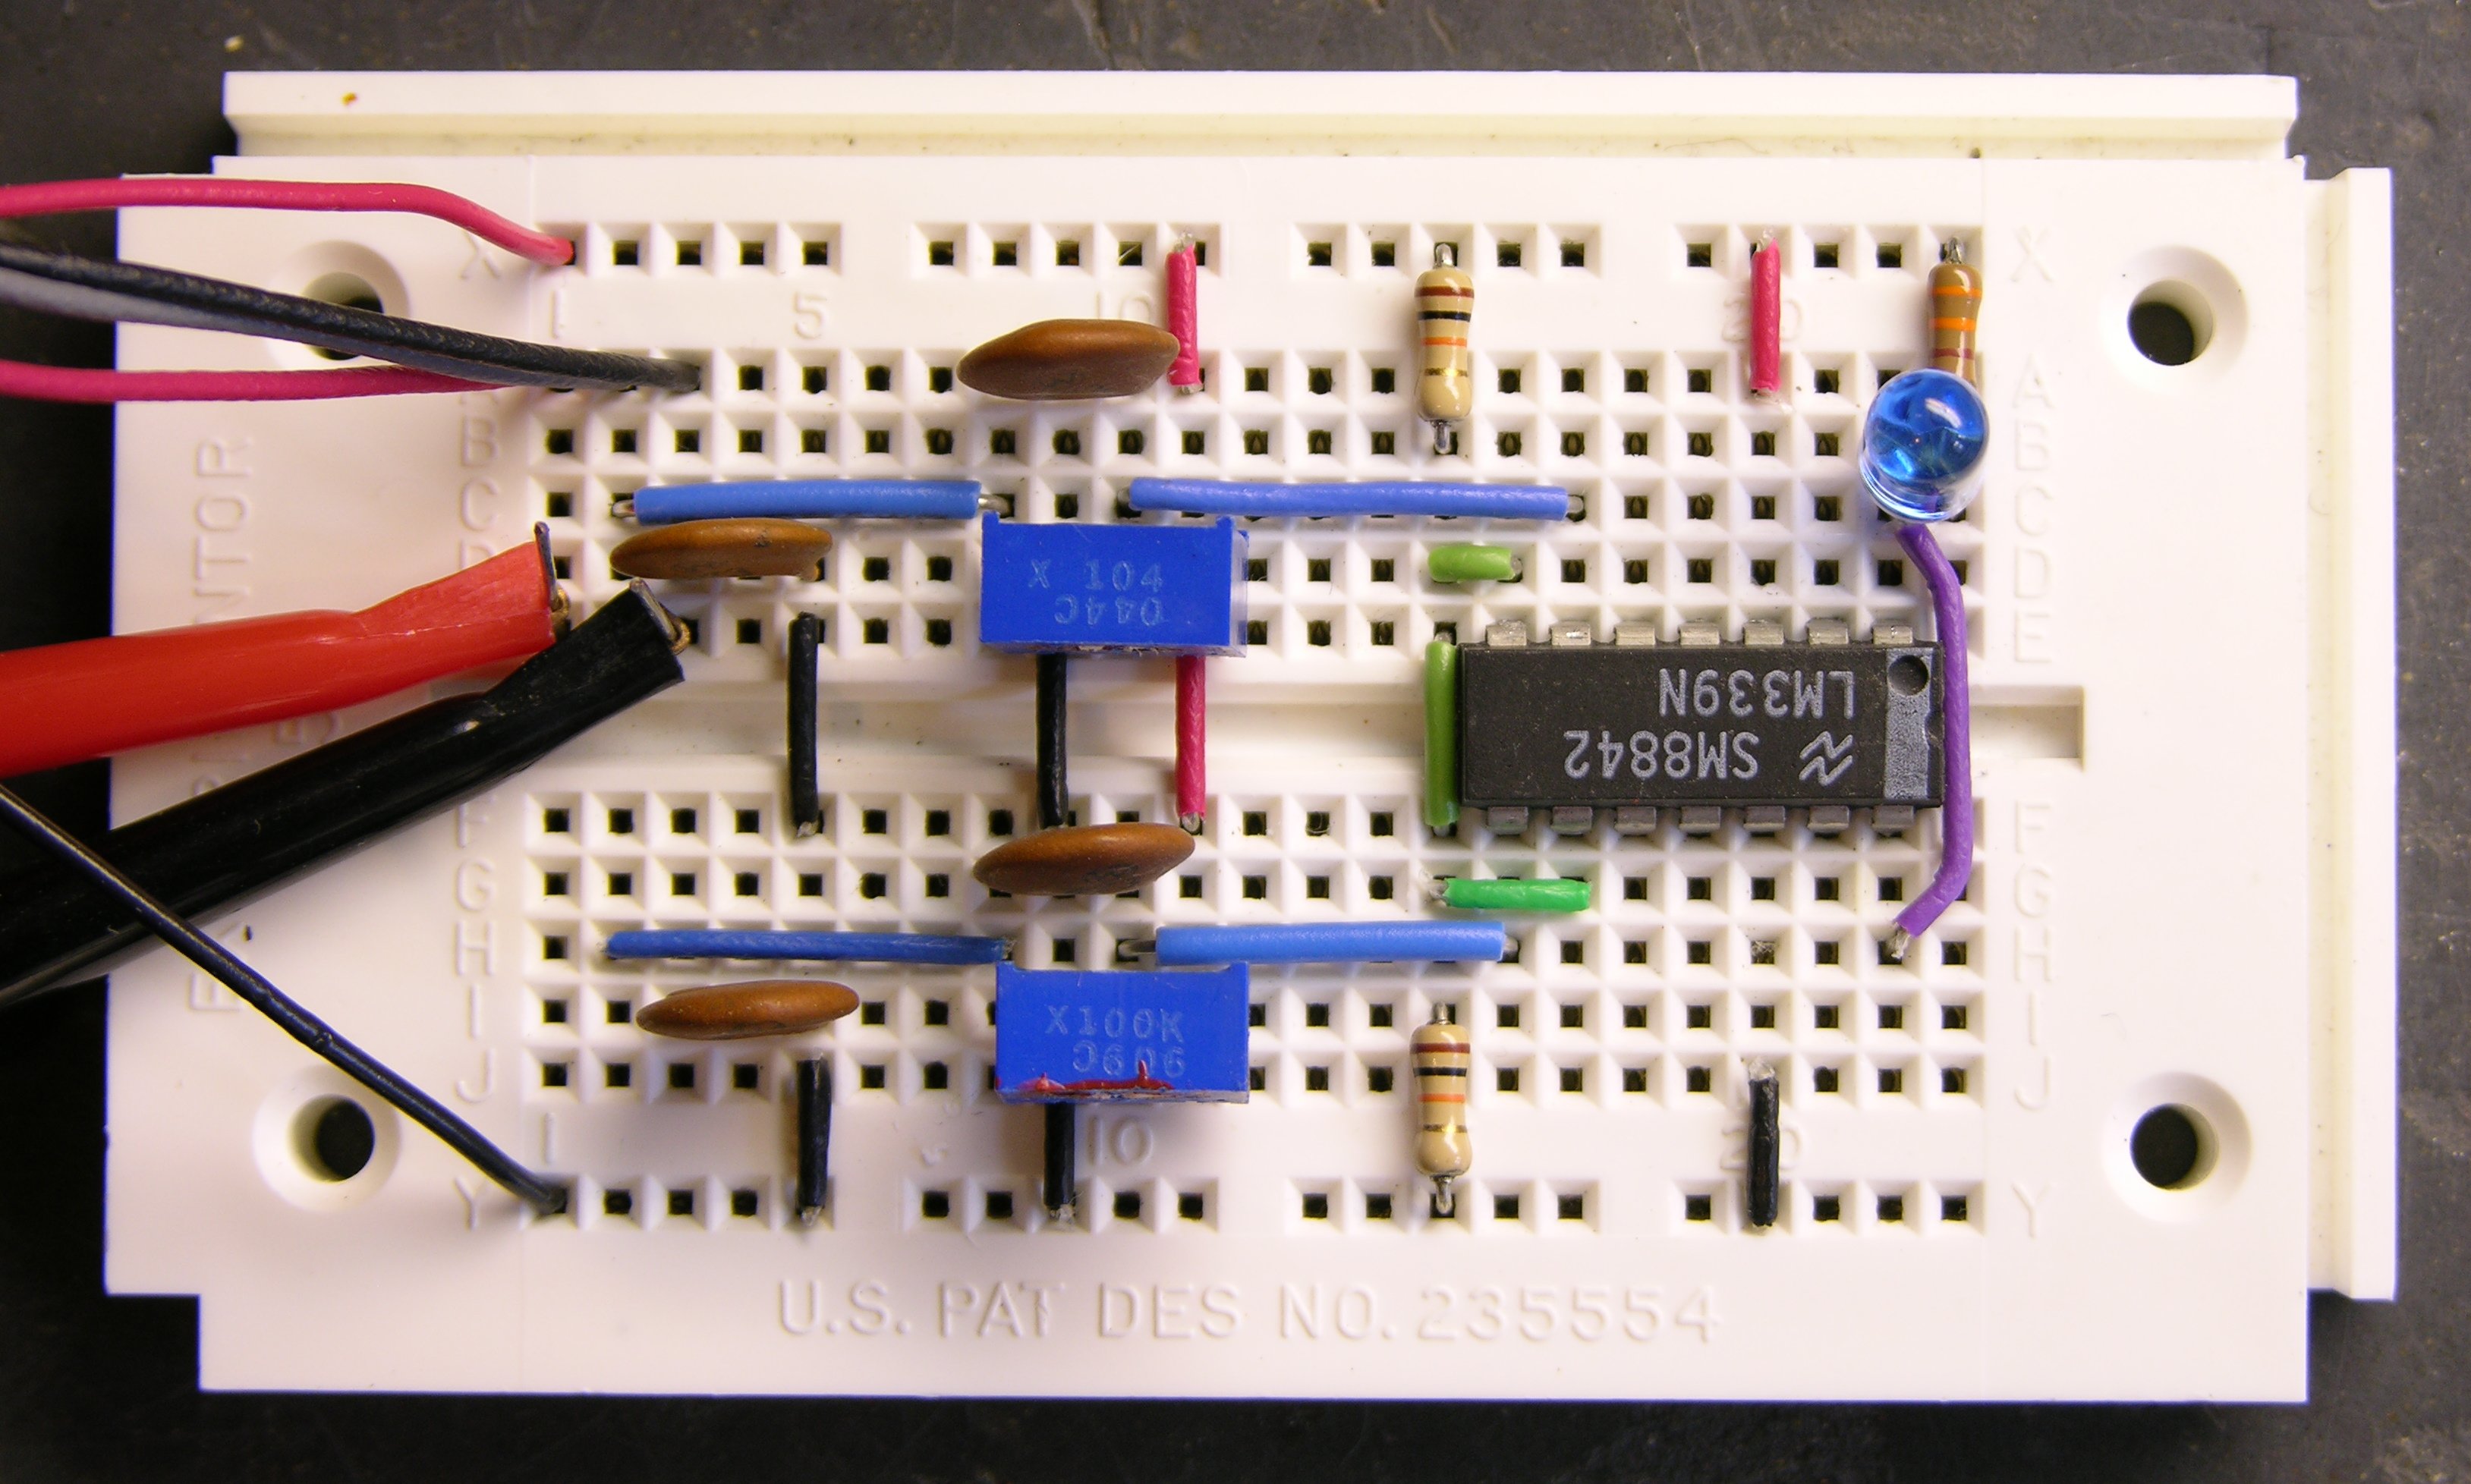
I breadboarded this circuit with 330Ω resistors, and the LED was quite a bit dimmer than normal. Well, of course it was; it’s running off less voltage than usual. Plus the voltage divider isn’t exactly a stiff current source. But I was curious exactly how much less voltage (seems obvious, but wouldn’t it be nice to know for sure?), and what was the exact series resistance (ah, somewhat less obvious, eh?).

Thévenin Analysis

Thévenin’s Theorem states that any linear circuit (comprising only voltage sources and resistors) can be represented as a single voltage source and a single series resistor, and provides a very simple method to determine the equivalent voltage and resistance. So a Thévenin analysis of the voltage divider will give us a simpler model of that section of the circuit, which can then be used to determine the actual LED current.

First, to determine the Thévenin voltage (VTH), mentally remove the load from the circuit and use Kirchhoff’s Law to find the voltage at the load connection.

Determining Thévenin equivalent voltage

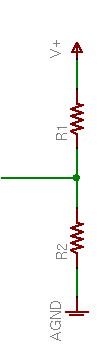
In this case, assuming R1 = R2, VTH is V+ / 2.

Next, to determine the Thévenin resistance (RTH), (mentally) short out all the voltage sources and use Kirchhoff to find the overall resistance looking into the circuit.

Determining Thévenin equivalent resistance

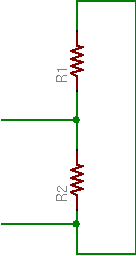
In this case, mentally shorting V+ to ground puts R1 and R2 in parallel, giving

RTH = (R1 * R2) / (R1 + R2)

Or again in the case where R1 = R2,

RTH = R2 / 2R = R / 2

Thévenin Equivalent Circuit

So assuming R1 = R2, the voltage divider is equivalent to a voltage source of V+ / 2 in series with a resistance of R / 2, which gives this simplified circuit:

Bicolor LED drive circuit with Thévenin equivalent voltage divider

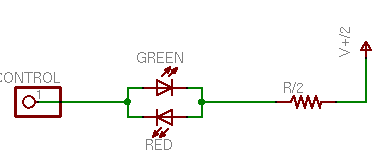
This makes it easy to determine the LED current (ID). Whether the control voltage is at V+ or 0V, the LED and Thévenin resistor will see a voltage of V+ / 2 (forward or reverse).

Using the zeroeth approximation of a diode as a device that conducts electricity in a forward direction with no voltage drop, the resistor has the full voltage across it, so the resistor current

IR = (V+ / 2) / (R / 2) = V / R

and ID = IR. For a 5V supply and 330Ω resistors, I = 5V / 330Ω ≈ 15mA.

But that’s exactly the same current (and concomitant LED brightness) we’d expect running an LED from a full V+ with a full R, and I distinctly noted that the LED was dimmer. What’s going on?

LED Voltage Drop

The answer lies in the first approximation of an LED as a device that conducts electricity in the forward direction with a voltage drop and no resistance. The bicolor LED I was using has about a 2V drop in either direction (about 2.08V green and 1.95V red, at the temperature and moment I measured).

Still using a 5V supply and 330Ω resistors, an LED voltage drop VD = 2V gives a voltage across the resistor of

VR = (V / 2) – 2V = 2.5V – 2V = .5V
IR = VR / RTH = .5V / 165Ω ≈ 3mA
ID = IR3mA

Whoa! That’s a whole different story! Halving the effective supply voltage dramatically exaggerates the effect of the LED’s voltage drop.

In fact, to get back up to ID = 15mA:

RTH = VR / IR = .5V / 15mA &symp; 33Ω

That’s an order of magnitude lower current-limiting resistance to get the same LED current and brightness.

Even worse, note that this circuit (the original) has a continual current of V+ / 2R through the voltage divider. With 330Ω resistors, that’s 7.6mA (38mW), which may be tolerable in a non-battery-driven circuit; but with 33Ω resistors, that’s an unacceptable 76mA (380mW) per LED driver!

Tolerable Adaptations

So how can we make this circuit work well enough to be practical? Here are a couple of options.

First, note that the current-limiting resistance needed to be made so low because half the supply voltage is barely more than the diode’s voltage drop. With a higher supply voltage, more voltage would be “left” after taking out the LED’s drop, and a higher resistance could be used to get the same LED current.

But how far can we raise the supply voltage? For the circuit to work properly, the control voltage from the microcontroller needs to swing over the same range as the LED’s voltage divider. And alas, the PIC I’m using has a maximum VDD of 7.5V; or say a safe working voltage of 7V.

Adding 2V to V+ adds only 1V to the LED/resistor supply, increasing VR from .5V to 1.5V, or threefold. That translates into three times larger resistance and one third the voltage-divider power consumption — progress, but not as much as I’d like.

Second, note that the bicolor LED I’m using is not particularly high performance. Newer LEDs appear to me to be several orders of magnitude brighter at the same current. (Go check the amazing mCd claims of LED vendors on eBay. For the most part, they’re increasing efficiency, not current-handling capacity.) I’d gladly pay a little more for a much brighter LED that has lower current requirements for the same brightness.

Even one order of magnitude difference in LED efficiency pushes the voltage divider power consumption back into an acceptable level for the device I’m designing. It also cuts the power requirements for the PIC pin driving the LED. The datasheet quotes 25mA source or sink per pin, 200mA source or sink for all pins, but I’m old-fashioned and don’t want to push my luck.

One thing I don’t know is whether high-efficiency LEDs have the same voltage drop as traditional ones. With only 2.5V available for the LED, if higher efficiency comes at the expense of a higher voltage drop, I could “efficient” the circuit right out of its operating range.

Boosting the Drive Current

Before doing the actual calculations, I was pondering whether the PIC could really source and sink enough current to power all my LEDs as brightly as I want. I was musing out loud with Tom about how to build a transistor driver to buffer/boost the PIC’s output.

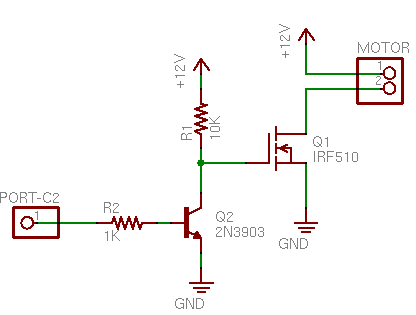
The driver needs to be a totem pole, meaning that it has two stacked elements so it can source the LED line up to V+ or sink it down to ground. The catch is the tristate trick that makes it possible to turn the bicolor LED off. Trying to cram a traditional complementary totem-pole output into this circuit IS WRONG AND DOESN’T WORK.

Bicolor LED circuit with incorrect totem-pole driver

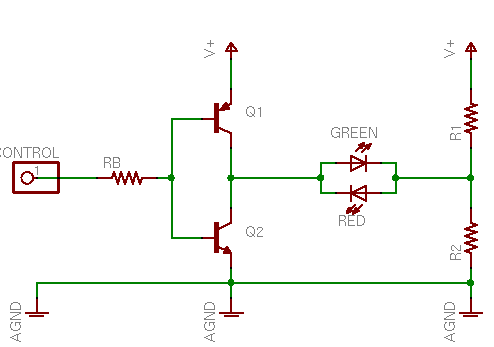
When the control line is high, the upper (PNP) transistor is off and the lower (NPN) is on, so the NPN pulls the driver output low. Likewise, a low control line pulls the driver output high.

The problem is when the control line is tristated. Then current flows through the PNP’s emitter and base to the NPN’s base and emitter, turning both transistors on and shorting V+ to ground. Real totem-pole drivers are designed to make sure this can never happen, even during transitions.

Here’s Tom’s solution, which like the tristate trick is probably a reinvention, but which is so clever that it still tickles me a day later to think about it.

Bicolor LED circuit with reversed totem-pole driver

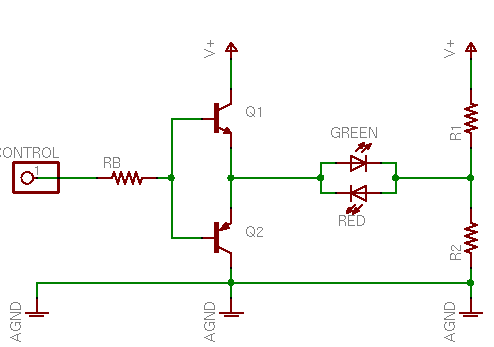
Just swap the NPN and PNP transistors in the totem pole, putting the NPN on top and the PNP on the bottom. When the control line goes high, the upper (NPN) transistor is on and the lower (PNP) off, so the NPN pulls the driver output high. Likewise, a low control line pulls the driver output low.

And a tristated control line leaves both transistors off and the driver output in a high-impedance state, because the emitters aren’t connected to the power rails to conduct through the bases any more.

Brilliant! Makes me want to use it, even though I realize with high-efficiency LEDs I no longer have any technical reason to. :-) But I’ll keep it in my bag of tricks.

ResQPOD Circulatory Enhancer Circuit

Saturday, June 23rd, 2007

Back in May, I got this email from my friend J who works ER:

http://www.advancedcirculatory.com/CET/resqproduct.htm

I was at work last night and we had a code come in by ambulance. The Newton fire dept. now uses these when they code somebody. I saw that it had a circuit board and some LED’s and thought that you might be interested. It has been used but it I cleaned it up. Let me know if this is something that you want to take a look at.

“Code” is code blue, no respiration and no pulse. So J saved me a gizmo from a dead person, and “cleaned it up.” This is interesting. Wonder what it could be. I read the manufacturer’s web page and it doesn’t really enlighten me as to what kind of electronics are inside it.

I visit a few days later, and the gizmo looks like this:

ResQPOD

There’s a hole down the middle and a switch on the side. Turn on the switch and two red LEDs flash every six seconds. You plug the bottom end into a breathing mask and the top end into the CPR squeeze bag, and the lights tell you how often to squeeze for respiration for optimal (two-person) CPR timing.

A little bit of prying gets the case open, and the board pops right out.

ResQPOD PCB

There’s not much to the circuit — the eight-pin chip is obviously what makes it work. My first thought is that it’s going to be a 555 timer, but it’s labelled “MBAC ZC5.” Google gets me nothing useful to identify the chip, so I draw out a copy of the PCB traces to see whether I can get anything out of the pinouts.

For my first pass, I place the components on the schematic corresponding with their physical placement on the board. (I actually did this on paper; when I translated to EAGLE, I didn’t have a library component for the mystery part, so I used a connector that had the pins numbered wrong. Heed the green numbers I added, not the grey ones.)

Schematic diagram of PCB in ResQPOD Circulatory Enhancer, PCB order

Then I slide things around based on a logical placement.

Schematic diagram of PCB in ResQPOD Circulatory Enhancer, logical order

And this is starting to look awfully familiar — it is indeed the same pinout as a 555 in the astable multivibrator configuration, which makes perfect sense. In fact, the 555 circuit should have a connection from pin 2 (TRIGGER) to pin 6 (THRESHOLD) that I haven’t drawn — and when I look closely, I can see that it’s hidden underneath the chip.

So now I have a tiny SMT 555, a couple of red SMT LEDs, and a handful of SMT passives, plus a cell that’ll probably drive this thing for a long time. Cool.

CdS Photocell

Tuesday, April 17th, 2007

A cadmium sulfide (CdS) photocell is a passive component whose resistance decreases when light shines on it. CdS photocells can be used to detect when lights turn on, to orient things toward a light source (electronic sunflower), and to detect shadows passing across them.

CdS photocell

To use a CdS photocell, you put it in series with a resistor and put a voltage across them. This forms a voltage divider: the voltage at their junction is determined by the proportion of the two resistances. If you want brightness to increase the measured voltage, put the photocell on top; if you want darkness to increase the measured voltage, put the photocell on the bottom.

Circuit diagram showing two ways to connect a photocell

All that remains is to determine an appropriate value for the complementary resistor. Assuming you want output voltage to increase when brightness increases, the goal would be to make the output read as close to 0V as possible when it’s as dark as you expect it to be, and as close to your maximum voltage as possible when it’s as bright as you expect it to be.

To begin this calculation, I measured the resistance of the photocell (out of circuit) in light and dark conditions. With the photocell shown above, I found the following values:

450KΩ in the dark (my finger pressed over it)
36KΩ in average light
7.6KΩ in bright light (under my fluorescent desk lamp)

I discovered later that the photocell’s carrier PCB isn’t entirely opaque and a noticeable amount of light does leak in around the edges even when the face is covered. The resistance in true darkness would probably be even higher.

I decided to scale the photocell’s circuit to the range from darkness to normal room lighting, so calculating for a resistance range of 450KΩ to 36KΩ. Because this is only a single order of magnitude variation of resistance, I could already tell the voltage swing of the output wasn’t going to be as large as I’d like. I picked a 100KΩ resistor and estimated the voltage range:

5V * (100KΩ / (100KΩ + 450KΩ)) ≅ .91V
5V * (100KΩ / (100KΩ + 36KΩ)) ≅ 3.7V

So it has a swing of about 3V out of a 5V range. Not ideal, but it still provides a fair amount of resolution.

Finally, I connected the photocell to my LogoChip’s A0 input and confirmed its behavior by running print read-ad 0. I got a wide range of values out of the A/D converter, making this circuit quite usable for microcontroller interfacing.

I also posted a cookbook version of using the photocell on the TASD class wiki.

PWM Control of a Larger DC Motor

Saturday, April 7th, 2007

A year or two ago, I bought a couple of cheap cordless drills at Harbor Freight with thoughts of tearing them down to use the motors for MOSFET-controlled robot drive systems. Yesterday in lab, several guys were talking about how to control DC motor speed for their final project. Serendipity kicked me in the butt and got me prototyping.

The Circuit

The obvious approaches to varying DC motor speed are varying the supply voltage and varying a resistor in series with the motor (which amounts to the same thing). The problem is, DC motors don’t run well on a low supply voltage, and the response is very non-linear.

The usual solution is to use pulse-width modulation (PWM): turn full power to the motor on and off rapidly, increasing (modulating) how long the power is on (pulse width) to increase the motor speed, and decreasing the pulse width to decrease the motor speed. And the PIC (the underlying hardware of the LogoChip) has built-in PWM control, because it’s designed to be used for a wide variety of applications just such as this.

The LogoChip/PIC can’t supply enough power to drive a large motor, so the total control circuit involves a LogoChip, a MOSFET power transistor, and some “glue” circuitry to interface the two together.

MOSFET motor speed control schematic

If I’d been building the circuit on a breadboard, I’d probably have started by plugging in components and wiring them up, because mistakes are easy to correct by unplugging and replugging. But since I was using larger components that I was going to need to solder, I didn’t want to have to change too many connections; so I started by drawing the schematic I intended to build.

(First I reread my May 2006 post about driving stepper motors with MOSFETs. They don’t use the same circuit, but I had taken the time to review my textbook and figure out how to treat MOSFETs right; and my blog isn’t just for y’all–it’s secondary storage for my own memory.)

The PIC’s PWM output is on port C2. The MOSFET’s gate needs at least 7V to saturate (turn all the way on), so port C2 controls the base of an NPN transistor (any common NPN will do; I happened to have a 3903) that switches the MOSFET gate between 12V and ground. The N-channel MOSFET in turn provides a ground path to turn on the motor when the MOSFET’s gate voltage is high.

The only snag is that the bipolar transistor inverts the control logic; so when C2 is high, the motor is off; and when C2 is low, the motor is on. Oh well. We’ll compensate in software.

Wiring it Up

I started by bolting one of my IRF510 MOSFETs to a heatsink. I should have used thermal grease, but I didn’t have any handy and I’m doing a quick test. And I should have used an insulator (since the FET’s tab is wired to drain, and that’s not going to be ground, and the heatsink might bump into something that’s grounded), but the heatsink seems to be anodized and sorta insulated already and I’m just doing a quick test.

MOSFET mounted to heatsink

I could have used the cordless drill’s battery to power the motor, but I didn’t feel like rewiring that much of the drill right now. So I settled on using my trusty old PC power supply–and I desoldered a connector from a dead CD-ROM drive to mate with the power supply. (Bench vise, heat gun, and pliers.)

Molex power connector on CD-ROM drive board

I wired the MOSFET to the power connector and left fly wires to go to the motor and the LogoChip. As always, I put heat-shrink tubing on each solder joint to be safe. The 10K pull-up resistor at the end of the blue wire, hidden behind the yellow wire next to the power connector.

Fully-wired MOSFET and power connector

The 5V supply on the power plug isn’t needed, so I insulated it as well.

Connecting the Drill

The largest DC motor that I could think of having at home was the cordless drill. It’s not as big as the windshield wiper motor that Team Doccia might be using, but it’s the best I could do. Here’s the victim with its the case removed:

Cordless drill, case opened

The motor is the silver and white cylinder in the center of the top of the picture. The tan cylinder to its right is the planetary gear system that reduces speed and increases torque.

To the left of the motor, you can see the MTP15N06V MOSFET that normally runs the drill. I could have reused it, but (1) then I’d have been done before I even started; and (2) I wanted to test with a FET that I had lots of, so someone else could use exactly the same circuit. Both the drill’s MTP15N06V and my IRF510 have a built-in reverse-biased diode to shunt the back-EMF spike that occurs when the supply voltage is removed from an inductive load (like a motor).

Cordless drill motor rewired for MOSFET speed controller

I pulled the the motor out of the drill casing, soldered on the leads from the FET wiring harness, and jammed it back in. I could have laid in on my bench for testing, but I was afraid the counter-torque when the motor started up at high speed might roll it right off the edge. The gearbox has a tab on the bottom that mates with the case and keeps it from twisting.

LogoChip Wiring

Tom left a nice prototyping area on the LogoBoard when he designed it, so I built the rest of the circuit there. I soldered a header socket into the connector for pin C2, plugged the NPN transistor into the breadboard section, and plugged in the base resistor and the gate and ground leads from the FET assembly.

LogoChip NPN switching circuit

Here’s what the whole works looks like when it’s all hooked up:

Cordless drill motor wired to MOSFET speed controller

Control Software

For prototyping, I reused my old motor-pwm-demo.txt program, even though it has some extra stuff that’s not needed here. I called pwm-init and then pwm-set 255 255 to shut the motor off. (Remember, it’s backwards logic because of the inverting effect of the NPN switching transistor.) pwm-set 255 0 turned the motor on at full speed, and pwm-set 255 128 selected a medium speed. pwm-set 255 196 was about as slow as it could reliably go.

To explain the code, the first parameter (the one that I’m always calling with 255) is the period of the control pulse–the higher the number, the longer between consecutive pulses (i.e. the slower the pulse train). The second parameter is the pulse width–how long each pulse output should be on. So pwm-set 128 64 should have about the same effect as pwm-set 255 128, only twice as fast (half as long).

Unfortunately, that ain’t quite so. Due to the inductive effects of the motor coils, some frequencies of PWM control work better (more efficiently) than others. In this case, the lower control frequency is more efficient–the motor runs a little faster at 255/128 (longer pulse = lower speed) than at 128/64 (shorter pulse = higher speed).

Worse, the motor would probably like it even better if the control frequency were even lower. But I can’t do that–I’m already running the PWM clock at its lowest speed and dividing that speed as far down as it goes. This is as good as it gets.

Final Thoughts

Motor On at Powerup

When the circuit powers on, port C2 is set as an input, so the MOSFET’s pull-up resistor pulls the line high and the motor turns on at full speed. That’s bad; you never want mechanical systems initiating motion before the control systems come online.

The circuit should really be redesigned to use non-inverting buffers to get around this problem. But for now, at a minimum, the motor should be turned off in the LogoChip’s powerup routine:

to powerup
pwm-init
pwm-set 255 255
end

Operating Temperature

With an ambient temperature of 72°F, the FET got up to about 96°F after running for a few minutes. The FET is rated for 250°C and its rated capacity only drops from 5.6A at 25°C to 4A at 100°C, so it’s well within safe operating conditions. If a larger load were required, I might look at using more FETs in parallel. (I don’t even remember whether you can do that, so I’d start with the Malvino textbook and review whether parallel FETs are subject to thermal runaway.)

Low Torque

The drill really doesn’t have much torque using this driver at low speeds. Granted, the drill is rated for 18V and I was running it 12V. But I was hoping to get away with using open-loop control for robotics, and it looks like I’ll probably have to put optical encoders on the wheels to make sure they’re really turning as fast as I told them to.

I’m still optimistic that a windshield wiper motor is geared down enough, and natively runs at a low enough speed, that this control method will be adequate for Team Doccia’s breathing mechanism.

Arduino Circuits and Tutorial

Sunday, October 15th, 2006

Tod Kurt is posting lecture notes from an Arduino class on his blog. It’s Halloween themed, and the two sets of notes posted so far look like a really nice introduction to electronics and the Arduino. Go, Tod!

DIY Logic Probe

Monday, March 13th, 2006

Over the weekend I was working on a bidirectional PWM motor speed control circuit with the LogoChip, and I ended up using a 74LS138 demultiplexer to route the PWM signal to the appropriate H-bridge input. (It’s what I had on hand.) Because I wasn’t that familiar with the ’138, I wanted to test it carefully before connecting it to the motor driver. I needed a logic probe, and I didn’t have one.

A logic probe is a tester–usually a small, handheld tester–with a probe that you poke into different parts of your circuit. When you touch a logic connection, the probe lights up an LED to indicate whether the connection is at a high or low logic level. Radio Shack used to sell one for about $30, although I think they’ve discontinued it and I can’t find it in their catalog any more.

In principle, it sounds simple–something that could be built with two TTL buffer gates, one inverting and one non. In practice, there’s a snag that has to do with the definition of TTL logic voltages: a voltage below .5 – .8V is considered a low signal, a voltage above 2.0 – 2.7V is considered a high signal, and a voltage in between is undefined. (Output voltage specifications are stricter and input voltage specs more generous, to account for lossy transmission.)

The obvious implementation–feeding the input into a TTL buffer–would always indicate either high or low, because the buffer will always produce a valid output even if the input is in the “dead zone.” But the probe needs to have both LEDs off when it’s not touching anything or touching something that’s not a high or low logic signal (like a tristated connection, something that isn’t digital logic at all, an output that’s broken, two outputs mistakenly wired together, etc.). Ironically, to indicate the state of a digital signal correctly, you have to use analog electronics.

I’ve wanted a logic probe for years, and although at $30 I could certainly afford one, I never felt it was quite worth buying one. After building my own, I’d have to concur with my previous opinion. :-)

Different Designs

I searched online and found several logic probe designs, but wasn’t satisfied with any of them. My dissatisfaction fell into two categories:

  • Several of the circuits reported whether the input voltage was above or below 2.5V. That’s doubly wrong: they never go dark to indicate absence of a valid signal; and if you’re going to make that mistake, make it around 1.6V, the middle of the “dead zone.”
  • Other circuits purported to remain dark when the input was in the TTL dead band, but their schematics were beyond my ability to confirm correct operation. They did things like play tricks with pull-up and pull-down resistors between the probe input and TTL inverter inputs, presumably to try to pull dead-band voltages out of the input range of the buffer. I just wasn’t comfortable with this.

So I designed my own around an LM339 quad comparator chip and some resistors, all from my parts bin.

The Circuit

The key to understanding the circuit is to understand the operation of the LM339. A comparator is an op-amp designed to be used open-loop, to indicate which of two input voltages is higher than the other. The inverting input (labelled -) is subtracted from the non-inverting input (labelled +), and if the resulting voltage is positive, the comparator’s output is high; if the resulting voltage is negative, the comparator’s output is low. That is, if the signal provided to the + input is larger than the one provided to the – input, it indicates high; if the signal provided to the – input is larger, it indicates low. In effect, it compares the two voltages.

Then keep in mind a small trick: Most transistor and IC outputs can sink more current than they source, so I wanted to wire the indicator LEDs from +5V to the comparator output, rather than from the comparator to ground. That means I had to use inverted logic on the outputs, which is accomplished by swapping the inputs. It’s easily done; it just messes with the brain a bit.

Logic Probe Schematic

Going through the schematic from left to right, the signal under test is received at the probe input. It’s attached to a high-impedance voltage divider to bias the circuit into the TTL dead band (1.67V) when the probe isn’t touching anything or is touching a high-impedance connection, but which is easily overridden (the bias current is only a few microamps) when a real signal is present.

I built a voltage divider to provide the reference voltages for the TTL low and high voltage levels. I was aiming for .8V and 2.4V; common resistor values of 3.9kΩ, 8.2kΩ, and 13kΩ gave me actual voltages of .78V and 2.41V. Close enough for jazz.

Looking first at the logic-low indicator (which is the lower section on the schematic), the input signal feeds to the non-inverting (+) input of the comparator, with the low reference voltage (.8V from the divider) feeding the inverting input. That means the reference voltage is subtracted from the input voltage, so when the input signal is higher than .8V, the comparator output is high–which leaves the red LED off. (Inverted outputs, remember?) When the input is lower than .8V, the comparator output is low, and the red LED lights.

In contrast, in the logic-high section of the circuit (the upper part of the schematic), the input signal feeds the inverting input of the comparator and the high reference voltage (2.4V) feeds its inverting input. Here the input is subtracted from the reference voltage, so when the input signal is higher than 2.4V, the comparator output is low, lighting the green LED. When the input is lower than 2.4V, the comparator output is high, and the green LED stays off.

The rest of the schematic is housekeeping. Because the LM339 runs as an “infinite-gain” amplifier in an open-loop configuration, it’s subject to self-oscillation, and the datasheet recommends wiring all unused inputs and outputs to ground. And the probe takes its power (and reference VCC) from the circuit under test, so it needs wires to connect to +5V and ground–the jumper at the far right.

Success!

It works like a charm! Because of the inverted logic on the LED-driving outputs, I confused myself about the placements of the inputs a couple of times. But after straightening that out, I haven’t had any problems. It correctly identifies logic levels (and un-identifies non-logic signals), and proved invaluable while troubleshooting my 74LS138 PWM circuit (which will be the subject of another post).

Right now, the probe is built into the rightmost end of the breadboard with my LogoChip, 74LS138, and 74LS04. I’m planning to drill and etch a few dedicated PCBs to make logic probes for myself and some friends, and I’ve just learned to use the Eagle circuit design software–which runs on Mac OS X (among others–another ‘nother post?). W00T!

What’s Missing?

Commerical logic probes have two things that mine doesn’t (not counting a fancy case and a higher price tag): audible output and pulse stretching.

Audible output

Audible output is just what it, er, sounds like: high/low tones played through a little speaker (in conjunction with the LEDs), to indicate high/low logic signals. I don’t think it’d be a big gain for me, but a friend who has one says it’s really handy to be able to focus on keeping the probe tip from slipping off the pin you’re measuring and not have to glance over at the LEDs to check the logic level. I may add that in a future version, or swap probes with him long enough to find out how much it matters to me.

Pulse Stretching

Pulse stretching has to do with the handling of very short pulses. A single bump from low to high of 1ms duration will be detected by the probe and send appropriate current through the high LED, but it’ll probably be so short it can’t be detected (or registered) by the human eye. Pulse-stretching circuitry adds a short-duration timer (say 1/4 second) to the high and low indicators, so that every time a high signal is detected, the indicator lights (and/or sounds) for at least a minimum amount of time (e.g. 1/4 second)–and then for as long as the signal remains at that level. It just gives your eye longer to detect very rapid pulses.

I’m undecided on the topic for my own use, though. I know it’d be annoying to have short pulses coming through and miss them because they were too brief to see. On the other hand, since a lot of what I’m interested in testing right now is PWM signals, I don’t want pulses stretched. PWM is all about repeating rapid pulses, and I prefer to have variable (perceived) LED brightness as an indicator of PWM duty cycle.

I suppose the right answer is to add a switch to select the behavior. Pulse stretching isn’t difficult–it’s just a couple of monostable multivibrators, and the LM339 datasheet shows how I could build them from the two unused gates on the chip I’m already using. That dashes my hopes of dropping from a 14-pin quad comparator to an 8-pin dual comparator and making my logic probe extra slimmy; but sometimes that’s the price you have to pay for greatness.

Voltage Supply

One last consideration is that my circuit “trusts” the voltage supply from the circuit under measurement. The logic probes that I’ve seen all take their power from the test circuit–but mine also divides the circuit’s voltage to get its reference voltages. That means that if the test circuit’s voltage is nonstandard or faulty, my probe will behave differently than expected. It’s unlikely to be damaged–the LM339 can run on a supply voltage of 3-18V–but it wouldn’t necessarily deliver accurate results.

And there’s not much I can do about it without getting a lot fancier–a 7805 regulator needs something like 2.5V of headroom to maintain regulation, and even the more efficient regulators need some headroom. So when the probe is receiving the expected 5V supply, adding a regulator would potentially make it behave worse. I could do something clever stacking diodes to construct a reference voltage, but I’m not sure it’s worth it to me. Guess I might play with it for V2.