Replacing My PowerBook Screen, Part 02: G4 500 Disassembly, Top Side
Quick Links
Background
Part 1: G4 500 Disassembly, Bottom Side
Part 2: G4 500 Disassembly, Top Side
Part 3: G4 500 Disassembly, Back Edge Screws
Part 4: G4 500 Disassembly, Removing the MB and Screen
Part 5: G4 550 Disassembly, Bottom Side
Part 6: G4 550 Disassembly, Top Side
Part 7: G4 550 Disassembly, Back Edge
Part 8: G4 550 Disassembly, Removing the MB and Screen
Part 9: G4 550 Reassembly, Screen
Part 10: G4 550 Reassembly, Motherboard
Part 11: G4 550 Reassembly, Top Side
Part 12: G4 550 Reassembly, Bottom Side
Aftereffects
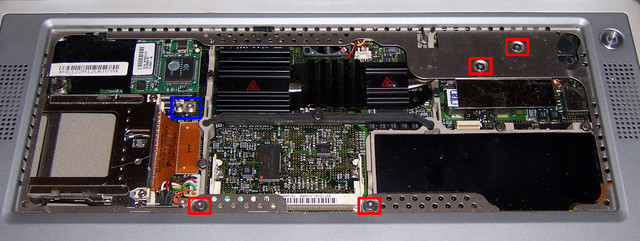
Motherboard Screws, Top Side
Now flip the notebook over into normal “operating” orientation and open the lid. Remove the keyboard by pulling back on the two latches near the ends of the function key row and lifting it out, then disconnect the keyboard connector and set the keyboard aside.
Remove the four T8 screws holding the motherboard to the case, at the locations shown in red. Also remove the two T8 screws holding the lower PCMCIA (AirPort) socket to the motherboard, at the location shown in blue. Rejoice in the ease of this operation, because the screws are hidden underneath a bar in the G3 550.
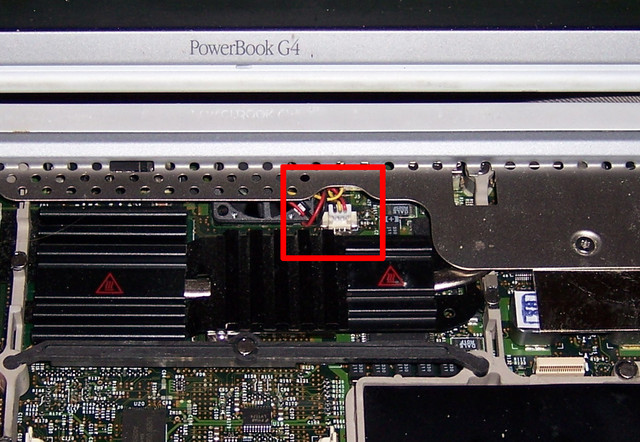
Motherboard Connectors, Top Side
Also unplug the PCMCIA snap connector and the battery wiring harness. I had to pull the battery connector by the wires to get it loose, which isn’t a great idea, but did work.

Finally, unplug the cooling fan connector from the motherboard. The fan is mounted to the case and doesn’t come out with the board, so it’s easier to disconnect now than later when lifting the board.
The motherboard is almost ready to come out!
Next: Part 3: G4 500 Disassembly, Back Edge Screws
Sections
Background
Part 1: G4 500 Disassembly, Bottom Side
Part 2: G4 500 Disassembly, Top Side
Part 3: G4 500 Disassembly, Back Edge Screws
Part 4: G4 500 Disassembly, Removing the MB and Screen
Part 5: G4 550 Disassembly, Bottom Side
Part 6: G4 550 Disassembly, Top Side
Part 7: G4 550 Disassembly, Back Edge
Part 8: G4 550 Disassembly, Removing the MB and Screen
Part 9: G4 550 Reassembly, Screen
Part 10: G4 550 Reassembly, Motherboard
Part 11: G4 550 Reassembly, Top Side
Part 12: G4 550 Reassembly, Bottom Side
Aftereffects