Replacing My PowerBook Screen, Part 06: G4 550 Disassembly, Top Side
Quick Links
Background
Part 1: G4 500 Disassembly, Bottom Side
Part 2: G4 500 Disassembly, Top Side
Part 3: G4 500 Disassembly, Back Edge Screws
Part 4: G4 500 Disassembly, Removing the MB and Screen
Part 5: G4 550 Disassembly, Bottom Side
Part 6: G4 550 Disassembly, Top Side
Part 7: G4 550 Disassembly, Back Edge
Part 8: G4 550 Disassembly, Removing the MB and Screen
Part 9: G4 550 Reassembly, Screen
Part 10: G4 550 Reassembly, Motherboard
Part 11: G4 550 Reassembly, Top Side
Part 12: G4 550 Reassembly, Bottom Side
Aftereffects
Disconnecting the Motherboard, Top Side
Flip the notebook right-side-up, open the lid, and remove the keyboard and set it aside.
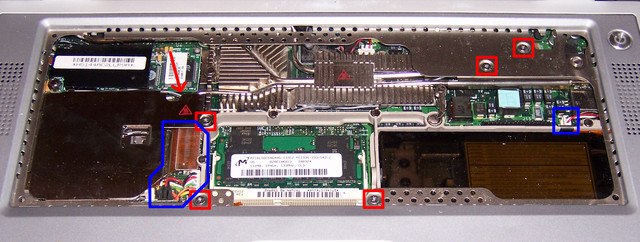
Remove the five T8 screws holding the motherboard to the case, at the locations boxed in red. Remove the two T8 screws holding the PCMCIA socket to the motherboard, which are hidden between the shielding and the modem underneath a couple of wires and a metal rod at the location indicated by the red arrow. A magnetic screwdriver is almost essential for getting them out after they’re unscrewed–consider sticking a small magnet onto your screwdriver if it’s not magnetic enough on its own. It helps a bit to slip the wires up and back onto the shielding.
Unplug the PCMCIA snap connector and the battery wiring harness on the left; and the red, white, and black thingamaconnector on the right (in the blue boxes). I don’t think you need to unplug the cooling fan connector in the center–I believe the fan is attached to the motherboard on the 550.
Next: G4 550 Disassembly, Back Edge
Sections
Background
Part 1: G4 500 Disassembly, Bottom Side
Part 2: G4 500 Disassembly, Top Side
Part 3: G4 500 Disassembly, Back Edge Screws
Part 4: G4 500 Disassembly, Removing the MB and Screen
Part 5: G4 550 Disassembly, Bottom Side
Part 6: G4 550 Disassembly, Top Side
Part 7: G4 550 Disassembly, Back Edge
Part 8: G4 550 Disassembly, Removing the MB and Screen
Part 9: G4 550 Reassembly, Screen
Part 10: G4 550 Reassembly, Motherboard
Part 11: G4 550 Reassembly, Top Side
Part 12: G4 550 Reassembly, Bottom Side
Aftereffects