Replacing My PowerBook Screen, Part 10: G4 550 Reassembly, Motherboard
Quick Links
Background
Part 1: G4 500 Disassembly, Bottom Side
Part 2: G4 500 Disassembly, Top Side
Part 3: G4 500 Disassembly, Back Edge Screws
Part 4: G4 500 Disassembly, Removing the MB and Screen
Part 5: G4 550 Disassembly, Bottom Side
Part 6: G4 550 Disassembly, Top Side
Part 7: G4 550 Disassembly, Back Edge
Part 8: G4 550 Disassembly, Removing the MB and Screen
Part 9: G4 550 Reassembly, Screen
Part 10: G4 550 Reassembly, Motherboard
Part 11: G4 550 Reassembly, Top Side
Part 12: G4 550 Reassembly, Bottom Side
Aftereffects
Reinstalling the Motherboard
There’s probably some flexibility in the order in which to reattach cables versus fitting the motherboard back into position, but here’s what worked for me. Place the back edge of the board approximately into position and reconnect the black and grey heartbeat cable on the right, routing the wires through the notch in the edge of the board. Then ease the peripheral connectors and the back edge of the board down into position, such that the front of the board can fall into place.
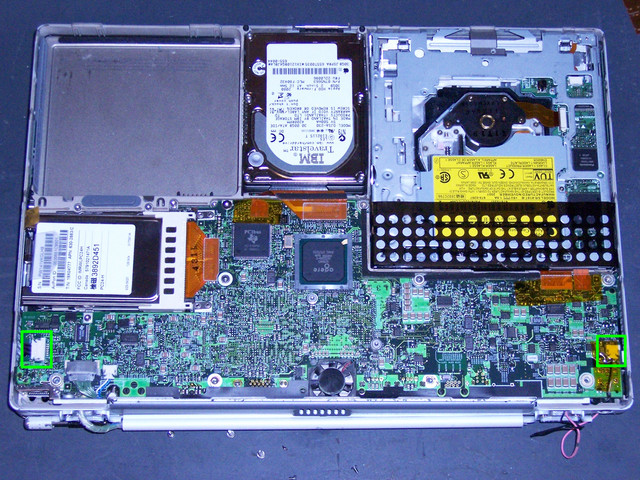
Reconnect the black-wires cable at the left edge of the board. Also make sure that under the board in that vicinity, the connector and ferrite bead are tucked back into their niche, so the board has room to seat fully.
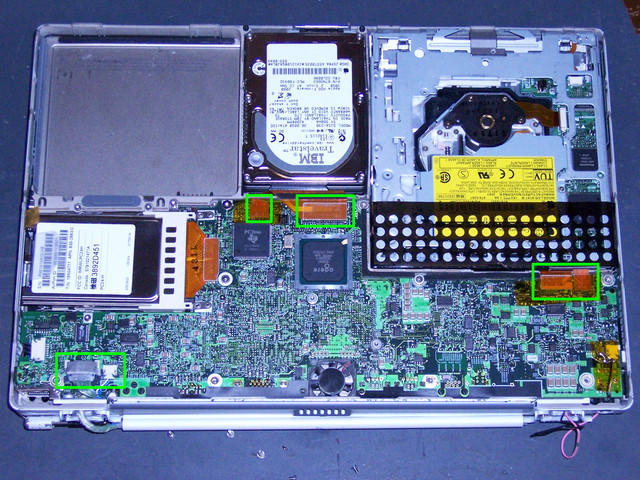
Now tilt the board down into place until the front edge reaches the hard drive and DVD connectors. Fold the connectors back until the board can clear them, working back and forth between easing the board down and pulling the connectors out of the way. You could probably save a lot of trouble by taping the connectors back out of the way–but I’m leery of bending them too far. If you break the flexpcb cables, they’ll be very difficult to fix.
Once the motherboard is fitted back into place, snap the connectors for the hard drive and DVD back onto the board and reconnect the video and backlight cables in the lower left.
Next: G4 550 Reassembly, Top Side
Sections
Background
Part 1: G4 500 Disassembly, Bottom Side
Part 2: G4 500 Disassembly, Top Side
Part 3: G4 500 Disassembly, Back Edge Screws
Part 4: G4 500 Disassembly, Removing the MB and Screen
Part 5: G4 550 Disassembly, Bottom Side
Part 6: G4 550 Disassembly, Top Side
Part 7: G4 550 Disassembly, Back Edge
Part 8: G4 550 Disassembly, Removing the MB and Screen
Part 9: G4 550 Reassembly, Screen
Part 10: G4 550 Reassembly, Motherboard
Part 11: G4 550 Reassembly, Top Side
Part 12: G4 550 Reassembly, Bottom Side
Aftereffects