Replacing My PowerBook Screen, Part 09: G4 550 Reassembly, Screen
Quick Links
Background
Part 1: G4 500 Disassembly, Bottom Side
Part 2: G4 500 Disassembly, Top Side
Part 3: G4 500 Disassembly, Back Edge Screws
Part 4: G4 500 Disassembly, Removing the MB and Screen
Part 5: G4 550 Disassembly, Bottom Side
Part 6: G4 550 Disassembly, Top Side
Part 7: G4 550 Disassembly, Back Edge
Part 8: G4 550 Disassembly, Removing the MB and Screen
Part 9: G4 550 Reassembly, Screen
Part 10: G4 550 Reassembly, Motherboard
Part 11: G4 550 Reassembly, Top Side
Part 12: G4 550 Reassembly, Bottom Side
Aftereffects
“Assembly is the reverse of disassembly.” Yeah, right. On the one hand, by now you’ve touched every piece of the computer you’re going to have to touch. On the other hand, there are still some tricks hiding inside that case. And on the gripping hand, where do all these screws go?!!!
Installing the New Screen
The old screen should be disconnected from the computer, except possibly the latch on the front edge. Unlatch it, separate it from the computer, and set it aside. Orient the replacement lid with the screen up and the connectors toward you, transfer the computer onto it, and get the hinges and latch approximately lined up.
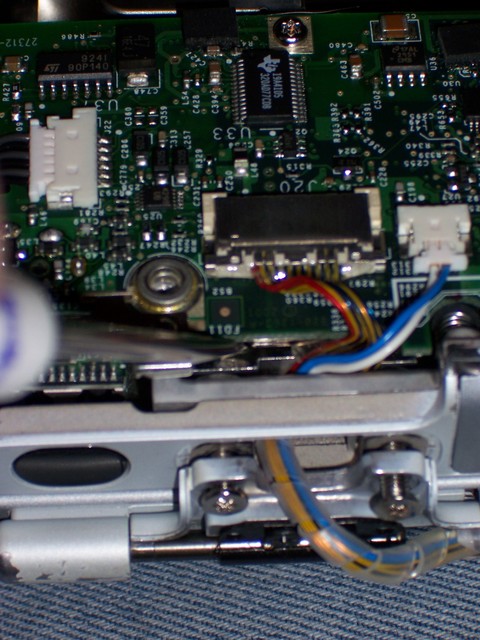
Thread the video connector through the hole at the left end of the case and follow it with the backlight connector; then manipulate the molded backing plate down into position, being careful to keep the wires within its opening rather than trapped underneath. Press the metal bar back into position as well. If possible, bend its rod into shape so that it stays in position, because it has to aligned rather precisely to get the hinge screws into place later. (Don’t worry too much–you can always hold it down with a screwdriver while starting the screws.)
Also thread the pink and whatever heartbeat connector through the hole at the right side of the case and plug it back in, positioning (and optionally taping) most of the excess length inside the case.

Extra Pieces
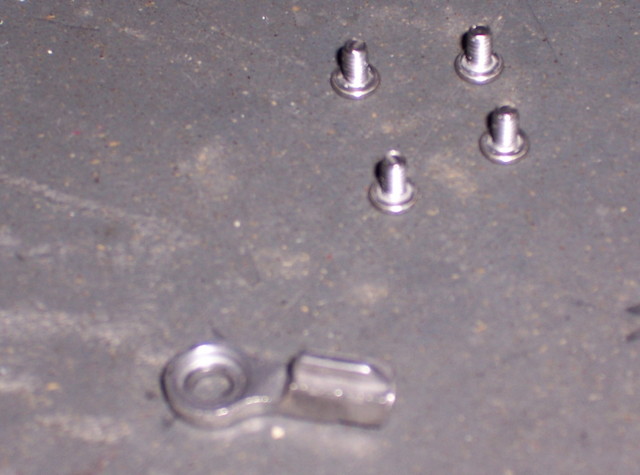
Have one of these lying around? Starting to wonder what it’s for?
Let me save you about ten minutes of rework, taking almost the entire computer back apart to install this little wonder. It’s the anchor for two of the back-edge screws. If you took out the screws like I did, one (or both) of the anchors may have come loose. Fit it back onto its post, and beg it to stay in place while you continue.

Attaching the Hinges
Because of the metal block on the left side that you bent up earlier, it’s easiest to reattach the hinges before reinstalling the motherboard, while you can still reach the block.
Align the new screen’s hinges with the holes on the back of the case, and find the four long screws to reattach the hinges. Note that one of the screws is different–the countersink screw going in the second hole from the left, so it can recess completely flush for the video cable to pass over it.
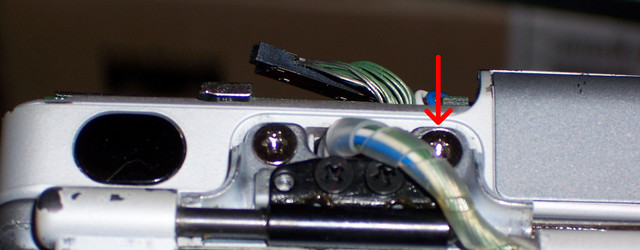
Start by installing the two screws on the right end until they’re nearly but not completely tight. Leave a little wiggle room until the left hinge is anchored also. Then install the two screws on the left. They fit loosely through everything until that darn metal block, so you may need to push it into place with a screwdriver while you get the screws started into it.
Making sure not to trap and pinch the video wires, fully tighten the left hinge screws, then the right.
Next: G4 550 Reassembly, Motherboard
Sections
Background
Part 1: G4 500 Disassembly, Bottom Side
Part 2: G4 500 Disassembly, Top Side
Part 3: G4 500 Disassembly, Back Edge Screws
Part 4: G4 500 Disassembly, Removing the MB and Screen
Part 5: G4 550 Disassembly, Bottom Side
Part 6: G4 550 Disassembly, Top Side
Part 7: G4 550 Disassembly, Back Edge
Part 8: G4 550 Disassembly, Removing the MB and Screen
Part 9: G4 550 Reassembly, Screen
Part 10: G4 550 Reassembly, Motherboard
Part 11: G4 550 Reassembly, Top Side
Part 12: G4 550 Reassembly, Bottom Side
Aftereffects